Advertisement
Available languages
Available languages
Advertisement
Table of Contents

Related Manuals for Audiovox VME 9415


Summary of Contents for Audiovox VME 9415
- Page 1 VME 9415 Installationsanleitung Installation Guide ®...
- Page 2 Anschlussdiagramm/ Wiring Diagram...
- Page 3 Schalten Sie vor der Montage des Geräts die Zündung ab, und lösen Sie das Kabel vom Minuspol (-) der Batterie, um einen Kurzschluss zu vermeiden HINWEIS: Wenn das VME 9415 in ein Fahrzeug eingebaut werden soll, das mit einem Navigationssystem ausgestattet ist, lösen Sie das Batteriekabel nicht. Andernfalls gehen die im Speicher des Navigationssystems abgelegten Daten unter Umständen verloren.
- Page 4 Verkabelung ACHTUNG! Schließen Sie das Gerät nur an eine Stromquelle mit 12 Volt an und stellen Sie dabei eine ordnungsgemäße Erdung sicher. Nehmen Sie die Verkabelung wie im Anschlussdiagramm dargestellt vor. Schließen Sie dann das gelöste Batteriekabel wieder an. Ist kein ACC-Anschluss (Zündleitung) verfügbar, schließen Sie das ACC-Kabel mit einem Schalter an die Stromversorgung an.
-
Page 5: Tools And Supplies
To prevent a short circuit, be sure to turn off the ignition and remove the negative (-) battery cable prior to installation. NoTE: If the VME 9415 is to be installed in a car equipped with an on-board drive or navigation computer, do not disconnect the battery cable. If the cable is disconnected, the computer memory may be lost. Under these conditions, use extra caution during installation to avoid causing a short circuit. -
Page 6: Final Installation
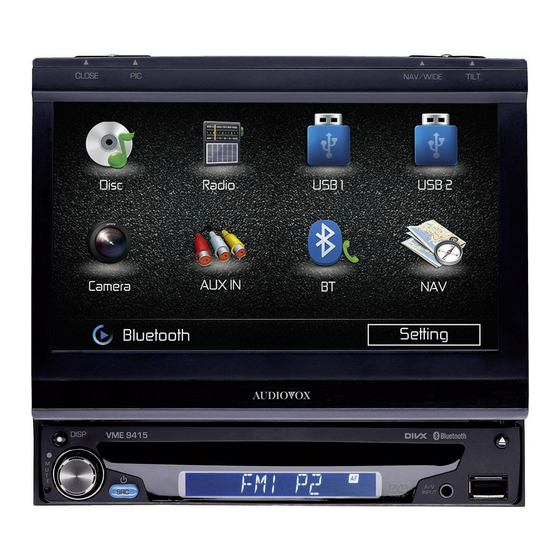
If there is no ACC available, connect the ACC lead to the power supply with a switch. NOTE: When replacing a fuse, be sure to use correct type and amperage to avoid damaging the radio. The VME 9415 uses one 15 amp fuse, located in the black filter box in-line with the main wire harness. - Page 7 ANSCHLUSSdIAGrAMM / WIrING dIAGrAM IMPORTANT: Incorrect wiring connections can damage the unit. Follow the wiring instructions carefully, or have the installation handled by an experienced technician. For basic iPod connectivity, you can use the white 30-pin to USB iPod cable that came with your Apple device. Connect the iPod cable to the rear chassis iPod inputs (USB / 3.5mm connectors) and route the iPod cable to an accessible part of the dash area for easy connectivity.
- Page 8 ® Audiovox Audio Produkte GmbH Lise-Meitner-Str. 9 50259 Pulheim www.audiovox.de...
Need help?
Do you have a question about the VME 9415 and is the answer not in the manual?
Questions and answers