
Related Manuals for Seculine ZIGView S2

Summary of Contents for Seculine ZIGView S2
- Page 1 Digital View Finder User’s Manual Please read the instructions thoroughly before using the Zigview S2. Please use accessories recommended in this user’s manual. http://www.secu-line.com...
- Page 2 Thank You For Purchasing Zigview S2. The Zigview S2 is a digital view finder that has a CCD image sensor and a color TFT LCD attached. It allows users to take a variety of pictures easily by providing real-time images of view finder information of SLR(Single Lens Reflex) camera.
-
Page 3: Safety Precautions
Safety Precautions Follow these safeguards and use the equipment properly to prevent injury, death, and material damage. Do not use any accessories such as power adapters other than those recommended ■ in this user's manual. Connect the power cord thoroughly, and do not touch the power cord with wet hands. ■... - Page 4 Name of Each Part Before Using This Product Installing the Battery Charging the Battery Attaching Eyepiece Adapter Adjusting angle of Zigview S2 Basic Operations Installing and Removing Zigview on Camera Power ON and OFF Adjusting Diopter of Camera Swiveling Zigview LCD...
-
Page 5: Table Of Contents
Digital View Finder Selecting Digital View Finder ........... 21 Zooming Screen ..............21 Adjusting LCD backlight ........... 21 Using Style Mode ............. 22 Interval Shot (Simple) Selection of Simple Interval Shot Mode ......23 Meaning of Each Item ............23 Execution of Interval Shot .......... -
Page 6: Package Contents
Package Contents This product package contains following components. Zigview S2 Battery Battery cover Manual Latch Carrying case Driver/Screws AC Adapter Shutter release cable Video cable Eyepiece adapter ※Package contents can be changed without notice. -
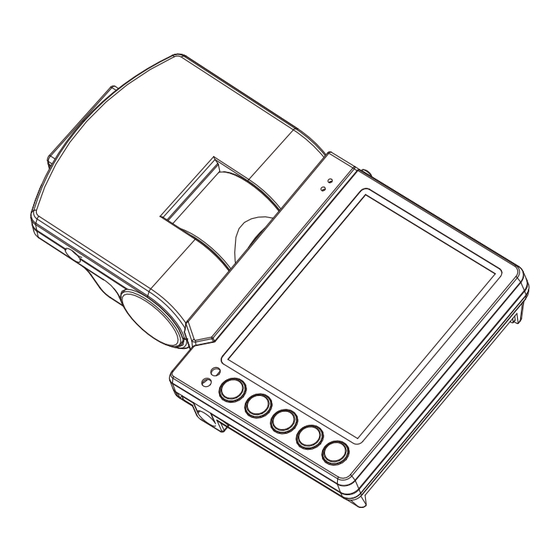
Page 7: Name Of Each Part
Name of Each Part Shutter release port Video port Eyepiece adapter mount Battery cover Swivel unit Latch hole Charging lamp Operation lamp Decoupling button Operating buttons Power switch Display unit DC power input port... -
Page 8: Installing The Battery
Before Using This Product Installing the Battery Load a battery pack into the camera to fully charge it. 1. Detach the battery cover. 2. Pay attention to the plus and minus sides <Open the cover> <Check Polarity> before installing battery on the product. 3. -
Page 9: Before Using This Product
Before Using This Product Attaching Eyepiece Adapter Install an eyepiece adapter that fits the camera before using this product. 1. Attach the eyepiece adapter to the main body of ZIGVIEW by using the supplied screw driver and four screws. 2. Not fully tightening the screws may cause damage to the product if there is a loose connection between the main body and the camera. - Page 10 Before Using This Product Adjusting angle of Zigview S2 1. There are three different S2 models in order to provide optimum condition for image quality and sensitivity. 2. Even if proper S2 model is used for your SLR camera, the S2 LCD display image is not exactly aligned to camera viewfinder image information.
- Page 11 8. Attach the eyepiece adapter to S2 main body after inserting proper metal insertio as following picture. 9. Please fasten all 4 screws when metal insertion is used. 10. If upper image is cut off after installing metal insertion, metal insertion thickness is larger than proper size.
-
Page 12: Basic Operations
Basic Operations I n stal l i n g Zi g vi e w to camera/ Removi n g Zi g vi e w from camera 1. Attach eyepiece adapter to ZIGVIEW properly before installing ZIGVIEW to camera. 2. Remove an eyepiece or eyecup on the camera viewfinder. - Page 13 Basic Operations Adjusting Diopter of Camera If you cannot see the sharply out-lined image on the LCD after installing of ZIGVIEW, you can focus the image by adjusting camera diopter lever or dial. 1. Attach ZIGVIEW to the camera. Power on and confirm sharply out-lined image on the LCD.
- Page 14 Basic Operations Swiveling Zigview LCD 1. Zigview LCD can be swiveled left, right and tilted up and down. 2. Use swiveling and tilting function according to shooting angle and position. 3. Do not exert too string force or exceed swiveling and tilting boundaries.
-
Page 15: Using The Menus
Basic Operations Using the menus Use the buttons on the front panel for using menus or operating the product. 1. Pressing the Esc button makes the cursor return to the previous position or menu item, and makes the operating mode escape from the setup menu. 2. - Page 16 Mode Selection ZIGVIEW S2 has 6 operation modes and 1 setup mode 1. Pressing the Esc button on each operating mode Operation Mode selection (1.1) makes the mode move to mode selection screen. 2. Select the mode that you want by pressing □...
-
Page 17: Adjusting Backlight Brightness
General Setup and Size Adjustment Screen Size Adjustment When ZIGVIEW is installed, screen sizes may vary in right, left, up, and down depending on cameras. Adjust the screen size to fit your camera. 1. Select the General Setup Mode on the operation General Setup mode selection screen. - Page 18 General Setup and Size Adjustment Screen Color Selects the color of displayed images. 1. Select General Setup mode on mode selection screen. General Setup 2. Select the Screen Color and press the Enter button. □ Screen Adjustment ☞ 3. Select the color of display. If color is selected, color □...
- Page 19 General Setup and Size Adjustment Camera Ready Time Set the time from the camera power-on to ready taking pictures. In interval shot or motion sensing shot, camera must be waked up before shooting if the camera is in the auto power-off state. Because this is varied General Setup with each camera, proper time must be set □...
- Page 20 General Setup and Size Adjustment Saving setup parameter values The setup parameter values are stored. 1. Select the General Setup mode on the mode General Setup selection screen. □ Screen Adjustment ☞ □ Brightness 2. Select Save/Load and press the Enter button. □...
-
Page 21: Digital View Finder
Digital View Finder Operation Mode selection (1.1) Selecting Digital View Finder □ Digital View Finder Digital view finder mode is a basic function □ Interval Shot(Simple) □ Long Exposure(Bulb) of ZIGVIEW. It assists the shootings in various □ Long Exposure(Time) positions and angles. -
Page 22: Using Style Mode
Digital View Finder Using Style Mode Displays various styles assisting shooting Style mode 1 composition or framing photos. 1. In the digital view finder mode, repeating the pressure of the Enter button overlays various style graphics on the image in turn. 2. -
Page 23: Interval Shot (Simple)
Interval Shot (Simple) In simple interval shot, camera shutter is released according to the number of total shot and interval time. Selection of Simple Interval Shot Mode Operation Mode selection (1.1) 1. Move to the mode selection screen pressing Esc □... -
Page 24: Execution Of Interval Shot
Interval Shot (Simple) Parameter Setting of Interval Shot (Simple) Setup 000002 1. Set the number of total shot and interval time Interval 00:00:10 Shots 000010 for simple interval shot. 2. Press the Enter button for about 1 second during STOP. STOP will be changed SETUP, and the cursor moves to the first 2 digit of interval time, HOUR field. -
Page 25: Long Exposure (Bulb Shot)
Long Exposure (Bulb shot) Bulb Shot mode releases the shutter of the camera connected to the ZIGVIEW for assigned time. The shutter speed of the camera must be B for proper operation. Selection of Bulb Shot mode Operation Mode selection (1.1) □... - Page 26 Long Exposure (Bulb shot) Sound ON/OFF 1. Set whether beep sound is produced or not. PLAY 00:00:02 2. Pressing the Up button makes the beep sound ON or OFF in turn. 3. Sound ON/OFF can be set during STOP or PLAY. Long Exposure (Bulb) Sound ON...
-
Page 27: Long Exposure(Time Shutter)
Long Exposure(Time Shutter) Time shutter mode releases the shutter of the camera connected to the ZIGVIEW for arbitrary time. The shutter speed of the camera must be B for proper operation. Selection of Time Shutter mode Operation Mode selection (1.1) 1. -
Page 28: Interval Shot (Advanced)
Interval Shot (Advanced) It is possible to set the details of interval parameters. Various interval setting methods are provided. Selection of Interval Shot (Advanced) mode Operation Mode selection (1.1) 1. Move to the mode selection screen by pressing □ Digital View Finder the Esc button in any modes. -
Page 29: Parameter Setting Of Interval Shot (Advanced)
Interval Shot (Advanced) Parameter Setting of Interval Shot (Advanced) Set various parameters and methods on the setup screen for advanced interval shot. 1. Pressing the Enter button for 1 second during STOP moves the mode to Interval Shot (advanced) setup mode. 2. - Page 30 Interval Shot (Advanced) Meaning of Interval Shot Setup Parameters (Continued) 3. Shot Interval : set interval time between consecutive two shots. The interval time has the range from 1 seconds to 99 days, 23hours, 59 minutes, and 59 seconds. The interval time can be set every 1 second unit. 4.
- Page 31 Interval Shot (Advanced) Meaning of Interval Shot Setup Parameters (Continued) 10.Load and Save : Load and save setting parameter values. If you want to save current parameter values to memory, select one of 3 banks, save1, save2 and save3, then press the Enter button.
-
Page 32: Motion Sensing Shot
Motion Sensing Shot Performs shutter release when brightness variation Operation Mode selection (1.1) on image exceeds predefined level. □ Digital View Finder Selection of Motion Sensing shot □ Interval Shot(Simple) 1. Move to the mode selection screen by pressing the Esc □... -
Page 33: Parameter Setting Of Motion Sensing Shot
Motion Sensing Shot Parameter Setting of Motion Sensing Shot Set various parameters and methods on the setup screen for motion sensing shot. 1. Pressing the Enter button for about 1 second during STOP moves the mode to the motion sensing shot setup. 2. - Page 34 Motion Sensing Shot Meaning of Motion Sensing Setup Parameters (continued) 3. Sensing Mode : Select the motion sensing mode. - 9 sector mode : Image is divided into 9 sectors, then motion is sensed in each sector. If above 1 sector is sensed, shutter is released. - All image : Motion is sensed in all image areas.
- Page 35 Motion Sensing Shot Meaning of Motion Sensing Setup Parameters (continued) 11. Load and Save : Load and save setting values. If you want to save current parameter values to memory, select one of 3 banks, save1, save2 and save3, then press the Enter button. If you want to load previously saved parameter values, select one of 3 banks, load1, load2, and load3, then press the Enter button.
-
Page 36: Remote Monitoring
Remote monitoring The image sensing part and the display part of the Zigview can be separated via video transceiver cable RV01. Then, you can remotely monitor the view finder image from a distance. Connection of video transceiver cable 1. Power off the Zigview, and remove the latchs. 2. -
Page 37: Connecting External Monitor
Connecting External Monitor Connecting External Monitor Images on Zigview can be displayed on the external video monitor. 1. Connect the video cable between video out connector of Zigview and video in connector of monitor. External monitor must have an external video input connector. -
Page 38: Optional Accessories
Optional accessories Remote Video Transceiver RV01 Using RV01, the display part of Zigview can be separated and monitored from the image sensing part. Also, remote shutter release can be performed observing the image on the Zigview LCD. The length of cable can be extended with EC05/EC10 cable to 6.5m or 11.5m. - Page 39 Optional accessories Eyepiece Adapter Model Cameras IP200N1 Nikon D200, D80, D70s, D50, D40, Fuji S2pro, S3pro, etc IP200N3 Nikon D2H, D2X, D1H, D1X, F6, F5, F100, F90x, etc IP200C1 Canon 1Ds, 1Ds MK2, 10D, 20D, 30D, 5D, 400D, 300D, 350D, D30, D60, etc IP200C2 Canon EOS 5, EOS55e, etc α...
-
Page 40: Troubleshooting
Troubleshooting Images on the camera view finder are shown partially or too small. ■ ☞If you first use the product or the values are set at factory or a connected camera is changed, you have to adjust the screen size to the camera to be used. Please refer to the manual and adjust the size of images. -
Page 41: Specifications
Specifications High sensitivity CCD sensor with 270K pixels Image Sensor Color TFT LCD with 230K pixels Display AC adapter with 5V DC output External Power Rechargeable Li-ion battery Battery About 2 hours from a complete discharge. Charging time About 2 hours from a complete charge. Operation time (varied with operation environment or battery condition) Input 100V ~ 240V... -
Page 42: Safety Information
Declaration of Conformity Name: Seculine Co.,Ltd. Address: Kolon Science Valley 2nd #510, 811 Kuro-dong, Kuro-ku, Seoul, 152-878, KOREA Trade Name: Seculine Co.,Ltd. Model Number: S2 This device has been tested according to the FCC/CISPR22/95 requirements for Class B devices and found compliant with the following standards: EMI/EMC: ANSI C63.4 -2003, FCC Part 15... - Page 43 Zigview S2 Zigview S2...
Need help?
Do you have a question about the ZIGView S2 and is the answer not in the manual?
Questions and answers