Table of Contents
Advertisement
Advertisement
Table of Contents

Summary of Contents for HD Radio HD Jump
- Page 1 ™ User GUIde...
-
Page 3: Table Of Contents
Table of Contents Introduction HD Jump™ Radio Car Cradle Setup Playing the HD Jump™ Radio in Your Car HD Jump™ Radio Home Cradle Setup Using the HD Jump™ Radio Setup Options Customer Support... -
Page 4: Introduction
HD Radio transmissions, which the HD Jump receiver is specially designed to receive. Plug your HD Jump receiver in your car cradle, or in the home cradle, and you are ready to experience the improved clarity and content of HD Radio broadcasts! iBiquity Digital’s HD Radio technology enhances the audio quality of AM and FM broadcasts. - Page 5 Introduction NOTICE TO ALL DRIVERS Do not operate the HD Jump in a manner that may divert your attention from safe driving. As the driver, you are responsible for safely operating your vehicle at all times in accordance with traffic safety laws.
- Page 6 Introduction Maintain a minimum distance of 1” (25mm) around the front, rear, and sides of the product for sufficient ventilation. The ventilation should not be impeded by placing on or around the product items such as newspapers, table cloths, curtains, etc. POWER SOURCES This product should be operated only from the type of power source indicated on the marking label.
- Page 7 Introduction OBJECT AND LIQUID ENTRY Never push objects of any kind into this product through the openings as they may touch dangerous voltage points or short-out parts that could result in a fire or electric shock. Avoid spilling liquids of any kind on the product. SERVICING Do not attempt to service this product yourself as opening or removing covers may expose you to dangerous voltage or other hazards.
- Page 8 Upon completion of any service of repairs to this product, ask the service technician to perform safety checks to determine that the product is in proper operating condition. HD JUMP MODULE KIT The HD Jump radio kit includes the following: Owner Guide HD Jump Radio...
- Page 9 Introduction HD JUMP CAR CRADLE KIT (OPTIONAL) The Car Cradle kit includes the following: Surface Preperation Cleaning Kit Suction Cup Cradle Mount Surface Cleaning Suction Cup Cradle Mount Screws Adhesive Disk Antenna Antenna Power In Cable Out Cable Cable Cable...
- Page 10 Introduction HD JUMP HOME CRADLE KIT (OPTIONAL) The Home Cradle kit includes the following: Note: Actual product may differ slightly from those illustrated.
-
Page 11: Hd Jump™ Radio Car Cradle Setup
Pick a spot where you can easily reach the HD Jump radio once it is mounted and does not obstruct vehicle features, warning lights, and safety devices such as airbags. - Page 12 HD Jump™ Radio Car Cradle Setup To mount the car cradle using the suction cup mount: 1. Attach the suction cup mount to the car cradle using the four screws provided. 2. Clean the area you are attaching the suction cup to with the cleaning pad provided in the car kit.
- Page 13 Pick a spot where you can easily reach the HD Jump radio once it is mounted and does not obstruct vehicle features, warning lights and safety devices such as airbags. The area you choose to mount the adhesive disk should be as flat as possible to maximize holding power.
- Page 14 CAR CRADLE CONNECTIONS (ANTENNA AND 12–VOLT DC POWER CABLE) In order to achieve the clearest signal and retain digital clarity of the HD Radio signal, the antenna wiring is a direct connection that may require temporary removal of the vehicle radio in...
- Page 15 HD Jump™ Radio Car Cradle Setup The 12–Volt DC power cable is a also a direct (hard wired) connection to ensure a more reliable power delivery and cleaner overall look of installation. Due to this, we recommend professional installation of the car cradle antenna wiring and 12–Volt...
- Page 16 Using an always on power source could drain your vehicle’s battery if you leave the HD Jump radio on while the ignition is OFF. NOTE: The white striped wire on the power cord is the (+) positive lead. The plain (all black) wire is the (–) negative lead.
- Page 17 If you experience problems with the fuse blowing often, there may be a wiring problem with the power cord or a problem with the HD Jump radio. In this case, discontinue use of the radio and have the power supply wiring or radio serviced.
-
Page 18: Playing The Hd Jump™ Radio In Your Car
HD Jump radio through your vehicle’s audio system. The HD Jump radio gives you the choice of using its built in RF modulator or using the AUDIO OUT jack combined with your vehicle’s auxiliary input jack if it is equipped with one. - Page 19 Using the HD Jump Radio with a Vehicle’s Auxiliary Input You can use the HD Jump’s AUDIO OUT jack to connect it to your vehicles auxiliary input jack, if it is equipped with one. You can use this instead of using the RF modulator. You will need to turn the RF modulator off first to use this function.
- Page 20 AUDIO OUT ANT IN ANT OUT 3. Turn on the HD Jump radio and press the BAND/AUX button until the unit enters the AUX screen. 4. Use the auxiliary device’s volume to find a level that provides the best sound without...
-
Page 21: Hd Jump™ Radio Home Cradle Setup
HD Jump™ Radio Home Cradle Setup USING THE HD JUMP RADIO AT HOME Slide the HD Jump radio into the home cradle to secure the unit in the upright position. - Page 22 HD Jump™ Radio Home Cradle Setup Connecting the AC/DC Adapter (Home Cradle) 1. Insert the power supply cord into the port labeled DC IN on the side of the home cradle. 2. Plug the AC/DC adapter into a wall outlet.
- Page 23 HD Jump™ Radio Home Cradle Setup Cable Radio Signals The HD Jump radio’s FM antenna connector is a standard F-Type connector and can accept cable FM feeds from some cable systems that provide FM programming. Contact your cable TV provider for assistance to connect your HD Jump radio to the FM signal, available from some cable TV providers.
- Page 24 2. Insert the cable’s 1/8 inch stereo jack end into the port labeled AUDIO OUT on the rear of the HD Jump’s home cradle. 3. Set the HD Jump radio’s line-out volume to HIGH, MEDIUM, or LOW. See “Line Out Volume” in the Setup Options chapter. Select a level for best sound without distortion.
- Page 25 For instance, connect your MP3 player to the HD Jump radio and then use the HD Jump radio’s aux output to play your MP3 player through your home stereo. See “Connecting the HD Jump to Auxilliary Output Devices” in this chapter for more information.
-
Page 26: Using The Hd Jump™ Radio
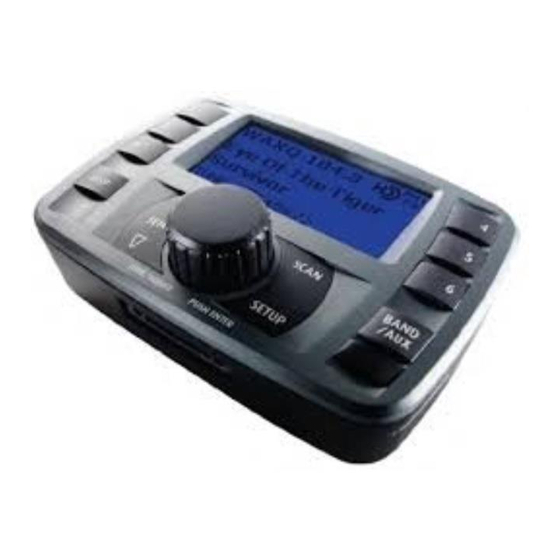
Using the HD Jump™ Radio HD JUMP RADIO OVERVIEW TURNING THE HD JUMP RADIO ON/OFF • Press the power button on the side of the radio to power it ON/OFF. The radio will enter the mode last used before it was turned off. - Page 27 Using the HD Jump™ Radio BAND/AUX • Press the BAND/AUX button to select FM1, FM2, AM or AUX mode. The currently tuned station will be displayed in radio mode or AUX will be displayed in AUX mode. • Press BAND/AUX when the current mode is AUX to switch back to radio mode.
- Page 28 • Storing presets: Press and hold a number (1–6) to store a currently tuned station. The HD Jump radio provides 18 presets: six presets for each band (AM, FM1, FM2). • Press and release one of the preset numbers (1–6) to jump to a preset station.
- Page 29 HD Jump radio to power the unit on while it is in the car cradle. ANALOG RADIO MODE Although your HD Jump radio is designed as a high-definition digital radio, it also operates as a standard analog AM/FM radio.
- Page 30 Using the HD Jump™ Radio Analog radio is automatically used by the HD Jump radio when no HD Radio digital signal is available or is too weak to receive. RBDS (Radio Broadcast Data System) text information is still available in analog radio mode, provided the broadcast station transmits this information.
- Page 31 Using the HD Jump™ Radio HD Radio Multicast (FM Only) Besides offering static free and clear radio signals, HD Radio technology also allows radio stations to multicast. This allows radio stations to offer more than one programing channel or station (multicast) at a time using their existing frequency on the radio dial.
- Page 32 For more information on display modes, see “Display Mode” in this chapter. Unavailable Digital Signal/Loss of Digital Signal If the HD Jump radio incurs a loss of digital HD Radio signal, the radio mode will automatically change to analog radio mode.
- Page 33 Using the HD Jump™ Radio Note: If a multicast station saved to a preset is chosen when the multicast station is not available or looses signal, the HD Jump radio will switch to the radio station’s main broadcast station. HD Radio Delay To overcome the delay that digital systems inherently produce, HD Radio technology first uses a station’s analog signal to quickly tune to an AM or FM station.
- Page 34 Using the HD Jump™ Radio DISPLAY MODE You can change your HD Jump radio’s HD display mode by WAXQ 104.3 pressing the DISP button. Song 1 Back in Black List 2 Draw the Line Display 3 School's Out 3 School's Out 4 Cradle of Love WAXQ 104.3...
-
Page 35: Setup Options
Use this to adjust the display’s contrast. Turn the TUNE/ADJUST knob to choose – or + and press the knob to select. Auto-Load HD Select this option to autoload the first six HD Radio stations that the HD Jump radio finds. - Page 36 Once this is selected, no other buttons will work, until Auto-Load is complete. This may take several minutes. When the HD Jump radio is finished with Auto-Load, it will begin playing the station loaded into preset 1. If the radio searches the entire frequency range and there are not six HD Radio stations, the system replaces the current presets with as many HD Radio stations as it can find starting with preset 1.
- Page 37 Setup Options Software Version Displays the HD Jump radio’s current software version numbers. Factory Default Use this to return to the factory default settings. Turn the TUNE/ADJUST knob to choose Factory Default and press the knob to select. After answering YES twice to the questions, all of the settings including presets will be returned...
-
Page 38: Customer Support
Customer Support TROUBLESHOOTING Symptom Probable Cause Correction HD Jump does not turn Radio not seated properly in cradle Remove radio and properly re-seat in cradle Power cable not properly Check power cable for proper connected connection and polarity Blown fuse - (car install only) Check car power cable’s in-line... - Page 39 Car’s AM and FM radio HD Jump power is ON while Turn off power to HD Jump when reception is poor attempting to use car’s AM/FM wanting to use the car’s AM/FM radio - (car install only)
- Page 40 • Do not use the optional AC adapter in high temperature or cold and humid environments. CLEANING AND MAINTENANCE Many plastic parts are used in the HD Jump. Do not use volatile chemicals such as benzene or thinner. This might damage the finish. Wipe the casing with a soft, dry cloth. For excessive dirt, use a cloth lightly dampened in a diluted neutral detergent, and wipe again with a soft dry cloth.
- Page 41 (3) years from the date of the initial purchase or 36,000 miles recorded on the odometer of the vehicle in which the Visteon HD Jump Components are first installed or the greater of the remainder of the original manufacturer’s warranty period for that vehicle or twelve (12) months.
- Page 42 Visteon HD Jump Components, (ii) installation of a Visteon HD Jump Component in a manner which is inconsistent with Visteon’s written instructions, (iii) alteration...
- Page 43 Copyright © 2007 Visteon Corporation. HD Radio™ Technology Manufactured Under License From iBiquity Digital Corporation. iBiquity Digital, the HD Radio logo, and the HD logo are registered trademarks of iBiquity Digital Corporation. HD Radio™ is a trademark of iBiquity Digital Corporation. U.S. and Foreign Patents.
- Page 44 Visteon Corporation Van Buren Township, MI www.evisteon.com 8823409070...
Need help?
Do you have a question about the HD Jump and is the answer not in the manual?
Questions and answers