Table of Contents
Advertisement
Advertisement
Table of Contents

Subscribe to Our Youtube Channel
Related Manuals for Sunfire Atmos XTATM265


Summary of Contents for Sunfire Atmos XTATM265
-
Page 2: Safety Instructions
WARNING: To reduce the risk of fire or electric shock, do not expose this apparatus to rain or moisture. AVIS: Pour réduire le risque d’incendie ou de choc électrique, ne pas exposer cet appareil sous la pluie et l’humidité. The apparatus shall not be exposed to dripping or splashing and that no objects filled with liquids, such as vases, shall be placed on apparatus. -
Page 3: Table Of Contents
Introduction ........4 System Configurations ....14 Features ........4 Adjusting the Controls ....18 Unpacking and Care ....4 Specifications ......19 Overview ........5 Troubleshooting Guide ....21 Control Panel Features ....6 Limited Warranty ......23 Installation ........9 Service Assistance ....23 Connections .......10 sunfire.com User's Manual User's Manual... -
Page 4: Introduction
Introduction Features Thank you for purchasing this Sunfi re • 1400 watt, high effi ciency amplifi er ATMOS Subwoofer. We hope you enjoy • Automatic Room Equalization mode it and the music it makes as much as we • Measurement Microphone included have enjoyed creating it for you. -
Page 5: Overview
The power amplifier within your Sunfire you can feel as well as hear. Subwoofer is capable of delivering over The subwoofer has an automatic 1400 watts into a 3.3 ohm resistor (the... -
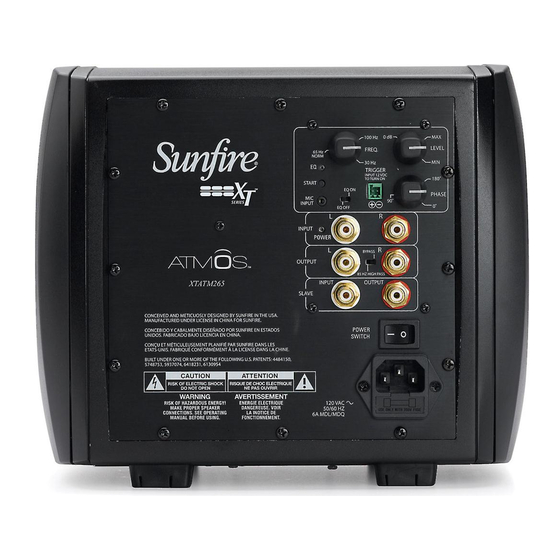
Page 6: Control Panel Features
Control Panel Features 1. Crossover Frequency installed your system, turn this down before turning on your sub woof er. This This control changes the high fre- will prevent any loud surprises. quency cutoff point. With the control set to 100 Hz, the sub woof er will reproduce 3. -
Page 7: Power Switch
5. Line-Level Inputs 8. Slave Input and Output Connect these unbalanced inputs with These connections simplify the RCA type patch cords to the line-level hookup and operation of two ATMOS outputs of your receiver or preamp. subwoofers. If your preamplifier or receiver has a Connect the slave output from the first single sub/LFE output, connect it to subwoofer to the slave input of the sec-... -
Page 8: Power Led
Control Panel Features continued 10. (continued) 13. Start button EURO (230 VAC) MODEL: Connect Used to calibrate the EQ. See page the linecord to the subwoofer before 12 for details on the EQ calibration connecting the other end to a 230 Volt, procedure. -
Page 9: Installation
2 and 3 before using your Sunfire sors. As uncomfortable as it may feel, 60 Subwoofer. degrees C cannot burn you, and in fact is almost cool to copper, silicon, steel, and •... -
Page 10: Connections
Connections Please consider the following when set- • Whenever possible, keep the ting up your new system : power cords away from the signal cables or speaker wires to prevent • Before making or changing any any hum or interference being connec tions, ALWAYS make sure heard in the speakers. -
Page 11: Location
Location Walk around the room, listening, and stand in all the positions where you might be able to place the subwoofer. Try crouching down, and try the corners. Find the place where the subwoofer's bass output Your subwoofer is designed to be placed sounds the loudest. -
Page 12: Room Equalization Procedure
This gives a "Room EQ" effect which can Sunfire. often be far from wonderful. 4. Plug the microphone into the subwoof- The Sunfire ATMOS can automatically er's microphone jack. adjust for the effects of Room EQ. It 5. Set these controls: measures the actual frequency response •... -
Page 13: Using Two Subwoofers
11. Unplug the microphone and store it in a safe place. 12. Finish the setup by adjusting the Atmos VOLUME, CROSSOVER and PHASE appropriately and calibrating your surround sound receiver/processor according to its owner’s manual. 13. If you add/remove heavy draperies or large furniture or move the Atmos to a new acoustic environment repeat steps 6-12. -
Page 14: System Configurations
System Configurations The following pages show some typical connections that you might make in your installation. They show how the inputs and outputs of the Sunfire Subwoofer are con nected to your preamplifier or receiver. Connections to a preamplifier’s subwoofer output... - Page 15 Connections to a preamplifier using Y cables If your preamplifier does not have a dedicated sub/LFE output, you can use “Y” cables to send its main outputs to both the sub- woofer and your amplifier. The subwoofer will play the low frequency range and your front speakers will play the full range.
- Page 16 Using the line-level outputs If you are using a preamplifier that does not have a sub/LFE output, you can send its left and right front output into the subwoofer’s line-level inputs and then connect the subwoofer’s line-level outputs to the inputs of your amplifier. The subwoofer will play the low frequencies and your amplifier and front speak-...
- Page 17 Using the slave input and output The SLAVE output from one ATMOS subwoofer can be con- nected to the SLAVE input of a second ATMOS subwoofer. The second subwoofer will then re- ceive the optimum audio signals from the first. There is no need to adjust the controls of the second subwoofer, as the audio is con-...
-
Page 18: Adjusting The Controls
Step 4. Use the phase control to make ing the level, crossover frequency and the response even smoother. It has its phase of the Sunfire Subwoofer to match biggest effect at the crossover frequency. a system: You can iterate between the crossover and the phase controls. -
Page 19: Specifications
35 Hz to 80 Hz. Mea- surement is one meter, anechoic. A typical Sunfire subwoofer can be © 2012 Sunfire, a division of The AVC expected to beat its specified minimum Group LLC. peak SPL by several decibels. - Page 20 User's Manual User's Manual...
-
Page 21: Troubleshooting Guide
Most prob- frequency, make sure that the Sunfire lems that occur can usually be solved subwoofer’s own crossover point is set by checking your setup or making sure... - Page 22 preamplifier, TV, or any other compo- Adding any component such as a sub- nent. If the hum is caused by the cable woofer to an existing system will often TV line, then you will need a “ground- give rise to a hum which wasn’t there loop isolator.”...
-
Page 23: Limited Warranty
CLUDING BUT NOT LIMITED TO IMPLIED many years. Sunfire offers the following WARRANTIES OF MERCHANTABILITY Warranty to you, the owner of a new Sunfire AND FITNESS FOR A PARTICULAR PUR- product: POSE. Sunfire warrants the ATMOS subwoofer to... - Page 24 Subwoofer Sunfire 1969 Kellogg Ave., Carlsbad, CA 92008 www.sunfire.com Sunfire Manual 9901152 Rev C 1969 Kellogg Ave., Carlsbad, CA 92008. The service address is The AVC Group / Return Center, 2040 Creative Drive, Ste. 100...
Need help?
Do you have a question about the Atmos XTATM265 and is the answer not in the manual?
Questions and answers