Table of Contents
Advertisement
Quick Links
Advertisement
Table of Contents

Related Manuals for Akai AHC1200


Summary of Contents for Akai AHC1200
-
Page 2: Safety Instructions
SAFETY INSTRUCTIONS The lightning flash with an arrowhead symbol, CAUTION within the equilateral triangle, is intended to alert the user to the presence of uninsulated "dangerous RISK OF ELECTRIC SHOCK voltage" within the product's enclosure that may be DO NOT OPEN of suffi... -
Page 3: Important Safety Instructions
IMPORTANT SAFETY INSTRUCTIONS SAFE USE OF YOUR EQUIPMENT Here are a few tips to help you do this: READ this instruction manual before you attempt to use the equipment. NEVER fi t make shift stands or legs with woodscrews. Use only approved supports and fasteners specially designed for the equipment. -
Page 4: Table Of Contents
TABLE OF CONTENTS Safety Instructions ........2 Special Function ........16 Important Safety Instructions....3 Display function ......... 16 Table of Contents ........4 Locating a specifi c title/chapter/time ..16 Locating a specifi c track ......16 Disc Formats ..........5 Setting favorite bookmark during playback Accessories .......... -
Page 5: Disc Formats
DISC FORMATS The unit can playback discs bearing any of the following marks: DVDs [8cm(3")/12cm(5") disc] Compatible Audio CDs [8cm(3")12cm(5") disc] Region Management Information Region Management Information: This unit is designed and manufactured to respond to the Region Management Information that is encoded on DVDs. If the region number printed on the DVD does not correspond to the region number of this unit, this unit cannot play that disc. -
Page 6: Accessories
ACCESSORIES Please check and identify the supplied accessories. Remote control (with batteries) ..................x 1 Audio/Video cable ......................x 1 AM (MW) Loop antenna ....................x 1 REMOTE CONTROL Using the Remote Control • Point the remote control at the REMOTE SENSOR located on the unit. •... -
Page 7: Control Reference Guide
CONTROL REFERENCE GUIDE Remote Control 9) VOLUME –/+ buttons Adjust the volume. STOP button Stop playback. TUNING buttons : Fast reverse playback. : Fast forward playback. TUNING : Scan all available radio stations. PREV button Move backwards through titles, chapters or tracks on a disc. -
Page 8: Front And Top Panel
CONTROL REFERENCE GUIDE Front and Top Panel 6 7 8 9 10 1) Disc Tray PLAY Button Opens or closes the disc tray by pushing the OPEN/ Press to start or resume playback of a disc. CLOSE button. STOP Button 2) Display Window Stops playing a disc. -
Page 9: Connections
CONNECTIONS For Better Reception FM Antenna AM (MW) Loop Antenna (supplied) Fully unwind the wire antenna and position it for the best reception. Fully unwind the rotate the loop antenna then position it for the best reception. A. Connecting your TV The unit can be connected to your TV in several different ways, depending on the design of your TV. - Page 10 CONNECTIONS SCART cable To SCART INPUT SCART Cable (not supplied Note: Press the SETUP button and select Video Out to RGB. (Please see CUSTOMIZING THE FUNCTION SETTINGS.) Component video cable (good quality) Some TVs or monitors are equipped with component video inputs. Progressive output (DVD) Some TVs or monitors are equipped with Component Video inputs that are capable of reproducing a progressively scanned video signal.
-
Page 11: Connecting A Vcr
CONNECTIONS B. Connecting a VCR Yellow Red White Yellow Red White Audio/Video Cable (supplied White White White White Yellow Yellow Yellow Yellow Audio/Video Cable (not supplied Watching a videotape 1. Turn on the unit. Use the FUNCTION button on the remote control or the front panel to select "AV IN". 2. -
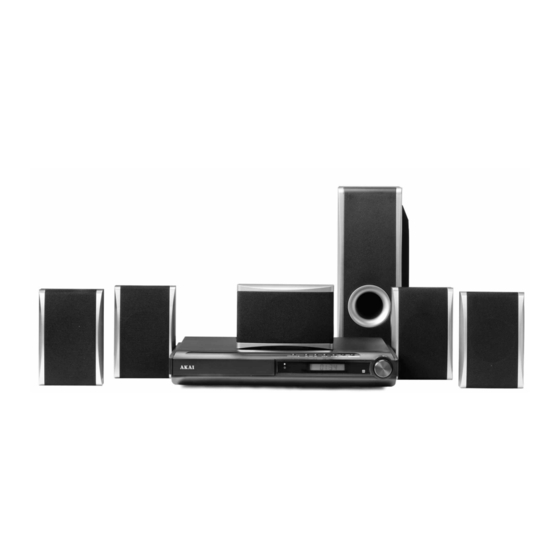
Page 12: Positioning The Speakers And Subwoofer
CONNECTIONS D. Positioning the Speakers and Subwoofer FRONT SPEAKERS CENTER Place on both sides of the TV, Place on the top of or below the TV. equal distances apart. REAR SPEAKERS SUBWOOFER Place right beside or slightly behind Can be placed anywhere. your listening position, and a little higher than your ears. -
Page 13: Plugging In The Unit
CONNECTIONS Plugging in the Unit • Ensure all the components and speakers are connected correctly. • Be sure the AC power cord is disconnected and all functions are off before making connections. • When you are not going to use the unit for a long period of time, disconnect the power cord. Turning on the Unit and TV 1. -
Page 14: Playing A Disc
PLAYING A DISC Basic playback This owner’s manual explains the basic instructions for operating this unit. Some DVDs are produced in a manner that allows specifi c or limited operation during playback. Therefore, this unit may not respond to all operating commands. THIS IS NOT A DEFECT. Please refer to the instructions accompanying the specifi... -
Page 15: Slow-Motion Play (Dvd)
PLAYING A DISC Basic playback Slow-motion play (DVD) 1. Press the SLOW button on the remote in play mode. • Four speeds are available. Each time the SLOW button is pressed, the speed of slow-motion playback changes in the following sequence: 2. -
Page 16: Special Function
SPECIAL FUNCTION DISPLAY function Using the DISPLAY button, you can check the current settings of the following items: Time, Title/Chapter, Audio, Subtitle and Angle. Locating a Specific Title/Chapter/Time If a DVD contains title/chapter/time numbers, you can locate a specific title/ chapter/time by directly selecting a title/chapter/time number. -
Page 17: Repeat Playback
REPEAT PLAYBACK You can play a specifi c title or chapter repeatedly. (Title repeat, chapter repeat, A-B repeat) (DVD) Repeating a Chapter You can play the same chapter repeatedly. 1. While the disc is playing, press the REPEAT DISC button until the “ ”... -
Page 18: Dvd Programmable Memory
DVD PROGRAMMABLE MEMORY DVD Programmable Playback You can combine your favorite titles/chapters and play them in the order you determine. 1. Press the MEMORY button on the remote control. 2. Use the button to select the title you want, then press the OK button on the remote control to confi... -
Page 19: Play Modes For Cd Or Jpeg Disc
PLAY MODES FOR CD OR JPEG DISC When playing CD/JPEG discs, you can modify the Play Modes through the Toolkit which appears on the right side of the window. Press the button on the remote control to navigate between the left/right windows and the button on the remote control to select fi... -
Page 20: Customizing The Function Settings
CUSTOMIZING THE FUNCTION SETTINGS Language 1. Press the SETUP button. 2. Press the button, then press the button to select desired option (OSD language, Subtitle, Audio or DVD menu). 3. Press the button, then press the button to be adjusted, press the OK button. -
Page 21: Radio Operation
RADIO OPERATION 1. Press the FUNCTION button to select RADIO. 2. Press the STOP button on the front panel or the BAND button on the remote control to select FM or MW. 3. Press the TUNING buttons on the remote to tune in to a desired station. FM Stereo Press the MONO/STEREO button on the remote control until “... -
Page 22: Maintenance
MAINTENANCE Cleaning the Disc A defective or soiled disc inserted into the unit can cause sound to drop out during playback. Handle the disc by holding its inner and outer edges. • Do NOT touch the surface of the unlabeled side of the disc. •... -
Page 23: Troubleshooting Guide
TROUBLESHOOTING GUIDE SYMPTOM CAUSE (AND REMEDY) No power. • Check that the AC power cord is connected. No picture. • The region number of the disc doesn't match the region number of this Unit. • The TV is not set to receive DVD signal output. •... - Page 24 For more detailed information about recycling of this product, please contact your local city offi ce, your household waste disposal service or the shop where you purchased the product. For more information and warranty conditions, please visit : www.akai.eu 811-ST8291W781...
Need help?
Do you have a question about the AHC1200 and is the answer not in the manual?
Questions and answers