Advertisement
Quick Links
PlatinumPlus by Sunpak DigiFlash 2800 Instructions
Congratulations on your purchase of this PlatinumPlus by Sunpak
DigiFlash 2800 Canon E-TTL II or Nikon i-TTL flash. This flash is
dedicated for Canon or Nikon digital and film single lens reflex cameras.
Never use the flash on any camera brand other than the one noted on
the base of the flash. Before use, please read the instructions carefully to
take full advantage of its features and safe usage.
Flash Safety
* For maintenance, inspection or repair, return to ToCAD America Inc.
* Never try to open, repair or modify the flash. Such action may result in
fire, shock hazard or injury due to high voltage.
* Never use accessories not specified by Sunpak. Using them may result
in fire, shock hazard or injury.
* If the flash is dropped or damaged, or impacted, return to ToCAD
America Inc. for service and repair.
* Never use the flash at close distances to subject's eyes, especially
babies and newborns. Using the flash at close distances to subject's
eyes may result in visual impairment. When shooting infants or
newborns, keep the flash at a minimum distance of 3 feet or greater.
* When loading batteries, install in the correct polarity. When replacing
the batteries, replace both at the same time, use only the same model
and type and from the same manufacturer. Incorrect battery usage may
result in leakage, over heating, rupture, short battery time and loose
contacts.
* Never use the flash near glass or near containers holding cosmetics or
chemicals. If cosmetics or chemicals enter the flash, it may result in fire,
shock hazard or injury.
* Never use the flash in a place with high humidity, such as in the bath-
room or near a humidifier. It may result in fire, shock hazard or injury.
* When cleaning or caring for the flash, be sure to remove the batteries.
* Never use the flash in a place where flammable gas or explosive gas
may exist in the air.
* Keep batteries away from babies so that they will not be swallowed or
ingested.
* Never place the flash in a dusty environment, subject to direct sunlight
or areas of high humidity. Increased temperatures may result leading to
serious damage, shock hazard or fire.
* Never use the flash without the locking ring securely tightened. If left
un-tightened it may fall or drop from the camera resulting in injury
and/or damage.
Other Cautions
* Never use benzene, thinner or alcohol to clean the flash. Use a soft
cloth without chemicals or solvents.
*If subject to moisture, remove the batteries and dry completely before
use.
*Neglecting any of these instructions may lead to injury or damage.
Before use
* Mount the flash on the camera and securely tighten the locking ring to
secure to the camera. For operation, be sure to hold the body of the cam-
era, not the flash. If the flash is used to hold the camera, the camera will
break from the flash causing serious damage to the flash and camera.
* For additional operating instructions and camera compatibility, go to
www.sunpak.jp.
Mounting
When the DigiFlash 2800 is mounted on or dismounted from the camera,
be sure to turn OFF the Power switch. If the DigiFlash 2800 is mounted
or dismounted with the power ON, malfunction or failure of the camera
may result.
1. Insert the flash into the camera's shoe firmly and turn the Locking Ring
clockwise to secure the flash to the camera.
2. After mounting the flash on the camera, turn on the camera and flash.
3. The shutter speed of the camera will automatically be set.
4. To confirm a correct exposure, the Auto Check function of the Test
Charge indicator will flash approximately two seconds. If Auto Check
function of the Test Charge indicator does not blink indicating a correct
exposure, the distance from the flash to the subject is too great. Move
closer to the subject if possible until confirmation of the Auto Check Test
Charge indicator confirms the correct exposure.
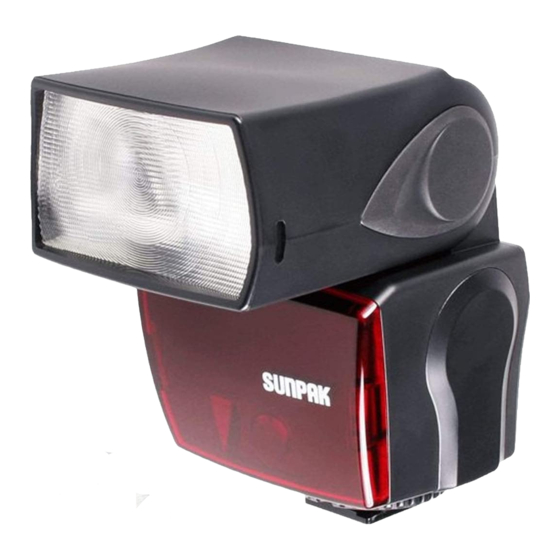
Flash Diffuser
Battery Cover
AF Assist Light
Locking Ring
Bounce Head
- EV Indicator
- EV Selector
Auto Check
Power Switch
Hot Shoe
Installing Batteries
1. Confirm that the Power switch is OFF before loading the batteries.
2. Press down on the Battery cover and slide it downwards to open it.
3. Carefully load 2 AA type batteries into the battery box in accordance
with the +/- illustrations. The flash is designed to prevent incorrect
loading, but if the batteries are installed incorrectly, failure will result.
4. Close the battery cover and slide it upward to close securely. Turn
power switch to the ON position. Charging will start with the beep sound.
During the charging cycle, the Ready Lamp will blink indicating the
charging cycle and then to continues on for full charge status. (When fully
charged, the lamp changes from blinking to steady illumination.)
5. To turn off, turn the Power switch to the OFF position.
Before Mounting
* When the flash is not mounted on a camera and turned on, use caution
not to short-circuit the hot shoe terminals. If short-circuited, the flash may
fire and cause an operational failure of the flash.
* Nickel Metal-Hydride (NiMH) batteries are highly recommended to
shorten the charging time and increase the number flashes.
Information on the Ready Lamp
Confirm after each shot that the Ready Lamp is on and not blinking. If
blinking, charging is still taking place. If the flash is fired without the
Ready Light on continuously, there will be insufficient flash to illuminate
the subject causing an under exposed image. Therefore it is highly
recommended for images with the optimum amount of illumination, wait
until Ready Light remains on continuously.
* If the Ready lamp continuously blinks for more than 30 seconds without
changing to a continuous illumination, the voltage of the batteries has
dropped below the recommend voltage and must be replaced.
Test Lighting
The Test Charge button and Ready lamp are one in the same. For test
lighting, press this button after the Ready Lamp is illuminated, the flash
will fire and if the Auto Check function of the Test Charge button flashes
for approximately two seconds, the exposure will be correct.
Auto Check lamp
When an object is within the Auto effective range, the Auto Check lamp
will blink for approximately 2 seconds just after the flash is fired. The
Auto Check lamp does not flash after the exposure, move closer to the
subject if possible or select a larger aperture.
Another effective way to achieve a correct exposure is to change the ISO
sensitivity to the higher value. *Note that the effective range is shorter
just after lighting of the Ready Lamp.
+ EV Indicator
+ EV Selector
Ready Lamp/Test
Advertisement

Related Manuals for Sunpak PlatinumPlus DigiFlash 2800


Summary of Contents for Sunpak PlatinumPlus DigiFlash 2800
- Page 1 When the DigiFlash 2800 is mounted on or dismounted from the camera, Test Lighting be sure to turn OFF the Power switch. If the DigiFlash 2800 is mounted The Test Charge button and Ready lamp are one in the same. For test...
- Page 2 ToCAD America Inc. Automatic Power Saving Function Sunpak Flash Division When the DigiFlash 2800 is not operated for more than 15 minutes with 53 Green Pond Road the power ON, the automatic power saving function automatically starts Rockaway, NJ 07866 in order to save the power consumption of the batteries.
Need help?
Do you have a question about the PlatinumPlus DigiFlash 2800 and is the answer not in the manual?
Questions and answers