Advertisement
DVC-ST100-VP
User's Manual
1. Getting to know your Video Converter
1.1 Features List
‧Convert your favorite analog composite videos to digital format.
‧Advanced recording format – MPEG-4 to double the total recording length.
‧Video playback supports MPEG-4 format.
‧Built-in SD card slot supports SD or SDHC memory card up to 32GB.
‧Recorded content can be directly played on MPEG-4 compatible player.
‧Approved by CE/FCC. EMC and Safety is guaranteed.
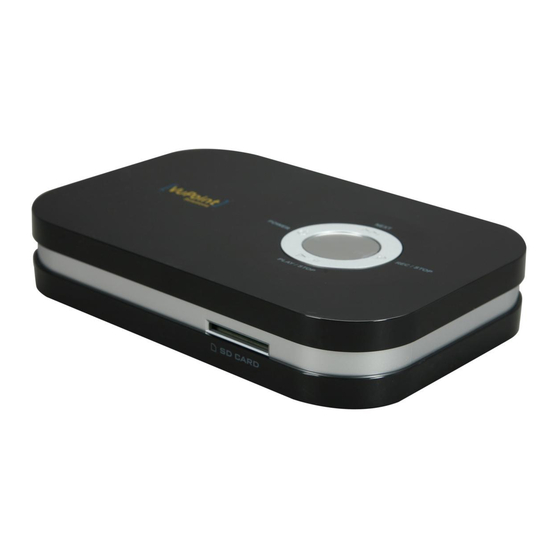
1.2 Functional parts:
Item
Part function
Press this botton to turn ON the unit and stay in
1
PREVIEW mode in power off status. Press and
Power (On/ Off)
hold this botton to turn OFF.
1. Power indicator is solid green when turned on.
Power indicator
2
2. Power indicator blinks green when playing a
(Green LED)
3
Next
Selects next file in playback mode.
Record indicator
4
Record indicator blinks red while recording.
(Red LED)
Press once to get into preview mode and press
5
again to start / stop recording if video and audio
Record / Stop
signal are connected.
Press once to get into playback mode and press
6
PLAY / STOP
again to start / stop playing saved videos.
7
SD card slot
Insert SD card/SDHC card up to 32GB.
8
DC power jack
DC power input
9
AV IN jack
Video input (supports CVBS signal)
10
AV OUT jack
Video output (outputs CVBS signal)
PAL: PAL format output (European countries);
11
TV out mode
NTSC: NTSC format output (North America area).
1 .3 Product Specification
ITEM
DVC-ST100-VP
AV recording, AV Playing
Function
Video source
PAL / NTSC
Record straight from TV
YES
TV-out
PAL / NTSC
Operation description
video.
Output file format
ASF (MPEG-4 with playback)
Recording Resolution
640x480
Recording Quality
Normal
Video Recording Rate
Up to 30fps@VGA with audio
Internal Nand flash Memory
16MB
External memory slot
SD card or SDHC card up to 32GB
Indicator LED
Power / Recording / Playing status
DC Power Port
YES
Video Line in Jack
YES, Ø3.5mm Jack input
TV-out Jack
YES
4 Keys
Control key
(POWER, REC/STOP, PLAY/STOP, NEXT)
Dimension (LxWxH)
6.3" x 4.2" x 1.2"
Weight
9.3 oz.
Accessories
AC/DC adapter, (2) AV cable, CD, User's manual
2. Using the Video Converter
3
2.1 How to connect the Video Converter
1.
Connect the video converter and TV with "AV CABLE 1".
2.
Connect the video converter and video output with "AV CABLE 2". (Video format is
CVBS)
3.
Plug AC/DC adapter to an outlet and "DC IN" jack.
2.2 Inserting a memory card
1.
Insert SD card or SDHC card into the SD card slot.
2.
To remove the SD card, push the memory card and the card will slide out.
Note:
a)
The speed and class of the SD card and SDHC card will determine how long it takes to
save your files while recording. For example, if you have a 4GB SDHC Class 2 memory, it
may take up to approximately 1 min 07 sec to save your file. If you have a 4GB SDHC
Class 4 or above memory card, it may take approximately 11 sec. to save your file. Faster
speed or different class memory cards will save your recorded file quicker than a slower
speed or class memory card. Saving times may vary depending on the memory card used.
b)
Built-in SD card slot supports SD card and SDHC card up to 32GB.
2.3 Using the video converter with analog composite device
1.
Press "
POWER" button to turn on the video converter.
Once the converter is on, the logo will appear first and the video that you wish to
record will show next on the television. Make sure your Beta/VHS/DVD player or
analog composite device is powered on as well as your television before you start
recording.
2.
Press "
REC/STOP" button to start recording. The red record LED indicator will
Advertisement

Related Manuals for VuPoint DVC-ST100-VP


Summary of Contents for VuPoint DVC-ST100-VP
-
Page 1: Inserting A Memory Card
ASF (MPEG-4 with playback) Recording Resolution 640x480 Recording Quality Normal Video Recording Rate Up to 30fps@VGA with audio DVC-ST100-VP Internal Nand flash Memory 16MB User’s Manual External memory slot SD card or SDHC card up to 32GB Indicator LED Power / Recording / Playing status 1. -
Page 2: Troubleshooting
start blinking. Note: Do not insert or remove the SD card or SDHC card while recording or playing a video. Press the “ REC/STOP” button again to stop recording. When using a high memory SD card or SDHC, a lag time will occur when saving or Note: viewing files.
Need help?
Do you have a question about the DVC-ST100-VP and is the answer not in the manual?
Questions and answers