Table of Contents
Advertisement
Quick Links
Owner's Manual
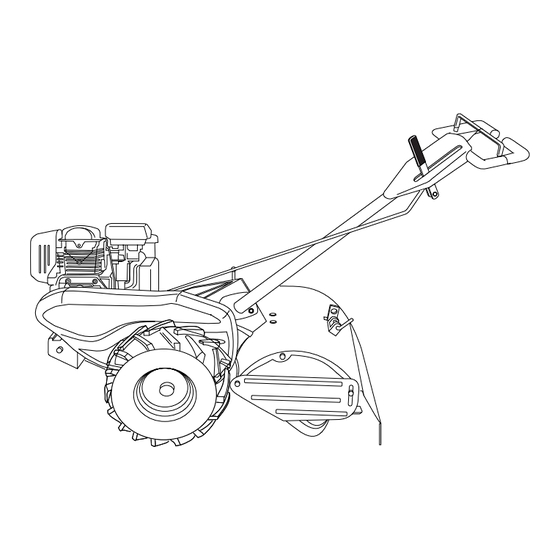
REAR TINE TILLER WITH
COUNTER ROTATING TINES
5.0 HP
17 Inch Tine Width
Model No.
917.29425
This product has a low emission engine which operates
differently from previously built engines. Before you start the
engine, read and understand this Owner's Manual.
IMPORTANT:
Read and follow all Safety
Rules and Instructions before
operating this equipment.
Sears, Roebuck and Co., Hoffman Estates, IL 60179 U.S.A.
Visit our Craftsman website:www.sears.com/crafts man
Advertisement
Table of Contents

Subscribe to Our Youtube Channel
Related Manuals for Craftsman Craftsman 917.29425


Summary of Contents for Craftsman Craftsman 917.29425
- Page 1 Before you start the engine, read and understand this Owner’s Manual. IMPORTANT: Read and follow all Safety Rules and Instructions before operating this equipment. Sears, Roebuck and Co., Hoffman Estates, IL 60179 U.S.A. Visit our Craftsman website:www.sears.com/crafts man...
-
Page 2: Table Of Contents
For two (2) years from date of purchase, when this Craftsman Tiller is main tained, lu bri cat ed, and tuned up according to the operating and maintenance instructions in the own er’s manual, Sears will repair free of charge any defect in material or work man ship. This Warranty does not cover: •... - Page 3 SAFETY RULES • Use extension cords and receptacles • Never operate the machine at high as specifi ed by the manufacturer for all speeds on slippery surfaces. Look be- units with electric drive motors or elec- hind and use care when backing. tric starting motors.
-
Page 4: Prod Uct Spec I Fi Ca Tions
AGREEMENTS CONGRATULATIONS on your purchase Congratulations on making a smart pur- of a Sears Tiller. It has been designed, chase. Your new Craftsman® product is en gi neered and manu fac tured to give you designed and manufactured for years of the best pos sible de penda bil ity and per- dependable operation. - Page 5 ACCESSORIES These accessories were available when the tiller was produced. They are also avail able at most Sears retail outlets and service centers. Some of these accessories may not apply to your tiller. ENGINE SPARK PLUG MUFFLER AIR FILTER GAS CAN...
-
Page 6: Assembly/Pre-Operation
ASSEMBLY/PRE-OPERATION Your new tiller has been assembled at the factory with the exception of those parts left unassembled for shipping purposes. To ensure safe and proper operation of your tiller all parts and hard ware you assemble must be tight ened securely. Use the cor rect tools as necessary to insure proper tight ness. - Page 7 Handle Column Handle Assembly "UP" Position Tighten handle Cables lock lever to hold Cable Clip Loosen Handle Lock handles_14 Lever to Move CONNECT SHIFT ROD 1. Insert end of shift rod farthest from bend into hole of shift lever in di ca tor. handles_97 2.
-
Page 8: Operation
OPERATION These symbols may appear on your Tiller or in literature supplied with the product. Learn and understand their meaning. KNOW YOUR TILLER READ THIS OWNER'S MANUAL AND SAFETY RULES BEFORE OPERATING YOUR TILLER. Compare the illustrations with your tiller to familiarize yourself with the location of var i ous controls and adjustments. - Page 9 The operation of any tiller can result in foreign objects thrown into the eyes, which can result in severe eye damage. Always wear safety glasses or eye shields before starting your tiller and while tilling. We recommend a wide vi- sion safety mask over spec ta cles or standard safety glasses.
- Page 10 TURNING CHECK ENGINE OIL LEVEL The engine in your unit has been shipped, 1. Release the drive control bar. 2. Move throttle control to “SLOW” posi- from the factory, already fi lled with SAE 30 tion. summer weight oil. 3. Place shift lever indicator in “F” (for- 1.
- Page 11 CAUTION: Alcohol blended fuels (called See “TO AD JUST CARBURETOR” in the gasohol or using ethanol or methanol) can Service and Ad just ments section of this attract moisture which leads to separa- manual. tion and for ma tion of acids during storage. NOTE: If engine does not start, see trou- Acidic gas can damage the fuel system ble shoot ing points.
- Page 12 ADJUST WHEELS FOR CUL TI VAT ING 1. Place blocks under right hand side of tiller and remove hairpin clip and clevis pin from right hand wheel. 2. Move wheel outward approximately 1 inch until hole in inner wheel hub lines up with inner hole in axle.
-
Page 13: Maintenance
MAINTENANCE MAINTENANCE SCHEDULE FILL IN DATES AS YOU COMPLETE SERVICE DATES REGULAR SERVICE Check Engine Oil Level Change Engine Oil Oil Pivot Points Inspect Spark Arrester / Muffler Inspect Air Screen Clean or Replace Air Cleaner Cartridge Clean Engine Cylinder Fins Replace Spark Plug RH Gear Case Grease Fitting (1oz.) 1 - Change more often when operating under a heavy load or in high ambient temperatures. - Page 14 5. Refi ll engine with oil. See “CHECK CAUTION: Disconnect spark plug EN GINE OIL LEVEL” in the Operation wire before performing any maintenance section of this manual. (except car bu re tor ad just ment) to prevent accidental start ing of engine. Prevent fi...
-
Page 15: Service And Adjustments
SPARK PLUG CLEANING Replace spark plugs at the beginning of Do not clean your tiller when the engine each tilling sea son or after every 50 hours and transmission are hot. We do not rec- of use, whichever comes fi rst. Spark plug om mend using pressurized water (gar den type and gap setting is shown in “PROD- hose, etc.) to clean your unit un less the... - Page 16 TO REMOVE BELT GUARD 2. Remove old belt by slipping off engine pulley fi rst then remove from trans- NOTE: For ease of removal, remove hair- mis sion pulley. pin clip and clevis pin from left wheel. Pull 3. Place new belt in groove of trans- wheel out from tiller about 1 inch.
- Page 17 Sears or Warranty repairs must be per formed by an other qualifi ed service center which has...
-
Page 18: Storage
STORAGE Immediately prepare your tiller for storage NOTE: Fuel stabilizer is an acceptable at the end of the season or if the unit will al ter na tive in minimizing the formation of not be used for 30 days or more. fuel gum deposits during stor age. -
Page 19: Troubleshooting
TROUBLESHOOTING CHART: See ap pro pri ate section in manual un less di rect ed to Sears service center PROBLEM CAUSE CORRECTION Will not start 1. Out of fuel. 1. Fill fuel tank. 2. Engine not “CHOKED” 2. See “TO START ENGINE” in properly. - Page 20 TROUBLESHOOTING CHART: See ap pro pri ate section in manual un less di rect ed to Sears service center PROBLEM CAUSE CORRECTION Engine 1. Low oil level/dirty oil. 1. Check oil level/change oil. overheats 2. Dirty engine air screen. 2. Clean engine air screen.
- Page 21 Sears Parts and Repair Center. 1-800-488-1222 Anytime, day or night (U.S.A. only) www.sears.com To purchase a protection agreement (U.S.A.) or maintenance agreement (Canada) on a product serviced by Sears: 1-800-827-6655 1-800-361-6665 (U.S.A.) (Canada) Para pedir servicio de reparación Au Canada pour service en français:...
Need help?
Do you have a question about the Craftsman 917.29425 and is the answer not in the manual?
Questions and answers