Table of Contents
Advertisement
Advertisement
Table of Contents

Related Manuals for Kenmore 17881


Summary of Contents for Kenmore 17881
- Page 1 Kenmope SEWING MACHINE 17881 OWNER'S MAN1...
- Page 2 KNOWING YOUR SEWING MACHINE Machine identification ...... 2 _3 Accessories ......Setting spool pins ......Converting to free-arm sewing ....Pressure regulator, Presser foot lever ... Presser feet, Speed control plug ....Light and power switch, Sewing light .... Foot control, Seam guides, Darning plate ..
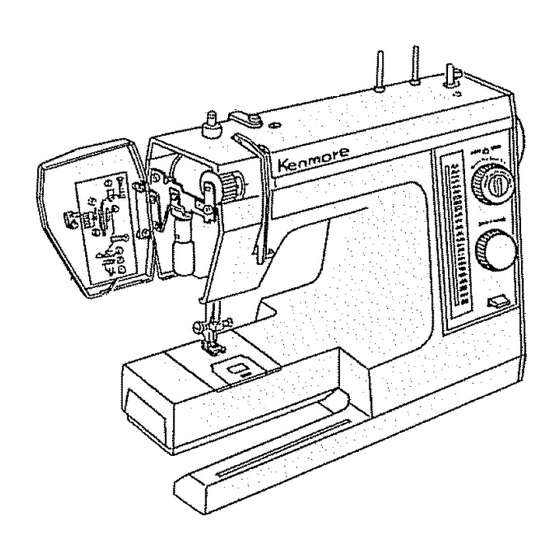
- Page 3 Bobbin Winder Face Cover Plate Threading Chart Ex tension Table/, Thread Guide Thread Guide Needle Presser Foot Thumb Screw Clamp Screw Needle Plate Bobbin Cover Plate Thread Spool Pins Hand Wheel Presser Foot Lever Push-Pull Clutch Free Arm Stretch Stitch Adjuster Light and Power...
- Page 4 2. StitchWidthControt Stitch Length Controt 3÷ Stitch Seiector "_5. Reverse Stitch Lever This control regulates length stitch you select. The diaf is calibrated in stitches per inch. higher number, the shorter stitch. Fabric will not be fed when the dial is set at "0 't"...
- Page 5 ACCESSORI Buttonhole opener Accessory Bobbin Small screw driver Large screw driver Spool pin Spool pin fett Lint brush Spool pin disc Straight stitch foot Darning plate Zipper foot Buttonhole guide foot Owner's manual Foot control...
- Page 6 SETTING SI:'OO L P'!NS Spool Pins are packed in accessory box, Screw thread spool pins in place securely with a screw driver. Position spool pin discs and felts as shown in illustration. _ _. spool pin,_i_o II'" s_'°O' _'° " Slot CONVERTING TO FREE-ARM...
- Page 7 ? _-_ ES SU R E R I:._aU L s "i-} i_ Push down the outer ring of the pressure regulator.. This will release the pressure on the presser foot.. (See above) To increase the pressure, push down inner pin until suitable pressure is obtained..
- Page 8 PRESSER FEET To change the various presser feet, raise the presser bar to its highest position lifting the presser foot levero Loosen the presser foot thumb screw, choose proper foot, insert from bottom. Tighten screw using the large screw driver to make certain the foot is secure.
- Page 9 LIGHT :-, ^.r'_D_POWER SWI _CH Turn power pushing light power switch, Important safety feature Your machine will not operate unless the light/power switch is turned on,, Turning on the power automatically illuminates the whole stitching area. If you're inter- rupted stop sewing, turn...
- Page 10 FOOT L_ C4 P_j L (:!i i i _: Step on this control to start to sew, The harder press contro!, faster the machine will sew. Slow down reducing pressure control° may want to practice your speed at different levels when first use the...
- Page 11 NEEDLE RECOMMENDED SIZE AND THREAD SIZE STITCH LENGTH COLOR SETTING Polyester Core/Cotton 12 stitches Wrap 11-ORANGE Fine Mercerized Cotton per inch Silk 50 Mercerized Cotton Polyester Core/Cotton 10 to 12 stitches 14-RED Wrap per inch Silk 50 Mercerized Cotton 14-RED Mercerized Heavy-Duty 8 to t0 stitches...
- Page 12 Use KENMORE needles. The size of the needle should conform with the size of thread both should suit fabric. Kenmore needles are color-coded by size for your convenience (See chart on facing page)° Never use a bent needle or one with a dull point.
- Page 13 winder shaft to the right until it clicks, 1. Pull Push-pull Clutch away from Holding onto thread, start machine to disengage clutch, machine. When bobbin slightly 2. Draw thread from spool through filled, snip off end of thread. bobbin winder tension disc as shown, 5, Wind...
- Page 14 Bobbin cover p ate 1_ Remove bobbin cover plate 4_ Pull 4-inches of thread through tension pulling it toward you while pushing slot of bobbin case and toward back of down stightlv. machine as shown,, 2. Take the bobbin out and wind 5o Close the bobbin cover plate allowing (See page 12 for winding...
- Page 15 The numberedstepsbelowfollow the numbers onthe illustrations. Dotted lines show placeswhere the thread loops and then is 3ulledtight, ® 4, Draw thread & through take-up lever, 5, Draw thread down into thread guide. 6. Thread then is slipped into needle bar 1.
- Page 16 PICkiNG UP BOBBIB_ TI4READ ® 1, Raise presser foot lever. Hold needle thread loosely in left hand and rotate handwheel toward one complete turn° 2. Bring bobbin thread pulling ® upper thread. 3. Pull both threads under and to the ®...
- Page 17 ADJUSt _[_GTOP Lr_Rsr',m_.=_ TENSIONS Probably the most important control your machine is this one that regulates ideal straight stitch will have threads locked between your top thread tension. layers of fabric. There many reasons having Setting mark reset your tension. The best tension one fabric may not be correct for another°...
- Page 18 Kenmore sewing machine. Below are some good habits to follow each time you sit down to sew: Test the needle.. It should be straight, properly set and sharp on the point°...
- Page 19 STRiAtGFIT STITCHING Stitch length Stitch width 0 6to 12 Stitch selector Top thread tension control 3 to 6 : :Vml_ Presser foot You will find in garment construction that you are doing two types of sewing-temporary and permanent. 1. Temporary stitching-Usually the longest stitch possible and often done on a single layer...
- Page 20 FASTENtNG A SEAM Be sure both threads drawn back under presser foot. Lower needle into fabric about 1/2 inch from beginning of seam_ Press and hold reverse stitch lever down stitch reverse until needle reaches beginning seam Release the reverse lever and complete seam°...
- Page 21 Z_GZAG STITCHING /VVV',.i\ Stitch length Stitch width t to 5 Stitch selector 6 to 24 ..thread tension control 0 to 4 Presser foot This type of stitching greatly expands use of your machine. This is the feature that enables overcast seams, applique and sew on buttons.
- Page 22 UNDESIRABLE DESIRABLE The easiest way to check tensions is to sew a medium zigzag stitch on the fabric you will be using. iiiiiiii!!i i!!i!il Use the appropriate type of thread needle. Use different colors of thread on the bobbin and upper spool. a line medium zig-zag...
- Page 23 :UTU L _T'_,/A?4D S _RETOH STfT_ooH SEWUH_s BUTTONHOLE MAI(_NG Stitch iength Stitch width Stitch selector Blue Zone "t_ 3 to 5 thread tension ontrol 0 to 4 i:i: _ !ii, iI:_, :}< _i_ _ii=_i _:i _ Presser foot _'_ _ _i_"...
- Page 24 2. Set stitch selector at r--_q. Stitch for- ward until approach bot- marking buttonhole, Stop sewing at the right stitch raise the needle to its highest position turning hand-wheel toward manually. 3. Set stitch selector at EC3]and bartack 5 or 6 stitches at the bottom mark of buttonhole.
- Page 25 BL_ND H EMMI[_xtG Stitch width Stitch length 8 to 24 2to3 Stitch selector Top thread tension control 0 to 4 LA_A_ Presser foot z'VV_ -=-=_-_ ..Foot Fig, I Fig 3 3. Place garment under presser foot t, Finish edge of anyway such a way...
- Page 26 SMELL STITCHING Stitch length Stitch width 12 to 24 3 to 5 Stitch selector Top thread tension control 4 to 9 c o :/{ Presserfoot This stitch used on the edge of nylon tricot makes attractive edge stitch called Shell Stitching. When sewing this stitch, allow...
- Page 27 BOX STITCHING Stitch length Stitch width Stitch selector 3to5 12 to 24 Top thread tension control 0 to 4 :_ll_ ¸ ( i.iv_ L ¸ This is a good stitch to use in attaching binding elastic fabrics stretch lace, lingerie stretch knit.
- Page 28 Stitch width Stitch length Stitch selector Blue Zone _ to 12 Top thread tension control 0 to 4 Presser foot This is a popular decorative stitch (used in sleeves or fronts of blouses and dresses). attach separate pieces of fabric together, leave a little space inbetween,...
- Page 29 WO-PO NT SHELL STfTCI4_NG & Stitch width Stitch length 3to5 _lue Zone _;:::_to Stitch selector Top thread tension control 0 to 4 Presser foot i¸_ i This stitch can also be used as a single overlock stitch as well.
- Page 30 SAT_N STFi-CHtNG I,t A / I I, A 114,1ii/ At,14/ Stitch width Stitch length Stitch selector 2to5 Blue Zone Top thread tension control 0 to 4 Presser foot Closely spaced zigzag stitches are called satin stitches. This is an attractive stitch used for appliqueing,...
- Page 31 APPL I:QUEII',IG Stitch width Stitch length 2 to5 Stitch selector Blue Zone 1C_ thread tension control 0 to 4 Presser foot Select an applique design to be applied your garment and baste it in place° Satin stitch around the raw edge of the applique completely covering...
- Page 32 Z_PPER APP L_CAT_ON Stitch length Stitch width 0 Stitch selector Top thread tension control 3 to 6 Presser foot REGU:LAR ZIPPER Pin or baste zipper to fabric and place the work in position under the presser foot, Loosen zipper foot adjusting screw to set the...
- Page 33 INVISIBLE ZIPPER Adjust foot so the needle is sewing through the center hole of the foot one groove of the foot is riding on the teeth of the zipper. See Fig. 2o Follow the zipper manufacturer's instructions. After zipper been inserted, finish sewing...
- Page 34 l/_\ Stitch width Stitch length Blue Zone Stitch selector thread tension control 0 to 4 : 1 1 >_,J_£ i I, _ :iii: _ i/i Presser foot !/VV_ repair a straight or three-cornered tear, position the tear under the needle in such a way that the stitching catches...
- Page 35 DARNING Stitch length 8 to 10 Stitch width 0 Stitch selector thread tension control 3 to 6 Presser foot Use Darning plate (See page 9) Push down the outer ring of the pressure regulator to release the pressure on the presser foot, (See page 6) Stretch...
- Page 36 BUTTON oEv,JING Stitch tength Any number (not necessary Stitch width Must be adjusted Stitch selector to adjust) ..thread tension control 0 to 4 :_,. :..v:..'. Presser foot Use Darning plate (See page 9) Align two holes of button with slot of presser foot and lower foot...
- Page 37 BAR T_CKING Stitch length Stitch width Blue Zone 1 to 5 Stitch selector Top thread tension control 0 to 4 Presser foot This stitch is similar to a very short satin stitch and is used to reinforce points strain such as corners pockets straps on lingerie,...
- Page 38 The stitches shown below are all for use with stretch and knit fabrics, These are special stitches built in to the machine for your quick selection. 1. Straight Stretch 2. Rickrack Stretch 3. Overcast Stretch 4. Smocking Stretch 5. Serging or Pine Leaf Stretch 6.
- Page 39 STRAIGHT 8TR ETCH .." "In Stitch length number (not necessary to adjust) Stitch selector Stitch width Top thread tension control 3 to 6 Presser foot Use this stretch stitch with knitted fabric other fabrics that stretch° Sew as with regular straight stitch...
- Page 40 ,_' _'4 _ _4 ",W'W <':_, Stitch length number Stitch width (not necessary to adjust) 2to5 thread tension control 0 to 4 Presser foot Sew on stretch fabrics in any area that you might use a zigzag stitch, This stitch can be used as a decorative top stitch as well.
- Page 41 OVERCAST _:_RETCH STITCH ING Stitch length ",{/xT/_,/ ,/ ,/ number (not necessary Stitch selector to adjust) Stitch width thread tension control 0 to 4 Presser foot This stitch can be used for sewing a seam with an overcast finish. is used for seams of 3/8"...
- Page 42 MO_.,,L _.t Lf,G S"i_is_ FTC[-i Stitch length ". / _,, iN i+*u number "., ix, /'-. i'..t,..,,1 (not necessary Stitch width Stitch selector to adjust) 3 to 5 I 'll ..Top thread tension control 0 to 4 Presser foot /vvk With a narrow...
- Page 43 Stitch length number necessary Stitch width (not to adjust) S_t i tch selector 3to5 ,-,,., -" thread tension control 0 to 4 I! : Aru'k Presserfoot The serging or pine leaf stitch is similar one used by garment industry in making sportswear.
- Page 44 Stitch length number Stitch width (not necessary 3 to 5 Stitch selector to adjust) thread tension control 0 to 4 Presser foot Use this versatile stitch to insert elastic in garments. Simply stitch elastic into place, making sure it is evenly spaced_ To do this, mark the correct length piece...
- Page 45 STRE _C.s PATCHING I ¸ Stitch length _.j_,/-. x,_/-, j number Stitch width (not necessary Stitch selector to adiust) _"a thread tension control 0 to 4 :L: } ;v...ni _vw_ Presser foot If the kids keep "busting out" elbows or kness ..
- Page 46 _= E F_ ¸ i?_ _i -_ .._"_¸ _ r-_" _ _ Stitch length Any number Stitch width {not necessary Stitch selector to adjust} thread tension control 0 to 4 Presserfoot Use as hemming stitch for blankets, table* cloth and draperies. Place the fabric right...
- Page 47 GEOMETRIC DECOR,_,TfVE STI'FCHIF,!G Stitch width Stitch length Blue Zone _ 3to5 thread tension ontrot 0 to 4 Presser foot These stitches purely decorative, can sew one row or several or vary stitch width and length special effects, want combine these stitches with other...
- Page 48 • i _': iL _ This sewing machine can be used Iike a flat bed machine, but easily converts free machine removing extension table, The free arm enables you to sew tubular types of pieces more easily, ,lust slip the sleeve or pants leg on the free...
- Page 49 Checking Pe i -o mance Probbms WHATTO O0 CORRECTION Choose correct size needle for thread and fabric. Rethread machine. Tighten upper thread tension. Do not pull fabric; guide it gently. Increase pressure on presser foot. Reset presser foot. Rewind bobbin. ty wound bobbin Nicks...
- Page 50 CORRECTION PROBABLE CAUSE : n;orrect sizeneedle. Choose correct size needle for thread and fabriC. Insert new needle. Bent or blunt needIei :Reset needle, of needlei ight upper,thread tension: Loosen upper thread tension. Increase pressure on presser foOt. _t pressure on presser foot, : : s_a_ting to stitch...
- Page 51 CARUBIG FOR 'T " CLEANING FEED DOGS AND Sk!UTTLE insure the best possible operation your machine, it is necessary to keep the essential parts clean at all times° Using a small brush, remove the lint that accumu- lates in the shuttle area and around feed dogs.
- Page 52 _ , _', E R i-!:.._-'_, i In Remove arm cover plate to oil points indicated in top of machine head. To remove cover plate, loosen up two top screws and lift the cover plate as illustrated below.
- Page 53 (A} and {B) as shown below, Then place one or two drops of Kenmore sewing machine oil at each point. IFI " ®_ .._ _ _:: : iii ¸ }¸¸: :7 ¸...
- Page 54 Open face cover plate and oil points in illustration,...
- Page 55 PARTS LIST <:::S-. t *""...
- Page 56 kll parts listed herein may be ordered from any Sears store or service centen VHEN ORDERING REPAIR PARTS, ALWAYS GIVE FOLLOWING INFOR- /IATION: PART NUMBER 2,. PART DESCRIPTION 3. MODEL NUMBER 4. NAME OF ITEM f the parts you need are not stocked locally, your order will be electronically transmitted...
- Page 57 SETTING UP YOUR MACHINE t. You'll find spool pins, nylon discs and spool pm fails m t_a accessory box, M I1 \ Using a screw driver, attach spool pros securely on the top cover and position nylon discs and fehs over the spool pins as indicated.
- Page 58 Ch_ck Be sure needle is not bfunt Periodically at points indicated p_sh.pua or bent. your instruction book. ONLY KENMORE SEWING MACHINE OIL..¢ _'-I |eng_h. Fl_t si4_ av_ay THREADING .:_,;_ TENSION THREAD CAN TANGLE SNAP without being seen.
- Page 59 Canada Inc. Dear Homemaker: You have just invested in a very fine zigzag sewing machine Before using your new Kenmore machine, please pause for a moment and carefully read this booklet which contains instructions on how to operate and care for your machine.
- Page 60 WARRANTY MACHINE 25-YEAR WARRANTY SEWING FULL HEAD 25 years from the date of purchase, Sears will, free of charge, repair defects material or workmanship which appear in the sewing machine head. FULL TWO YEAR WARRANTY ON ELECTRICAL EQUIP- MENT OF SEWING MACHINE ÷...
- Page 61 SEWING MACHINE Now that you have purchased your Kenmore Sewing Machine, should a need ever exist repair parts or service, simply contact any Sears Service Center and most Sears Stores. Be sure to provide all pertinent facts when you call or visit.
Need help?
Do you have a question about the 17881 and is the answer not in the manual?
Questions and answers