Garmin Fishfinder 320C Owner's Manual And Reference Manual
Garmin car gps receiver owner's manual 320c
Hide thumbs
Also See for Fishfinder 320C:
- Template manual (1 page) ,
- Specifications (2 pages) ,
- Specifications (2 pages)
Table of Contents
Advertisement
Quick Links
Advertisement
Table of Contents

Related Manuals for Garmin Fishfinder 320C


Summary of Contents for Garmin Fishfinder 320C
- Page 1 Fishfi nder 320C owner’s manual reference guide...
- Page 2 Information in this manual is subject to change without notice. Garmin reserves the right to change or improve its products and to make changes in the con- tent without obligation to notify any person or organization of such changes.
-
Page 3: Introduction
Please take the time to read this Owner’ s Manual, and learn the operation of your new unit. This will help ensure that you get the most from the Fishfi nder 320C. This manual is broken down into three sections for your convenience. -
Page 4: Limited Warranty
Garmin retains the exclusive right to repair or replace the unit or software or offer a full refund of the purchase price at its sole discretion. SUCH REMEDY SHALL BE YOUR SOLE AND EXCLUSIVE REMEDY FOR ANY BREACH OF WARRANTY. -
Page 5: Software License Agreement
OF THE FOLLOWING SOFTWARE LICENSE AGREEMENT. PLEASE READ THIS AGREEMENT CARE- FULLY. Garmin grants you a limited license to use the software embedded in this device (the “Software) in binary executable form in the normal operation of the product. Title, ownership rights and intellectual property rights in and to the Software remain in Garmin. -
Page 6: Packing List
Garmin dealer immediately. Standard Package (010-00289-00 w/o transducer): • Fishfi nder 320C Unit • Surface-Mount Bracket and Knobs • Power/Data Cable • Owner’ s Manual • Self-Adhesive Quick Reference Guide • Protective Cover • Flush-Mount Hardware Kit Optional Package (010-00289-01) includes Standard Package, plus: •... -
Page 7: Selecting A Transducer
(compared to a wide cone angle transducer at the same depth) with improved bottom resolution and a smaller dead zone. A variety of optional transducers are available from your local dealer or direct from Garmin. • 200/50kHz, 12/45°, plastic, transom mount, depth, temp •... -
Page 8: Table Of Contents
Introduction Table of Contents Introduction ......i-vi Preface and Registration ....i Warranty . -
Page 9: Section One: Installation
2. Mark and drill the four mounting holes for the fastener you are using. 3. Fasten the bracket to the surface using the appropriate fasteners. 4. Insert the Fishfi nder 320C into the mounting bracket. The bracket is designed for a tight fi t to provide additional support when swiveling the unit. - Page 10 Flush Mounting the Fishfi nder 320C Unit The Fishfi nder 320C can be fl ush mounted on a fl at panel. When fl ush mounting the Fishfi nder 320C, be sure to choose an appropriately sized location for the unit. Check that all cables will reach the unit mounting location before beginning installation.
-
Page 11: Connecting The Power/Data Cable
Garmin GPS (Global Positioning System). If equipped with a capable transducer, the Fishfi nder 320C can send depth, temperature, and speed information. It can also mark a location (pg. 13) that could be displayed on another device and can accept GPS navigational data (pg. 14), such as position, time, course, distance, etc. - Page 12 Output — SDDBT, SDDPT, SDMTW, SDVHW, SDWPL* (only if a waypoint is “marked” in Pointer Mode) *Garmin GPS units will accept the SDWPL (WPL) NMEA sentence and create a waypoint (saved location) at that position (see pg. 13). For compatibility with other brands of GPS or NMEA capable navigation devices, check with that manufacturer to see if their unit accepts/stores NMEA 0183 SDWPL sentences/waypoints.
-
Page 13: Mounting The Transducer
Proper transducer installation is key to getting the best performance from your new unit. If the trans- ducer lead is too short, extension cables are available from your Garmin dealer. Coil and secure any excess cable. DO NOT cut the transducer lead or any part of the transducer cable, as this will void your warranty. -
Page 14: Shoot-Thru-Hull Installation
Installation Mounting the Transducer Weight transducer PVC Pipe to hold it in place or a Can Fill Pipe or Can with water or a Strip Caulk light mineral oil or RTV Sealer Hull Surface Testing the Location To avoid drilling a hole to mount a thru-hull transducer, a transducer may be secured with epoxy inside a boat (“shoot-thru-hull”... -
Page 15: Testing The Installation
Press the POWER/BACKLIGHT key (see pg. 8) and the Fishfi nder 320C should power on. If the unit fails to power on, verify that the wiring adapter is seated properly in the back of the unit, the Red and Black wires are connected to the correct polarity, and that the 2-Amp fuse is installed and not blown. -
Page 16: Section Two: Unit Operation
Use the ARROW KEYPAD to move the cursor around the display to examine the depth of specifi c items in greater detail. If the Fishfi nder 320C is interfaced with a Garmin GPS or compatible NMEA navigation device (pgs. 3-4), pressing the ENTER key in this state will send a WPL sentence to that device (if the cur-... -
Page 17: Sonar Page
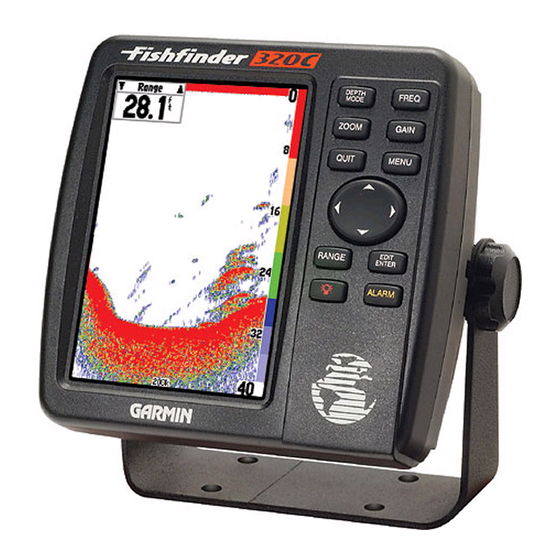
Sonar Page The Sonar Page is where your Fishfi nder 320C becomes a powerful fi shfi nder/fl asher. If the unit does not detect a transducer, a “Sonar Turned Off” message will appear across the Sonar Page. If in Simulator mode, a ‘Running Simulator’... -
Page 18: Using The Adjustment Menu
3. Press ENTER or QUIT to accept the new setting and return to the sonar graph. For users accustomed to other Garmin sonar products, the current adjustment will appear in the upper left corner. For fast adjustment from the Sonar Page, press LEFT or RIGHT on the ARROW KEYPAD to scroll through the options, then press UP or DOWN on the ARROW KEYPAD to immediately change the current option or the ENTER key to review the current setting before making changes. -
Page 19: View/Span
The Zoom function is divided into six display levels: 2X Split –– Shows two reduced-size sonar pictures at the same time. The right half of the display screen shows the complete sonar picture at its original scale. The left half shows a portion of the original picture at 1/2 depth scale. -
Page 20: Whiteline
Unit Operation Adjustment Menu Options You may resize the split line to the left or right. Resizing the Sonar Split The current frequency setting will display at the bottom of the screen. • Whiteline — controls how the unit displays information about the bottom type (hard or soft). With the Whiteline ‘Off’, all high-intensity bottom returns will display as red. -
Page 21: Using The Pause Key
You may also use Pointer mode to move a cursor around on the paused sonar graph in order to reference sonar items and mark waypoints for that location (if attached to a Garmin GPS or compatible NMEA naviga- tion device. See pg. 4.) When Pointer mode is activated, a data fi eld will appear at the top of the graph with the cursor’... -
Page 22: Using The Data Key
Unit Operation Using the DATA Key Adding a Data Field Sonar Page With Advanced Data Field Modifying a Data Field Basic and Advanced Data Fields The top left of the screen contains confi gurable data fi elds for the sonar display. Pressing the DATA key will allow you to toggle between a Basic and Advanced data fi... -
Page 23: Main Menu
Main Menu The Main Menu contains the unit settings that should not require frequent change. The Main Menu is divided into eight tabs: Graph, Tools, Temp, Alarms, System, Units, Sonar and Time. Each tab will be described in more detail in this section. To enter the Main Menu, press the MENU button on the face of the unit twice. -
Page 24: Custom Range
Unit Operation Main Menu Options Main Menu - Tools Tab Main Menu - Temp Tab • Custom Range — allows you to specify a custom viewing range/scale. Once enabled, this range will appear as ‘Custom’ in the ‘Range’ adjustment control. The left value will be the top of the scale and the right value, the bottom of the scale. -
Page 25: Alarms Tab
Alarms Tab Contains settings for the unit’ s alarms. (For a list of alarms and unit messages, see page 26.) The Alarm tab is divided into two submenu tabs: Sonar alarms and System alarms. Sonar: • Fish — sets alarm/icon to sound/display when unit detects a fi sh of the specifi ed symbol size. •... -
Page 26: System Tab
Unit Operation Main Menu Options Main Menu - System Tab Main Menu - Units Tab System Tab Controls various system and interface settings. The following settings are available: • Beeper — controls audible beep. Select from ‘Off’, ‘Alarms Only’ (sounds for alarms/messages), or ‘Key and Alarm’... -
Page 27: Heading
• Heading — lets you select the reference used in calculating heading information for the the Bearing, Compass, Course, and Track Advanced Data fi elds (pg. 14). ‘True’ will display data with reference to True North. ‘Magnetic’ will display data with reference to Magnetic North using the magnetic varia- tion value received in the RMC NMEA sentence (see pgs. -
Page 28: Time Tab
Unit Operation Main Menu Options Calibrating the Speed Sensor Main Menu - Time Tab unit will automatically use GPS ground speed (if available via NMEA input) for comparison on the calibration. If a GPS ground speed is not available, use either your boat’ s speedometer reading (not always accurate) or a stopwatch to determine your speed over a certain distance (distance / time = speed). -
Page 29: Section Three: On The Water
(strongest), then oranges (strong), yellows (medium), greens (weaker) and blues (weak- est). That is a brief description of how your Fishfi nder 320C operates. The following pages will show how this data can help you to improve your fi shing. -
Page 30: Transducer Coverage
When using the Fishfinder 320C in ‘Dual’ frequency mode, the unit transmits both 50kHz and 200kHz signals at the same time. The ‘Dual’ frequency capability of the Fishfinder 320C allows the user to have a large coverage area and still retain good bottom resolution. When in ‘Dual’ frequency mode the unit uses the narrow cone angle (200kHz) to display detailed bottom information, keeping “Dead Zones”... -
Page 31: Understanding The Graph
Understanding the Graph It is important to understand that the unit does not display a 3-D representation of the underwater environment. The unit can display multiple things at the same time, but cannot determine where the return originated – only when it was received. Examples 1 and 2 provide a look at the underwater world from a top view, and illustrate how these views would be displayed on the graph. -
Page 32: Whiteline And Thermoclines
Whiteline The Fishfi nder 320C can help you to determine if the bottom is hard or soft. When the sonar soundwaves are refl ected back by the bottom, a hard bottom will return a stronger signal than a soft bottom. -
Page 33: Physical Specifications
Do not store the Fishfi nder 320C where prolonged exposure to temperature extremes may occur (such as in the trunk of a car) as permanent damage may result. Unit settings will be retained in the unit’ s memory without the need for external power. -
Page 34: Appendix B: Messages And Alarms
(If the unit does not detect a transducer attached, it will automatically enter Simulator Mode.) Shallow Water Alarm — Shallow Water Alarm depth has been reached. Sonar Failed Unit Needs Repair — Internal problem with unit. Contact your dealer or Garmin Product Support to have the unit serviced. -
Page 35: Appendix C: Index
Accessories Accessories iv iv Adjustment Menu Adjustment Menu 10 10 Adjustment Menu Options 10 10-12 Adjustment Menu Options Advanced data setup Advanced data setup 14 14 Advanced display Advanced display 14 14 Alarms Alarms 17 17, , 26 26 Alarms Tab Alarms Tab 17 17 Anti-reflective coating Anti-reflective coating 25 25... - Page 36 Appendix C Index Number Size Number Size 16 16 Packing List iv iv Packing List PAUSE key 8 8 , , 13 13 PAUSE key Pointer Mode 13 13 Pointer Mode Position Format Position Format 18 18 POWER/BACKLIGHT key 7 7 - - 8 8 POWER/BACKLIGHT key Power Up 7 7 Power Up...
- Page 38 For the latest free software updates (excluding map data) throughout the life of your Garmin products, visit the Garmin web site at www.garmin.com. © Copyright 2003 Garmin Ltd. or its subsidiaries Garmin International, Inc. 1200 East 151 Street, Olathe, Kansas 66062, U.S.A.
Need help?
Do you have a question about the Fishfinder 320C and is the answer not in the manual?
Questions and answers