Mesa/Boogie Subway Rocket with Reverb Owner's Manual
With reverb
Hide thumbs
Also See for Subway Rocket with Reverb:
- Owner's manual (54 pages) ,
- Operating instructions manual (24 pages) ,
- Owner operating instructions (11 pages)

Related Manuals for Mesa/Boogie Subway Rocket with Reverb


Summary of Contents for Mesa/Boogie Subway Rocket with Reverb
- Page 1 with Reverb Owner’s Manual The Spirit of Art in Technology 1317 Ross Street, Petaluma, CA 94954 USA...
- Page 2 Mesa/Boogie circuits that led to the refinement of your new instru- ment. Feel confident, as we do, this amp will inspire many hours of musical satisfaction and lasting enjoyment.
-
Page 3: Table Of Contents
TABLE OF CONTENTS Precautions ___________________________________________________________ Page # Overview: __________________________________________________________________ 1 FRONT PANEL: Description & Usage Power-Up / nstrument Input ___________________________________________________ 2 Connecting Footswitch_______________________________________________________ 2 Mode Select (sample settings) _________________________________________________ 2 CONTROLS ________________________________________________________________ 3 Gain ______________________________________________________________________ 3 Master _____________________________________________________________________ 3 Treble _____________________________________________________________________ 7 Middle Bass Reverb... - Page 4 Your MESA/Boogie Amplifier is a professional instrument. Please treat it with respect and operate it properly. USE COMMON SENSE AND ALWAYS OBSERVE THESE PRECAUTIONS: Do not expose amplifier to moisture, rain or water, direct sunlight or extremely high temperatures. Always insure that amplifier is properly grounded.
-
Page 5: Overview
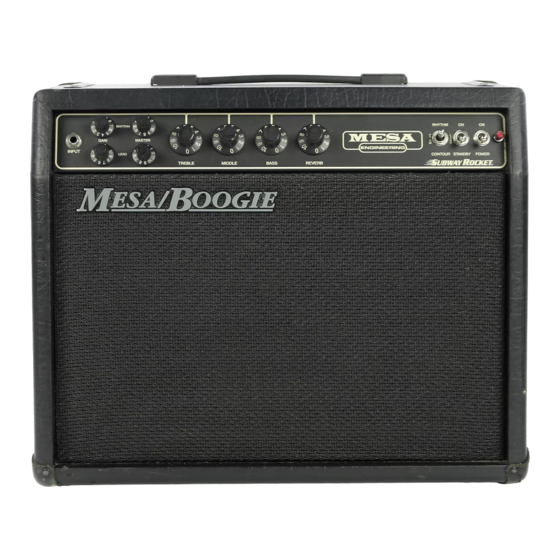
Operating Instructions OVERVIEW: The SUBWAY ROCKET ushers in a new era of compact, portable and affordable combo amplification that boasts no compromise, quality construction throughout. Don’t let small size and the sparse layout fool you...the ROCKET is an extremely versatile single channel, Tri-Modal amplifier that provides a georgious clean sound, a soaring high gain lead and a giant, grinding crunch - way too big for its humble size. -
Page 6: Mode Select (Sample Settings)
FRONT PANEL POWER-UP: First familiarize yourself with the front and rear panels of your new ROCKET. 1.) Connect your favorite guitar to the instrument INPUT jack. Now turn the power switch “ON” while leaving the STANDBY switch set to “STANDBY.” It is always a good idea to practice this start up procedure as at least 30 seconds of warm-up time lessens the shock on cold power tubes, thus prolonging their toneful life substantially. -
Page 7: Controls
CONTROLS: GAIN: This is by far the most powerful control in each of the three different Modes that are activated by the Mode switch. It not only determines the overall gain amount, shape and sensitivity of the Mode selected...but it is also a powerful tone control. Generally speaking, whatever is dialed up here ultimately determines the Modes’... -
Page 8: Middle
CONTROLS: (Continued) MIDDLE: Through endless daily tone dreaming, the “if-only” design dictum led to the MID control that doubles as a dial-in gain boost. From to about the taper is adjusted to act as a very effective MID control. As you increase the MID to and above, you will hear the lower MIDS getting more pronounced and fatter. -
Page 9: Toggle Switches
TOGGLE SWITCHES: RHYTHM, LEAD OR CONTOUR: Use this toggle to select one of the three Modes - RHYTHM - LEAD - CONTOUR. This toggle can also take the place of the remote footswitch when there isn’t one handy. RHYTHM CONTOUR STANDBY POWER ON / STANDBY: Perfect for set breaks...this toggle switch also serves an even more important purpose. -
Page 10: Record / Phones
REAR PANEL: (Continued) RECORD / PHONES: This jack provides direct-to-console interfacing for recording or sound reinforcement applications. It can also be used to power a set of personal headphones which is a convenient way to practice day or night privately. It is a circuit dedicated to reproducing the roll off that occurs in the output section with a speaker connected. -
Page 11: Silent Recording
REAR PANEL: (Continued) SILENT RECORDING: This rocker switch which is located down under the chassis and selects between the live “Speaker On” setting and the silent “Speaker Mute” setting. This is a perfect solution for all-nighters! This switch mutes all of the signal at th e power section driver stage, removing the need for a speaker load IN THIS POSITION ONLY! NOTE: When this switch is set to the ON position, a speaker load must be maintained by either a load resistor of some type or a speaker itself. -
Page 12: Personal Setting Page
Personal Settings Page RHYTHM GAIN MASTER INPUT CONTOUR STANDBY POWER LEAD TREBLE MIDDLE BASS REVERB RHYTHM GAIN MASTER INPUT CONTOUR STANDBY POWER LEAD TREBLE MIDDLE BASS REVERB RHYTHM GAIN MASTER INPUT CONTOUR STANDBY POWER LEAD TREBLE MIDDLE BASS REVERB RHYTHM GAIN MASTER INPUT... -
Page 13: Tube Noise & Microphonics
TUBE NOISE & MICROPHONICS: You may occasionally experience some form of tube noise or microphonics. Certainly no cause for alarm, this quirky behavior comes with the territory and the Tone. Much like changing a light bulb, you don’t need a technician to cure these types of minor user serviceable annoyances and in fact, you’ll be amazed at how easy it is to cure tube problems...by simply swapping out a pre-amp or power tube! First may we suggest that you set the amplifier up on something so that you can get to the tubes comfortably without having to bend... -
Page 14: Diagnosing Pre-Amp Tube Problems
DIAGNOSING PRE-AMP TUBE PROBLEMS: Because your amplifier is an all tube design, it is quite possible that you will at some point experience minor pre-amp tube noise. Rest assured - this is no cause for alarm and you can take care of the problem yourself in a matter of minutes by simply swapping tubes. Let us begin by saying;... -
Page 15: Bias Adjustment
BIAS ADJUSTMENT: (Part of a continuing series) NOTE: An article written by Randall Smith that BEAM- CONFINING we thought you might find interesting. ELECTRODE CATHODE GRID ..Here’s a question we often hear: SCREEN . - Page 16 BIAS ADJUSTMENT (Continued) doing is establishing the correct amount of idle CURRENT that flows through the power tubes. But you can’t adjust the current directly, you can only change it by adjusting the amount of bias VOLTAGE that goes onto the tu bes’ control grids.
-
Page 17: Rear View
FRONT VIEW SUBWAY ROCKET SWITCHES pt# 605373 KNOB pt# SWITCH pt# 601073 JACK pt# (all four) 409124 KNOB pt# (all four) 408115 610120 RHYTHM POT pt# POT pt# 592739 592151 POT pt# POT pt# POT pt# POT pt# GAIN MASTER 592736 592148 592150... - Page 18 OOGIE The Spirit of Art in Technology Thank you for trusting MESA/Boogie to be your amplifier company. We wish you many years of toneful enjoyment from this handbuilt all tube instrument.
- Page 19 The Spirit of Art in Technology 1317 Ross Street Petaluma, CA 94954...
Need help?
Do you have a question about the Subway Rocket with Reverb and is the answer not in the manual?
Questions and answers