JVC KD-R810 Instructions Manual
Cd receiver
Hide thumbs
Also See for KD-R810:
- Specifications (2 pages) ,
- Instruction manual (145 pages) ,
- Instructions manual (66 pages)
Table of Contents
Advertisement
KD-A815/KD-R810
CD RECEIVER / RECEPTOR CON CD /
RÉCEPTEUR CD
For canceling the display demonstration, see page 4. / Para cancelar la demostración en pantalla,
consulte la página 4. / Pour annuler la démonstration des affichages, référez-vous à la page 4.
For installation and connections, refer to the separate manual.
Para la instalación y las conexiones, refiérase al manual separado.
Pour l'installation et les raccordements, se référer au manuel séparé.
MANUEL D'INSTRUCTIONS
INSTRUCTIONS
MANUAL DE INSTRUCCIONES
ENGLISH
ESPAÑOL
FRANÇAIS
For customer Use:
Enter below the Model
No. and Serial No. which
are located on the top or
bottom of the cabinet.
Retain this information
for future reference.
Model No.
Serial No.
GET0651-001A
[J]
Advertisement
Chapters
Table of Contents
Troubleshooting

Related Manuals for JVC KD-R810


Summary of Contents for JVC KD-R810
- Page 1 ENGLISH ESPAÑOL FRANÇAIS KD-A815/KD-R810 CD RECEIVER / RECEPTOR CON CD / RÉCEPTEUR CD For canceling the display demonstration, see page 4. / Para cancelar la demostración en pantalla, consulte la página 4. / Pour annuler la démonstration des affichages, référez-vous à la page 4.
- Page 2 INFORMATION (For U.S.A.) This equipment has been tested and found to comply with the limits for a Class B digital device, pursuant to Part 15 of the FCC Rules. These limits are designed to provide reasonable protection against harmful interference in a residential installation. This equipment generates, uses, and can radiate radio frequency energy and, if not installed and used in accordance with the instructions, may cause harmful interference to radio communications.
-
Page 3: Table Of Contents
Thank you for purchasing a JVC product. How to read this manual Please read all instructions carefully before The following icons/symbols are used to operation, to ensure your complete indicate: understanding and to obtain the best possible Press and hold the button(s) performance from the unit. -
Page 4: Setting The Clock
Canceling the display demonstration Turn on the power. Select <Off>. DEMO SET UP Finish the procedure. DEMO [Hold] Clock PRO EQ (Initial setting) Select <DEMO>. DEMO Setting the clock Turn on the power. Select <24H/12H>. Clock Set Clock 24H/12H Clock Adjust SET UP DEMO Select <24Hours>... -
Page 5: Preparing The Remote Controller (Rm-Rk50)
Preparing the remote controller (RM-RK50) Warning (to prevent accidents and When you use the remote controller for the first time, pull out the insulation sheet. damage): • Do not install any battery other than CR2025 or its equivalent. • Do not leave the remote controller in a place (such as dashboards) exposed to direct sunlight for a long time. -
Page 6: Basic Operations
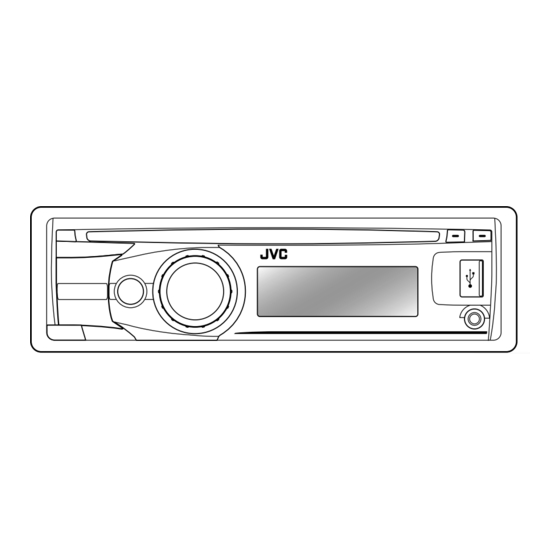
Basic operations Ejects the disc Loading slot Display window USB (Universal Serial Bus) input terminal Detaches the panel Control dial Auxiliary input Remote sensor jack • DO NOT expose to bright sunlight. When you press or hold the following button(s)... Remote Main unit General operation... - Page 7 Remote Main unit General operation controller Selects the sound mode. • Enters tone level adjustment directly ( 28 ) if pressed and held EQ/BASS-TRE on the main unit. • Enters “Call Menu” screen * or answers incoming call when the unit rings.
-
Page 8: Listening To The Radio
Listening to the radio Ÿ ] “FM” or “AM” lights up when receiving an FM stereo broadcast with sufficient signal strength. Manual search Automatic presetting (FM)— “M” appears, then press SSM (Strong-station Sequential Memory) the button repeatedly. You can preset up to 18 stations for FM. [Hold] While listening to a station... -
Page 9: Title Assignment
Manual presetting (FM/AM) Title assignment You can preset up to 18 stations for FM and 6 You can assign titles up to 30 station stations for AM. frequencies (FM and AM) using 8 characters (maximum) for each title. Ex.: Storing FM station of 92.50 MHz into preset •... -
Page 10: Listening To A Disc
Listening to a disc Ÿ ] Turn on the power. All tracks will be played repeatedly until you change the source or eject the disc. Stopping playback and ejecting Selecting a folder/track on the the disc list “No Disc” appears. While listening to a disc.. -
Page 11: Listening To The Usb Device
3 Turn the control dial to select your desired track. Then press the control dial to confirm. • Only the existing characters will be shown on Repeat the search menu. • Press and hold 5/∞ to continuously change Track : Repeats current track Folder : Repeats current folder the character of the search menu. - Page 12 ] Turn on the power. Ÿ USB cable from the USB input rear of the unit terminal and / or USB memory All tracks will be played repeatedly until you change the source or detach the USB device. If you have turned off the power (without •...
-
Page 13: Using The Bluetooth ® Device
Using the Bluetooth ® device Bluetooth is a short-range wireless radio communication technology for the mobile device such as mobile phones, portable PCs, and other devices. The Bluetooth devices can be connected without cables and communicate with each other. • Refer to page 4 of the Installation/Connection Manual (separate volume) to check the countries where you may use the Bluetooth®... - Page 14 Pairing a device Use the Bluetooth device to search. When you connect a Bluetooth device to the On the device to be connected, enter the same PIN code you have just unit for the first time, make pairing between entered for this unit. the unit and the device.
-
Page 15: Using A Bluetooth Mobile Phone
Deleting a registered device [Hold] ] Select a device you want to connect. • “Connecting...” appears, then “Connected [Device Name]” appears on the display when the device is ] <Bluetooth> ] <Delete Pairing> connected. Using a Bluetooth mobile phone ] Select a device you want to delete. “Delete OK?”... - Page 16 How to enter phone number • Phonebook * : Shows the name/ 1 Turn the control dial to select a number. phone number of the phonebook 2 Press 4 /¢ to move the entry registered in the unit or from the position.
- Page 17 Receiving/ending a phone call When a call comes in, the source is automatically changed to “BT FRONT/BT REAR.” “Receiving... [Phone number/name]” appears on the display. ] Show the search menu (A to Z, 0 to • The display will flash in blue. (<Ring Color>, 9, and OTHERS).
-
Page 18: Using A Bluetooth Audio Player
Switching the connected mobile phone Using a Bluetooth audio You can switch the current connected mobile player phone to the last connected mobile phone. Operations and display indications differ [Hold] depending on their availability on the connected device. Phone icon appears and “Connecting” flashes on the display. -
Page 19: Changing The Bluetooth Settings
Selecting the playback modes Warning messages • For Bluetooth devices that support AVRCP 1.3. Connection Error The device is registered but the connection has failed. Use <Connect Phone / Connect [Hold] Audio> to connect the device again. Error Try the operation again. If “Error” appears again, check if the device supports the ] “Repeat”... - Page 20 Setting item Selectable setting, [ Initial: Underlined Auto Connect • Last : The connection is established automatically with the last connected Bluetooth device when you turn on the unit. • Off : The unit does not connect the Bluetooth device automatically. Connect the device manually.
-
Page 21: Listening To The Hd Radio ™ Broadcast
Listening to the HD Radio ™ Broadcast Before operating, connect HD Radio tuner box, Select your desired channel. KT-HD300 (not supplied) to the expansion port HD1 j HD2 j ..j HD8 on the rear of the unit. j (back to the beginning) •... -
Page 22: Listening To The Satellite Radio
• This setting cannot take effect for the Using the remote controller conventional FM/AM stations. 5 U / D ∞ : Changes the preset • If the radio station forces the reception stations mode to digital or analog, the 2 R / F 3 : Searches for stations indicator lights up. -
Page 23: Storing Channels In Memory
Activate your SIRIUS subscription after Checking the satellite radio ID connection While selecting “SIRIUS” or “XM”... ] “SIRIUS” ] Select “Channel 0.” SIRIUS Satellite radio starts updating all SIRIUS: SIRIUS identification number is the SIRIUS channels. Once completed, displayed after “Channel 0” is selected. SIRIUS Satellite radio tunes in to the XM: The display alternately shows “RADIO ID”... -
Page 24: Listening To The Ipod/Iphone
Selecting preset station/category/ Using the remote controller channel on the list 5 U / D ∞ : Changes the categories 2 R / F 3 : Changes the channels 2 R / F 3 : Changes the channels ] Shows the “List” screen. [Hold] rapidly Information:... - Page 25 The operations explained below are under <Headunit Mode>. ] Turn on the power. Ÿ USB input iPod/iPhone terminal USB 2.0 cable (accessory of the iPod/iPhone) and/or USB cable from the rear of the unit iPod/iPhone USB 2.0 cable (accessory of the iPod/iPhone) Playback starts automatically.
- Page 26 Selecting a track from the menu • Only the existing characters will be shown on the search menu. The following is not applicable in <iPod Mode> • Press and hold 5/∞ to continuously change and <External Mode>. the character of the search menu. •...
-
Page 27: Listening To The Other External Components
Using the remote controller The following is not applicable in <External Mode>. 2 R / F 3 : Selects track or chapter 2 R / F 3 : Fast-forwards or reverses the track [Hold] Listening to the other external components You can connect an external component to: •... -
Page 28: Selecting A Preset Sound Mode
Selecting a preset sound mode You can select a preset sound mode suitable Storing your own sound mode for the music genre. You can store your own adjustments in memory. FLAT = NATURAL = DYNAMIC = VOCAL [Hold] = BASS = USER = (back to the beginning) While listening, you can adjust the tone level of the selected sound mode. -
Page 29: Menu Operations
Menu operations Repeat step 2 if necessary. [Hold] • To return to the previous menu, press BACK. • To exit from the menu, press DISP or MENU. Category Menu item Selectable setting, [ Initial: Underlined DEMO • On : Display demonstration will be activated Display demonstration automatically if no operation is done for about 20 seconds. - Page 30 Category Menu item Selectable setting, [ Initial: Underlined Button Zone Color 01 — : For settings, Color 29, Display Zone User, Color All Zone Flow 1, 2, 3 Day Color • Button Zone : For settings, 34, 35. • Display Zone Night Color Menu Color •...
- Page 31 Category Menu item Selectable setting, [ Initial: Underlined Subwoofer • LPF : Turn the control dial to select the cutoff frequency to the subwoofer. Off: All signals are sent to the subwoofer. LPF 55Hz/LPF 85Hz/LPF 120Hz: Frequencies higher than 55 Hz/85 Hz/120 Hz are cut off. •...
- Page 32 Category Menu item Selectable setting, [ Initial: Underlined Tag Display • On : Shows the Tag information while playing MP3/WMA/WAV tracks. • Off : Cancels. LCD Type • Negative : Negative pattern of the display. • Positive : Positive pattern of the display. •...
- Page 33 Category Menu item Selectable setting, [ Initial: Underlined Blend Hold * • Auto : Switch between digital and analog audio HD Radio automatically. ( 21, 22) reception mode • Analog : Tune in to analog audio only. • Digital : Tune in to digital audio only. Stereo/Mono * •...
- Page 34 Selecting the variable buttons and display color illumination You can select your preferred color for buttons illumination (except for EQ/BASS-TRE / DISP) and display color seperately. ] Select your preferred color from one of the 29 preset colors, <User> color, or <Color Flow 1/2/3>.
- Page 35 Ex.: Creating <User> color for <Button Zone> in <Day Color>. [Hold] ] Confirm the settings. ] <Color Setup> ] <Day Color> ] ] Exit from the setting. <Button Zone> If “00” is selected for all the primary colors (as in step 3) for <Display Zone>, nothing appear on the display.
-
Page 36: More About This Unit
More about this unit Basic operations • When a disc is inserted upside down, “Please Eject” appears on the display. Press 0 General to eject the disc. • If you turn off the power while listening to • If the ejected disc is not removed within a track, playback will start from where it had 15 seconds, it is automatically inserted into been stopped previously next time you turn... - Page 37 • Do not use the following CD-Rs or CD-RWs: • This unit cannot play back the following files: – Discs with stickers, labels, or a protective seal – MP3 files encoded in MP3i and MP3 PRO stuck to the surface. format.
-
Page 38: Bluetooth Operations
• This unit can play back MP3/WMA/WAV files Bluetooth operations meeting the conditions below: • While driving, do not perform complicated MP3: operation such as dialing the numbers, using – Bit rate: 32 kbps — 320 kbps (for MPEG-1) phonebook, etc. When you perform these 8 kbps —... - Page 39 HD Radio reception Menu operations • HD Radio broadcasting can normally • <Auto> setting for <Dimmer> may not work be received in the USA, and it may also correctly on some vehicles, particularly on be received in countries where limited those having a control dial for dimming.
- Page 40 • Microsoft and Windows Media are either registered trademarks or trademarks of Microsoft Corporation in the United States and/or other countries. • The Bluetooth word mark and logos are owned by the Bluetooth SIG, Inc. and any use of such marks by Victor Company of Japan, Limited (JVC) is under license.
-
Page 41: Maintenance
Maintenance How to clean the connectors To keep discs clean Frequent detachment will deteriorate the A dirty disc may not play connectors. correctly. If a disc does become dirty, wipe it with a soft cloth To minimize this possibility, periodically wipe the connectors with a cotton swab or cloth in a straight line from center to moistened with alcohol, being careful not to... -
Page 42: Troubleshooting
Troubleshooting Symptom Remedy/Cause Sound cannot be heard from the • Adjust the volume to the optimum level. speakers. • Make sure the unit is not muted/paused ( • Check the cords and connections. The unit does not work at all. Reset the unit. - Page 43 Symptom Remedy/Cause Disc cannot be played back. • Use a disc with MP3/WMA tracks recorded in a format compliant with ISO 9660 Level 1, Level 2, Romeo, or Joliet. • Add the extension code <.mp3> or <.wma> to the file names.
- Page 44 Symptom Remedy/Cause Noise is generated. The track played back is not an MP3/WMA/WAV track. Skip to another file. (Do not add the extension code <.mp3>, <.wma>, or <.wav> to non-MP3/WMA/WAV tracks.) “Reading” keeps flashing on the • Readout time varies depending on the USB device. display.
- Page 45 Symptom Remedy/Cause The unit does not detect the • Search from the Bluetooth device again. Bluetooth device. • Reset the unit ( 3), then search from the Bluetooth device again. The unit does not make pairing Enter the same PIN code for both the unit and target with the Bluetooth device.
- Page 46 Symptom Remedy/Cause “CALL 1-888-539-SIRIUS TO SUBSCRIBE” Starts subscribing to SIRIUS Satellite radio. scrolls on the display while listening to the SIRIUS Satellite radio. No sound can be heard. “Updating” The unit is updating the channel information appears on the display. and it takes a few minutes to complete.
- Page 47 Symptom Remedy/Cause The iPod does not turn on or does not • Check the connecting cable and its work. connection. • Update the firmware version of the iPod/ iPhone. • Charge the battery of the iPod/iPhone. • Reset the iPod/iPhone. •...
-
Page 48: Specifications
Frequency Response: 40 Hz to 20 000 Hz Line-Out/subwoofer-Out Level/ KD-A815: 5.0 V/20 kΩ load (full scale) Impedance: KD-R810: 2.5 V/20 kΩ load (full scale) Output Impedance: 1 kΩ Other Terminal: AUX (auxiliary) input jack, USB input terminal, USB cable, Antenna input, Expansion port, Steering... - Page 49 Type: Compact disc player Signal Detection System: Non-contact optical pickup (semiconductor laser) Number of Channels: 2 channels (stereo) Frequency Response: 5 Hz to 20 000 Hz Dynamic Range: 96 dB Signal-to-Noise Ratio: 98 dB Wow and Flutter: Less than measurable limit MP3 Decoding Format: (MPEG1/2 Audio Layer 3) Max.
- Page 50 Having TROUBLE with operation? Please reset your unit Refer to page of How to reset your unit Still having trouble?? USA ONLY Call 1-800-252-5722 http://www.jvc.com We can help you! EN, SP, FR © 2010 Victor Company of Japan, Limited 0110DTSMDTJEIN...
- Page 51 KD-A815/KD-R810 Installation/Connection Manual Manual de instalación/conexión Manuel d’installation/raccordement GET0651-002A 0110DTSMDTJEIN EN, SP, FR © 2010 Victor Company of Japan, Limited ENGLISH / ESPAÑOL / FRANÇAIS You need the installation kits which corresponds to your car. / Check the battery system in your car / Verifique el sistema de batería To the car system / Al sistema de automóvil...
- Page 52 ELECTRICAL CONNECTIONS / CONEXIONES ELECTRICAS / RACCORDEMENTS ELECTRIQUES IMPORTANT: A custom wiring harness (separately purchased) which IMPORTANTE: Para la conexión entre la unidad y su vehículo, se IMPORTANT: Un faisceau de câbles personnalisé (vendu séparément) is suitable for your car is recommended for connection between the recomienda utilizar un mazo de cables personalizado (vendido correspondant à...
- Page 53 Connecting the microphone unit / Conexión de la unidad de micrófono / Connexion du microphone G Microphone / Micrófono / Microphone or / o / ou Secure the microphone cord using cord cramps * if necessary. / H Microphone clip / Presilla para micrófono / Si es necesario, asegure el cable del micrófono por medio de H Microphone clip / Presilla para micrófono / Attache de microphone...
- Page 54 The countries where you may use the Country Country Country Bluetooth® function Andorra Ísland Türkiye Italia United States of America Australia Lichtenstein Venezuela Österreich Lietuva Vietnam Bosna i Hercegovina Vi t Nam Luxemburg Belgien South Africa Luxembourg Belgique Lëtzebuerg ENingizimu Afrika България...
- Page 55 ENGLISH FRANÇAIS KD-R811 CD RECEIVER / RÉCEPTEUR CD For canceling the display demonstration, see page 4. / Pour annuler la démonstration des affichages, référez-vous à la page 4. For installation and connections, refer to the separate manual. / Pour l’installation et les raccordements, se référer au manuel séparé.
- Page 56 Thank you for purchasing a JVC product. Please read all instructions carefully before operation, to ensure your complete understanding and to obtain the best possible performance from the unit. IMPORTANT FOR LASER PRODUCTS 1. CLASS 1 LASER PRODUCT 2. CAUTION: Do not open the top cover. There are no user serviceable parts inside the unit; leave all servicing to qualified service personnel.
-
Page 57: How To Read This Manual
How to read this manual CONTENTS The following icons/symbols are used to How to read this manual indicate: How to attach/detach the control Press and hold the button(s) panel [Hold] until the desired operation How to reset your unit begins. How to forcibly eject a disc Canceling the display Turn the control dial. -
Page 58: Canceling The Display Demonstration
Canceling the display demonstration Turn on the power. Select <Off>. DEMO SET UP Finish the procedure. DEMO [Hold] Clock PRO EQ (Initial setting) Select <DEMO>. DEMO Setting the clock Turn on the power. Select <24H/12H>. Clock Set Clock 24H/12H Clock Adjust SET UP DEMO Select <24Hours>... -
Page 59: Preparing The Remote Controller (Rm-Rk50)
Preparing the remote controller (RM-RK50) Warning (to prevent accidents and When you use the remote controller for the first time, pull out the insulation sheet. damage): • Do not install any battery other than CR2025 or its equivalent. • Do not leave the remote controller in a place (such as dashboards) exposed to direct sunlight for a long time. -
Page 60: Basic Operations
Basic operations Ejects the disc Loading slot Display window USB (Universal Serial Bus) input terminal Detaches the panel Auxiliary input jack Control dial Remote sensor • DO NOT expose to bright sunlight. When you press or hold the following button(s)... Remote Main unit General operation... - Page 61 Remote Main unit General operation controller Selects the sound mode. • Enters tone level adjustment directly ( 26 ) if pressed and held EQ/BASS-TRE on the main unit. • Enters “Call Menu” screen * or answers incoming call when the unit rings.
-
Page 62: Listening To The Radio
Listening to the radio Ÿ ] “FM” or “AM” lights up when receiving an FM stereo broadcast with sufficient signal strength. Manual search Automatic presetting (FM)— “M” appears, then press SSM (Strong-station Sequential Memory) the button repeatedly. You can preset up to 18 stations for FM. [Hold] While listening to a station... - Page 63 Manual presetting (FM/AM) The following features are available You can preset up to 18 stations for FM and 6 only for FM Radio Data System stations. stations for AM. Searching for your favourite Ex.: Storing FM station of 92.50 MHz into preset FM Radio Data System number “4.”...
- Page 64 Standby receptions Tracing the same programme— Network-Tracking Reception TA Standby Reception When driving in an area where FM reception is TA Standby Reception allows the unit to switch not sufficient enough, this unit automatically temporarily to Traffic Announcement (TA) from tunes in to another FM Radio Data System any source other than AM.
-
Page 65: Listening To A Disc
Listening to a disc Ÿ ] Turn on the power. All tracks will be played repeatedly until you change the source or eject the disc. Stopping playback and ejecting Selecting a folder/track on the the disc list “No Disc” appears. While listening to a disc.. -
Page 66: Listening To The Usb Device
2 Press 5/∞ to select your desired character. Selecting the playback modes Then press the control dial to confirm. You can use only one of the following playback • The track list with the selected character modes at a time. appears. - Page 67 ] Turn on the power. Ÿ USB cable from the USB input rear of the unit terminal and / or USB memory All tracks will be played repeatedly until you change the source or detach the USB device. If you have turned off the power (without •...
-
Page 68: Using The Bluetooth ® Device
Using the Bluetooth ® device Bluetooth is a short-range wireless radio communication technology for the mobile device such as mobile phones, portable PCs, and other devices. The Bluetooth devices can be connected without cables and communicate with each other. • Refer to pages i and ii at the end of the manual to check the countries where you may use the Bluetooth®... - Page 69 Pairing a device Use the Bluetooth device to search. When you connect a Bluetooth device to the On the device to be connected, enter the same PIN code you have just unit for the first time, make pairing between entered for this unit. the unit and the device.
-
Page 70: Using A Bluetooth Mobile Phone
Deleting a registered device [Hold] ] Select a device you want to connect. • “Connecting...” appears, then “Connected [Device Name]” appears on the display when the device is ] <Bluetooth> ] <Delete Pairing> connected. Using a Bluetooth mobile phone ] Select a device you want to delete. “Delete OK?”... - Page 71 How to enter phone number • Phonebook * : Shows the name/ 1 Turn the control dial to select a number. phone number of the phonebook 2 Press 4 /¢ to move the entry registered in the unit or from the position.
- Page 72 Receiving/ending a phone call When a call comes in, the source is automatically changed to “BT FRONT/BT REAR.” “Receiving... [Phone number/name]” appears on the display. ] Show the search menu (A to Z, 0 to • The display will flash in blue. (<Ring Color>, 9, and OTHERS).
-
Page 73: Using A Bluetooth Audio Player
Switching the connected mobile phone Using a Bluetooth audio You can switch the current connected mobile player phone to the last connected mobile phone. Operations and display indications differ [Hold] depending on their availability on the connected device. Phone icon appears and “Connecting” flashes ] Select “BT FRONT”... -
Page 74: Changing The Bluetooth Settings
Selecting the playback modes Warning messages • For Bluetooth devices that support AVRCP 1.3. Connection Error The device is registered but the connection has failed. Use <Connect Phone / Connect [Hold] Audio> to connect the device again. Error Try the operation again. If “Error” appears again, check if the device supports the ] “Repeat”... - Page 75 Setting item Selectable setting, [ Initial: Underlined Auto Connect • Last : The connection is established automatically with the last connected Bluetooth device when you turn on the unit. • Off : The unit does not connect the Bluetooth device automatically. Connect the device manually.
-
Page 76: Listening To The Ipod/Iphone
Listening to the iPod/iPhone You can connect the iPod/iPhone using the USB 2.0 cable (accessory of the iPod/iPhone) to the USB input terminal on the control panel or USB cable from the rear of the unit. There are three control terminals: •... - Page 77 Stopping playback and • If the selected menu contains many tracks, you can fast search (±10, ±100, ±1000) detaching the iPod/iPhone through the menu by turning the control dial Straightly pull the USB 2.0 cable out from the quickly. unit. •...
- Page 78 Selecting the playback modes Using the remote controller The following is not applicable in <iPod Mode> The following is not applicable in and <External Mode>. <External Mode>. 2 R / F 3 : Selects track or chapter 2 R / F 3 [Hold] : Fast-forwards or [Hold]...
-
Page 79: Listening To The Other External Components
Listening to the other external components You can connect an external component to the AUX (auxiliary) input jack on the control panel. • For details, refer also to the instructions supplied with the external components. Preparation: Make sure <Show> is selected for the <Source Select> = <Aux Source> setting. ] “AUX IN”... -
Page 80: Selecting A Preset Sound Mode
Selecting a preset sound mode You can select a preset sound mode suitable Storing your own sound mode for the music genre. You can store your own adjustments in memory. FLAT = NATURAL = DYNAMIC = VOCAL [Hold] = BASS = USER = (back to the beginning) While listening, you can adjust the tone level of the selected sound mode. -
Page 81: Menu Operations
Menu operations Repeat step 2 if necessary. [Hold] • To return to the previous menu, press T/P BACK. • To exit from the menu, press DISP or MENU. Category Menu item Selectable setting, [ Initial: Underlined DEMO • On : Display demonstration will be activated Display demonstration automatically if no operation is done for about 20 seconds. - Page 82 Category Menu item Selectable setting, [ Initial: Underlined Ring Color * • On : When a call comes in, the display will flash in blue. • The display will change to the original color when the call is answered or the incoming call stops.
- Page 83 Category Menu item Selectable setting, [ Initial: Underlined Beep • On : Activates the keypress tone. Keytouch tone • Off : Deactivates the keypress tone. Amplifier • High Power : Vol 00 – Vol 50 Gain * • Low Power : Vol 00 –...
- Page 84 Category Menu item Selectable setting, [ Initial: Underlined : For Bluetooth operations, 15 – 18. : For Bluetooth settings, 20, 21. SSM * • SSM 01 – 06 : For settings, Strong-station • SSM 07 – 12 Sequential • SSM 13 – 18 Memory AF Regional * •...
- Page 85 Category Menu item Selectable setting, [ Initial: Underlined AM Source * • Show : Enable “AM” in source selection. • Hide : Disable “AM” in source selection. AUX Source * • Show : Enable “AUX IN” in source selection. • Hide : Disable “AUX IN”...
- Page 86 Selecting the variable buttons and display color illumination You can select your preferred color for buttons illumination (except for EQ/BASS-TRE / DISP) and display color seperately. ] Select your preferred color from one of the 29 preset colors, <User> color, or <Color Flow 1/2/3>.
- Page 87 Ex.: Creating <User> color for <Button Zone> in <Day Color>. ] Confirm the settings. [Hold] ] Exit from the setting. If “00” is selected for all the primary colors (as in ] <Color Setup> ] <Day Color> ] step 3) for <Display Zone>, nothing appear on <Button Zone>...
-
Page 88: More About This Unit
More about this unit Basic operations Disc/USB operations General Caution for DualDisc playback • If you turn off the power while listening to • The Non-DVD side of a “DualDisc” does not a track, playback will start from where it had comply with the “Compact Disc Digital Audio”... - Page 89 Playing a CD-R or CD-RW • This unit can display only one-byte characters. No other characters can be correctly • Use only “finalized” CD-Rs or CD-RWs. displayed. • This unit can only play back files of the same • This unit can play back MP3/WMA files type as those detected first if a disc includes meeting the conditions below: both audio CD (CD-DA) files and MP3/WMA...
- Page 90 Playing MP3/WMA/WAV tracks from a • The maximum number of characters for folder and file names is 25 characters (including USB device <.mp3>, <.wma>, <.wav>); 128 characters for • While playing from a USB device, the playback MP3/WMA/WAV Tag. order may differ from other players. •...
- Page 91 • Connecting condition may vary depending • It is not possible to browse video files on the on the circumstances around you. “Videos” menu in <Headunit Mode>. • If you turn off the unit, detach the control • If the iPod does not play correctly, please panel, or unplug the USB Bluetooth Adapter update your iPod software to the latest during a phone call conversation, the...
- Page 92 • Microsoft and Windows Media are either registered trademarks or trademarks of Microsoft Corporation in the United States and/or other countries. • The Bluetooth word mark and logos are owned by the Bluetooth SIG, Inc. and any use of such marks by Victor Company of Japan, Limited (JVC) is under license.
-
Page 93: Maintenance
Maintenance How to clean the connectors To keep discs clean Frequent detachment will deteriorate the A dirty disc may not play connectors. correctly. If a disc does become dirty, wipe it with a soft cloth To minimize this possibility, periodically wipe the connectors with a cotton swab or cloth in a straight line from center to moistened with alcohol, being careful not to... -
Page 94: Troubleshooting
Troubleshooting Symptom Remedy/Cause Sound cannot be heard from the • Adjust the volume to the optimum level. speakers. • Make sure the unit is not muted/paused ( • Check the cords and connections. The unit does not work at all. Reset the unit. - Page 95 Symptom Remedy/Cause Disc cannot be played back. • Use a disc with MP3/WMA tracks recorded in a format compliant with ISO 9660 Level 1, Level 2, Romeo, or Joliet. • Add the extension code <.mp3> or <.wma> to the file names.
- Page 96 Symptom Remedy/Cause Noise is generated. The track played back is not an MP3/WMA/WAV track. Skip to another file. (Do not add the extension code <.mp3>, <.wma>, or <.wav> to non-MP3/WMA/WAV tracks.) “Reading” keeps flashing on the • Readout time varies depending on the USB device. display.
- Page 97 Symptom Remedy/Cause Phone sound quality is poor. • Reduce the distance between the unit and the Bluetooth mobile phone. • Move the car to a place where you can get a better signal reception. The unit does not response You may have tried to copy the same entries (as stored) when you tried to copy the to the unit.
-
Page 98: Specifications
Specifications Maximum Power Output: Front/ 50 W per channel Rear: Continuous Power Output (RMS): Front/ 20 W per channel into 4 Ω, 40 Hz to Rear: 20 000 Hz at no more than 1% total harmonic distortion. Load Impedance: 4 Ω (4 Ω to 8 Ω allowance) Tone Control Range: Bass: ±12 dB (50 Hz, 100 Hz, 200 Hz) - Page 99 Type: Compact disc player Signal Detection System: Non-contact optical pickup (semiconductor laser) Number of Channels: 2 channels (stereo) Frequency Response: 5 Hz to 20 000 Hz Dynamic Range: 96 dB Signal-to-Noise Ratio: 98 dB Wow and Flutter: Less than measurable limit MP3 Decoding Format: (MPEG1/2 Audio Layer 3) Max.
- Page 100 The countries where you may use the Bluetooth® function nh ng qu c gia mà b n có th s d ng ch c n ng Bluetooth ®...
- Page 101 Country Country Country Andorra Ísland Türkiye Italia United States of America Australia Lichtenstein Venezuela Österreich Lietuva Vietnam Bosna i Hercegovina Vi t Nam Luxemburg Belgien South Africa Luxembourg Belgique ENingizimu Afrika Lëtzebuerg България Suid-Afrika Latvija Canada Monaco Schweiz Crna Gora Suisse Македонија...
- Page 102 KD-R811 Installation/Connection Manual Manuel d’installation/raccordement GET0653-010A 0110DTSMDTJEIN EN, FR © 2010 Victor Company of Japan, Limited ENGLISH / FRANÇAIS You need the installation kits which corresponds to your car. / Vous avez besoin des kits Check the battery system in your car / To the car system / Au système autoradio d’installation correspondants à...
- Page 103 ELECTRICAL CONNECTIONS / RACCORDEMENTS ELECTRIQUES Connecting the microphone unit / Connecting a subwoofer (through a JVC amplifier) / Connexion d'un caisson de Connexion du microphone grave (à travers un amplificateur JVC) G Microphone / Microphone Subwoofer / JVC Amplifier / Caisson de grave JVC Amplificateur H Microphone clip /...
- Page 104 ENGLISH KD-R816 CD RECEIVER / For canceling the display demonstration, see page 4. / For installation and connections, refer to the separate manual. INSTRUCTIONS GET0652-001A [U/UH]...
- Page 105 Thank you for purchasing a JVC product. Please read all instructions carefully before operation, to ensure your complete understanding and to obtain the best possible performance from the unit. IMPORTANT FOR LASER PRODUCTS 1. CLASS 1 LASER PRODUCT 2. CAUTION: Do not open the top cover. There are no user serviceable parts inside the unit; leave all servicing to qualified service personnel.
-
Page 106: Panel How To Reset Your Unit
How to attach/detach the control CONTENTS panel How to read this manual How to attach/detach the control panel How to reset your unit How to forcibly eject a disc Canceling the display demonstration How to reset your unit Setting the clock Your preset adjustments Preparing the remote controller will also be erased (except... -
Page 107: Canceling The Display Demonstration
Canceling the display demonstration Turn on the power. Select <Off>. DEMO SET UP Finish the procedure. DEMO [Hold] Clock PRO EQ (Initial setting) Select <DEMO>. DEMO Setting the clock Turn on the power. Select <24H/12H>. Clock Set Clock 24H/12H SET UP DEMO Select <24Hours>... -
Page 108: Preparing The Remote Controller (Rm-Rk50)
Preparing the remote controller (RM-RK50) Warning (to prevent accidents and When you use the remote controller for the first time, pull out the insulation sheet. damage): • Do not install any battery other than CR2025 or its equivalent. • Do not leave the remote controller in a place (such as dashboards) exposed to direct sunlight for a long time. -
Page 109: Basic Operations
Basic operations Ejects the disc Loading slot Display window USB (Universal Serial Bus) input terminal Auxiliary input Detaches the panel jack Control dial Remote sensor • DO NOT expose to bright sunlight. When you press or hold the following button(s)... Remote Main unit General operation... - Page 110 Remote Main unit General operation controller Selects the sound mode. • Enters tone level adjustment directly ( 25 ) if pressed and held EQ/BASS-TRE on the main unit. • Enters “Call Menu” screen * or answers incoming call when the unit rings.
-
Page 111: Listening To The Radio
Listening to the radio Ÿ ] “FM” or “AM” lights up when receiving an FM stereo broadcast with sufficient signal strength. Manual search Automatic presetting (FM)— “M” appears, then press SSM (Strong-station Sequential Memory) the button repeatedly. You can preset up to 18 stations for FM. [Hold] While listening to a station... - Page 112 Manual presetting (FM/AM) Title assignment You can preset up to 18 stations for FM and 6 You can assign titles up to 30 station stations for AM. frequencies (FM and AM) using 8 characters (maximum) for each title. Ex.: Storing FM station of 92.50 MHz into preset •...
-
Page 113: Listening To A Disc
Listening to a disc Ÿ ] Turn on the power. All tracks will be played repeatedly until you change the source or eject the disc. Stopping playback and ejecting Selecting a folder/track on the the disc list “No Disc” appears. While listening to a disc.. -
Page 114: Listening To The Usb Device
3 Turn the control dial to select your desired track. Then press the control dial to confirm. • Only the existing characters will be shown on Repeat the search menu. • Press and hold 5/∞ to continuously change Track : Repeats current track Folder : Repeats current folder the character of the search menu. - Page 115 ] Turn on the power. Ÿ USB cable from the USB input rear of the unit terminal and / or USB memory All tracks will be played repeatedly until you change the source or detach the USB device. If you have turned off the power (without •...
-
Page 116: Using The Bluetooth ® Device
Using the Bluetooth ® device Bluetooth is a short-range wireless radio communication technology for the mobile device such as mobile phones, portable PCs, and other devices. The Bluetooth devices can be connected without cables and communicate with each other. • Refer to pages i and ii at the end of the manual to check the countries where you may use the Bluetooth®... - Page 117 Pairing a device Use the Bluetooth device to search. When you connect a Bluetooth device to the On the device to be connected, enter the same PIN code you have just unit for the first time, make pairing between entered for this unit. the unit and the device.
-
Page 118: Using A Bluetooth Mobile Phone
Deleting a registered device [Hold] ] Select a device you want to connect. • “Connecting...” appears, then “Connected [Device Name]” appears on the display when the device is ] <Bluetooth> ] <Delete Pairing> connected. Using a Bluetooth mobile phone ] Select a device you want to delete. “Delete OK?”... - Page 119 How to enter phone number • Phonebook * : Shows the name/ 1 Turn the control dial to select a number. phone number of the phonebook 2 Press 4 /¢ to move the entry registered in the unit or from the position.
- Page 120 Receiving/ending a phone call When a call comes in, the source is automatically changed to “BT FRONT/BT REAR.” “Receiving... [Phone number/name]” appears on the display. ] Show the search menu (A to Z, 0 to • The display will flash in blue. (<Ring Color>, 9, and OTHERS).
-
Page 121: Using A Bluetooth Audio Player
Switching the connected mobile phone Using a Bluetooth audio You can switch the current connected mobile player phone to the last connected mobile phone. Operations and display indications differ [Hold] depending on their availability on the connected device. Phone icon appears and “Connecting” flashes ] Select “BT FRONT”... -
Page 122: Changing The Bluetooth Settings
Selecting the playback modes Warning messages • For Bluetooth devices that support AVRCP 1.3. Connection Error The device is registered but the connection has failed. Use <Connect Phone / Connect [Hold] Audio> to connect the device again. Error Try the operation again. If “Error” appears again, check if the device supports the ] “Repeat”... - Page 123 Setting item Selectable setting, [ Initial: Underlined Auto Connect • Last : The connection is established automatically with the last connected Bluetooth device when you turn on the unit. • Off : The unit does not connect the Bluetooth device automatically. Connect the device manually.
-
Page 124: Listening To The Ipod/Iphone
Listening to the iPod/iPhone You can connect the iPod/iPhone using the USB 2.0 cable (accessory of the iPod/iPhone) to the USB input terminal on the control panel or USB cable from the rear of the unit. There are three control terminals: •... - Page 125 Selecting a track from the menu Caution: • Some of the applications in the connected The following is not applicable in <iPod Mode> iPod/iPhone may not work correctly with this and <External Mode>. unit. • Avoid using the iPod/iPhone if it might hinder your safety while driving.
- Page 126 Using the remote controller • Only the existing characters will be shown on the search menu. The following is not applicable in • Press and hold 5/∞ to continuously change <External Mode>. the character of the search menu. 2 R / F 3 : Selects track or chapter •...
-
Page 127: Listening To The Other External Components
Listening to the other external components You can connect an external component to the AUX (auxiliary) input jack on the control panel. • For details, refer also to the instructions supplied with the adapter or external components. Preparation: Make sure <Show> is selected for the <Source Select> = <Aux Source> setting. ] “AUX IN”... -
Page 128: Selecting A Preset Sound Mode
Selecting a preset sound mode You can select a preset sound mode suitable Storing your own sound mode for the music genre. You can store your own adjustments in memory. FLAT = NATURAL = DYNAMIC = VOCAL [Hold] = BASS = USER = (back to the beginning) While listening, you can adjust the tone level of the selected sound mode. -
Page 129: Menu Operations
Menu operations Repeat step 2 if necessary. [Hold] • To return to the previous menu, press BACK. • To exit from the menu, press DISP or MENU. Category Menu item Selectable setting, [ Initial: Underlined DEMO • On : Display demonstration will be activated Display demonstration automatically if no operation is done for about 20 seconds. - Page 130 Category Menu item Selectable setting, [ Initial: Underlined : Fad (fader): Press 5 / ∞ to adjust the front and Fad/Bal * R6 – F6, [ 0 ] Fader/balance rear speaker output balance. : Bal (balance): Press 4 / ¢ L6 –...
- Page 131 Category Menu item Selectable setting, [ Initial: Underlined Dimmer • Auto : Dims the display when you turn on the headlights. * • On : Dims the display and button illumination. • Time Set : Set the timer for dimmer. ( •...
- Page 132 Category Menu item Selectable setting, [ Initial: Underlined IF Band • Auto : Increases the tuner selectivity to reduce Intermediate interference noises between adjacent stations. frequency band (Stereo effect may be lost.) • Wide : Subject to interference noises from adjacent stations, but sound quality will not be degraded and the stereo effect will remain.
- Page 133 Selecting the variable buttons and display color illumination You can select your preferred color for buttons illumination (except for EQ/BASS-TRE / DISP) and display color seperately. ] Select your preferred color from one of the 29 preset colors, <User> color, or <Color Flow 1/2/3>.
- Page 134 Ex.: Creating <User> color for <Button Zone> in <Day Color>. [Hold] ] Confirm the settings. ] <Color Setup> ] <Day Color> ] ] Exit from the setting. <Button Zone> If “00” is selected for all the primary colors (as in step 3) for <Display Zone>, nothing appear on the display.
-
Page 135: More About This Unit
More about this unit Basic operations • When a disc is inserted upside down, “Please Eject” appears on the display. Press 0 General to eject the disc. • If you turn off the power while listening to • If the ejected disc is not removed within a track, playback will start from where it had 15 seconds, it is automatically inserted into been stopped previously next time you turn... - Page 136 • Do not use the following CD-Rs or CD-RWs: • This unit cannot play back the following files: – Discs with stickers, labels, or a protective seal – MP3 files encoded in MP3i and MP3 PRO stuck to the surface. format.
- Page 137 • This unit can play back MP3/WMA/WAV files Bluetooth operations meeting the conditions below: • While driving, do not perform complicated MP3: operation such as dialing the numbers, using – Bit rate: 32 kbps — 320 kbps (for MPEG-1) phonebook, etc. When you perform these 8 kbps —...
- Page 138 iPod/iPhone operations • Microsoft and Windows Media are either • You can control the following types of iPods/ registered trademarks or trademarks of iPhone: Microsoft Corporation in the United States and/or other countries. – iPod with video (5th Generation) * –...
-
Page 139: Maintenance
Maintenance How to clean the connectors To keep discs clean Frequent detachment will deteriorate the A dirty disc may not play connectors. correctly. If a disc does become dirty, wipe it with a soft cloth To minimize this possibility, periodically wipe the connectors with a cotton swab or cloth in a straight line from center to moistened with alcohol, being careful not to... -
Page 140: Troubleshooting
Troubleshooting Symptom Remedy/Cause Sound cannot be heard from the • Adjust the volume to the optimum level. speakers. • Make sure the unit is not muted/paused ( • Check the cords and connections. The unit does not work at all. Reset the unit. - Page 141 Symptom Remedy/Cause Disc cannot be played back. • Use a disc with MP3/WMA tracks recorded in a format compliant with ISO 9660 Level 1, Level 2, Romeo, or Joliet. • Add the extension code <.mp3> or <.wma> to the file names.
- Page 142 Symptom Remedy/Cause Noise is generated. The track played back is not an MP3/WMA/WAV track. Skip to another file. (Do not add the extension code <.mp3>, <.wma>, or <.wav> to non-MP3/WMA/WAV tracks.) “Reading” keeps flashing on the • Readout time varies depending on the USB device. display.
- Page 143 Symptom Remedy/Cause The unit does not detect the • Search from the Bluetooth device again. Bluetooth device. • Reset the unit ( 3), then search from the Bluetooth device again. The unit does not make pairing Enter the same PIN code for both the unit and target with the Bluetooth device.
- Page 144 Symptom Remedy/Cause The iPod does not turn on or does not • Check the connecting cable and its work. connection. • Update the firmware version of the iPod/ iPhone. • Charge the battery of the iPod/iPhone. • Reset the iPod/iPhone. •...
-
Page 145: Specifications
Specifications Maximum Power Output: Front/ 50 W per channel Rear: Continuous Power Output (RMS): Front/ 20 W per channel into 4 Ω, 40 Hz to Rear: 20 000 Hz at no more than 1% total harmonic distortion. Load Impedance: 4 Ω (4 Ω to 8 Ω allowance) Tone Control Range: Bass: ±12 dB (50 Hz, 100 Hz, 200 Hz) - Page 146 Type: Compact disc player Signal Detection System: Non-contact optical pickup (semiconductor laser) Number of Channels: 2 channels (stereo) Frequency Response: 5 Hz to 20 000 Hz Dynamic Range: 96 dB Signal-to-Noise Ratio: 98 dB Wow and Flutter: Less than measurable limit MP3 Decoding Format: (MPEG1/2 Audio Layer 3) Max.
- Page 147 The countries where you may use the Bluetooth® function nh ng qu c gia mà b n có th s d ng ch c n ng Bluetooth ®...
- Page 148 Country Country Country Andorra Ísland Türkiye Italia United States of America Australia Lichtenstein Venezuela Österreich Lietuva Vietnam Bosna i Hercegovina Vi t Nam Luxemburg Belgien South Africa Luxembourg Belgique ENingizimu Afrika Lëtzebuerg България Suid-Afrika Latvija Canada Monaco Schweiz Crna Gora Suisse Македонија...
- Page 149 Having TROUBLE with operation? Please reset your unit Refer to page of How to reset your unit EN, TH © 2010 Victor Company of Japan, Limited 0110DTSMDTJEIN...
-
Page 150: Removing The Unit
KD-R816 Installation/Connection Manual การติ ด ตั ้ ง คู ่ ม ื อ การติ ด ตั ้ ง GET0652-006A 0110DTSMDTJEIN EN, TH [U/UH] © 2010 Victor Company of Japan, Limited ไทย ENGLISH / You need the installation kits which corresponds to your car. / Check the battery system in your car / To the car system / สำหรั... -
Page 151: Electrical Connections
การเชื ่ อ มต่ อ ไฟฟ้ า ELECTRICAL CONNECTIONS / ข้ อ สำคั ญ ขอแนะนำให้ ใช้ ช ุ ด สายไฟแบบสั ่ ง ทำ แยกซื ้ อ ต่ า งหาก ซึ ่ ง เหมาะสำหรั บ รถของคุ ณ IMPORTANT: A custom wiring harness (separately purchased) which is suitable for your car is เพื...