Table of Contents
Advertisement
Available languages
Available languages
Quick Links
REGISTER YOUR PRODUCT!
www
Thank you for choosing this ARCHOS product. We hope that you will enjoy using it and that it will give you satisfaction for many
years to come. Once you unpack your ARCHOS product, we recommend that you take a few minutes to register it
(
). This will allow you to get access to ARCHOS technical support (
www.archos.com/register
?
NEED HELP?
On our Website: See the Frequently Asked Questions section on
Contact our Technical Support Team: Visit
Europe: please register your product before contacting Technical Support (see Register your Product ).
FCC RF Radiation Exposure and SAR Statements
RF Exposure Information: The radio module has been evaluated under FCC Bulletin OET 65C (01-01) and found to be compliant to the requirements
as set forth in CFR 47 Sections, 2.1093, and 15.247 (b) (4) addressing RF Exposure from radio frequency devices. This model meets the applicable
government requirements for exposure to radio frequency waves. The highest SAR level measured for this device was 0.939 W/kg.
SAR Statement : The ARCHOS 8 home tablet has been tested for body-worn Specific Absorption Rate (SAR) compliance. The FCC has established
detailed SAR requirements and has established that these requirements have been met for this device.
As we are often updating and improving our products, your device's software may have
a slightly different appearance or modified functionality than presented in this Quick Start Guide.
Ä
On the web at www.archos.com/register
www.archos.com/support
www.archos.com/support
www.archos.com/faq
for e-mail support.
U.S. & Canada: Call 877-300-8879 (toll free).
).
1
Advertisement
Table of Contents

Related Manuals for Archos 8 Home Tablet


Summary of Contents for Archos 8 Home Tablet
- Page 1 On the web at www.archos.com/register Thank you for choosing this ARCHOS product. We hope that you will enjoy using it and that it will give you satisfaction for many years to come. Once you unpack your ARCHOS product, we recommend that you take a few minutes to register it ).
-
Page 2: Description Of The Device
Power connector: to connect the supplied power cable. On/Off Headphone jack Loudspeakers Leg stand: pull it out, and it will allow your ARCHOS to stand by itself on a flat, stable surface. - Page 3 Connect the supplied power cable to the ARCHOS Power connector and to a wall outlet. The ARCHOS device will turn on and start charging. The Power indicator light is red while the battery is charging. It will turn yellow when the battery is fully charged.
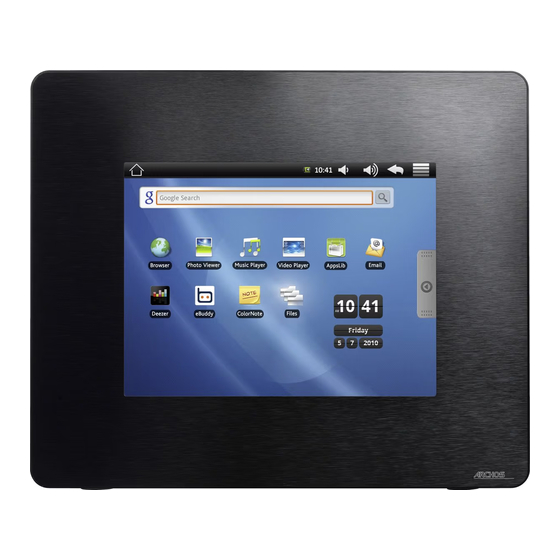
- Page 4 THE ARCHOS INTERFACE Your ARCHOS device is equipped with a touchscreen. Most screen areas will react when you tap on them with your finger. Home Screen These are the default These are the default Applications Tab Android™ shortcuts ( Android™ shortcuts ( Tap on this icon to reveal all the An- , etc.).
- Page 5 Wallpaper Adding more applications: With the ARCHOS connected to the Internet, tap on the AppsLib icon on the Home screen. This online library of free and purchasable applications has hundreds of fun games and useful applications to download and use.
-
Page 6: Connecting To The Internet
First of all, you need to configure a WiFi network. For this procedure to work, you need to be in a WiFi zone that will allow you to connect to it. Every time the ARCHOS is in range of a network that you have already configured once, it will at- tempt to make a connection. -
Page 7: Playing Multimedia Files
PLAYING MULTIMEDIA FILES From the Home screen, tap on the video, audio or photo application. The ARCHOS will display a list of files or folders corresponding to the selected category. Tap on an item to start playing it. Only in Video and Photo modes: to display/hide the on-screen controls, tap anywhere on the screen. - Page 8 Connect the supplied USB cable to the ARCHOS and to a running computer. The ARCHOS will turn on and ask you if you want to connect it. Tap on “Mount” to connect it. Within a few seconds the ARCHOS will appear as an icon on your computer.
- Page 9 Ä На сайте www.archos.com/register Благодарим Вас за выбор продукции ARCHOS. Мы надеемся, что она будет доставлять вам удовлетворение в течение многих лет.После того, как вы распаковали ARCHOS мы рекумендуем потратить несколько минут для его регистрации (www.archos. com/register).Это позволит получить доступ к службе технической поддержки ARCHOS (www.archos.com/ ВАМ...
-
Page 10: Описание Устройства
показать возможные опции выключения устройства. Индикатор зарядки - красный: батарейка заряжается/ желтый : батарейка заряжена. Сброс установок: В случае, если ваш ARCHOS завиc, попробуйте его перезагрузить: нажмите кнопку reset, расположенную на задней стенке устройства. Чтобы нажать расположенную в углублении кнопку, воспользуйтесь предметом, типа канцелярской скрепки. -
Page 11: Первое Использование
Перед первым использованием ARCHOS полностью зарядите батарею! Зарядка батареи Подключите Блок питания/зарядки ARCHOS в гнездо электросети. ARCHOS включится и начнется зарядка. Индикатор зарядки имеет красный цвет пока батарея заряжается. Он становится желтым, когда батарея полностью заряжена. Мастер установки При первом использовании ARCHOS мастер установки поможет вам настроить основные функции устройства:... - Page 12 ИНТЕРФЕЙС ARCHOS Ваш ARCHOS оборудован сенсорным экраном. Практически все области экрана будут реагировать на ваше прикосновение пальцем. Главный экран Вот ярлыки Android™ по Закладка Приложения Вот ярлыки Android™ по умолчанию ( Web Навигатор, умолчанию ( Web Навигатор, Нажмите на эту иконку, чтобы...
- Page 13 опций. Нажмите на Обои и выберите из списка. Добавление других приложений: Подсоедините ваш ARCHOS к Интернету, затем нажмите на иконку AppsLib на главном экране. Вы найдете на этом портале сотни бесплатных и платных приложений - игры, полезные программы, и тд. Выберите приложение из списка и просто загрузите его.
-
Page 14: Подключение К Интернету
доступных сетей Wi-Fi и покажет их в нижней части экрана. Выберите одну из сетей из списка*, введите необходимую информацию и затем нажмите на «Подключиться». Ваш ARCHOS попытается установить соединение с этой точкой доступа с этой точкой доступа Wi-Fi с теми сетевыми параметрами, которые вы ввели. - Page 15 ВОСПРОИЗВЕДЕНИЕ МУЛЬТИМЕДИА ФАЙЛОВ На главном экране нажмите на иконку Видео, Аудио или Фото. ARCHOS покажет вам список файлов/папок в соответствующем разделе. Для открытия файла вам нужно нажать на него. Только для режима Видео и Фото: для того, чтобы показать или спрятать все доступные опции прикоснитесь к...
- Page 16 ПЕРЕДАЧА МУЛЬТИМЕДИА ФАЙЛОВ Подсоедините кабель USB, который идет в комплекте, к ARCHOS и к включенному компьютеру. ARCHOS включится и предложит подсоединить его. Выберите «Mount» для подключения. Через несколько секунд в вашем компьютере появится иконка ARCHOS. Вы можете перенести свои медиафайлы в ARCHOS, выполняя копирование/вставку в соответствующие...
Need help?
Do you have a question about the 8 Home Tablet and is the answer not in the manual?
Questions and answers