
Related Manuals for Samsung SCH-R480


Summary of Contents for Samsung SCH-R480
- Page 1 S C H - R 4 8 0 P O R T A B L E M O B I L E P H O N E User Manual Please read this manual before operating your phone and keep it for future reference. GH68_3XXXXA...
-
Page 2: Intellectual Property
Intellectual Property All Intellectual Property, as defined below, owned by or which is otherwise the property of Samsung or its respective suppliers relating to the SAMSUNG Phone, including but not limited to, accessories, parts, or software relating there to (the “Phone System”), is proprietary to Samsung and protected under federal laws, state laws, and international treaty provisions. - Page 3 THERETO. NOTHING CONTAINED IN THE INSTRUCTION MANUAL SHALL BE CONSTRUED TO CREATE AN EXPRESS OR IMPLIED WARRANTY OF ANY KIND WHATSOEVER WITH RESPECT TO THE PRODUCT. IN ADDITION, SAMSUNG SHALL NOT BE LIABLE FOR ANY DAMAGES OF ANY KIND RESULTING FROM THE PURCHASE OR USE OF THE PRODUCT OR ARISING FROM THE BREACH OF THE EXPRESS WARRANTY, INCLUDING INCIDENTAL, SPECIAL OR CONSEQUENTIAL DAMAGES, OR LOSS OF ANTICIPATED PROFITS OR BENEFITS.
- Page 4 Internet Address: http://www.samsung.com ©2013 Samsung Telecommunications America, LLC. Samsung is a registered trademark of Samsung Electronics Co., Ltd. Do you have questions about your Samsung Mobile Device? For 24 hour information and assistance, we offer a new FAQ/ARS System (Automated Response System) at: www.samsung.com/us/support...
-
Page 5: Table Of Contents
Table of Contents Section 1: Getting Started ......4 Answering a Call ..... . 29 Call In Progress Options ....30 Understanding This User Manual . - Page 6 Section 7: Multimedia .........60 Stopwatch ......79 World Clock ......79 Accessing Multimedia .
- Page 7 Samsung Mobile Products and Recycling . . . 102 UL Certified Travel Charger ... . . 103 Display / Touch-Screen ....104 GPS .
-
Page 8: Section 1: Getting Started
Section 1: Getting Started Notes and Tips This section explains how to start using your phone by activating your service, setting up your voicemail, or getting Throughout this guide, there is text that is set apart from the an understanding of how this manual is put together. rest. -
Page 9: Battery
➔ Used in place of “select” in long “drill down” Warning!: Use only Samsung-approved charging devices and procedure steps. batteries. Samsung accessories are designed to maximize battery life. Using other accessories may Example: “...Settings ➔... -
Page 10: Battery Cover
Battery Cover Replacing the Battery Cover The battery is under a removable cover on the back of Align the cover and press it into place, ensuring that it the phone. snaps securely at all four corners. Removing the Battery Cover Use a fingernail in the slot at the upper left of the back of your phone to lift the back cover off of the phone. -
Page 11: Installing The Battery
Installing the Battery Removing the Battery 1. Remove the battery cover. For more information, refer 1. Remove the battery cover. For more information, refer to “Removing the Battery Cover” on page 6. to “Removing the Battery Cover” on page 6. 2. -
Page 12: Charging The Battery
Charging the Battery 3. When charging is complete, the battery indicator ( in the upper right corner of the display shows five bars. Your phone comes with a travel adapter to rapidly charge Unplug the travel adapter from the phone. your phone from any 100/240 AC outlet. -
Page 13: Activating Your Phone
Battery Indicator Note: As with any other radio-transmitting device, do not The battery indicator ( ) in the upper-right corner of the touch the antenna while using your phone as this can display indicates power level. Monitor the battery strength affect call quality and can cause the phone to operate at and ensure your battery is adequately charged. -
Page 14: Voicemail
Voicemail Memory Card Setting Up Your Voicemail Your phone supports optional, removable microSD ™ microSDHC ™ memory cards of up to 32GB capacity (not Voicemail allows callers to leave voice messages, which can included). You can store music, pictures, videos, and other be retrieved any time. -
Page 15: Removing A Memory Card
Removing a Memory Card 1. Pull the memory card cover out and turn it to expose the memory card in the card slot. 2. Press on the memory card to release the lock; then remove the card. Formatting Formatting erases all content from the memory card and prepares it for use with your phone. -
Page 16: Section 2: Understanding Your Phone
Section 2: Understanding Your Phone This section outlines some key features of your Samsung Note: The SCH-R480 phone supports the wireless headset, SCH-R480 phone. It also describes the screen format. hands-free, dial-up networking, stereo (A2DP), Your Phone’s Features phonebook access, object push, and file transfer profiles •... -
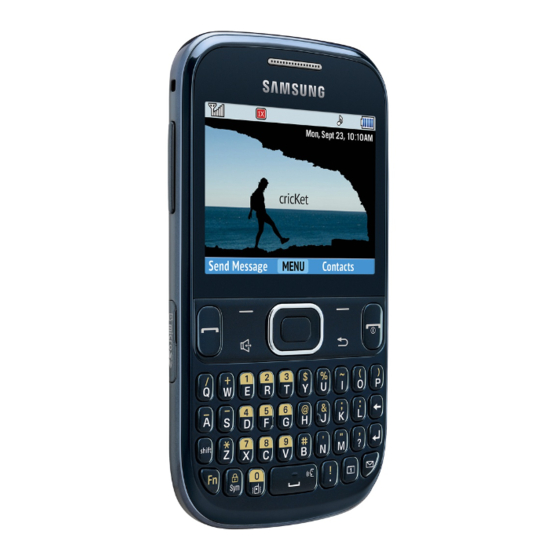
Page 17: Front View Of Your Phone
Front View of Your Phone 3. Left Soft Key: Press to select the command displayed at the left of the bottom line of the display. 4. Send Key: Press to place or receive a call. Press in standby mode to launch the Recent Calls list. 5. -
Page 18: Keypad
Keypad 4. Sym/Lock Key: When entering text, press to launch a Symbols screen for selecting symbols. From standby mode, press and hold this key to lock the keypad. 5. Vibrate Mode Key: In standby mode, press and hold to activate Vibrate mode. 6. -
Page 19: Side Views Of Your Phone
Side Views of Your Phone Features 1. Volume Key: In standby mode, adjust the System Volume. When receiving a call, temporarily mute the ringer. 2. microSD (Memory Card) Slot: Install and remove an optional microSD Memory Card for additional image/ photo storage and for music storage. -
Page 20: Rear View Of Your Phone
Rear View of Your Phone Features 1. Headset Connector: Connect an optional headset (for hands-free operation and/or music playback) or an optional TTY device. 2. Camera Lens: The lens of your built-in camera. 3. Power/USB Connector: Connect charging accessories or optional USB Data cable to your phone. -
Page 21: Command Keys
Command Keys Center-Select Key Left Soft Key Some functions of the Center-Select Key ( ) are: • In standby mode, press the Center-Select Key to open the Main Some functions of the Left Soft Key ( ) are as follows: Menu. -
Page 22: Send Key
Send Key Volume Key The Send Key ( ) is used to answer calls, dial calls, and to Use the Volume Key ( ) to adjust volume: recall the last number(s) dialed, received, or missed. • In standby mode, press the Volume Key to adjust Master Volume. •... -
Page 23: Back Key
Back Key Camera Key The Back Key ( ) is used to return to a previous menu or In standby mode, press and hold the Camera key screen. In some screens, you can also use the key to erase ) on the right side of your phone. or clear numbers, text, or symbols from the display. -
Page 24: Navigation Key
Navigation Key Spacebar/Voice Command Key • In standby mode, press and hold the Spacebar/Voice Command In standby mode, press the Navigation Key up or down, left or right to launch menus and features in the pattern shown Key ( ) on the QWERTY keyboard to activate the Voice here. -
Page 25: Menu Navigation
Menu Navigation Speakerphone Key In standby mode, press the Speakerphone Key ( ) to Access the menus and sub-menus in your phone using the Navigation Key, soft keys, and Menu Shortcuts. switch between the earpiece and the speakerphone, 1. In standby mode, press MENU. -
Page 26: Understanding The Display Screen
Understanding the Display Screen 4. Center Soft Key Function: The bottom line of the display shows current soft key function. The sample screen shows that pressing the Center Soft Key Function (MENU) will display the Main Menu. 5. Right Soft Key Function: The bottom line of the display shows current soft key functions. -
Page 27: Dialog Boxes
Dialog Boxes Dialog boxes prompt for action, inform you of status, or warn of situations such as low battery. Dialog boxes and their definitions are outlined below. • Choice – Example: “Save Message?” • Reconfirm – Example: “Erase All Messages?” •... -
Page 28: Section 3: Entering Text
Section 3: Entering Text Entering Text SYM/Lock: Press SYM/Lock to select special characters (symbols). Press the Navigation Key Your phone has a QWERTY keypad for quick and easy text left or right to scroll through symbols. Press Prev input. You can enter text as you would when using a (the Left Soft Key) and Next (the Right Soft Key) to computer keyboard. - Page 29 In a text entry field, press the Left Soft Key (entry mode) to display the Entry Mode menu: • Abc/ABC: Abc mode is standard text entry mode for mobile telephones and is the default text entry mode of the external keypad.
-
Page 30: Section 4: Call Functions
Section 4: Call Functions Dialing International Numbers This section provides procedures for making and answering Call Another Country — Manual Method calls. This section also describes features, such as call logs and call timers, that help you make calls and manage your 1. - Page 31 Call Another Country — Shortcut Method Tip: If you place most or all of your international calls to 1. In Standby mode, press . A plus sign (+) appears in numbers in the same country, set up the International the display. Dialing shortcut to dial that country’s code for you.
-
Page 32: Manual Pause Calling
Manual Pause Calling Speed Dialing To manually call a number with pause(s) without storing it in Speed Dialing lets you place a call to any Contact stored in your Contacts list: your Contacts list by dialing the Contact’s Location number. (For more information, refer to “Speed Dials”... -
Page 33: Answering A Call
Reject Call with Text Message 3-Touch Dialing Use 3-touch dialing to speed dial Contacts from 100 Send a text message to a caller instead of answering a call. through 999. (For more information, refer to “Creating and Sending Text 1. In standby mode, press and release the number key Messages”... -
Page 34: Call In Progress Options
Call In Progress Options Voice Commands Access menus and features while in a call: Voice Commands is advanced speech recognition software that recognizes your spoken commands to dial phone Press Options for these options: numbers, create messages, and launch phone features such •... - Page 35 Call <Name or #> Tip: Press Info at any time to display helpful tips for using Place a call by speaking a contact name or telephone Voice Commands. number. 1. In standby mode, press and hold Spacebar/ You can perform the following functions with Voice Voice Command Key.
- Page 36 Send Message <Name or #> Check <Item> Create a new message by speaking the type of message and Access device information by speaking the command. the recipient(s). 1. In standby mode, press and hold Spacebar/ 1. In standby mode, press and hold Spacebar/ Voice Command Key.
-
Page 37: Voice Commands Settings
Contacts <Name> Voice Commands Settings Search for Contacts list entries on your phone by saying the Configure the Voice Commands feature of your phone. name of the searched Contact. Tools ➔ 1. In standby mode, press MENU; then select 1. In standby mode, press and hold Spacebar/ Voice SVC ➔... -
Page 38: Calls Logs
Calls Logs • Prompts: Choose how Voice Commands prompts you: Choose the prompt Mode (Prompts or Tones Only). – The CALLS menu retains information about outgoing, Choose whether the Audio Playback will play in – incoming, and missed calls. You can also view times for your Speakerphone mode or through the Earpiece. -
Page 39: Deleting All Recent Calls Records
Deleting Recent Calls Records 1. From the CALLS menu, select Missed, Incoming, Outgoing, All, or View Timers. 2. Highlight a call record. 3. Press Options; then select Erase. 4. At the Erase entry? prompt, select Yes. Deleting All Recent Calls Records 1. -
Page 40: Section 5: Messages
Section 5: Messages Creating and Sending Text Messages This section explains how to send or receive different types of messages. This section also describes the features and Send text messages to recipients with a compatible phone or functionality associated with messaging. other device. - Page 41 Priority Level: Set the message’s priority to Urgent or – 3. Press OK. The Text field appears in the display. Normal. 4. Enter the text content of your message. (For more ValidityPeriod: Enter the Date and Time when this message –...
-
Page 42: Creating And Sending Multimedia Messages
Creating and Sending Multimedia • Record Sound Record sound to send with your message. Messages • NameCard: Send a contact information with your message. • CalendarEvent: Send information about a meeting or other Send multimedia messages to recipients with a compatible event. - Page 43 • RECORD NEW: Press OK to start recording. Press STOP to 7. Press Options to access the following options: finish recording. • Preview: View your message before you send it. • ATTACH NAME CARD: Choose My Name Card to send your •...
-
Page 44: Receiving Messages
Receiving Messages Message Folders When you receive a message in standby mode or in a call, Your phone stores messages using five folders: Messages, the ringer sounds (unless turned off) and New Message Drafts, CMAS, Voicemail, and Social Networks. Messages appears in the display. -
Page 45: Message Viewing Options
Message Viewing Options • Resend: Send another copy of the message to the original recipient. While viewing your message, press Options. The following options may appear in the display (options vary based on • Lock/Unlock: Block/permit erasure of the message. message content): •... - Page 46 Managing Messages and Message Threads • Messaging Menu: Return to the main Messaging menu. • SocialNetworks: Access social networks such as Facebook 1. From the MESSAGING menu, select Messages. A list of and Twitter. all messages threads is displayed. Drafts 2.
- Page 47 View and Edit Draft Messages Managing Draft Messages 1. From the MESSAGING menu, select Drafts. A list of 1. From the MESSAGING menu, select Drafts. A list of draft messages appears in the display. draft messages appears in the display. 2.
- Page 48 CMAS Voicemail The Commercial Mobile Alert System (CMAS) system Messages in your voice mailbox are logged in the Voicemail provides the government the ability to send geographically folder of the MESSAGING menu. Open the Voicemail folder to targeted notifications of emergencies, such as threats to view details of the Voicemail message.
-
Page 49: Erase Messages
Social Networks 1. From the MESSAGING menu, press Options. The following options appear in the display: Social Networks provides a single point for accessing online • EraseMessages: Delete all unlocked messages stored in the communities and content. You can save your user names Messaging folder. -
Page 50: Messaging Settings
Messaging Settings • Quick Text: View preloaded messages or create new messages. From the MESSAGING menu, press Settings. The • CMASAlerts: Manage the receipt of Commercial Mobile Alert following options appear in the display: System (CMAS) alerts. Select Receive Alerts to choose •... -
Page 51: Section 6: Contacts
Section 6: Contacts Adding a New Contact This section details how you can manage your daily contacts by storing their names and numbers in your Contacts list. You You can use either of two methods to add an entirely new can have your Contacts entries sorted by name. - Page 52 Menu Method • Home Address Street 1. From the CONTACTS menu, select New Contact. – City The NEW CONTACT screen appears in the display with – the Name field highlighted. State – Zip Code – 2. Enter the name of the new Contact. (See “Entering Country Text”...
-
Page 53: Finding A Contacts Entry
Finding a Contacts Entry Call: Dial the number associated with the name. – Manage Contacts: Choose to Erase the Contact, Lock the – 1. From the CONTACTS menu, select Contact List. Contact (prevent erasure), Unlock the Contact (permit erasure). The CONTACT LIST appears with the Go To field Send Name Card: Send a copy of a Contacts entry in a –... -
Page 54: Saving A Number After A Call
Saving a Number After a Call 4. Highlight the particular information you want to enter or change. Once you finish a call, you can store the caller’s number in • To backspace and delete numbers or letters, press your Contacts list. •... - Page 55 Create a New Entry Add to an Existing Entry 1. From the Save screen, select Add New Contact. The 1. From the Save screen, select Update Existing. The ADD NEW CONTACT screen appears in the display UPDATE EXISTING screen appears in the display showing the following number type options: showing your Contacts list with the Go To field and the first Contacts entry highlighted.
-
Page 56: Groups
Deleting Contacts 4. Select Yes to confirm erasure of the selected Contacts. Deleting a Contact Select No to retain the Contacts. Groups 1. In the CONTACT LIST, find and highlight the Contact you wish to delete. Groups let you easily send messages to multiple selected 2. - Page 57 Add Contacts Entry to a Group Using Group Add Option Using Add New/Edit Contact Option The Add option lets you add one or more existing Contacts to a Group. To add a Contact to a Group using either the Add New 1.
-
Page 58: Rename A Group
Rename a Group 3. When you have marked the Contacts you want to add to the group, press Done. CONTACT ADDED TO The Rename option lets you change the name any of the <Group> appears in the display, followed by the Groups. - Page 59 Add a New Group Erase a Group 1. From the CONTACTS menu, select Groups. The The Erase option lets you delete a Group, thus freeing you to GROUPS screen appears in the display. reassign the Contacts formerly in the Group. 1.
-
Page 60: Speed Dials
Speed Dials Assigning a Speed Dial Location To assign a Speed Call number to a new Contacts entry Speed Dials are 1-, 2-, or 3-digit shortcuts you assign to number, do the following: contacts, to allow you to quickly call the contact. 1. -
Page 61: Favorites
Favorites Removing a Speed Dial Location 1. In the CONTACT LIST screen, find and highlight the Set contacts or contact groups as Favorites to quickly find a Contact you wish to remove from your Speed Dial list. contact or group to view, send a message, or call. Assigning Favorites (For more information, refer to “Finding a Contacts Entry”... -
Page 62: Using Favorites
Removing Favorites Using Favorites 1. From the CONTACTS menu, select Favorites. The Use Favorites to quickly view a favorite’s contact record or FAVORITES list appears. group list, send a message to a favorite, or view messages to and from a favorite. 2. -
Page 63: Memory Info
Memory Info The Memory Info menu option lets you see how many Contacts you’ve stored on your phone and the number of additional Contacts you can still store. From the CONTACTS menu, select Memory Info. The MEMORY INFO screen appears in the display, showing the Total number of Contacts you can store, the number of Contact spaces Used, and remaining number of spaces Free to store additional Contacts. -
Page 64: Section 7: Multimedia
Section 7: Multimedia Camera With your R480’s multimedia features, you can: • Taking Snap Shots (Single Pictures) Take full-color digital pictures or record full-color videos with the Camera-Camcorder. To take a single picture using the current camera settings, do • View your pictures and videos on your phone’s vivid color display. -
Page 65: Camera Options
Point, Click, and Send Pictures Camera Options 1. In standby mode, press and hold Camera (on In standby mode, press and hold Camera the right side of the phone). (on the right side of the phone). The following controls 2. Take a photo by pressing Camera or TAKE. - Page 66 Exposure metering indicates/changes the way the Settings: camera determines the exposure. Choose Matrix, • Photo Quality: Set image quality. Choose Center-weighted, or Spot. Superfine, Fine, or Normal. Effectsindicates/changes the replacement of photo colors • Auto Save: Set the Camera to let you manually save with None (normal colors), Black&White, Sepia, Negative, photos (Off) or to automatically save them (On).
-
Page 67: Camcorder
Camcorder 3. Using the display as a viewfinder, point the camera Recording Videos lens at your subject. To record a video using the current camcorder settings, do the following: 1. In standby mode, press and hold Camera (on the right side of the phone). 2. -
Page 68: Camcorder Options
Point, Click, and Send Videos Camcorder Options 1. In standby mode, press and hold Camera 1. In standby mode, press and hold Camera (on the right side of the phone). (on the right side of the phone). 2. From the Camera viewfinder, press Options;... - Page 69 After you record a video, the following options appear Viewfinder Mode: Control whether the Camcorder in the display: displays Icons, No Icons, or a Guideline grid. • Save: Press to save the video. Settings: • PLAY: Press to play the video. •...
-
Page 70: Playing Videos
Playing Videos Video Playback Controls • Volume 1. To display the video gallery: – Press the Volume key up to play a video file louder. From the Camcorder viewfinder screen, press – Press the Volume key down to play a video file softer. Videos. -
Page 71: Music Player
Music Player • Options Options ➔ My Videos to return to My Video List. – Press • The R480 supports MP3, unprotected WMA, M4A, AAC, AAC+ – Options ➔ File Info to view the Name, File Size, Press music file. Resolution, Duration, Date and Time created of the •... - Page 72 Accessing the Music Library Menu 2. Highlight the desired option and press VIEW. A list of music files, playlists, artists, genres, or albums 1. From the MULTIMEDIA menu, select Music Player. The appears in the display. following options appear in the display: •...
-
Page 73: Playing Music
Playing Music • Options soft key: Show the following sub-menus and options: – Background Music: If a music file or playlist is playing, return 1. From the MULTIMEDIA menu, select Music Player. to the Home screen (standby mode) while continuing to play the Select the desired option and press VIEW. -
Page 74: Downloading Music Files
Downloading Music Files 6. Drag or download music (MP3, AAC, AAC+, WMA, and M4A) files into the “media/my_music” folder, or a In addition to downloading music to your phone, you can also sub-folder, if any. transfer (“sideload”) music from a personal computer to an optional memory card in your phone. -
Page 75: My Images
My Images • Press Options(Right Soft Key) to display the following options: Send: Send the currently highlighted or displayed image as part – My Images lets you manage your photos you take with the of a Multimedia Message, To Online Album, Camera and pictures you download and lets you choose the Via Bluetooth, or To Facebook. -
Page 76: My Ringtones
My Ringtones Assigning Ringtones 1. From the MULTIMEDIA menu, select My Ringtones. My Ringtones lets you record voice memos and assign them or ringtones, melodies, or music files as ringtones for calls, 2. Highlight a file. You have the following options: •... -
Page 77: My Videos
My Videos easyedge My Videos lets you manage the videos you record with your With easyedge, you can download full featured applications phone’s Camcorder and videos you download and lets you over the air including games, personalized ring tones, play and manage your videos. pictures, and more. -
Page 78: Section 8: Browser
Section 8: Browser Using the Browser This section outlines how to launch the browser and navigate to other pages within the browser, and how the keys on the When you use the browser, some of the keys operate QWERTY keypad are used with web application. Additionally, differently than during a normal phone call. -
Page 79: Using Links
Using Links Left Soft Key: Press to activate the command that appears above it in the display. Links have several purposes, such as jumping to a different page, to a different site, or even initiating a phone call. Links Right Soft Key: Press to activate the command that are shown underlined. -
Page 80: Section 9: Tools
Section 9: Tools Add New Device This section explains how you can use your phone's productivity tools to view today’s calendar, schedule 1. In the BLUETOOTH MENU, select Add New Device. appointments, set an alarm, perform simple math Note: If prompted with “Turn bluetooth on?,” press Yes. calculations, and more. -
Page 81: Bluetooth Options
Bluetooth Options 5. Except for other wireless handsets, you are prompted to confirm whether you want to connect your phone Bluetooth Options allow you to set your phone’s Bluetooth with the other device. To connect with the other device, availability and view and set information about your phone’s press Yes. -
Page 82: Voice Svc
Voice SVC Calculator Your device includes Nuance Vsuite, state-of-the-art voice You can perform calculations, including addition, subtraction, recognition software that lets you use your voice to dial multiplication, and division, using your phone. numbers, access your Contacts list, and open Tools. The From the TOOLS menu, select Calculator. -
Page 83: Alarm Clock
Alarm Clock Memo Pad Set up to 10 alarm clocks for various times, days of the Create notes and store them in Memo Pad. Return to Memo week, or ringers. You can turn these alarm clocks on and off Pad anytime to review and edit your notes. without affecting their settings. -
Page 84: Section 10: Settings
Section 10: Settings Display Settings This section explains how to configure your phone’s language, network preferences, security options, and other Display settings let you change your phone’s menu settings. appearance, display brightness, and display content to better Accessing Your Phone’s Settings meet your needs. -
Page 85: Clock Format
Clock Format Fonts Size Clock Format lets you choose in what format your phone Fonts Size lets you choose the size of the digits you dial, the displays the current time. characters that compose your phone’s menu items, and the font size using in messaging. -
Page 86: Sounds Settings
Backlight Master Volume You can set the brightness of the backlight for your display or Set the Master Volume for all the sounds on your phone. keypad. From the SOUNDS SETTINGS menu, select 1. From the DISPLAY SETTINGS menu, select Backlight. Master Volume;... -
Page 87: Alert Sounds
Alert Sounds Keypad Volume You can select an individual tone to play for each type of Alert You can select the volume at which your phone produces your phone can sound. Keypad Sounds. 1. From the SOUNDS SETTINGS menu, select Alert Sounds. From the SOUNDS SETTINGS menu, select 2. -
Page 88: Call Settings
Call Settings Service Alerts Service Alerts lets you enable playback of the alert tone The Call Settings sub-menu lets you set call options such as when you Roam or lose service, for each minute a phone call Auto Retry, Data rates for data calls, and more. lasts, or each time a call connects. -
Page 89: Auto Retry
Auto Retry Voice Privacy Auto Retry automatically redials a number at an interval you Voice Privacy you choose what level of voice security select, when there is no answer or the dialed party is busy. (Standard or Enhanced) your phone will use. Depending upon your location, the number of times your Note: If Enhanced voice security is unavailable at a particular phone redials a number may vary. -
Page 90: Phone Settings
DTMF Tones Airplane Mode DTMF Tones let you select the length of the tone (Normal or When set to On, Airplane Mode disables all radio functions of Long) that the keypad generates each time you press a key. your phone. This blocks you from making or receiving calls other than Emergency (911) calls, but allows you to use other Note: The Long setting can be useful with automated systems. -
Page 91: Phone Lock Setting
Security Edit Codes The Edit Codes option lets you replace your phone’s default Use the Security sub-menu to lock your phone, set lock code (the default lock code is “0000”) with one of your restrictions, and other security options. own choosing. To access the Security sub-menu, you are prompted to enter It is advisable to change the default lock code to a secret your phone’s four-digit lock code. -
Page 92: Factory Data Reset
Reset Phone Restrictions The Reset Phone option returns all settings on your phone The Restrictions option settings let you set restrictions on (except for Contacts entries) to their factory default values. calls, messages, and data calls: Incoming/Outgoing Calls: Select Allow All, Contacts Caution! Before selecting Reset Phone, contact your Wireless Only, or Block All. -
Page 93: Nam Select
NAM Select System Select NAM Selection lets you select your preferred number System Select allows you to set system selections for assignment module (NAM 1 or NAM 2), provided your phone roaming. has a NAM 2 number programmed into it. (For more From the PHONE SETTINGS menu, select System Select. -
Page 94: Quick Search
Quick Search USB Mode Quick Search allows easy searching for contacts and menus The USB Mode option lets you enable the phone’s ability to in standby mode, by pressing keys on the QWERTY keyboard act as a USB flash drive, provided you have installed an optional microSD or microSDHC memory card and the USB From the PHONE SETTINGS menu, select Quick Search. -
Page 95: Phone Info
Memory Auto Key Lock The Auto Key Lock setting controls whether the external From the SETTINGS menu, select Memory. The following keypad locks automatically when the backlight goes out. options are available: • Save Options: Allow you to select a default storage location for From the PHONE SETTINGS menu, select Auto Key Lock. -
Page 96: Section 11: Health And Safety Information
Section 11: Health and Safety Information with RF energy, these studies have failed to be replicated. This section outlines the safety precautions associated with The majority of studies published have failed to show an using your phone. The terms “mobile device” or “cell phone” association between exposure to radio frequency from a cell are used in this section to refer to your phone. - Page 97 Interphone Study The energy levels associated with radio frequency energy, including both radio waves and microwaves, are not great Interphone is a large international study designed to enough to cause ionization of atoms and molecules. determine whether cell phones increase the risk of head and Therefore, RF energy is a type of non-ionizing radiation.
- Page 98 International Cohort Study on Mobile Phone Users Surveillance, Epidemiology, and End Results (SEER) (COSMOS) Program of the National Cancer Institute The COSMOS study aims to conduct long-term health The National Cancer Institute (NCI) actively follows cancer monitoring of a large group of people to determine if there statistics in the United States to detect any change in rates of are any health issues linked to long-term exposure to radio new cases for brain cancer.
- Page 99 The FDA also is working with voluntary standard-setting Headsets can substantially reduce exposure because the bodies such as the Institute of Electrical and Electronics phone is held away from the head in the user's hand or in Engineers (IEEE), the International Commission on approved body-worn accessories.
-
Page 100: Children And Cell Phones
Studies have shown that these products generally do not Additional information on the safety of RF exposures from work as advertised. Unlike “hands-free” kits, these so-called various sources can be obtained from the following “shields” may interfere with proper operation of the phone. organizations (updated 10/1/2010): The phone may be forced to boost its power to compensate, •... -
Page 101: Specific Absorption Rate (Sar) Certification Information
• US Food and Drug Administration: expressed in units of watts per kilogram (W/kg). The FCC requires wireless phones to comply with a safety limit of 1.6 http://www.fda.gov/Radiation-EmittingProducts/ watts per kilogram (1.6 W/kg). RadiationEmittingProductsandProcedures/ The FCC SAR limit incorporates a substantial margin of safety HomeBusinessandEntertainment/CellPhones/default.htm. -
Page 102: Fcc Part 15 Information To User
FCC ID number: A3LSCHR480 [Model Number: SCH- Samsung could void your authority to operate the device. R480] and the specific SAR levels for this mobile phone can This device complies with part 15 of the FCC Rules. -
Page 103: Commercial Mobile Alerting System (Cmas)
(CMAS) impaired. Samsung is committed to promoting responsible This device is designed to receive wireless emergency alerts driving and giving drivers the tools they need to understand from the Commercial Mobile Alerting System ("CMAS";... -
Page 104: Battery Use And Safety
Before answering calls, consider your circumstances. Let the Never mount this device in a manner that will obstruct the call go to voicemail when driving conditions require. driver's clear view of the street and traffic. Remember, driving comes first, not the call! Never use wireless data services such as text messaging, Web If you consider a call necessary and appropriate, follow these browsing, or e-mail while operating a vehicle. - Page 105 If the phone and/or battery get wet, have them checked • Never use any charger or battery that is damaged in any way. by your service provider or contact Samsung, even if they appear • Do not allow the battery to touch metal objects. Accidental to be working properly.
-
Page 106: Samsung Mobile Products And Recycling
Consumers should purchase manufacturer or We've made it easy for you to recycle your old Samsung carrier-recommended products and accessories. If unsure about mobile device by working with respected take-back whether a replacement battery or charger is compatible, contact companies in every state in the country. -
Page 107: Ul Certified Travel Charger
Mail It In The Samsung Mobile Take-Back Program will provide UL Certified Travel Charger Samsung customers with a free recycling mailing label. The Travel Charger for this phone has met applicable UL Just go to safety requirements. Please adhere to the following safety http://www.samsung.com/us/aboutsamsung/citizenship/... -
Page 108: Display / Touch-Screen
WARNING REGARDING DISPLAY The display on your mobile device is made of glass or Certain Samsung mobile devices can use a Global Positioning acrylic and could break if your mobile device is System (GPS) signal for location-based applications. A GPS dropped or if it receives significant impact. -
Page 109: Emergency Calls
• Remain on the mobile device for as long as the emergency make or receive any calls, the mobile device must be switched on and in a service area with adequate signal responder instructs you. Navigation strength. Emergency calls may not be possible on all wireless mobile Maps, directions, and other navigation-data, including data device networks or when certain network services and/or relating to your current location, may contain inaccurate or... -
Page 110: Care And Maintenance
Do not expose your mobile device to dust, dirt, or sand. years: Cleaning solutions Keep your Samsung Mobile Device away from: Do not use harsh chemicals, cleaning solvents, or strong Liquids of any kind detergents to clean the mobile device. Wipe it with a soft Keep the mobile device dry. - Page 111 • Damage to hearing occurs when a person is exposed to loud Always turn the volume down before plugging the earphones into sounds over time. The risk of hearing loss increases as an audio source. sound is played louder and for longer durations. Prolonged •...
- Page 112 • Avoid using headphones after exposure to extremely loud noises, National Institute on Deafness and Other such as rock concerts, that might cause temporary hearing loss. Communication Disorders Temporary hearing loss might cause unsafe volumes to sound National Institutes of Health normal.
-
Page 113: Operating Environment
Implantable Medical Devices Email: cdcinfo@cdc.gov A minimum separation of six (6) inches should be maintained Internet: between a handheld wireless mobile device and an http://www.cdc.gov/niosh/topics/noise/ implantable medical device, such as a pacemaker or default.html implantable cardioverter defibrillator, to avoid potential 1-888-232-6348 TTY interference with the device. -
Page 114: Posted Facilities
Other Medical Devices or fire resulting in bodily injury or even death. Users are advised to switch the mobile device off while at a refueling If you use any other personal medical devices, consult the point (service station). manufacturer of your device to determine if it is adequately shielded from external RF energy. -
Page 115: Fcc Hearing Aid Compatibility (Hac) Regulations For Wireless Devices
FCC Hearing Aid Compatibility (HAC) be able to use a rated mobile device successfully. Trying out Regulations for Wireless Devices the mobile device with your hearing device is the best way to evaluate it for your personal needs. The U.S. Federal Communications Commission (FCC) has M-Ratings: Wireless mobile devices rated M3 or M4 meet established requirements for digital wireless mobile devices FCC requirements and are likely to generate less interference... -
Page 116: Restricting Children's Access To Your Mobile Device
hearing aid meets the M2 level rating and the wireless The HAC rating and measurement procedure are described in mobile device meets the M3 level rating, the sum of the two the American National Standards Institute (ANSI) C63.19 values equals M5. standard. -
Page 117: Other Important Safety Information
Cautions • When using a headset in dry environments, static electricity can build up in the headset and cause a small quick static electrical Any changes or modifications to your mobile device not expressly approved in this document could void your shock. - Page 118 • Failure to observe these instructions may lead to the suspension or denial of cell phone services to the offender, or legal action, or both. • While using your device, leave some lights on in the room and do not hold the screen too close to your eyes. •...
-
Page 119: Section 12: Warranty Information
1 Year conjunction or connection with accessories, products, or ancillary/peripheral equipment not furnished or approved by Case/Pouch/Holster 90 Days SAMSUNG; (g) defects or damage resulting from improper Other Phone 1 Year testing, operation, maintenance, installation, service, or Accessories adjustment not furnished or approved by SAMSUNG;... - Page 120 (iii) the battery has return the Product to an authorized phone service facility in been used in equipment other than the SAMSUNG phone for an adequate container for shipping, accompanied by the which it is specified.
- Page 121 ALLOW LIMITATIONS ON HOW LONG AN IMPLIED WARRANTY claims, whether in advertising, presentations or otherwise, LASTS, OR THE DISCLAIMER OR LIMITATION OF INCIDENTAL on behalf of SAMSUNG regarding the Products or this Limited OR CONSEQUENTIAL DAMAGES, SO THE ABOVE LIMITATIONS Warranty.
- Page 122 For any arbitration in which your total damage claims, exclusive of attorney fees and expert witness fees, are ALL DISPUTES WITH SAMSUNG ARISING IN ANY WAY FROM $5,000.00 or less (“Small Claim”), the arbitrator may, if you THIS LIMITED WARRANTY OR THE SALE, CONDITION OR...
- Page 123 You may opt out of this dispute resolution procedure by Severability providing notice to SAMSUNG no later than 30 calendar days If any portion of this Limited Warranty is held to be illegal or from the date of the first consumer purchaser’s purchase of the unenforceable, such partial illegality or unenforceability shall Product.
-
Page 124: End User License Agreement For Software
Phone: 1-800-SAMSUNG THE SOFTWARE. Phone: 1-888-987-HELP (4357) © 1. GRANT OF LICENSE. Samsung grants you the following 2012 Samsung Telecommunications America, LLC. All rights provided that you comply with all terms and conditions rights reserved. of this EULA: You may install, use, access, display and run... - Page 125 Update that Samsung may provide to you or make available to you after the date you 4. CONSENT TO USE OF DATA. You agree that Samsung and its obtain your initial copy of the Software, unless we provide affiliates may collect and use technical information gathered other terms along with such Update.
- Page 126 License will terminate automatically without restrictions imposed by your network or internet provider. notice from Samsung if you fail to comply with any of the Unless your device is connected to the internet through Wi-Fi connection, the Software will access through your mobile...
- Page 127 "AS AVAILABLE" BASIS, WITHOUT WARRANTIES OF ANY KIND agree that Samsung is not responsible for the availability of FROM SAMSUNG, EITHER EXPRESS OR IMPLIED. TO THE such applications and is not responsible or liable for any...
- Page 128 (“Samsung Account”), and your loss, including but not limited to any damage to the mobile rights and obligations will be set forth in separate Samsung device or loss of data, caused or alleged to be caused by, or Account terms and conditions and privacy policies.
- Page 129 PERMITTED BY APPLICABLE LAW, EVEN IF ANY REMEDY where you are a resident. Notwithstanding the foregoing, FAILS ITS ESSENTIAL PURPOSE. Samsung may apply for injunctive remedies (or an equivalent 14. U.S. GOVERNMENT END USERS RESTRICTED RIGHTS. The type of urgent legal relief) in any jurisdiction.
- Page 130 Opt Out." You must include in the opt out e-mail (a) your part of any award, but may not grant Samsung its attorney name and address; (b) the date on which the device was fees, expert witness fees or costs unless it is determined that purchased;...
- Page 131 Software, and you will continue to enjoy the benefits of this license. 17. ENTIRE AGREEMENT; SEVERABILITY. This EULA is the entire agreement between you and Samsung relating to the Software and supersedes all prior or contemporaneous oral or written communications, proposals and representations with respect to the Software or any other subject matter covered by this EULA.
-
Page 132: Index
Index Browser Voice Commands 30 launching 74 Call Settings Accessing Contacts 47 links 75 answer options 84 Activating Your Phone 9 using 74 auto answer 84 Alarm Clock 79 using Browser keys 75 auto retry 85 Answering a Call 29 using soft keys 74 DTMF Tones 86 Apps... - Page 133 Camera 60 adding - menu method 48 Display Themes 81 camcorder options 64 adding call numbers 50 Do cell phones pose a health hazard? My Image viewer 71 deleting 52 options 61 editing 49 Draft Messages 42 playing videos 66 finding 49 DTMF Tones 86 sending photos 61...
- Page 134 Fn (Function) Key 19 Lock/Symbol Key 21 Memory Card Fonts Message Key 20 formatting 11 size 81 Navigation Key 20 installing 10 Right Soft Key 17 removing 11 Send Key 18 Memory Info 91 Getting Started settings 90 Memory Management 91 Understanding this User Manual 4 Shift Key 19 Menu...
- Page 135 Drafts Folder - viewing My Images 71 Display Screen 22 and editing 43 My Ringtones 72 Display Screen Icons 22 erase messages 45 assigning ringtones 72 features 12 message folders 40 recording voice memos 72 reset phone 88 Messages Folder 40 My Videos 73 security settings 87 Messages Folder - managing 42...
- Page 136 Tone Room Deluxe 73 Voice Commands 30 Spacebar/Voice Command Key 20 TTY Mode 85 Speakerphone Key 21 Turn Phone Off and On 9 Samsung Mobile Products and Specific Absorption Rate (SAR) Recycling 102 Certification Information 97 Security UL Certified Travel Charger 103...
- Page 137 Vibrate Mode Key 20 Wallpaper Videos settings 80 camcorder options 64 Warranty Information 115 My Videos player 73 World Clock 79 playback controls 66 playing 66 recording 63 sending 64 Voice Commands 30 calling 31 checking status 32 Contacts 33 opening menus or applications 32 sending messages 32 settings 33...
Need help?
Do you have a question about the SCH-R480 and is the answer not in the manual?
Questions and answers