
Related Manuals for Frye FONIX 7000


Summary of Contents for Frye FONIX 7000
- Page 1 FONIX 7000 ® Hearing Aid Test System Operator’s Manual Version 1.51 ©2006, Frye Electronics, Inc. All rights reserved Oct. 23, 2006...
-
Page 3: Table Of Contents
1.6.1 Unpacking the FONIX 7000 ........ - Page 4 3.3 Hearing Aid Setup ........
- Page 5 5.1.2 Setting up the hearing aid for ANSI ....... . .
- Page 6 5.1.7 Testing Digital Hearing Aids..............114 5.1.8 Viewing ANSI measurements in the Coupler screen .
- Page 7 6.4.6 Using Semi-Auto and Fully-Auto Mode ............151 6.4.7 Testing with a single tone or three frequency average .
-
Page 9: Chapter 1: Introduction & Setup
The 7000 Test System has many design improvements, including a high-resolu- tion color display, a flexible and easy-to-use interface, and built-in help screens. Throughout the design process of the 7000 Test System, the engineers at Frye Electronics have followed two important mantras: Flexibility and Usability. We wanted all the features of the existing 6500-CX system in a new package that was easier to use and easier to upgrade. -
Page 10: Basic Test Functions
Frye instruments. The FP40 analyzer introduced “function buttons” that adapt to handle the specific needs of each test screen and sequence. The FP35 analyzer added help screens and local menus to make the analyzer more intuitive and easier to use. - Page 11 Introduction and Setup with a probe microphone. Using real-ear measurements makes it possible to individualize the fitting of a hearing aid since a coupler measurement can sel- dom tell the operator exactly how what sound is received by the client. Many factors affect the sound on its way to the ear drum.
-
Page 12: Accessories
The following are accessories that are standard and optional on your FONIX 7000 hearing aid analyzer. 1.4.1 Standard Accessories The following accessories come standard with each 7000 test system. FONIX 7000 Hearing Aid Analyzer Coupler Microphone—M1950E 14 mm pressure-type electret instru- mentation microphone. - Page 13 Introduction and Setup Other Standard Accessories: Thermal Paper Fun-Tak RS232 Cable Dummy Microphone (for testing to ANSI specifications) Sound Chamber Replacement Feet Operator’s Manual Maintenance Manual (upon request at time of purchase) Microphone Adapter 14 mm to 1" (25.4) mm adapter for coupling the M1950E microphone and reference microphone to a 1-inch device such as a sound level calibra-...
-
Page 14: Real-Ear Accessories
1.4.2 Real-Ear Accessories When the Real-Ear Option is ordered, the following accessories are included. FONIX 7000 Hearing Aid Analyzer Remote Module and Microphones The remote module allows the user to control the analyzer while remaining close to the patient. The probe and ref-... - Page 15 Introduction and Setup Monitor Headset Plugs into the remote module, and allows the user to listen to the signal being measured by the probe micro- phone. Model of headset may differ from one shown. Wedge-style Ear Hook Standard Size. Holds probe and refer- ence microphone during real-ear test- ing.
-
Page 16: Optional Accessories
1.4.3 Optional Accessories FONIX 7000 Hearing Aid Analyzer Infant/Child Headband Includes infant, child, and adult head- bands, six bendable earhooks, and two sets of “animal ears.” 6-cc Coupler Enables checking the response of stan- dard audiometer headphones. It is designed around the NBS 9A coupler specifications. - Page 17 Introduction and Setup Open Ear Coupler Non-standard coupler used for realistic testing of open ear hearing aids. #5 battery pill Provides battery current measurements for many CIC hearing aids. Also available: #41 battery pill Sound Level Calibrator A portable, self-contained, field-type calibrator for calibrating the microphone amplifier.
- Page 18 FONIX 7000 Hearing Aid Analyzer Sound Chamber Stand A secure, steel-tube stand that improves sound isolation and brings the testing area of the test chamber to convenient table height. Color matches the electronics module. Sound Chamber Spring Damper Factory-installed.or Assembly Kit.
-
Page 19: Layout, Controls, And Safety
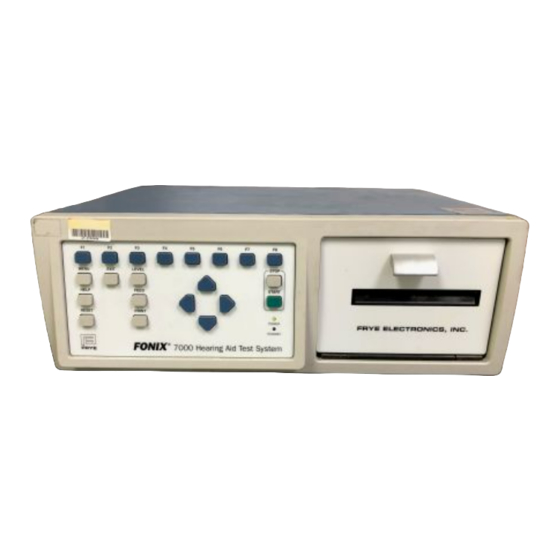
Introduction and Setup 1.5 Layout, Controls, and Safety This section describes the basic layout of the front and rear panel of the 7000 test system, and special information pertaining to safety regulations. 1.5.1 Front Panel Layout The front panel of the 7000 test system consists of 8 function keys, 4 arrow keys, and 9 other keys with varying operations. - Page 20 Power: When green, this LED indicates that the 7000 Test System is powered on. Standby: When green, this LED indicates that the screensaver mode is engaged (screensaver not available at this time) FONIX 7000 Hearing Aid Analyzer...
-
Page 21: Rear Panel Layout
The rear panel of the 7000 test system contains most of the external connec- tions for the analyzer. See Figure 1.5.2 for a diagram of the back panel. T630 mAL FONIX 7000 Serial No. 1234 Frye Electronics products are protected by U.S. and/or foreign patents and/or patents pending Figure 1.5.2—Back panel 1. PRINTER: 2. -
Page 22: Safety
11. PROBE: KEYBD: AUX: The following safety symbols can be found on the back of the 7000 hearing aid analyzer: 1.5.3 Safety Safety Classification for IEC 60601-1 Type of protection against electric shock: Class I Degree of protection against electric shock: Type B... - Page 23 Introduction and Setup Connection of peripheral equipment to the 7000 Compliance with IEC 60601-1-1 Safety requirements for medical electrical sys- tems must be determined on a case-by-case basis. All electrical equipment attached to the 7000, such as video monitors, computer equipment, etc.
-
Page 24: Setup
1.6.1 Unpacking the FONIX 7000 Remove the FONIX 7000 test system from the shipping cartons. Store the ship- ping cartons in a dry place so that they can be used again in the event that the unit must be returned to the factory for repair or upgrade. -
Page 25: Locating And Arranging The 7000 Test System
Introduction and Setup 1.6.2 Locating and arranging the 7000 test system Locate the 7000 test system in a moderately quiet area, such as a private office or laboratory. In order for test results to reliably conform to specifications, the ambient noise, mechanical vibrations, electrical or magnetic fields must not affect test results by more than 0.5 dB (ANSI S3.22). -
Page 26: Connecting The Real-Ear Equipment
Consult accompanying documents. FONIX 7000 Serial No. 1234 ELECTRICAL RATING: 100–240 V 50-60 Hz Frye Electronics products are protected by U.S. and/or foreign patents and/or patents pending External printer (not provided) Figure 1.6.3 —7000 test system setup 1.6.4 Connecting the Real-Ear Equipment If you ordered the Real-Ear Option, connect the real-ear equipment as follows. -
Page 27: Powering Up The 7000 Test System
& reference microphones and the sound field speaker. These calibrations can be performed by any Frye distributor or by yourself with the aid of a sound level calibrator such as a Quest QC-10. Please see Appendix B for calibration instructions. -
Page 28: Care & Maintenance Of Your M1950E Coupler Microphone
This information will help us help you regarding repair, upgrade, and technical questions. The serial number of your 7000 test system can be found on the back of the main module, just to the right of the power switch. See Figure 1.7.3A. FONIX 7000 Hearing Aid Analyzer... - Page 29 Introduction and Setup Figure 1.7.3A—Serial number location The software version of your 7000 test system can be found on the Opening screen. See Figure 1.7.3B. Press [HELP] to open a help window with more detailed service information. This data may be requested if you call in with a repair-related question. Press [HELP] again to close the help window.
-
Page 30: Contacting The Factory
(given in Appendix A of this manual) for a period of one year from the date of purchase. FONIX 7000 Hearing Aid Analyzer Shipping address: Frye Electronics 9826 SW Tigard St. -
Page 31: Chapter 2: General Operation
Chapter 2 General Operation This chapter describes the general operation of the 7000 test system, including basic operation of the buttons, screen navigation, default settings, source types, printing, and other information. 2.1 Operation of buttons The general operation of the various buttons on the 7000 test system are described in this section. - Page 32 [>] to perform the actual selection. For example, in the Coupler screen, pressing [F5] will bring up a selection of source types. To select the desired source, you would use [∨, ∧]. To complete the selection, you would press [>]. FONIX 7000 Hearing Aid Analyzer...
-
Page 33: Navigating Through The Screens
General Operation 2.1.2 Navigating through the screens The function keys are used to move from screen to screen. Here is a flow chart of all the available screens and the buttons used to open each screen. Some of the screens will only be available to you if you’ve ordered a certain option. Coupler Screen Audiogram... -
Page 34: Using The Pop-Up Help Windows
FONIX 7000 Hearing Aid Analyzer 2.1.3 Using the pop-up help windows Each operational screen on the 7000 test system has a local help window designed to give you a basic operational overview of the current screen. In gen- eral, these help windows tell you what each button does in the current screen. -
Page 35: Using The Local Menus
General Operation 2.1.4 Using the local menus Pressing the [MENU] button will pop up a local menu that, like the help win- dow, will be overlaid on your current screen. Each local menu contains selec- tions specific to your current screen. For instance, when you are in the Coupler screen, the local menu will contain only selections specific to coupler measure- ments. -
Page 36: Using The Exit And Reset Buttons
The [RESET] button resets the analyzer and returns it to the start screen. By default, this start screen is the Opening screen with the Frye logo. However, the user can change the start screen to be the Coupler Multicurve screen by chang- ing the settings in the Default Settings (see Section 2.2.1). -
Page 37: Saving And Loading Default Settings
General Operation 2.2.1 Saving and loading default settings All of the settings in the Setup menu (described in Section 2.2.4) can be saved as default settings. There are five possible setups, so you can have five different configurations saved into the analyzer’s permanent memory. To save a user configuration: 1. -
Page 38: Setting The User Mode
Other AID TYPE: Type of hearing aid being measured. Choose between STANDARD (linear), AGC, and ADAPTIVE AGC. This will affect the delays of pure-tone sweeps as well as some other measurements. See Section 2.3.1.3 for details. - Page 39 START SCREEN: The screen shown when the analyzer is powered on or the [RESET] button is pressed. COUPLER sets this screen to the Coupler Multicurve screen. OPENING sets this screen to the Opening screen with the Frye logo. Date/Time YEAR/MONTH/DAY/HOUR/MINUTE: Current date and time. See Section 2.2.2.
- Page 40 FONIX 7000 Hearing Aid Analyzer NOISE RED (TONE): Pure-tone noise reduction for real-ear measurements. See Section 2.3.1.2. NOISE RED (COMP): Composite noise reduction for real-ear measurements. See Section 2.3.2.1. SMOOTHING: Status of smoothing, which rounds off real-ear curves and removes minor peaks. Turn it ON or OFF.
-
Page 41: Source Types
Digital Speech. The composite signal can have your choice of speech weight- ings, including ANSI and ICRA. The type of signal you should choose for a particular test or type of hearing aid depends upon the situation. Here is a description of each of the source types and when you would want to use them. -
Page 42: Pure-Tone Settings
FONIX 7000 Hearing Aid Analyzer 2.3.1.1 Pure-tone settings There are several different settings available for pure-tone sweeps. You can change all of them in the Setup menu (see Section 2.2). Some of these settings are also available in local menus. Here is an explanation of the pure-tone set- tings. -
Page 43: Noise Reduction
In determining the length of time needed for a proper measurement, a good rule is to use twice the published attack time of the hearing aid. If you are unsure of the attack time, you can experiment with longer times and shorter times and see if there is any difference in the test results. -
Page 44: Harmonic Distortion
Harmonic distortion occurs when a hearing aid clips the peak of a pure-tone input signal, resulting in artifacts at harmonics (integer multiples) of that input signal. For example, if you present a 500 Hz tone to the hearing aid, distortion artifacts could occur at 1000 Hz and 1500 Hz. -
Page 45: Understanding Composite Signals
ANSI, ICRA, and FLAT. Flat is generally only used for specific research purposes—it contains no speech weighting and is difficult for most hearing aid circuits to process. See Section 2.3.2.3 for a discussion of the ANSI and ICRA speech weightings. -
Page 46: Noise Reduction
FONIX 7000 Hearing Aid Analyzer A significant advantage of using a composite signal is that each frequency pres- ent in the signal can be individually controlled in amplitude and phase. As the analyzer goes through the leveling process, each component is adjusted to produce a signal that is optimally accurate at the reference point where the lev- eling microphone is located. -
Page 47: Composite Filter
General Operation Figure 2.3.2.2—Example of IM distortion 2.3.2.3 Composite filter There are two main types of composite filters (also known as “speech weight- ing”): ICRA and ANSI. They differ in the speech spectrum they use. The ANSI filter, taken from the ANSI S3.42 standard, rolls off the high frequen- cies at a rate of 6 dB per octave, starting with a 3 dB drop at 900 Hz. -
Page 48: Composite Type
FONIX 7000 Hearing Aid Analyzer Figure 2.3.2.3—Comparison of the ICRA shape and the ANSI shape 2.3.2.4 Composite type There are two types of the traditional Composite signal available on the 7000 test system. They are known as “Standard” and “Chirp.” The two signals differ in the manner that their phase is generated, and this difference has an impact on the crest factor of the signals. -
Page 49: Composite Source Levels
General Operation Chirp Composite signal is the standard composite signal used on the FP40 and FP35 portable hearing aid test systems. Although the Standard and Chirp Composite signals sound the same to most people, an analysis tool such as Tempus3D will show the difference between them. -
Page 50: Digital Speech Technical Details
2. Use [∨, ∧] to select Printer under Misc Settings. (You can use the [START] button to skip ahead sections in the local menu.) 3. Use [>] to make your printer selection (INTERNAL or EXTERNAL). 4. Press [EXIT] to return to the measurement screen. FONIX 7000 Hearing Aid Analyzer... -
Page 51: Adding A Label
A label with your printout allows you to record useful information about the client and hearing aid to go along with the test results. See Figure 2.4.2. If you are in the middle of a test, and you want to add a label for the printout in the local screen, without changing the default setting: 1. -
Page 52: Using The Internal Printer
There are two categories of errors that can occur with the 7000 printer: initial- ization errors and printing errors. Initialization errors occur only when the 7000 analyzer is first powered up; this also initializes the printer. Here are the printer initialization error codes: FONIX 7000 Hearing Aid Analyzer... -
Page 53: Loading The Thermal Paper
If you are having a problem with the 7000 printer, contact the factory (Section 1.7.4) and be ready to provide the Frye technician with the error code. The printer software version, available in the help menu of the Opening screen, will also be helpful. - Page 54 3. Unroll approximately six inches of paper from the roll, and insert the paper’s leading edge into the bottom of the printer, directly behind the rub- ber roller. See Fig. 2.4.4C. Figure 2.4.4B—Head-Up lever in up position. FONIX 7000 Hearing Aid Analyzer...
- Page 55 General Operation Figure 2.4.4C—Loading paper into the printer 4. While holding the paper in place behind the rubber roller, manually turn the thumbwheel to advance the paper approximately one inch. Never press the [FEED] button while the Head-Up lever is in the up position. See Note 2 at the end of this section.
-
Page 56: Unloading A Partial Roll Of Paper
5. Follow the directions found in Section 2.4.1 to select the external printer in the 7000 software. If you want to set the printer language or whether to print in color or black & white, you will need to use the Setup menu. FONIX 7000 Hearing Aid Analyzer... -
Page 57: Putting Multiple Screens On A Page
General Operation 2.4.7 Putting multiple screens on a page When printing with an external printer, it is possible to save paper by putting two screen prints on one piece of paper. This is done by printing the first screen on one half of the paper and leaving the paper halfway through the external printer until you choose to print the second screen. - Page 58 Source Transducer: This identifies the transducer used to make the measure- ment. “Chamb” means sound chamber. “S.F.” means sound field. “Tcoil” refers to a telecoil board or telewand transducer. Source Amplitude: This identifies the amplitude of the signal used to make the curve. FONIX 7000 Hearing Aid Analyzer...
-
Page 59: Viewing Numerical Data
General Operation RMS Out: The root-mean-square of the measured curve. Correction Factors (COR): The coupler correction factors used to make the mea- surement. Coupler screen only. Noise Reduction: The noise reduction used to make the measurement. See Sections 2.3.1.2 and 2.3.2.1. Lastly, just to the right of the Curve Name column, the 7000 test system uses symbols to describe the display status of the curves. -
Page 60: Computer Connection
However, we have made a special effort to ensure all real- ear functions can be performed with the remote module, allowing you to step away from the main module during the measurement process and make any necessary adjustments to your client and testing situation. FONIX 7000 Hearing Aid Analyzer... -
Page 61: Leveling
General Operation Figure 2.7—Remote Module 2.8 Leveling Leveling is the process by which the response of the sound chamber or sound field is measured and computer-corrected so that a flat sound field is achieved. Sound chamber leveling can be saved into permanent memory, but sound field leveling for real-ear measurements must be done for every patient and every ear. - Page 62 (This technique should NOT be used for leveling for actual real-ear measurements.) Contact the factory or your local FONIX distributor if you continue to have prob- lems with leveling. FONIX 7000 Hearing Aid Analyzer...
-
Page 63: Chapter 3: Basic Sound Chamber Tests
Chapter 3 Basic Sound Chamber Tests In the Coupler screen, you can view measurement curves in dB SPL or dB Gain, and run them with Composite, Digital Speech, or pure-tone signals. You can dis- play up to 10 curves on the Coupler screen at the same time. From the Opening screen of the 7000 test system, enter the Coupler screen by pressing [F1]. -
Page 64: Viewing A Composite Display
Refer to Figure 3.1.2 for the following explanation of the graphical display: 1. Type of display. This will be either dB SPL (coupler output) or dB Gain (cou- pler gain). 2. Selected ear. 3. Curve Characteristics box. See Section 2.5.1 for more details. FONIX 7000 Hearing Aid Analyzer... -
Page 65: The Leveling Process
If you are getting bad coupler frequency responses that you suspect are the fault of the analyzer, rather than the fault of the hearing aid, the first step of trouble- shooting is to level the sound chamber. Even if the screen says LEVELED, the response of the measurement microphone may have altered since the analyzer was last leveled, invalidating the leveling. -
Page 66: Removing The Leveling Of The Sound Chamber
3.3 Hearing Aid Setup Coupler types and methods for attaching them to hearing aids are described in this chapter. This includes a description of the HA-1 coupler, HA-2 coupler, and the ear-level adapter (used with the HA-2 coupler). FONIX 7000 Hearing Aid Analyzer... -
Page 67: Explaining The Coupler Types
Basic Sound Chamber Tests 3.3.1 Explaining the Coupler Types The HA-1 direct access coupler is used to test in-the-ear and canal aids, and aids with molds connected. Figure 3.3.1B shows the direct access coupler. The sound bore of the aid is sealed directly to the 2-cc cavity of this coupler with Fun-Tak putty, provided with the instrument. -
Page 68: In-The-Ear (Ite) And Canal Aids
3.3.2 In-The-Ear (ITE) and Canal Aids FONIX 7000 Hearing Aid Analyzer 1. Roll the Fun-Tak, provided with each instrument, into a rod long enough to go around the transmitting end of the aid (approximately 2 inches). - Page 69 Basic Sound Chamber Tests 4. Seal any vent on the aid with a small kernel of Fun-Tak. 5. Complete the acoustical sealing of the aid to the coupler by using a pen- cil or finger. You may want to dou- ble-check the aid placement through the open end of the coupler at this point.
-
Page 70: Behind-The-Ear (Bte) Aids
HA-1 or HA-2 coupler. One such device, pictured in Figure 3.3.4A, is attached to the speaker unit of the open-ear hearing aid and to the tubing of an HA-2 coupler. Other connecting devices consist of a plate that attaches to an HA-1 coupler. - Page 71 Figure 3.3.4B—HA-1 Coupler Figure 3.3.4C—Open-ear coupler Figure 3.3.4D contains an example of a comparison of an open-ear hearing aid tested with an open-ear coupler (Curve 1), an HA-1 coupler attached to the open-ear hearing aid with Fun-Tak (Curve 2), and an HA-2 coupler with an open-ear attachment (Curve 3).
-
Page 72: Body Aids
Figure 3.3.4D—Comparison of couplers with open-ear hearing aid. Curve 1 was measured using the Open Ear coupler, Curve 2 with an HA-1 coupler, Curve 3 with an HA-2 coupler, and Curve 4 is the KEMAR real-ear response. 3.3.5 Body Aids 1. -
Page 73: Eyeglass Aids
Figure 3.3.5A—Coupler setup 3.3.6 Eyeglass Aids 1. Follow the manufacturer’s instructions for removing the hearing aid assem- bly or the temple piece from the eyeglass frame, if possible. Should you be unable to remove the aid assembly or temple from the frame, it is possible to place the entire frame in the test chamber for testing. -
Page 74: Wireless Cros And Bicros Aids
You can test these units in the test chamber of the FONIX 7000 Test System. See Figure 3.3.7. 1. Place the microphone of the transmitter at the reference point in the test chamber. - Page 75 3. Test the hearing aid again. Adding the transmitter should increase the gain by the amount specified by the manufacturer. It is not possible to get exact measurements by this measure because at least one of the microphones will not be at the reference point.
-
Page 76: Wire-Type Cros And Bicros Aids
(Otherwise, follow the steps given in Section 3.3.7 for BICROS aids.) 3.4 Basic Measurements In the Coupler screen of the 7000 analyzer, you can perform the following mea- surements: response curves, single-frequency measurements, three-frequency averages, harmonic distortion, and intermodulation distortion. FONIX 7000 Hearing Aid Analyzer... -
Page 77: Signal Types
Basic Sound Chamber Tests 3.4.1 Signal Types The following signal types are available: DIGITAL SPEECH—A randomly interrupted composite signal designed to mimic speech. This signal is for use with hearing aids with a “noise reduc- tion” or “speech enhancing” feature that lowers the gain of the aid in the presence of a continuous signal (such as the regular composite signal). -
Page 78: Example
3. Use [∨, ∧] to select a source level of 50 dB SPL. 4. Use [F5] to select a source type of COMPOSITE. 5. Press [START] to run the first measurement. Press [STOP] when the mea- surement has stabilized. FONIX 7000 Hearing Aid Analyzer... - Page 79 Basic Sound Chamber Tests 6. Use [F2] to select CRV 2. 7. Use [∧] to select a source level of 60 dB SPL. 8. Press [START] to run the second measurement. Press [STOP] when the mea- surement has stabilized. 9. Use [F2] to select CRV 3. 10.
-
Page 80: Deleting Measurements And Settings
• All Curves & Settings: Delete all curves and return them all to analyzer default settings. To delete a curve: 1. Press [F4]. 2. Use [∨, ∧] to make the desired deletion type. 3. Press [>] to perform the deletion and close the pop-up menu. FONIX 7000 Hearing Aid Analyzer... -
Page 81: Running A Single Frequency Measurement
Basic Sound Chamber Tests 3.4.5 Running a Single Frequency Measurement At times, you may want to find out what the frequency response of the hearing aid is to a single pure-tone signal. See Figure 3.4.5. 1. Press [MENU] from the Coupler screen. 2. -
Page 82: Measuring Harmonic Distortion
7. Adjust the amplitude using the [∧,∨] buttons. Figure 3.4.6—Measuring a three frequency average 3.4.7 Measuring Harmonic Distortion Harmonic distortion is when the hearing aid returns energy at frequencies not present in the source signal. The 7000 analyzer allows you test for this phe- nomenon very easily. - Page 83 Basic Sound Chamber Tests 3RD: Distortion present at the third harmonics, or three times the presented frequency. TOTAL: Distortion present at the second and third harmonics. 4. Press [EXIT]. 5. Use [F5] to select a signal type of TONE NORMAL. (Press [F5]. Use [∨, ∧] to select TONE NORMAL.
-
Page 84: Intermodulation Distortion
3.4.8 Intermodulation Distortion The composite signal is helpful for identifying intermodulation distortion (IM), a type of distortion that sometimes occurs in a hearing aid response. IM distortion occurs when more than one frequency is present in the source signal and those frequencies combine to create new frequencies not actually present in the source. -
Page 85: Battery Current Drain
6. Use [>] to turn ON the Battery Meas. 7. Use [∨] to select Battery Size and use [<, >] to select the hearing aid’s bat- tery size. 8. Press [EXIT] to return to the Coupler screen. You should now see the bat- tery current drain measurement below the Curve Characteristics box. -
Page 86: Telecoil
Every 7000 sound chamber has a built-in telecoil board that can be used for telecoil testing. 1. Set up the hearing aid for testing in the usual way by connecting it to the appropriate coupler and inserting the measurement microphone. - Page 87 The Telewand is supposed to provide a more realistic test of the telecoil features of a hearing aid than the built-in telecoil board in the sound chamber because it more closely simulates the magnetic field pro- duced by a telephone receiver.
-
Page 88: Measuring Directionality
The FONIX 7000 hearing aid test system cannot give you a polar plot of the directional hearing aid response, but it can provide you with the basic informa- tion of how much directional benefit the hearing aid wearer is receiving and at which frequencies. - Page 89 Figure 3.4.11A—7000 sound chamber speaker placement Forward measurement The first step in doing a directional test is to position the hearing aid in the sound chamber so that the front of the hearing aid is pointing towards the right side of the chamber. See Figure 3.4.11B. Close the sound chamber lid and per- form the following steps: 1.
- Page 90 Next, open the sound chamber and position the hearing aid so that the front of the hearing aid is pointing towards the left side of the chamber. See Figure 3.4.11C. Different hearing aids have different null points so you will want to adjust the positioning so that the sound chamber speaker is pointing towards what should be the null point of the directional aid.
- Page 91 Basic Sound Chamber Tests Figure 3.4.11C—Reverse directional measurement Figure 3.4.11D—Directional measurement screenshot...
-
Page 92: Digital Hearing Aids
DIG SPEECH in Step 3. Digital Speech can be used to accurately test any hearing aid, so if you aren’t sure if the hearing aid is digital, you can always use Digital Speech and be assured that the frequency response is correct. -
Page 93: Testing With Bias Signals
Basic Sound Chamber Tests 5. Use [F5] to choose the DIG SPEECH signal source. It will now have the ICRA speech weighting. See Figure 3.5.2 for a comparison of an aid tested with the ANSI and ICRA speech weightings. 5. Use [F5] to choose the DIG SPEECH signal source. It will now have the ICRA speech weighting. -
Page 94: Checking Noise Suppression
3.5.4 Checking Noise Suppression When testing a digital hearing aid that is supposed to be programmed with a noise suppression or speech enhancement feature, it is useful to make sure the feature is working correctly. - Page 95 Digital Speech signal just as it would respond to the Composite signal. This could be an indication that the digital suppression feature is either not enabled or not present on the hearing aid. Figure 3.5.4 gives an example of a hearing aid that is amplifying the Digital Speech sig- nal and suppressing the Composite signal.
-
Page 96: Understanding Terminology
Just keep in mind that these are two separate applications of the phrase “Noise Reduction” that mean two completely different things. When you set the Noise Reduction on your FONIX 7000 test system, you are setting the amount of aver- aging the analyzer does. When you set Noise Reduction on your hearing aid, you are usually setting the amount of noise reduction that the hearing aid does. -
Page 97: Occluded Ear Simulator Option
FAST, COMPOSITE, or DIG SPEECH signal, press [STOP] to end the measurement once it has stabilized. Figure 3.6 shows the difference between a CIC hearing aid tested with an HA-1 coupler, and the same aid tested with a CIC coupler and correction factors. - Page 98 1. Attach the MZ coupler to the aid. See Table 3.7 for details on choosing the correct MZ coupler. 2. Set up the hearing aid for testing as described in Section 3.3. 3. Press [MENU] in the Coupler screen. 4. Highlight Coupler Type under Measurement Settings with [∨, ∧].
-
Page 99: Automatic Testing-Loading & Saving Groups
Basic Sound Chamber Tests Figure 3.7—Comparison of the responses with the MZ and HA-2 couplers. Curve 2 was measured with an MZ coupler and OES correction factors. Curve 1 was measured using a standard 2-cc coupler. 3.8 Automatic Testing—Loading & Saving Groups You can use the 7000 Test System to program simple automated or semi-auto- mated test sequences that will help you test hearing aids more efficiently. -
Page 100: Setting Up A Test Sequence
CRV 4. This will make the analyzer pause after the four mea- surements – the remaining 6 available curves will not be run. 11. Use [F6] to SAVE GROUP 1, 2, or 3, if desired. This will permanently save the automated sequence. FONIX 7000 Hearing Aid Analyzer... -
Page 101: Loading A Saved Test Sequence
A programmed pause will be indicated by a horizontal line across the Curve Characteristics box. -
Page 102: Complete List Of Menu Items
The 7000 analyzer will automatically advance the curve selection to the next curve. 4. Make any desired adjustments to the hearing aid and repeat Step 3 until you have measured all your curves. Use [F6] to turn the AUTO TEST OFF when you want to return to normal test- ing mode. - Page 103 • Composite Filter: Filter used in Composite and Digital Speech measure- ments. Choose between ANSI, ICRA and FLAT. Aid Settings • Aid Type: Type of hearing aid being measured. Choose between STANDARD (linear), AGC, and ADAPTIVE AGC. • Avg Freqs: Selection of three frequencies used in a three frequency aver- age.
- Page 104 • Battery Meas: Status of the battery current measurement. Choose ON or OFF. • Battery Size: Size of battery used with the hearing aid being tested. • Print Label: Status of the printing label. Choose ON or OFF. • Printer: Printer used for printouts. Choose INTERNAL or EXTERNAL. See Section 2.4.
-
Page 105: Chapter 4: Advanced Coupler Tests
For now, this measurement will give you more information about what’s really going on in that digital hearing aid circuit, and, hopefully, it will help you trou- bleshoot why some aids work better than other aids with monaural or binaural... -
Page 106: Signal Phase
If care is not taken, it’s entirely possible to wire one hearing aid of a custom binaural set one way, and wire the other aid in the opposite way. This could cause one of the hearing aids to be “pulling” while the other aid is “pushing,”... -
Page 107: Procedure
Otherwise, they will be shown in the lower two graphs. 5. Set up a second hearing aid in the sound chamber, if desired, and use [F1] to select the other ear. Press [START] to perform the measurements on this second aid. -
Page 108: Battery Current Test
The Battery screen lets you perform extensive tests on the amount of battery current that the hearing aid uses. These tests were designed to give you a com- plete picture of the amount of battery current that the hearing aid drains when exposed to different situations. -
Page 109: Static Test (Estimated Battery Life)
4. Selected test settings. 4.2.1 Static Test (Estimated Battery Life) The Static test estimates the battery life of the hearing aid. To turn on the test: 1. Enter the Battery screen (as described above). 2. Use [F7] to set the battery size: Press [F7]. Use [∨, ∧] to select the battery size of the hearing aid. -
Page 110: Ma/Freq
4.2.2 mA/Freq The mA/Freq test shows how much battery current the hearing aid drains when exposed to different frequencies. By default, it runs a 60 dB SPL LONG pure- tone sweep. The selected amplitude is displayed below the mA/Ampl graph. -
Page 111: Coupler I/O
[RESET] button is pressed.) 4.3 Coupler I/O The Coupler I/O Test measures the input/output of the hearing aid from 50 dB SPL to 90 dB SPL in 5 dB steps. Test results are shown in both graphical format and numerical format and can be displayed in either Gain or SPL (Output). -
Page 112: Attack & Release
The loud stimulus demonstrates the hearing aid’s attack time. That is, how the hearing aid reacts to the test stimulus going from a soft level to a loud level. The last soft stimulus demonstrates the hearing aid’s release time. That is, how the hearing aid reacts to the test stimulus going from a loud level to a soft level. - Page 113 Automated Test Sequences Figure 4.4—Attack & Release Test 1. Attack graph 2. Release graph 3. Measured Attack & Release times and test settings. 4. Currrent Attack & Release settings By default, the Attack & Release test uses the settings specified by the ANSI 96 test sequence at 2000 Hz.
- Page 114 NOT change the duration of the test. Technical Details • In order to determine the attack and the release times of the hearing aid, the 7000 analyzer calculates the settling amplitude of each measurement and uses the tolerance setting to achieve the final test result. The settling amplitude is calculated by averaging the last 16 measurements of the test.
-
Page 115: Chapter 5: Automated Test Sequences
The ANSI 96 standard was officially approved by the FDA on March 17, 2000. This means that any hearing aid designed after this date must be labeled to the ANSI 96 standard. However, if a manufacturer designed a hearing aid before this date, they can continue labeling newly manufacturered aids of the same design to the older ANSI 87 standard. -
Page 116: Leveling For Ansi
1. Place the dummy microphone (a black cylinder, provided when ANSI Option is ordered) into the coupler. 2. Attach the hearing aid to the coupler in the way appropriate for the type of aid under test. See Section 3.3. FONIX 7000 Hearing Aid Analyzer... -
Page 117: Setting Up The Hearing Aid For Ansi
3. Position the hearing aid/coupler assembly in the test chamber with the microphone of the aid at the reference point of the chamber. 4. Place the test microphone as close as practical to the hearing aid micro- phone (3-5 mm). See Figure 5.1.1A. -
Page 118: Setting Up The Analyzer For Ansi
AGC aids to have the most minimum compression possible or as otherwise specified by the manufacturer. 4. Put the hearing aid in “test mode,” if applicable. All noise suppression and feedback cancellation features should be turned off. 5. Set the gain control of the aid to the full-on position. - Page 119 Plug the telewand into the side of the sound chamber, just above the cable that connects the sound chamber to the Frye box. d. Hold the telewand over the aid as if it were the ear piece on a phone.
-
Page 120: Running An Ansi 87 Test
Switch the aid back to normal, microphone mode. f. Press [START] to resume testing. 3. Depending on the aid type selected and the gain of the hearing aid, the ANSI sequence may stop for you to adjust the gain control to the reference- test. - Page 121 Automated Test Sequences Figure 5.1.6—ANSI 03 test results, Frequency Response Screen 9. RTG Measured: Measured reference test gain 10. EQ Inp Noise: Equivalent input noise measurement 11. Resp Limit: The response limit level is determined by taking the three fre- quency average of the RESP 50 curve and subtracting 20 dB.
-
Page 122: Testing Digital Hearing Aids
Chapter 3 and Chapter 6 using the digital speech (DIG SPEECH) signal source. 5.1.8 Viewing ANSI measurements in the Coupler screen It’s possible to copy ANSI response curves to the Coupler screen where they can be compared to other response curves. To do this: FONIX 7000 Hearing Aid Analyzer... -
Page 123: Explaining The Menu Settings
• Battery Meas—The status of the battery current measurement. Turns it ON or OFF. (Battery pill required for this measurement.) • Battery Size—Size of the battery for the hearing aid being tested. • 12 dB Dist—The status of the 12 dB harmonic distortion rule. When mea-... - Page 124 • I/O Meas—The delay between frequencies in the I/O sweep. • Attack Window—The amount of time the analyzer measures the attack time of the hearing aid. Select a time that is at least twice as long as the attack time specified by the manufacturer.
-
Page 125: Ansi S3.42-1992 (Ansi 92)
In order to produce a signal that met with the provisions of the S3.42 standard, Frye Electronics decided to slightly modify the Composite signal for use in this ANSI 1992 test sequence. This modified signal is not used in the normal com- posite operation of the 7000 test system. -
Page 126: Viewing Ansi 92 Results
This target is used to adjust the hearing aid’s actual gain to a level of ±1 dB of the target. The figure is calculated by adding the 60dB SPL input + 17dB and subtracting it from the NSPL90 RMS output. -
Page 127: Viewing Ansi Measurements In The Coupler Screen
Automated Test Sequences Figure 5.2.3—ANSI 92 test results 5.2.4 Viewing ANSI measurements in the Coupler screen It’s possible to copy ANSI response curves to the Coupler screen where they can be compared to other response curves. To do this: 1. Run the ANSI 92 test sequence. 2. -
Page 128: Explaining The Menu Settings
BTE aid, use the BTE adapter and a 0.6” (15 mm) length of #13 thick walled tubing. The combined length of the BTE adapter and the tub- ing is the right length to meet the specification (once you have inserted the ear hook into the tubing). FONIX 7000 Hearing Aid Analyzer... -
Page 129: Running Iec
Automated Test Sequences 5. Level the sound chamber, if necessary (see Section 5.1.1). 6. Plug the battery simulator into the jack near the battery voltage supply. 5.3.2 Running IEC 1. Press [START] from the IEC screen. The instrument will run a measurement and then pause. -
Page 130: Viewing Iec Measurements In The Coupler Screen
• Battery Meas.—The status of the battery current measurement. Turns it ON or OFF. (Battery pill required for this measurement.) • Battery Size—The size of the battery of the hearing aid being tested. IEC Settings • Equiv Noise Test—Status of the EIN measurement. Turns it ON or OFF. -
Page 131: Jis
Automated Test Sequences • Misc. Start Delay—The delay after the first tone is presented and before the first measurement is taken in the HFA/SPA, reference test gain, equiv- alent input noise, and harmonic distortion measurements. • Misc. Meas. Delay—The delay between frequencies in the measurements mentioned above. -
Page 132: Viewing Jis Results
FONIX 7000 Hearing Aid Analyzer 5.4.2 Viewing JIS Results Figure 5.4.2 See Figure 5.4.2 for the following explanation of test results. 1. OSPL90 response curve 2. Full-on gain response curve measured at 50 or 60 dB SPL 3. Response curve measured at reference test gain at 60 dB SPL 4. -
Page 133: Viewing Jis Measurements In The Coupler Screen
• Battery Meas.—The status of the battery current measurement. Turns it ON or OFF. (Battery pill required for this measurement.) • Battery Size—The size of the battery of the hearing aid being tested. Aid Settings • Sweep Start Delay—The delay after the first tone is presented in a pure- tone frequency sweep and before the first measurement is taken. - Page 134 • Equiv Noise Test—Status of the EIN measurement. Turns it ON or OFF. Misc. Settings • Print Label—Status of the printing label. Choose ON or OFF. • Printer—Printer used for printouts. Choose INTERNAL or EXTERNAL. See Section 2.4. FONIX 7000 Hearing Aid Analyzer...
-
Page 135: Chapter 6: Real-Ear Measurements
Chapter 6 Real-Ear Measurements 6.1 Introduction The Real-Ear Option gives you the capability to make probe microphone mea- surements inside your client’s ear. You can: • Input audiograms • Create targets • Perform insertion gain measurements • Perform SPL measurements •... -
Page 136: Navigating Through The Real-Ear Screens
45 degrees (halfway between the client’s nose and ear). The height of the loud- speaker should be level with, or a little above the ear. See Figure 6.2.1. NOTE: It is especially important for accuracy that the speaker is within 12" if you are using a 90-dB signal. FONIX 7000 Hearing Aid Analyzer... -
Page 137: Placing The Earhook And Reference Microphone
Real-Ear Measurements Top View Figure 6.2.1—Sound field speaker setup 6.2.2 Placing the earhook and reference microphone 1. Place the wedge-style earhook on the client’s ear. 2. Attach the reference microphone, facing forward, on the wedge of the earhook, directly above the ear to be tested. The reference microphone should be as close to the head as possible. -
Page 138: Inserting The Probe Tube
6 kHz frequency reflecting off the eardrum. 1. Press [F2] to enter the Real-Ear Navigation screen from the Opening screen. 2. Press [F3] to enter the Insertion Gain screen. FONIX 7000 Hearing Aid Analyzer... - Page 139 Real-Ear Measurements Choose OUTPUT LIMITING carefully (see procedure below). You don’t want to damage your clients’ hearing or to cause them discomfort during testing. To ensure safety and comfort, the 7000 Test System reacts automatically when the OUTPUT LIMITING level is exceeded at the Probe Microphone. When the level measured at the Probe Microphone exceeds the pre- set limit, the words “OUTPUT OVER LIMIT”...
- Page 140 FONIX 7000 Hearing Aid Analyzer SANITATION NOTICE DO NOT REUSE PROBE TUBES. Use a new probe tube for each ear to prevent the possible spread of infection. Sterilization of probe tubes is not pos- sible, and germicidal solutions can leave a residue inside the tubing which can result in errors.
-
Page 141: Leveling The Sound Field Speaker
Leveling is important so that the input to the hearing aid is properly controlled across the frequency spectrum. See Figure 6.2.4. You must re-level the sound field for every client... - Page 142 1 dB and 2 dB, but that the maximum output that the speaker can produce is less than 80 dB SPL. To produce a louder signal, move the speaker closer to the patient and re-level. FONIX 7000 Hearing Aid Analyzer...
-
Page 143: Setting Up Body Aids
Real-Ear Measurements If the instrument didn’t successfully level, there are several things you can try. • Check the position of the sound field speaker. It should be 12 to 15 inches from the client’s head. • Make sure the microphones are securely plugged into the remote module. •... - Page 144 This is useful if your client has a similar loss in both ears. Figure 6.3.1—Audiogram Entry screen To specify the transducer used to take the audiometric measurements, press [MENU] and use the arrow keys to specify the Aud. Transducer under Targets. FONIX 7000 Hearing Aid Analyzer...
-
Page 145: Deleting Audiometric Information
• Aid Limit: Type of output limited employed by the aid. Choose from Multichannel or Wideband. • Fit Type: Type of hearing aid fitting used by the patient. Choose Unilateral or Bilateral. • Sound Field: Position of the sound field speaker during real-ear measure- ments. -
Page 146: Entering Bone Data
Both measurements are usu- ally performed with an insert earphone as the transducer. It’s also possible to use a linear hearing aid, instead of an insert earphone, to perform the RECD test. In this case, you would use the same hearing aid, set with identical volume control and/or other settings, for both the coupler and real-ear portions of the test. - Page 147 Real-Ear Measurements To perform the coupler measurement: 1. Insert the 50 ohm insert earphone into the jack on the back of the 7000 test system labeled “EARPHONE.” 2. Plug the other end of the insert earphone into the tubing of the ear level adapter attached to an HA-2 coupler.
- Page 148 HTL values. E R 3 I N S E A R P H O Probe mic Figure 6.3.5D—Insert foam eartip connected to insert microphone. FONIX 7000 Hearing Aid Analyzer Foam plug or custom earmold E R T Probe mic...
-
Page 149: Modifying A Target
Real-Ear Measurements Figure 6.3.5E—Taking an RECD Measurement 6.3.6 Modifying a Target Once you input an audiogram in the Audiogram Entry screen, a target will auto- matically appear on the real-ear measurement screens. You can use the Real-Ear Target screen to modify a target or to input your own target in dB insertion gain or dB SPL, edit your client’s HTL and UCL values in dB SPL, and input a cus- tom real-ear to dial difference (REDD). - Page 150 Note: When you edit the Target IG, the Target SPL will also be updated. However, when you edit the Target SPL directly, it will not have an effect on the Target IG. Figure 6.3.6—The Real-Ear Target screen FONIX 7000 Hearing Aid Analyzer...
-
Page 151: Entering An Redd Transform
5. The aided response is measured. (Section 6.4.4) 6. The insertion gain response is compared to the prescribed insertion gain tar- get and any necessary adjustments are made to the hearing aid in order for the response to better match the target The Insertion Gain screen itself consists of two graphs. - Page 152 FONIX 7000 Hearing Aid Analyzer In other words, the bottom graph of the insertion gain screen shows the differ- ence between the sound field measured by the reference microphone outside of the ear and the probe microphone in the ear canal. (When the reference micro- phone is disabled, the estimated sound field is subtracted.) The top graph shows...
-
Page 153: Measuring In The Real-Ear Spl Screen
SPL. This allows for a direct comparison of audiometric measurements and real-ear measurements. The goal in the SPL method is to ensure the response of the hearing aid to soft signals (50 dB SPL) reach above the patient’s HTLs, the response to average signals (65-80 dB SPL) meet the target, and the response to loud signals (90 dB SPL) are below the UCLs. -
Page 154: Measuring The Unaided Response (Reug/Reur)
2. Insert the probe tube into the patient’s ear canal. See Section 6.2.3. 3. Input the patient’s audiogram to generate a target, if desired. See Section 6.3. 4. Press [EXIT] in the Audiogram Entry screen to return to the Real-ear Navigation screen. FONIX 7000 Hearing Aid Analyzer... - Page 155 Real-Ear Measurements 5. Enter the Insertion Gain or Real-ear SPL screen by using [F3] or [F4] in the Real-ear Navigation screen, respectively. 6. Level the sound field speaker. See Section 6.2.4. 7. Select the desired ear with [F1]. 8. Look at the [F2] setting to see which curve is selected. If necessary, use [F2] to select REUR 1.
-
Page 156: Measuring The Aided Response (Reag/Rear)
2. Insert the hearing aid into the ear, being careful not to move the probe tube. 3. Select the signal source with the [F5] button. Digital Speech is a good source type to use when measuring most hearing aids. - Page 157 REIG prescription target. When fitting to the prescription target, the Curve 6 should be within 5 dB of Curve A. Make any necessary adjustments to the hearing aid fitting, and repeat Step 5 above to make another measurement. If desired, use [F2] to select REAG 3-5. It is recommended to perform real-ear measurements as 50, 65, 80, and 90 dB SPL.
-
Page 158: Working With Prescription Targets
6.4.5 Working with prescription targets The 7000 Hearing Aid Test System has the following fitting rules available: NAL-NL1, NAL-RP, 1/3 Gain, 1/2 Gain, 2/3 Gain, Berger, and POGO. The NAL- NL1 fitting rule is non-linear and changes depending upon the amplitude of the input signal. -
Page 159: Using Semi-Auto And Fully-Auto Mode
Fully-Automatic mode. 6.4.7 Testing with a single tone or three frequency average It is sometimes useful to be able to look at a hearing aid’s response to a single frequency or to a repeating three-frequency sequence. To measure with one of... -
Page 160: Using The Reference Microphone
8. Press [STOP] when the measurement is complete. 6.4.8 Using the reference microphone When determining the gain of a hearing aid, the analyzer normally subtracts the response measured by the probe tube from the sound field measured by the ref- erence microphone positioned outside the ear. - Page 161 Real-Ear Measurements To view curve data in the Real-ear Insertion Gain screen: 1. Enter the Real-ear Insertion Gain: 2. Press [MENU] to enter the local menu. 3. Select Data/Graph under Display using [∨, ∧]. 4. Use [<, >] to choose: •...
-
Page 162: Deleting And Un-Displaying Measurements
100 Hz apart are averaged to get the curve point at the center frequency. • From 2000 Hz–3000 Hz, measured data points from five consecutive fre- quencies 100 Hz apart are averaged to get the curve point at the center frequency. FONIX 7000 Hearing Aid Analyzer... - Page 163 Real-Ear Measurements • From 3000 Hz–8000 Hz, measured data points from seven consecutive frequencies 100 Hz apart are averaged to get the curve point at the center frequency. In normal pure-tone log smoothing: • Each center frequency is smoothed by averaging it together with the out- puts from the next upper and lower 12th octave frequency.
-
Page 164: Using Output Limiting
You can use the Insertion Gain screen in order to measure the “occlusion effect” of a hearing aid. By analyzing the spectrum of your client’s own voice, you can judge whether the occlusion effect will make the hearing aid uncomfortable, and you can measure an improvement (lessening) of the occlusion effect after adjusting the vent opening. -
Page 165: Digital Hearing Aids
AGC hearing aids, checks if the sound going into the hearing aid is a continuous signal that could be regarded as noise. If the aid decides that the sound is noise, it lowers the gain at the corresponding frequencies. -
Page 166: Choosing A Speech Weighting
This is useful for checking the filters of the hearing aid and determining how one channel of the hearing aid reacts to noise in a different channel of the aid. -
Page 167: Testing Digital Noise Suppression
Digital Speech signal can be used to see how much the aid lowers its gain when subjected to a noisy signal. This is a test of the noise suppression technology on the hearing aid. 1. Enter the Real-ear Insertion Gain or Real-ear SPL screen, set up the patient for real-ear measurements, and level the sound field speaker. -
Page 168: Directional Hearing Aids
Digital Speech curve, and Curve 3 shows the response of the aid to the Composite signal. . Figure 6.5.4—Testing noise suppression of a digital hearing aid. REAR 2 was tested using Digital Speech. REAR 3 was tested using the Composite Signal. - Page 169 Figure 6.6.1—Testing directionality. REUR 1 was tested with the source at 135° azimuth. REAR 2 was tested with the source at 45° azimuth. Curve 6 illustrates the directional advantage of the hearing aid. 12. Reposition the patient so that the sound field speaker is placed at 0° or 45°...
-
Page 170: Determining The "Null
When performing a directional test, the position of the sound field speaker can be used to determine the “null” of the directional microphones. The “null” is the azimuth at which the directional hearing aid provides the least amount of amplification. -
Page 171: Visible Speech
Real-Ear Measurements 7. Test as usual. With the reference microphone disabled, it is even more criti- cal than usual that the patient not move after leveling and that the sound field be undisturbed during testing. 6.8 Visible Speech The Visible Speech screen, shown in Figure 6.8, is a special screen used for per- forming real-ear measurements with live speech or other external source types. -
Page 172: Performing Visible Speech Measurement
5. Insert the hearing aid into the ear, being careful not to move the probe tube. 6. Situate the patient in front of the person who will be providing the live speech stimulus, or the loudspeaker providing the external signal. -
Page 173: Viewing The Real-Time Visible Speech Display
• Real-time measurement curve showing the immediate response of the hearing aid • Average frequency response of the hearing aid over the time of the test • Maximum amplitude of the response per frequency • Minimum amplitude of the response per frequency These measurements together give the clinician both the real-time response of the hearing aid and information about its response over the time of the test. -
Page 174: Measuring Multiple Envelopes
FONIX 7000 Hearing Aid Analyzer Figure 6.8.3—Completed Visible Speech test. 6.8.4 Measuring multiple envelopes The clinician can measure up to three different Visible Speech envelopes. For example, it may be beneficial to perform measurements of the different pro- grams on the hearing aid. -
Page 175: Cros/Bicros Aids
Real-Ear Measurements 6.9 CROS/BICROS Aids When performing real-ear measurements on a Body aid, CROS, or Bi-CROS aid, we suggest the following setups and procedures. Four Goals: 6.9.1—Measuring the Head Baffle Effect 6.9.2—Measuring the Overcoming of the Head Baffle Effect 6.9.3—Measuring the Overall Insertion Gain 6.9.4—Measuring the Insertion Loss to the “Good”... -
Page 176: Measuring The Head-Baffle Effect
7000 test system to be UNLEVELED with the reference microphone OFF, the rest of the measurements in this section call for the 7000 test system to be LEVELED with the reference microphone ON. FONIX 7000 Hearing Aid Analyzer GOOD 12"... -
Page 177: Measuring The Overcoming Of The Head-Baffle Effect
Real-Ear Measurements 6.9.2 Measuring the Overcoming of the Head-Baffle Effect This section describes how to measure how well the hearing aid overcomes the head-baffle effect. The methods are different for CROS hearing aids than they are for BICROS hearing aids. -
Page 178: Bi-Cros
45º position of the loudspeaker only for monaural instruments, and a 0º position for CROS and BI-CROS instruments. FONIX 7000 Hearing Aid Analyzer BETTER 12"... -
Page 179: Cros
Same setup as above, except: • Aid in place in good ear and set to user gain. The difference curve, labeled “Insertion Gain” on the screen, shows the overall benefit of inserting the hearing aid. 6.9.3.2 BI-CROS Unaided—Measurement of “better” ear Set up the 7000 test system as follows: •... -
Page 180: Measuring Insertion Loss To The "Good" Ear (Cros)
• Earmold in place in good ear • Hearing aid is turned off The difference curve, labeled “Insertion Gain” on screen, shows insertion loss, if any, caused by inserting the earmold into the good ear. FONIX 7000 Hearing Aid Analyzer GOOD REFERENCE MIC PROBE MIC 12"... -
Page 181: Appendix A: Specifications
Appendix A Specifications ACOUSTIC DRIVE SIGNAL Frequencies: Frequency Accuracy: Amplitute (RMS 5-dB steps) Chamber Sound Field Amplitude Accuracy (All Modes, M1950E only) 3 dB; after leveling CREST FACTOR Composite Mode Signal: Less than 12 dB (4 to 1 ratio of peak to RMS value). TELECOIL DRIVE 1, 1.78, 3.16, 5.62, 10, 17.8, 31.6, 56.2, 100 mA/meter. - Page 182 2000-8000 Hz: 1.25 mSec; 800-1600 Hz: 2.5 mSec; 400, 500 Hz: 5 mSec. 100 to 300 Hz and Composite: 10 mSec. ANSI 96, ANSI 87 ANSI 87: 2000 mSec ANSI 96: variable (500 to 5000 mSec) FONIX 7000 Hearing Aid Analyzer...
- Page 183 Specifications ELECTRONICS MODULE Color: Size: Weight: PRINTER, INTERNAL Type: Paper width: Print speed: PRINTER, EXTERNAL (PRINTER NOT PROVIDED) Port: Type: Language: TEST CHAMBER Type: Test Area: Internal Acoustic Reflections: Ambient Noise Isolation: 45 dB at 1 kHz (allows THD measurement to within 3% at 60 dB Color: Size: Weight:...
- Page 184 Electronics module conforms to IEC 60601-1 GUARANTEE The FONIX 7000 and its accessories are guaranteed to be free from manufacturing defects which would prevent the products from meeting these specifications for a period of one year from date of purchase.
-
Page 185: Appendix B: Calibration
Appendix B Calibration B.1 Calibrating the microphones To calibrate the 7000 Test System’s microphones, you will need a sound level calibrator such as the Quest CA-12, the 14mm-to-1 inch microphone adapter provided with your 7000 Test System, and a small flathead screwdriver. If you are calibrating the probe microphone, you will also need the probe microphone adapter and a Phillips-head screwdriver. - Page 186 If you are unable to adjust the gain of the microphone to the level emit- ted by the calibrator, you probably have a faulty microphone and should contact your local FONIX distributor or the Frye factory. FONIX 7000 Hearing Aid Analyzer...
- Page 187 Calibration Figure B.1.C—Adjusting the reference pot with a Phillips-head screwdriver. 5. Remove the reference microphone from the adapter and turn off the calibra- tor. 6. Attach a new probe tube to the probe microphone. 7. Thread the probe tube through the edged side of the probe microphone adapter so that the probe tube sticks out a couple of millimeters from the other end of the adapter.
- Page 188 FONIX distributor or the Frye factory. 12. Press [EXIT] to return to the Opening screen.
- Page 189 Calibration Figre B.2—Calibrating the insert earphone...
- Page 190 FONIX 7000 Hearing Aid Analyzer...
-
Page 191: Appendix C: Troubleshooting Guide
Troubleshooting Guide These are the most common problems that typically cause instrument failure. Please check these troubleshooting suggestions and follow the procedures out- lined in this manual before contacting your local service representative or Frye Electronics. General Problems: No power a. -
Page 192: Printer Problems
Lubricate the black “O” ring with light petroleum type lubricant. 3. A bump or peak in the low frequency response curve a. There may be a hearing aid vent leak. Be sure to Fun-Tak the vent. b. There may be a coupler vent leak. -
Page 193: Appendix D: The Fonix Cic Feature
Analyzer. Realizing that ear simulators which contain frequency sensitive elements are somewhat fragile and can be damaged as they are handled in every day use, Frye made a coupler which it labeled the MZ (for Modified Zwislocki). This coupler had a central volume very similar to the standardized Zwislocki, but had no frequency sensitive elements. - Page 194 FONIX 7000 Hearing Aid Analyzer a good hearing aid fitting. It also felt that the approach taken in the use of the MZ coupler has been well accepted by professionals throughout the world and that the new CIC coupler should use a similar approach, with response correc- tions modified to take the smaller CIC volume into account.
- Page 195 It is nice to see that the CIC hearing aid can really produce significant amounts of gain in spite of its apparently poor perfor- mance in the 2cc world of the ANSI standard test.
- Page 196 3200 4.12 3300 4.18 3400 3500 4.25 3600 3700 4.35 3800 2.85 3900 4.45 2.91 4000 4100 4.52 FONIX 7000 Hearing Aid Analyzer 4200 4.54 6200 4300 4.55 6300 4400 6400 4500 4.65 6500 4600 6600 4700 4.75 6700 4800...
-
Page 197: Appendix E: Fitting Formula Tables
Appendix E Fitting Formula Tables The conversions used by the FONIX 7000 Test System to convert audiograms to target gain curves are the following: NAL-RP FITTING FORMULA CALCULATION The insertion gains at each frequency are calculated according to the following formulas:... - Page 198 8000 Note: Frequencies preceded by an asterisk (*) are interpolated because the article does not reference them. FONIX 7000 Hearing Aid Analyzer Insertion Gain (dB) 1/2 HTL - 10 dB 1/2 HTL - 5 dB 1/2 HTL - 2.5 dB...
- Page 199 Fitting Formula Tables 1/3, 1/2, 2/3 Gain The 1/3-2/3 Insertion Gain Hearing Aid Selection Guide by: Robert Libby Hearing Instruments vol 37 #3, 1986 Required insertion gain is calculated as follows: FREQ. INS GAIN (Hz) (2/3 rule) 2/3 HTL - 5 dB 1/3 HTL - 5 dB 1/2 HTL -5 dB...
- Page 200 FONIX 7000 Hearing Aid Analyzer...
-
Page 201: Appendix F: Probe Spl Mode Description
Appendix F Probe SPL Mode Description The Target IG is converted to the Target SPL in the following steps: (Conversion tables appear on the following pages.) 1. Add the source level for Aided curve 2. 2. Interpolate from 10 frequency to 79 frequency curve frame. 3. - Page 202 1200 3200 1300 3300 1400 3400 1500 3500 1600 3600 1700 3700 1800 3800 1900 3900 2000 4000 FONIX 7000 Hearing Aid Analyzer GAIN FREQ GAIN (Hz) 13.9 4100 12.7 14.7 4200 12.4 15.1 4300 12.2 15.0 4400 12.0 15.1 4500 11.9...
- Page 203 Probe SPL Mode Description TABLE 3 HL to real-ear SPL (or SPL to HL) conversion table from ANSI S3.6-1989 Table G.1 FREQ (Hz) 1000 1500 2000 3000 4000 6000 8000 TABLE 4 HTL(HL) to UCL(HL) prediction table from Pascoe(1988) Table 4 dBHL 19.0 12.0...
- Page 204 FONIX 7000 Hearing Aid Analyzer...
-
Page 205: Appendix G: Glossary Of Terms
(AGC-I) or the output level (AGC-O). Also known as “Compression.” AIDED The response of a hearing aid in place on the ear. (Also called “In-situ RESPONSE Response.”) Subtract the “Unaided Response” from the “Aided Response” to get the Insertion Gain Response. When the Aided Response is measured in a real ear (as opposed to a manikin), it is called the “Real Ear Aided Response”... - Page 206 The inverse of “CORFIG” is “GIFROC.” COUPLER A device that connects a test microphone to a hearing aid to provide an accurate testing situation. CROS Contralateral Routing of Signal. A type of hearing aid that uses a wired or wireless system to send a signal to the opposite ear.
- Page 207 Glossary of Terms for the FONIX 7000 DATA In FONIX analyzers, the word “data” refers to displaying curve information as a table of numbers. DEFAULT A choice automatically made by a computer program. A European-standard connector with pins surrounded by a round CONNECTOR metal shell.
- Page 208 Real Ear to Coupler Difference (RECD) measurements. INSERTION A measure of the acoustic benefit of a hearing aid, measured in a GAIN patient’s ear. The insertion gain is the difference, at any particular RESPONSE frequency, between the Aided Response and the Unaided Response.
- Page 209 MENU A list of choices offered by a computer. MULTI-CROS A hearing aid system that has a switch to select either a CROS, a BI- CROS, or a Monaural arrangement. MZ COUPLERS Modified Zwislocki Couplers. Three couplers based on the Zwislocki design, but sturdier;...
- Page 210 RESR Real Ear Saturation Response. A special case of the REAR for which the hearing aid is operated at its saturation level. This is akin to the coupler measurement known as the “SSPL-90.” REUR Real Ear Unaided Response. See “Unaided Response.”...
- Page 211 TELECOIL Same as COIL. In the 7000, it is an accessory that generates a magnetic field for testing the telephone pickup of a hearing aid. The telecoil is a standard feature with the 7020 sound chamber. UNAIDED...
- Page 212 A signal composed of all frequencies, which vary randomly in phase, each frequency having equal long-term energy levels. WINCHAP Windows® Computer Hearing Aid Program used for storing hearing aid tests and client information on a personal computer. FONIX 7000 Hearing Aid Analyzer...
- Page 213 FONIX 7000 Hearing Aid Analyzer Index Adaptive AGC 36 AGC frequency 116 AIDED DATA 153 Aided response 148 Aid type 95 ANSI 84, 158 ANSI 03 107, 108, 110 ANSI 92 117 ANSI Option 3 Arrow keys 12, 28 Attack & Release test 104...
- Page 214 HTL 136, 141 I/O Meas 116 I/O Meas. Delay 123, 125 I/O Start 116 I/O Start Delay 123, 125 I/O Test 103 FONIX 7000 Hearing Aid Analyzer ICRA 84, 158 IEC 120 IEC 60601 14 IEC Option 3 IG DATA 153...
- Page 215 Index Noise reduction 35, 38, 88 Noise Red (Comp) 95 Noise Red (Tone) 95, 115, 122, 125 Noise suppression 84, 86, 88, 159 NORMAL 33, 69 Occluded ear simulator 89 Occlusion effect 156 OES 89 OES Option 3 Open ear 62, 162 Option 115 OSPL90 115 Output 147...
- Page 216 SPL 141 Targets 145 Telecoil 78, 111, 112 Telewand 79, 111 Test Chamber Cable 5 Three-frequency average 73, 151 Three-frequency sequence 151 FONIX 7000 Hearing Aid Analyzer Time 29 Toggle 24 Tone 151 Tone filter 32, 36 Transducer 136 Troubleshooting 183...
Need help?
Do you have a question about the FONIX 7000 and is the answer not in the manual?
Questions and answers