Table of Contents
Advertisement
Advertisement
Table of Contents

Related Manuals for Brookstone tranquil moments


Summary of Contents for Brookstone tranquil moments
- Page 1 tranquil moments ® travel sound therapy system...
- Page 3 We believe that exacting standards are the core of our success. this product has been thoroughly tested to be certain it meets our rigorous quality control criteria. With our tranquil Moments travel sound therapy system, ® you’re sure to sleep and relax better—anywhere you go. eight clinically proven therapeutic sounds are divided into two channels (sleep and relax) to help you achieve healthier states of mind.
- Page 4 CAUTION • to reDUCe tHe rIsk oF eLeCtrIC sHoCk, Do not reMoVe CoVer or bACk. tHere Are no User-serVICeAbLe PArts InsIDe. • to reDUCe tHe rIsk oF FIre or eLeCtrIC sHoCk, Do not eXPose tHIs UnIt to WAter or MoIstUre. the lightning flash with arrow-head symbol within an equilateral triangle is intended to alert the user to the presence of uninsulated “dangerous voltage”...
- Page 5 CAUTION 1. All the safety and operating instructions should be read, followed, adhered to and retained for future reference. 2. the unit should not be used near water, such as a bathtub, swimming pool, washbowl, kitchen sink, laundry tub, or in a wet basement. 3.
- Page 6 8. the unit should be connected to a power supply only of the type described in the operating instructions or as marked on the unit. 9. Precautions should be taken so that the grounding or polarization means of the unit are not defeated. 10.
- Page 7 15. If using the AC ADAPter to power the unit, ensure it is properly connected to the electrical outlet before turning the unit on. 16. When moving the unit, be sure to first unplug the AC ADAPter. 17. Choose the installation location of your unit carefully. Avoid placing it in direct sunlight or close to a heat source.
-
Page 8: Fcc Information
fCC INfOrmATION this equipment has been tested and found to comply with the limits for a Class b Digital Device, pursuant to part 15 of the FCC rules. these limits are designed to provide reasonable protection against harmful interference in a residential installation. - Page 9 • Connect the equipment to an outlet on a circuit different from which the receiver is connected. • Consult the dealer or an experienced radio/tV technician for help. this device complies with Part 15 of the FCC rules. operation is subject to the following two conditions: 1.
-
Page 11: Location Of Controls
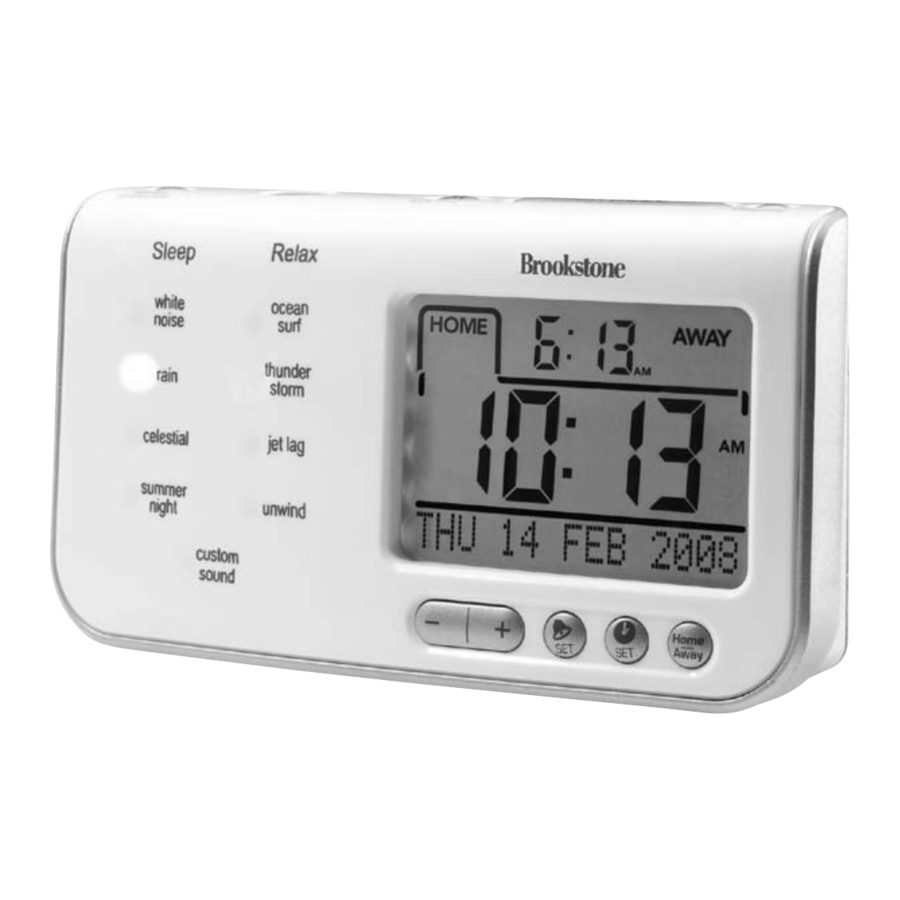
LOCATION Of CONTrOLS 1. sLeeP enHAnCe 2. seLeCt 3. on/oFF 4. snooZe DIsPLAy 6. soUnD sessIons 7. DIsPLAy 12. H oMe/AWAy... - Page 13 13. bAttery CoMPArtMent CoVer 14. reset 15. bACkUP bAttery CoMPArtMent CoVer 16. bACkUP bAttery InsULAtIon strIP 17. 7.5V DC 20. VoLUMe WHeeL 21. sPeAker 22. reCorD Accessories (not shown) • AC Adapter • travel Pouch...
-
Page 14: Installing The Batteries
POWEr SOUrCES the unit is powered by 4 AA batteries (not included) or the included AC Adapter. In addition, the unit comes with a Cr2032 button cell backup battery, which will ensure your settings are not lost if the 4 AA batteries or the AC Adapter is removed. - Page 15 Using the Ac AdApter Insert one end of the AC Adapter into 7.5V DC and the other end into an electrical outlet. Note: • When using the AC Adapter, no power is drawn from the batteries. • ensure any replacement adapters provide 7.5V DC output and are rated for a minimum of 150 mA.
-
Page 16: Setting The Time And Date
setting the time And dAte you can set the time and date for a Home and for an Away location. ensure is in the unlock position. refer to Using the Lock Feature. 1. to set your Home time, press HoMe/AWAy until your Home time appears on the DIsPLAy. - Page 17 10. Press set again. the day/date flashes on the DIsPLAy. 11. Press incrementally until the correct day/date displays. or press and hold to move at a faster rate. 12. Press set again. 12hr flashes on the DIsPLAy. 13. Press to select either 12- or 24-hour format. 14.
-
Page 18: Setting The Alarm Time
setting the AlArm time you can set the alarm time for a Home and for an Away location. ensure is in the unlock position. refer to Using the Lock Feature. 1. to set your Home alarm time, press HoMe/AWAy until your Home time appears on the DIsPLAy. - Page 19 7. Press incrementally until the desired volume level appears (0-20). (For use when waking to a soUnD sessIon. refer to Setting the Alarm Sound/Turning the Alarm On.)or press and hold to move at a faster rate. 8. Press set to save your selections. 9.
-
Page 20: Using The Alarm
4. Press on/oFF to turn off the sound session feature. 5. Press set incrementally until HoMe ALArM snD appears on the bottom of the DIsPLAy. soUnD appears in the upper left corner of the DIsPLAy. to wake to the unit’s beeper at Home: Press set incrementally until HoMe ALArM beeP appears on the bottom of the DIsPLAy. - Page 21 Away alarm time (and sound). soUnd therApy the unit has eight sound sessions divided into two categories: sleep and relax. For details on the sleep therapy built into these sessions, refer to The Scientific Breakthrough Behind Tranquil Moments ®...
- Page 22 Sleep 1. White noise: the steady flow of a cascading waterfall is perfect as natural white noise for masking unwanted background sounds. 2. rain: A tranquil rainfall provides a peaceful setting for relaxation and sleep. the rain sound is particularly good at masking higher toned background noise.
- Page 23 relax 1. ocean surf: the ocean surf provides a calm rhythm that helps you drift off to sleep or creates a relaxing oceanside environment. 2. thunderstorm: Unwind to the exhilarating, but soothing sound of distant thunder as gentle rain falls upon a remote lake. 3.
- Page 24 recording A cUstom soUnd the Custom sound recording feature allows you to record a single message up to 15 seconds in length. sound sessions must be off in order to record a custom sound. 1. Press and hold reCorD. the unit beeps. 2.
-
Page 25: Using The Timer
Using the timer you can set the timer to shut the unit off after 30, 60 or 90 minutes. 1. Press and hold on/oFF for two seconds. the status of the timer appears on the display (i.e. tIMer oFF). 2. Press to select your desired shutoff time. - Page 26 Using the sleep enhAncement feAtUre sleep Center research has proven that a gradual slowing of sounds helps promote better sleep and relaxation. When activated, the playback speed of the sound sessions gradually slows down over a 20-minute period to gently lull you to sleep. once the playback speed reaches its slowest point (close to one half of normal speed) at the 20-minute mark, the playback speed will remain at this level until the unit automatically turns itself off.
-
Page 27: Using The Backlight
Using the lock feAtUre the Lock feature ensures that your settings do not change if the buttons on the unit are accidentally pressed. to lock your settings, slide down. to unlock your settings, slide Using the BAcklight If using the AC Adapter to power the unit, the backlight is always illuminated at a reduced brightness level. -
Page 28: Resetting The Unit
AdjUsting the volUme to adjust the volume, rotate the VoLUMe WHeeL up or down until you reach your desired listening level. Using heAdphones For private listening, insert your headphones into resetting the Unit reset the unit if it is not working properly by removing the bAttery CoMPArtMent CoVer and inserting a thin, pointed object into reset. - Page 29 replAcing the BAckUp BAttery the backup battery may need to be replaced if the unit does not operate correctly after the primary batteries are replaced. Common indications that the battery needs to be replaced include: • Missing or scrambled display when replacing alkaline batteries. •...
- Page 30 ThE SCIENTIfIC BrEAkThrOUgh BEhINd TrANQUIL mOmENTS ® All of us experience different states of consciousness throughout our daily lives. some states are frequent, such as ordinary waking consciousness, sleep and dreaming, while others are less frequent states, like when we are particularly aware or extra creative.
- Page 31 one technique commonly used by Dr. thompson is entrainment. this naturally derived technique is the tendency of our brainwaves to adjust to our sound environment so they vibrate in harmony (for example, two pendulum clocks mounted side by side on the same wall will gradually start to swing at the same rate as they become entrained).
- Page 32 Theta Waves (3.5 – 7.0 Hz): theta waves reflect a state of mind that is attuned to intense creativity, visualization, imagination, and problem solving in a non-sleep state and emotional healing in the sleep state. theta waves are produced during deep meditation, dreaming and daydreaming.
-
Page 33: Care And Maintenance
CArE ANd mAINTENANCE Clean with a soft, dry cloth. Do not use harsh solvents as they may damage the finish. SPECIfICATIONS Uses one backup Cr2032 button cell battery (included). Uses four AA batteries (not included). - Page 34 (“Warranty Period”). If a defect arises and a valid claim is received within the Warranty Period, at its option, brookstone will either 1) repair the defect at no charge, using new or refurbished replacement parts, or 2) replace the product with a new product that is at least functionally equivalent to the original product, or 3) provide a store credit in the amount of the purchase price of the original product.
- Page 35 capability;...
- Page 36 H e L P y o U e n H A n C e t H e q U A L I t y o F y o U r L I F e . Merrimack, New Hampshire 03054 • Customer Service 800-846-3000 • www.Brookstone.com...
Need help?
Do you have a question about the tranquil moments and is the answer not in the manual?
Questions and answers