Advertisement
Advertisement
Table of Contents

Related Manuals for TC Electronic RH750


Summary of Contents for TC Electronic RH750
- Page 1 RH750 UseR’s manUal...
-
Page 3: Important Safety Instructions
Important Safety InStructIonS Warning! 1 Read these instructions. • To reduce the risk of fire or electrical shock, do not expose this equipment to 2 Keep these instructions. dripping or splashing and ensure that no objects filled with liquids, such as vases, 3 Heed all warnings. are placed on the equipment. 4 Follow all instructions. • This apparatus must be earthed. - Page 4 emc / emI EMC/EMI This equipment has been tested and found to comply with the limits for a Class B Digital device, pursuant to part 15 of the FCC rules. These limits are designed to provide reasonable protection against harmful interference in residential installations.
-
Page 5: Table Of Contents
RC-4 ................. 14 Rear panel ..............15 appendIx General Protection mode ......... 19 Heat Protection mode..........19 Signal Flow Diagram ..........20 Technical Specifications ........... 21 TC Electronic, Sindalsvej 34, DK-8240 Risskov – info@tcelectronic.com English Version - Revision 1 Prod. No: E60525111... -
Page 7: Introduction
IntroductIon Power and tone in spades! Congratulations. You are now unpacking a bass amp that will keep you supplied with tons of power and tonal versatility for years and years. In essence, our Bass Amp 2.0 concept is all about making you focus on playing. With a built-in bass tuner, 3 presets and a wealth of tonal options – such as SpectraComp, TubeTone, TweeterTone and 4-band EQ – you can sculpt any tone you desire, tune up in seconds, and switch freely between different basses and playing styles on the stage. -
Page 8: Quick Setup Guide
Both Speakon and ¼” jack Be sure to check www.tcelectronic.com for latest news about cables can be used. these and other TC Electronic products. • You can connect up to three TC Electronic RS cabinets or any other two 8 Ohm cabinets of another brand to the... -
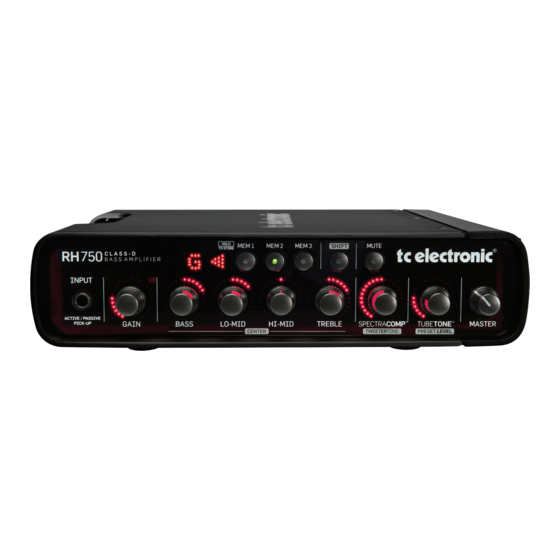
Page 9: Front Panel
You can connect an active or a passive bass to this ¼” input jack. The RH750 input stage is designed to adapt to any type of As you know, each instrument has its own sound characteristics. - Page 10 – front panel While RH750 is in Shift mode, the SHIFT button will be blinking to remind you that you are in Shift mode. When you haven’t been using the RH750’s front panel Example: controls for about twenty seconds, the LED will flash...
- Page 11 With Spectral Compression, the RH750 amplifier uses a SpectraComp In Depth different approach that allows for independent compression of the Low, Mid and High frequency areas. This way, the right...
- Page 12 TubeTone™ allows you to alter the “personality” and sound of 6 – PRESET LEVEL (in Shift Mode) your RH750. The effects you can achieve range from a small touch of classic tube amp response and character through Press SHIFT and then turn the TUBETONE knob to adjust obvious, but pleasant “tube attitude”...
- Page 13 Preset/Memory Level Settings be handy to simply push one button instead of fiddling with several knobs. When you haven’t been using RH750’s front panel controls for about twenty seconds, the RH750 will return to normal mode, Remote Control where the knobs control the primary functions printed in white.
- Page 14 11 – TUNER RH750 is equipped with a fully chromatic, high accuracy bass tuner. The tuner is always active, whether RH750 is in Mute mode or not. Here is how you read the display: The played note is shown on the left side of the display.
- Page 15 RH750’s default tuner reference is 440 Hz – just like any other tuner. However, you can select any reference frequency between 438 and 445 Hz. This is how you select the tuner reference frequency: – If RH750 is switched on, switch it off. – Press and hold the MUTE button during power up. – RH750 now powers up in Tuner reference mode, which is – Press the MUTE button to exit Tuner Reference mode. illustrated by an “R” in the Display (see illustration below).
-
Page 16: Rc-4
In addition to these indications (that – Note that you can only recall a MEM setting if a setting has are also shown on the RH750 tuner display), a line of nine dots actually been stored in a memory location. below the display indicates how far from the target pitch the – Also note that as soon as you change one of the stored... -
Page 17: Rear Panel
AUX IN (“Rehearsal”) input jack found on the rear panel of any mains voltage from 100 to 240 volts – you do not have the RH750. This feature allows you to play along with e.g. an to change settings, fuses or anything else. Simply connect a MP3 player (e.g. an iPod®), a signal from a computer soundcard standard IEC three pin connector to the local mains voltage, and or any other audio source playing background tracks – excellent... - Page 18 Setting up for recording: either Speakon or ¼” jacks. Do NOT use instrument cables! In order to record straight from RH750’s digital output, follow The RH750 can be used to drive any cabinet combination of up these steps: to three RS cabinets, or any other cabinet combination with a 4 – Connect RH750’s DIGITAL OUT to your DAW.
- Page 19 RISQUE DE CHOC ELECTRIQUE-NE PAS OUVRIR Power-amp in 7 – REMOTE IN Use the REMOTE IN jack to connect the RH750 to the optional footswitch/remote “RC-4”. 6 – INSERT PREAMP I/O – Effects Loop/Break point The RC-4 gives you access to the three memory locations, the These jacks provide a break point between RH750’s preamp...
- Page 20 DI boxes around, and it is capable of driving long cable hauls. No phantom power is required. Ventilation Be sure not to cover the black cooling plate of the RH750 amplifier! Insufficient ventilation may cause the amplifier’s temperature to increase.
-
Page 21: General Protection Mode
Protection mode. In both situations, proceed as follows: – Turn off the amplifier. To remedy the problem, try turning off your RH750 for a minute – Solve the issues. and then turn it on again. If the display still indicates “P”, you – Allow the amplifier to cool off for a few minutes. -
Page 22: Signal Flow Diagram
appendIx – SIgnal flow DIGITAL RECORDING “LINK” “LINK” ACTIVE MASTER HEADPHONE POWER SPECTRA TUBETONE TONE TUBETONE PRESET INPUT GAIN MUTE POWER VOLUME BREAK COMP CONTROLS POST LEVEL MANAGEMENT PHONES JACK PHONE HEADPHONE VOLUME TUNER 2 CH 2 CH 2 CH “LINK”... -
Page 23: Technical Specifications
appendIx – technIcal SpecIfIcatIonS Input Section Max. Output +0 dBu Input connector 1/4” jack Optimal Load Impedance 600 Ohm Input impedance 1 MOhm / 100 pF Preamp out 1/4” Jack, Balanced Output, Gain range -96 to 32 dB Max Output Level = +8 dBu Power amp in 1/4”...
Need help?
Do you have a question about the RH750 and is the answer not in the manual?
Questions and answers