Table of Contents
Advertisement
Advertisement
Table of Contents

Related Manuals for SPT IM-600US


Summary of Contents for SPT IM-600US
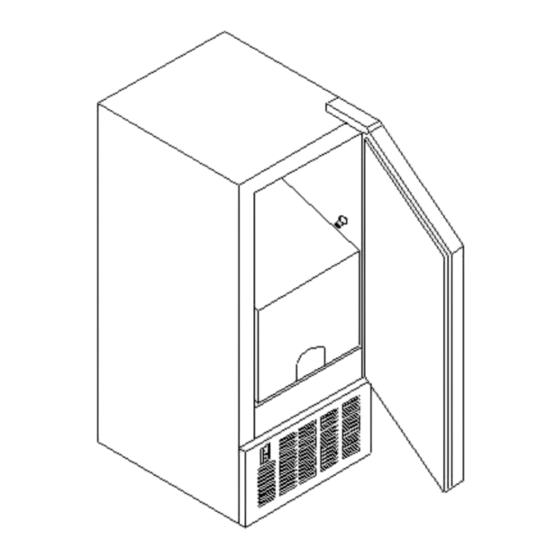
- Page 1 UNDERCOUNTER ICE MAKER Model #: IM-600US INSTRUCTION MANUAL Be sure to stand the icemaker upright for at least 24 hours prior to plugging it in. Installation by a licensed plumber only. Improper water line connection may result in flooding. IMPORTANT SAFETY INSTRUCTIONS...
-
Page 2: Table Of Contents
TABLE OF CONTENTS Page ICE MAKER SAFETY …………………………………………………………………2 ELECTRICAL CONNECTION ..……………………………………………………..2 SAFETY PRECAUTIONS ……………………………………………………………..3 TECHNICAL INFORMATION ………………………………………………………..3 COMPONENTS ………….………………………………………….………………. ..4 INSTALLATION INSTRUCTIONS ……………………………………………….5-7 Location requirements Installation Reversing the door Connecting the water supply Installation types OPERATING YOUR ICEMAKER ……………………………………………….…8-9 Operation checklist Operation of the icemaker Understanding the icemaker Control box... -
Page 3: Ice Maker Safety
FOLLOW THESE BASIC PRECAUTIONS TO WARNING REDUCE THE RISK OF FIRE, ELECTRICAL SHOCK, OR INJURY WHEN USING YOUR ICE MAKER. READ ALL INSTRUCTIONS BEFORE USING THE ICE MAKER. DANGER: RISK OF CHILD ENTRAPMENT. CHILD ENTRAPMENT AND SUFFOCATION ARE NOT PROBLEMS OF THE PAST. JUNKED OR ABANDONED APPLIANCES ARE STILL DANGEROUS. -
Page 4: Safety Precautions
If the supply cord is damaged, it must be replaced by the manufacturer, a service agent or similarly qualified person in order to avoid a hazard. SAVE THESE INSTRUCTIONS. TECHNICAL INFORMATION Model IM-600US Electrical input 115V ~ 60Hz Power consumption 12.2kWh/100 lbs of ice Ice-making/Ice harvest rated current 3.0A / 3.6A... -
Page 5: Components
NOTE ON ICE STORAGE This type of icemaker produces crystal-clear, gourmet ice cubes. An insulated ice storage bin is built into the unit. When the bin is filled with ice to its max capacity, the icemaker will automatically shut off. The ice in the bin will slowly melt and go out the drain. Once the amount of ice is reduced below it max capacity, the icemaker will automatically start again. -
Page 6: Installation Instructions
INSTALLATION INSTRUCTIONS BEFORE USING YOUR ICE MAKER Remove exterior and interior packing materials. Do not remove any permanent instruction labels or data label on the icemaker. Remove tape and glue from the icemaker before using. Tape or glue residue can be easily removed by rubbing a small amount of liquid dish soap over the adhesive with your fingers. -
Page 7: Reversing The Door
stick together. De-ionized water is not recommended. Place the icemaker on a level surface that is strong enough to support the unit when it is fully loaded. Remember that the unit will be significantly heavier once it is operational and fully loaded. Level the unit by adjusting the legs at the front of the icemaker. -
Page 8: Connecting The Water Supply
CONNECTING THE WATER SUPPLY WARNING IMPROPER WATER LINE CONNECTION MAY RESULT IN FLOODING YOU MUST USE A LICENSED PLUMBER REVIEW STATE AND LOCAL PLUMBING CODES BEFORE INSTALLATION The water supply should be ready at the point of installation. The water supply pressure should be 15-psig minimum with static pressure no more than 80 psig. -
Page 9: Operating Your Icemaker
OPERATING YOUR ICE MAKER OPERATION CHECK LIST All packing material and tape removed? Ice storage bin cleaned? Unit properly installed by a licensed plumber with proper drainage? Is unit leveled? Ambient temperature is between 50° F and 100°F? Supplied water temperature is between 41° F to 90° F year round? Water pressure is 15 psig minimum and static pressure no more than 80 psig? Clearance around the unit for proper air circulation? Power supply checked and tested against the nameplate rating? -
Page 10: Control Box
How the unit uses water The icemaker begins with a fixed charge of water that is contained in the water trough. As the water flows to the freezing evaporator surface, water that does not contain mineral impurities will freeze and stick to the ice cube molds. -
Page 11: Care And Maintenance
CARE AND MAINTENANCE FAILURE TO UNPLUG THE ICE MAKER PRIOR TO CLEANING, MOVING, OR SERVICING COULD RESULT IN ELECTRICAL SHOCK OR PERSONAL INJURY. CLEANING YOUR ICE MAKER Periodic cleaning and proper maintenance will ensure efficiency, performance and long life. Exterior Cleaning The door and cabinet may be cleaned with a mild detergent and warm water solution (1oz dishwashing liquid to 2 gallons of warm water). -
Page 12: Power Failure
3. Keep the icemaker connected to the water supply. Pour 8 oz. of a Nickel-Safe Ice Maker Cleaner into the water trough. Wait five minutes and set switch to WASH position. The unit will begin the automatic clean mode. Note: Nickel-safe ice maker cleaner can be purchased locally at any home improvement store. 4. -
Page 13: Troubleshooting
PROBLEMS WITH YOUR ICEMAKER? YOU CAN SOLVE MANY COMMON PROBLEMS EASILY, SAVING YOU THE TROUBLE OF A SERVICE CALL. TRY THE SUGGESTIONS BELOW BEFORE CONTACTING CUSTOMER SERVICE. TROUBLESHOOTING GUIDE PROBLEM POSSIBLE CAUSE OR FIX Unit is not plugged in. The fuse is blown – replace fuse. The machine won’t operate Switch is set at OFF position Ice storage bin is full. - Page 14 This guarantee is subject to the following terms: Sunpentown must be notified of the fault. Proof of purchase must be presented to Sunpentown’s nominated representative. The warranty will be void if the product if modified, misused or repaired by an unauthorized person.
Need help?
Do you have a question about the IM-600US and is the answer not in the manual?
Questions and answers