Table of Contents
Advertisement
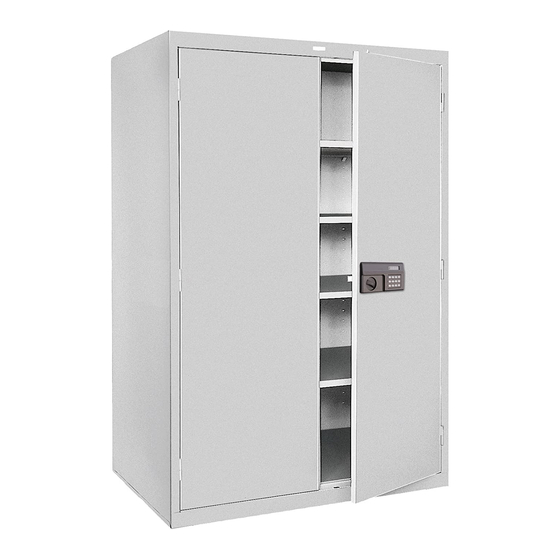
Model Numbers: KDE7236, KDE7824,KDE7848
Safety Instructions
CAUTION: Use caution when handling and assembling metal parts. Metal may have sharp edges or corners.
The use of protective gloves is recommended when assembling product.
• This unit should be installed on a level, dry surface.
• Do not use this unit as a step ladder. Do not climb on the unit.
• This unit is not intended to be used in any other manner than for storage.
• Always distribute weight evenly on shelves. Store heavier items on the bottom shelves.
• Do not use in high-humidity, high-corrosion locations. Humidity should be under 60%.
All assembly instructions must be followed exactly or the unit may not be assembled correctly and may not be stable. Assemble the unit on level surface.
Parts List
B2 -
Right Side Panel
1 each
Slots
Slots
B1 -
Left Side Panel
1 each
Part
Qty
Left Side Panel - B1
1
Right Side Panel - B2
1
Left Back Panel - A1
1
Right Back Panel - A2
1
Left Door - H1
1
Right Door - H2
1
Top - F
1
Shelf - G
4
Bottom - D
1
Inside Face Plate - C
1
Outside Face Plate - E
1
Bolt / Wingnut - I
4
Shelf Clip - S
16
Door Rod Guide - L
2
Hinge Pin Guide - K
4
Top Stop - J
2
Door Bumper - Q
4
Hinge Pin - O
4
External Power Supply
1
Keys
2
NOTE: Some of the components are factory installed.
Snap-It Storage Cabinets
Assembly Instructions
M
M
M
M
M
M
M
M
Mo
Model Numbers: KDE7236, KDE7824, KDE7848
M
M
M
M
M o
M
Mo
Mo
Mo
M
Mo
M
Mo
M
M
M
M o
M
Mo
M
M
M
o
o
o
o
de
de
de
de
d
de
d
de
de
d
d e
d
d
de
d e
de
d e
de
d
de
d
de
de
de
de
d
de
d e
de
de
d
de
de
d
d
d e
de
de
d
de
d
de
d
d
de
e
e
e
e
e
e
e
e
e
e
l
l
l
l
l
l
l
l
l
l
l
l
l
l
l
l
l
l
l
l
l
l
l
l
l
l
l
l
l
l
l
l
l
l
l
l
l
l
l
l
l
l
l
l
l
l
N u
N
N
N
N
Nu
N
N u
N
N u
N
N
N u
N u
N
N
N
N
Nu
Nu
Nu
N
N
N u
N u
N
N
N u
N
N
N
N u
N
Nu
N
N u
N
N
N
N
N u
N
N
N
N
N
N
N
N u
N
N
N
N
N
mb
mb
m
mb
mb
m
m
m
mb
mb
m
m b
mb
mb
m
m
m
m
m
m
m
m b
mb
mb
mb
mb
mb
mb
b
b
b
b
b
b
b
b
b
b
b
b
b
b
b
b
b
b
b
b
b
b
b
e
e s
e
e
e
e
e
er
e
e
e
er
er
er
er
er
er
er
e r
e
e
er
e r
e
e
er
er
er
r
r
r
r
r
r
s :
s
s
s
s
K
K
K
K
K
K
K
K
K
K
K
K
K
K
K
K
K
K
K
K
K
K
K
K
K
K
K
K
K
K
K
K
K
K
K
K
K
K
K
K
K
K
K
K
K
K
K
K
K
K
K
K
K
K
K
K
K
K
K
K
K
K
K
K
DE
DE
D
DE
DE
D E
D
DE
DE
DE
DE
D E
D
DE
D
DE
DE
D
DE
DE
DE
DE
DE
DE
DE
DE
D
DE
DE
DE
DE
DE
D
DE
D
DE
DE
D
DE
DE
DE
DE
D E
E
E
E
E
E
E
E
E
E
E
E
E
E
E
E
E
E
E
E
E
A2 -
Right Back Panel
1 each
Slots
Tabs
Tabs
Tabs
A1 -
Left Back Panel
1 each
I -
Screw / Wing Nut
4 each
S -
Shelf Clip
16 each
7
7
7
7
7
7
7
7
7
7
7
7
7
7
7
7
7
7
7
7
7
7
7
7
7
Electronic
Lock
H1 -
H2 -
Left Door
Right Door
1 each
1 each
L -
Door Rod Guide
2 each
(1 preinstalled)
K -
Hinge Pin Guide
4 each
(2 preinstalled)
Copyright
-
F
Top
1 each
G -
Shelf
4 each
-
D
Bottom
1 each
-
C
Inside Face Plate
1 each
-
E
Outside Face Plate
1 each
External Power Supply
Keys
1 each
J -
Top Stop
2 each
(2 preinstalled)
Q -
Door Bumper
4 each
(4 preinstalled)
Atlantic Metal Industries, Inc.
6302 Anderson Road, Tampa, Florida 33634
(813) 884-7541 Phone; (813) 884-2058 Fax
Atlantic Metal 2008
1
2 each
O -
Hinge Pin
4 each
12-008/1
Advertisement
Table of Contents

Summary of Contents for Sandusky Lee KDE7236
-
Page 1: Parts List
Snap-It Storage Cabinets Assembly Instructions Model Numbers: KDE7236, KDE7824,KDE7848 Model Numbers: KDE7236, KDE7824, KDE7848 Safety Instructions CAUTION: Use caution when handling and assembling metal parts. Metal may have sharp edges or corners. The use of protective gloves is recommended when assembling product. - Page 2 Snap-It Storage Cabinets Assembly Instructions Page 2 General Instructions TIPS FOR EASIER ASSEMBLY: • 2-person assembly is recommended. • Assemble the unit on a flat surface. • Check the parts carefully and follow the instructions. Step 1 Back Assembly Fig. 1 - Align back panels Lay the two back panels on a flat Tabs surface.
- Page 3 Snap-It Storage Cabinets Assembly Instructions Page 3 Step 3 Face Plate and Bottom Assembly Screws / Wing Nuts Attach the Inside Face Plate (C) using the Screws Fig. 1 - Install inside face plate and Wing Nuts (I). Make sure the door rod and hinge Door hinge hole holes are facing the top of the cabinet.
- Page 4 Snap-It Storage Cabinets Assembly Instructions Page 4 Step 4 Top Installation Carefully stand the cabinet assembly to an upright Fig. 1 - Top stops position. Note the plastic Top Stops (J) that are - Top Stop (installed at factory DO NOT remove) located on the front of each side panel.
- Page 5 Snap-It Storage Cabinets Assembly Instructions Page 5 Step 5 Shelf Installation Fig. 1 - Shelf clip installation At the desired shelf height, insert 4 Shelf Clips (S) into the slots located inside the front edges of the Side and Back Panels. Shelves rest on top Shelf Clip of clips...
- Page 6 Snap-It Storage Cabinets Assembly Instructions Page 6 Step 6 Door Installation Fig. 1 - Install plastic guides Install the Hinge Pin Guides (K) and the Door Rod Guide (L) into the Hinge Pin Guide bottom face plate. Make sure that they are fully seated. The Hinge Pin Guides are preinstalled in the top.
- Page 7 Laptop Computer Safe/Security Cabinet - Instruction Manual Page 4 Electronic Coded Lock Instructions Selecting the Mode of Operation The Electronic Lock can be programmed to operate in either of two modes of operation: 1) Standard Operation Mode - In this mode, both the Personal and Administrator passwords are stored in the system memory until they are manually changed.
- Page 8 Laptop Computer Safe/Security Cabinet - Instruction Manual Page 5 Electronic Coded Lock Instructions Retrieve the Open Door Records 1) Enter the password, press # and the display will read “OPEN” with a blue light. After a few seconds, the "OPEN" will disappear but the blue light will still be on.
Need help?
Do you have a question about the KDE7236 and is the answer not in the manual?
Questions and answers
Got a Sandusky cabinet but don’t know the previous owners code trying to reset it