Table of Contents
Advertisement
Advertisement
Table of Contents

Related Manuals for System Fidelity SA-270


Summary of Contents for System Fidelity SA-270
-
Page 2: Table Of Contents
Loudness TROUBLESHOOTING TECHNICAL DATA ACCESSORIES Accessories 1 x SA-270 Integrated Amplifier 1 x Remote control 2 x Batteries (Optional) 1 x Operation Manual This operation manual supplies all the information that you need to have about your System Fidelity Integrated Amplifier. Please read this operation manual carefully before you start... -
Page 3: Safety Precautions
SAFETY PRECAUTIONS A triangle with a lightning symbol draws the user’s attention to “dangerous voltage” without insulation in the cabinet which may be high enough to entail a risk of electric shock. A triangle with an exclamation mark draws the user’s attention to important instructions for use and maintenance in the accompanying manual, which should be studied. - Page 4 Ventilation The cabinet is provided with slots and openings to ensure ventilation and reliable operation and to protect the unit against overheating. Do not block or cover these openings. The openings must never be blocked, for instance by placing the unit on a bed, a sofa, a carpet or similar surface . Heat Do not place the unit near sources of heat such as radiators, heat registers, ovens or other units that produce heat.
- Page 5 must be made as incorrect setting may result in damage and often will make it difficult for a qualified technician to make the unit work properly again. E) If the unit has been dropped or damaged in any other way. F) When the operation of the unit changes drastically, the unit requires service.
-
Page 6: Important Information
NOTES ON INSTALLATION Your System Fidelity SA-270 should be placed on a firm, level surface. Avoid placing it in direct sunlight or near sources of heat and damp. Always allow adequate ventilation and don’t place it on a soft surface like a carpet. Don’t place it in an enclosed position such a bookcase or cabinet that may impede the air-flow through the ventilation holes. -
Page 7: Connections To The Mains
About connection to the mains Do not turn on the power before all connections have been made correctly. Check that all connections have been made correctly before turning on the power. Check that the mains voltage is 230-240V AC50Hz before turning on the power. Check that all other connections have been made correctly before inserting the mains plug into the wall socket. -
Page 8: Remote Control Functions
Remote control functions SA-270 AMPLIFIER FUNCTIONS: (1) Power: Sets the SA-270 in standby mode. (19-23) Input buttons: Selects input source of amplifier. (24) SPKRS A/B: selects which pair of speakers are playing - press once for SPEAKERS A, press one more time for SPEAKERS B, press third time... -
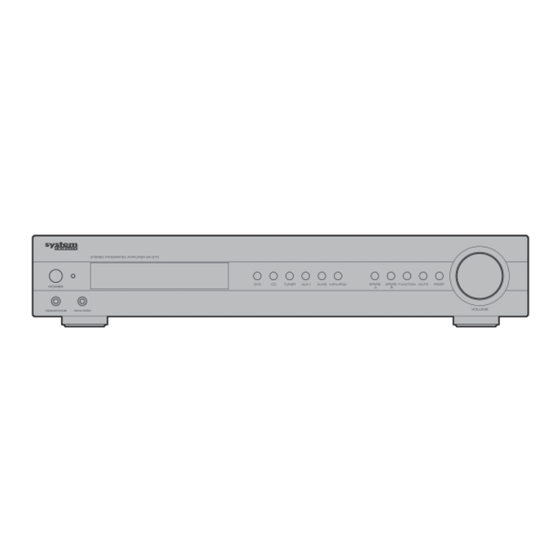
Page 9: Front Panel Description
FRONT PANEL DESCRIPTION (1) Mains switch: Used to switch on and off the unit by switching the mains voltage. (2) Headphone output jack: 3,5-mm jack that suits most headphones. (3) MP4/iPod input: 3,5mm jack for connection of iPod or MP3 and MP4 player. (4) LED indicator: Lights blue indicating that the amplifier is on stand-by mode. -
Page 10: Rear Panel Description
REAR PANEL DESCRIPTION (1) Line Out - RCA cynch output for connection of additional power amplifier, active subwoofer or recording device (2) AUX1: RCA cynch input for connection of optional equipment. (3) AUX2: RCA cynch input for connection of optional equipment (4) CD: RCA cynch input for connection of CD player (5) DVD: RCA cynch input for connection of DVD player (Note: Analogue stereo input only). -
Page 11: Operation And Functions
Note: All inputs are analogue stereo inputs. It means that you cannot connect a digital sound source through a digital cable (optical or coaxial). Using the function menu The SA-270 features a “function menu” that allows adjustment of the following: Master volume, bass, treble, balance and loudness. Volume control Turn the volume control knob to the right to increase the volume and turn the volume control to the left to reduce the volume. -
Page 12: Bass Control
Bass control This amplifier features bass control that allows adjustment of the bass level by +/- 14 dB, from 45Hz to 259Hz. 1. Press the FUNCTION button on the remote control or on the front panel until information on bass adjustment is displayed to activate the bass tone control. 2. -
Page 13: Troubleshooting
TROUBLESHOOTING PROBLEM CAUSE/REMEDY -Switch on the electric current at the socket. -Check that the plug has been correctly inserted into the socket. No power when the amplifier is turned on. -The internal fuse has blown and must be replaced by a qualified service technician. -
Page 14: Technical Data
CONSUMER NOTICE: The System Fidelity product you have purchased is subject to Directive 2002/ 96/EC of the European Parliament and the Council of the European Union on waste electrical and electronic equipment (WEEE) and, in jurisdictions adopting that Directive, is marked as being put on the market after August 13, 2005, and should not be disposed of as unsorted municipal waste.
Need help?
Do you have a question about the SA-270 and is the answer not in the manual?
Questions and answers