Advertisement
CHROMATIC TUNER STX1
INSTRUCTION MANUAL
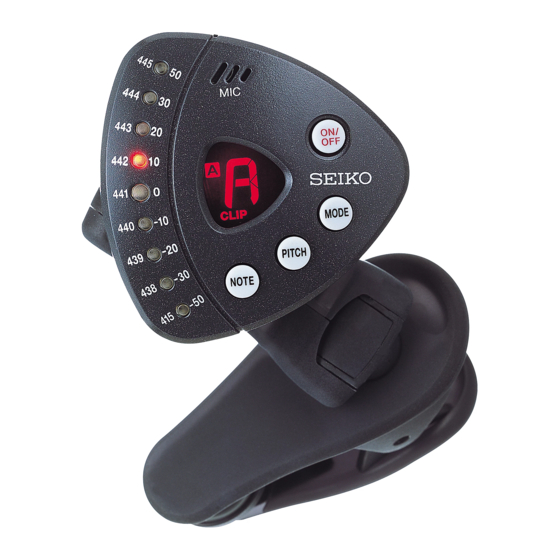
NAME AND OPERATION OF PARTS
Before use, pull out the insulating sheet from
the battery compartment, as shown in the
illustration below. If the sheet is torn off and left
inside the compartment, open the battery hatch
by referring to "BATTERY CHANGE" below,
and remove the remainder of the sheet
completely. Otherwise, the tuner will not be
turned on.
Note: The battery included with the tuner is a monitor
battery, and the battery life may be shorter than
the specified period.
- - - - -
Power button
With each press, the tuner stands by for "CLIP" and "MIC" input, and is turned
off in order.
CLIP input method:
The vibration sensor
senses the vibrations generated when the instrument
gives out a note, and tuning is made using them. This input method is
convenient for the tuning in noisy environments or in a situation where
other instruments are played nearby.
MIC input method:
Tuning is made using the note of the instrument input through the built-in
microphone
.
Mode button
Use the button to select the tuning mode from auto (
sound (
).
Auto mode
: By playing a note, the tuner automatically identifies and
indicates the note having the pitch closest to it. It also
indicates that the pitch of the input note is lower or higher
than that of the indicated note.
Manual mode
: Set the note you wish to tune, and then, play a note. The
tuner indicates that the pitch of the input note is lower or
higher than that of the note you have set.
Sound mode
: The tuner gives out the note you have set. Tune the
instrument on the basis of the reference note the tuner
produces.
Pitch button
Use the button to set the reference pitch (frequency of A4).
By pressing the button, an LED of reference pitch LED display
a certain period of time to show the current pitch setting. With each press of
the button while the LED is flashing, the reference pitch increases by 1 Hz. It
increases continuously if the button is kept pressed.
* If the tuner is left untouched with an LED flashing, the reference pitch indicated by the LED
is automatically registered in a certain period of time.
Settable range:
415 Hz ⇒ 438 Hz ⇒ 439 Hz ⇒ • • • • • ⇒ 444 Hz ⇒ 445 Hz
Note button
Use the button to set the note you wish to tune.
With each press, the note changes over at one-semitone step. It changes
continuously by keeping the button pressed.
* In the auto mode, the note button is disabled as the tuner automatically identifies and
indicates the input note.
Settable range:
Manual mode
: C ~ B (12 notes)
Sound mode
: C4 ~ B4 (12 notes)
Liquid crystal display
Note indication
Auto mode
: By playing a note, the tuner automatically identifies
and indicates the note having the pitch closest to
it. (The difference in octave is not indicated.)
Manual/sound mode: The note you have set is indicated. (The octave
cannot be set.)
Input method indication
The input method you have selected is indicated.
Mode indication
: Auto mode
: Manual mode
), manual (
) and
flashes for
(at 1 Hz steps from 438 to 445 Hz)
: Sound mode
Tuning guide/ reference pitch LED display
In the auto and manual modes, the difference in pitch between the note
indicated on the display and the note given by the instrument is indicated by
the LED that lights up. (See the numeral on the right of the LED that lights up.)
The LED display also indicates the reference pitch you have set. (See the
numeral on the left of the LED that lights up.)
Built-in microphone
Use it to input a note directly from the instrument in the "MIC" input method.
When the "CLIP" input method is selected, the built-in microphone is disabled.
Vibration sensor/built-in speaker
In the "CLIP" input method, it senses the vibration generated by the instrument.
When the "MIC" input method is selected, the vibration sensor/built-in speaker
is disabled. In sound mode, the reference note you have set is produced from
the built-in speaker.
Clip
Attach the tuner to the instrument using it to sense the vibration it generates.
HOW TO TUNE THE INSTRUMENT
Auto/manual mode
Play a note with the instrument, and tune it according to the note indication
and the tuning guide
.
1. Press the power button
When the "CLIP" input method is selected, attach the tuner to the instrument
using the clip
.
2. Select the tuning mode. Press the mode button
to the auto (
) or manual (
3. When the manual mode is selected, press the note button
you wish to tune.
4. To change the reference pitch, press the pitch button
5. Play the instrument to give a note. When the "MIC" input method is
selected, bring the instrument close to the built-in microphone
6. Tune the instrument until the LED at the center of the tuning guide
up in green. In the auto mode, also check the input note with the note
indication
.
[Flat]
Sound mode
The tuner gives out the note you wish to tune, and tune the instrument on the
basis of the reference note the tuner produces.
1. Press the power button
(The sound mode is available irrespective of the input method selected.)
2. Select the tuning mode.
Press the mode button
3. Press the note button
4. To change the reference pitch, press the pitch button
5. Tune the instrument on the basis of the reference note the tuner produces.
Precautions on tuning
1. The tuner may pick up noise from the surrounding environment or the
hum noise generated by electric appliances, and shows indications as if
a note is played. This is not a malfunction, and the tuner operates
properly when a note is played.
2. When the "MIC" input method is used, it is recommended that the tuning
procedure be performed in a quiet environment for accurate tuning.
Also, bring the instrument close to the tuner to register a note.
3. If you find it difficult to tune the instrument with the "CLIP" input method,
re-attach the tuner in such a position to the instrument that the vibrations
are transmitted to the tuner more clearly.
AUTO POWER-OFF FUNCTION
The tuner is equipped with an auto power-off function as described below to save
the battery energy.
Auto/manual mode
1. If none of the buttons
,
built-in microphone
or if the vibration sensor
for approximately 10 seconds while the power is turned on, the liquid
crystal display becomes slightly dim. (Power save mode, Phase 1)
2. If the tuner is left untouched further for approximately five more minutes
without sensing a note or vibrations, the liquid crystal display becomes
black, and the green LED at the center of the tuning guide
flashing. (Power save mode, Phase 2)
3. If the tuner is left untouched further for approximately 15 more minutes
without sensing a note or vibrations, the tuner is turned off automatically.
(Auto power-off function)
Sound mode
1. If none of the buttons
seconds while the power is turned on, the liquid crystal display becomes
slightly dim.
2. If the tuner is left untouched for approximately 5 more minutes, the tuner
is turned off automatically. (Auto power-off function)
to select the "CLIP" or "MIC" input method.
to set the tuning mode
).
to set the note
to set the desired pitch.
[In tune]
[Sharp]
to select the "CLIP" or "MIC" input method.
to set the tuning mode to the sound (
to set the note you wish to tune.
to set the desired pitch.
and
is pressed, if no note is input in the
senses no vibrations
,
and
is pressed for approximately 10
.
lights
).
starts
Advertisement
Table of Contents

Subscribe to Our Youtube Channel
Related Manuals for Seiko CHROMATIC TUNER STX1


Summary of Contents for Seiko CHROMATIC TUNER STX1
- Page 1 CHROMATIC TUNER STX1 Tuning guide/ reference pitch LED display In the auto and manual modes, the difference in pitch between the note INSTRUCTION MANUAL indicated on the display and the note given by the instrument is indicated by the LED that lights up. (See the numeral on the right of the LED that lights up.) The LED display also indicates the reference pitch you have set.
- Page 2 MEMORY BACKUP FUNCTION Even after the tuner is turned off, the settings you have made are stored in memory and will not be erased. If the battery is replaced with a new one, the tuner will return to the following initial settings. Input method [CLIP] Tuning mode...
Need help?
Do you have a question about the CHROMATIC TUNER STX1 and is the answer not in the manual?
Questions and answers