Schumacher SE-1-12S Owner's Manual
Automatic battery charger / maintainer
Hide thumbs
Also See for SE-1-12S:
- Owner's manual (4 pages) ,
- Owner's manual (56 pages) ,
- Owner's manual (68 pages)
Table of Contents
Advertisement
Available languages
Available languages
Quick Links
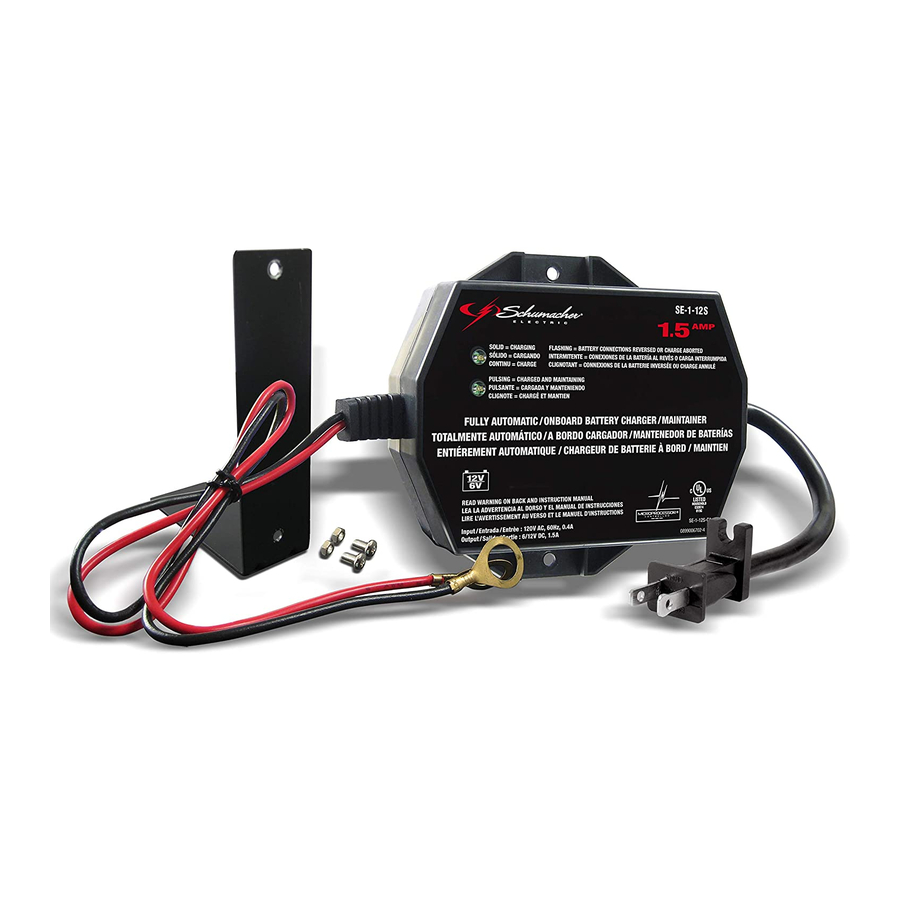
Model SE-1-12S
Automatic Battery Charger / Maintainer
Voltage: 12
Amperage: 1.5
OWNER'S MANUAL
READ ENTIRE MANUAL BEFORE
USING THIS PRODUCT
IMPORTANT: READ AND SAVE THIS SAFETY AND INSTRUCTION MANUAL.
1.
IMPORTANT SAFETY INSTRUCTIONS
1.1
SAVE THESE INSTRUCTIONS – The SE-1-12S offers a wide range of fea-
tures to accommodate the needs for home use. This manual will show you
how to use your charger safely and effectively. Please read, understand and
follow these instructions and precautions carefully, as this manual contains
important safety and operating instructions.
1.2
WARNING:
Pursuant to California Proposition 65, this product contains
chemicals known to the State of California to cause cancer and birth defects
or other reproductive harm.
1.3
Do not expose charger directly to rain or snow.
1.4
Use only recommended attachments. Use of an attachment not recom-
mended or sold by Schumacher
in a risk of fire, electric shock or injury to persons or damage to property.
1.5
To reduce the risk of damage to electric plug or cord, pull by the plug rather
than the cord when disconnecting the charger.
1.6
Use of an improper extension cord could result in a risk of fire and electric
shock. Make sure:
•
That the pins on the plug of the extension cord are the same number, size and
shape as those of the plug on the charger.
•
That the extension cord is properly wired and in good electrical condition.
•
That the wire size is large enough for the AC ampere rating of the charger as
specified in the table in section 8.
1.7
Do not operate the charger with a damaged cord or plug; take it to a quali-
fied service person. (Call customer service at: 1-800-621-5485.)
1.8
Do not operate the charger if it has received a sharp blow, been dropped or
otherwise damaged in any way; take it to a qualified service person. (Call
customer service at: 1-800-621-5485.)
1.9
Do not disassemble the charger; take it to a qualified service person when
service or repair is required. Incorrect reassembly may result in a risk of fire
or electric shock. (Call customer service at: 1-800-621-5485.)
1.10
To reduce the risk of electric shock, unplug the charger from the outlet
before attempting any maintenance or cleaning.
WARNING – RISK OF EXPLOSIVE GASES.
WORKING IN THE VICINITY OF A LEAD-ACID BATTERY IS DANGEROUS.
BATTERIES GENERATE EXPLOSIVE GASES DURING NORMAL BATTERY
OPERATION. FOR THIS REASON, IT IS OF UTMOST IMPORTANCE THAT YOU
FOLLOW THE INSTRUCTIONS EACH TIME YOU USE THE CHARGER.
TO REDUCE THE RISK OF BATTERY EXPLOSION, FOLLOW
THESE INSTRUCTIONS AND THOSE PUBLISHED BY THE BATTERY MANU-
FACTURER AND THE MANUFACTURER OF ANY EQUIPMENT YOU INTEND
TO USE IN THE VICINITY OF THE BATTERY. REVIEW THE CAUTIONARY
MARKINGS ON THESE PRODUCTS AND ON THE ENGINE.
2.
PERSONAL PRECAUTIONS
2.1
Consider having someone close enough by to come to your aid when you
work near a lead-acid battery.
2.2
Have plenty of fresh water and soap nearby in case battery acid contacts
skin, clothing, or eyes.
00-99-000913-0109
Electric Corporation may result
®
2.3
Wear complete eye protection and clothing protection. Avoid touching eyes
while working near the battery.
2.4
If battery acid contacts skin or clothing, wash immediately with soap and
water. If acid enters eye, immediately flood eye with cold running water for
at least 10 minutes and get medical attention immediately.
2.5
NEVER
smoke or allow a spark or flame in vicinity of the battery or engine.
2.6
Be extra cautious to reduce the risk of dropping a metal tool onto the bat-
tery. It might spark or short-circuit the battery or other electrical part that
may cause an explosion.
2.7
Remove personal metal items such as rings, bracelets, necklaces, and
watches when working with a lead-acid battery. A lead-acid battery can pro-
duce a short-circuit current high enough to weld a ring or the like to metal,
causing a severe burn.
2.8
Use this charger for charging a LEAD-ACID battery only. It is not
intended to supply power to a low voltage electrical system other than in
a starter-motor application. Do not use this battery charger for charging
dry-cell batteries that are commonly used with home appliances. These bat-
teries may burst and cause injury to persons and damage to property.
2.9
NEVER
charge a frozen battery.
3.
PREPARING TO CHARGE
3.1
If it is necessary to remove the battery from the vehicle to charge it, always
remove the grounded terminal first. Make sure all of the accessories in the
vehicle are off, to prevent arcing.
3.2
Be sure area around the battery is well ventilated while the battery is being
charged.
3.3
Clean the battery terminals before attaching the charger to the battery.
During cleaning, keep airborne corrosion from coming into contact with your
eyes, nose and mouth. Use baking soda and water to neutralize battery
acid and help eliminate airborne corrosion. Do not touch your eyes, nose or
mouth.
3.4
Add distilled water to each cell until the battery acid reaches the level speci-
fied by the battery manufacturer. Do not overfill. For a battery without remov-
able cell caps, such as valve regulated lead-acid (VRLA) batteries, carefully
follow the manufacturer's recharging instructions.
3.5
Read, understand and follow all instructions for the charger, battery, vehicle
and any equipment used near the battery and charger. Study all of the bat-
tery manufacturer's specific precautions while charging and recommended
rates of charge.
3.6
Determine the voltage of the battery by referring to the vehicle owner's
manual and make sure that the battery voltage matches the charger output
voltage (12V).
3.7
Make sure that the charger cable ring terminal connections are attached to
the battery and ground securely.
4.
CHARGER LOCATION
4.1
When mounting the charger to the fender well, locate charger as far away
from the battery as DC cables permit.
4.2
Never place charger directly above the battery being charged; gases from
the battery will corrode and damage the charger.
4.3
With the exception of the charger mounting bracket, do not set the battery
on top of the charger.
4.4
Never allow the battery acid to drip onto the charger when reading the
electrolyte specific gravity or filling the battery.
4.5
Do not operate the charger in a closed-in area or restrict ventilation in any
way.
5.
DC CONNECTION PRECAUTIONS
5.1
Connect and disconnect the DC output ring terminals only after removing
the AC plug from electric outlet.
5.2
Attach the ring terminals to the battery and chassis, as indicated in steps
6.5, 6.6, and 7.2 through 7.4.
6.
FOLLOW THESE STEPS WHEN BATTERY IS INSTALLED IN
VEHICLE.
A SPARK NEAR THE BATTERY MAY CAUSE A BATTERY EXPLOSION. TO
REDUCE RISK OF A SPARK NEAR BATTERY:
6.1
Position the AC and DC cords to reduce the risk of damage by the hood,
door, and moving or hot engine parts.
6.2
Stay clear of fan blades, belts, pulleys, and other parts that can cause injury.
6.3
Check the polarity of the battery posts. The POSITIVE (POS, P, +) battery
post usually has a larger diameter than the NEGATIVE (NEG, N,–) post.
6.4
Determine which post of the battery is grounded (connected) to the chassis. If
the negative post is grounded to the chassis (as in most vehicles), see step
(6.5). If the positive post is grounded to the chassis, see step (6.6).
6.5
For a negative-grounded vehicle: You should disconnect both battery cables
from the battery before connecting the charger cables. The output leads of
the charger are terminated with 3/8" dia. ring terminals. Remove the bolt
from the battery post connector, insert the bolt through the ring terminal then
place the bolt back in the battery connector and tighten. Connect the POSI-
1
Advertisement
Table of Contents

Related Manuals for Schumacher SE-1-12S


Summary of Contents for Schumacher SE-1-12S
- Page 1 IMPORTANT SAFETY INSTRUCTIONS fied by the battery manufacturer. Do not overfill. For a battery without remov- SAVE THESE INSTRUCTIONS – The SE-1-12S offers a wide range of fea- able cell caps, such as valve regulated lead-acid (VRLA) batteries, carefully tures to accommodate the needs for home use. This manual will show you follow the manufacturer’s recharging instructions.
-
Page 2: Follow These Steps When Battery Is Outside Vehicle
(such as a 10 amp) Do not face the battery when making the final connection. then use the SE-1-12S to maintain the charge level of the battery. When disconnecting the charger, always do so in the reverse order of the... -
Page 3: Limited Warranty
Manufacturer does not provide any warranty for any accessories used with this No desarme el cargador, llévelo a un reparador calificado cuando sea product that are not manufactured by Schumacher Electric Corporation and ap- necesario algún tipo de servicio técnico o reparación. El reensamblado proved for use with this product. -
Page 4: Preparación De La Carga
NEGATIVA (NEG, N,–). Determine qué terminal tiene conexión a tierra (conectado) con el chasis. Para montar el cargador al lado de la batería: El SE-1-12S también puede Si el terminal negativo está conectado al chasis (como en la mayoría de los... -
Page 5: Instrucciones De Operación
Use una batería en buenas condiciones grande (como de 10 amperios) y luego usar el SE-1-12S para mantener el para una verificar todas las conexiones; el enchufe de CA de 120 voltios, las nivel de carga de la batería. -
Page 6: Consignes De Sécurité Importantes
Assurez-vous que l’endroit où vous chargez la batterie est bien aéré durant importantes relatives à la sécurité et au fonctionnement du chargeur de bat- sa charge. terie modèle SE-1-12S. Nettoyez les bornes de la batterie. Faites attention aux substances cor- MISE EN GARDE : Conformément à... - Page 7 Déterminez quelle borne de batterie est mise à la masse (raccordée) au Montage du chargeur sur le côté de la batterie : Le chargeur SE-1-12S peut aussi être monté sur le côté de votre batterie en utilisant le support de fixation châssis.
-
Page 8: Instructions D'entretien
AVANT DE L’ENVOYER POUR RéPARATION très déchargées, il est recommandé de la recharger premièrement avec un chargeur plus puissant (comme un de 10 A), puis d’utiliser le SE-1-12S pour 14.1 Quand vous rencontrez un problème de chargement, assurez-vous que maintenir le niveau de charge de la batterie.
Need help?
Do you have a question about the SE-1-12S and is the answer not in the manual?
Questions and answers