
Subscribe to Our Youtube Channel
Related Manuals for La Crosse Technology WS-8157U


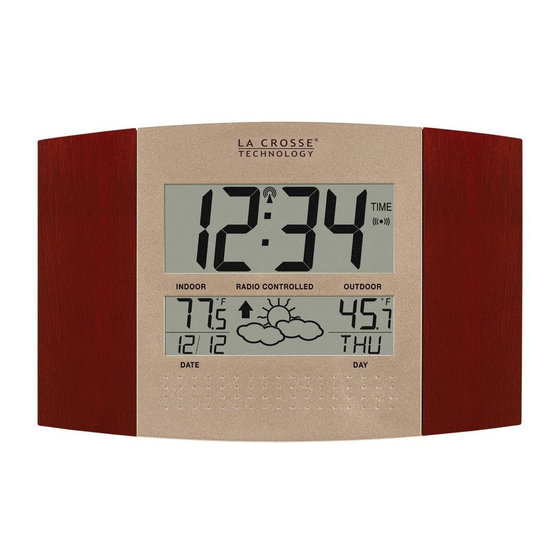
Summary of Contents for La Crosse Technology WS-8157U
- Page 1 WS-8157U RADIO-CONTROLLED CLOCK WITH OUTDOOR WIRELESS TEMPERATURE Instruction Manual...
-
Page 2: Table Of Contents
WS-8157U RADIO-CONTROLLED CLOCK WITH OUTDOOR WIRELESS TEMPERATURE INSTRUCTION MANUAL TABLE OF CONTENTS Page Glossary of Common Terms………………………………………………………………………….2 Features…………………………………………………………………………………………………..3 Batteries: Installation and Replacement…………………………………………………………..4 Setting-Up………………………………………………………………………………………………..5 Function Keys………………………………………………………………………………………..5-6 LCD Screen Descriptions……………………………………………………………………………..6 Weather Forecast…………………………………………………………………………………….6-7 Weather Tendency Icons………………………………………………………………………………7 Manual Settings……………………………………………………………………………………..7-11 LCD CONTRAST…………………………………………………………………………………………8 TIME ZONE……………………………………………………………………………………………….8 DST ON/OFF……………………………………………………………………………………………..8 TIME RECEPTION ON/OFF……………………………………………………………………………9... -
Page 3: Glossary Of Common Terms
GLOSSARY OF COMMON TERMS NIST* The National Institute of Standards and Technology maintains the primary frequency standard for the United States. The NIST also coordinates the United States time and frequency standards with other world standards. The NIST provides time and frequency services for United States clientele. WWVB* The WWVB is an AM radio station in Ft. -
Page 4: Features
FEATURES: RADIO-CONTROLLED CLOCK: Hanging holes LCD1 Function keys display Battery cover LCD2 display Foldable stand • WWVB Radio controlled time with manual time setting • Time reception ON/OFF • 12/24 hour time display • Time display: hour, minute, second • Alarm setting with snooze function •... - Page 5 TO INSTALL AND REPLACE BATTERIES IN THE TEMPERATURE TRANSMITTER(INSTALL BATTERIES IN TRANSMITTER BEFORE INSTALLING BATTERIES IN RADIO-CONTROLLED CLOCK) The transmitter uses 2 x AA,1.5V batteries. To install and replace the batteries, please follow the steps below: Remove the battery cover by pushing down towards bottom of transmitter and sliding cover out.
-
Page 6: Setting-Up
SETTING-UP: Alkaline batteries are recommended for use in both units. Avoid using rechargeable batteries. NOTE: Do not set-up the clock until the outdoor temperature is displayed. Place batteries in the outdoor transmitter first, then into the radio-controlled clock. DO NOT PRESS ANY BUTTONS FOR 15 MINUTES. After the 15 minutes both the Indoor and Outdoor areas on your clock should have a temperature showing. -
Page 7: Lcd Screen Descriptions
The weather forecasting feature is estimated to be 75% accurate. The weather forecast is based solely upon the change of air pressure over time. The WS-8157U averages past air- pressure readings to provide an accurate forecast, creating a necessity to disregard all weather forecasting for 12-24 hours after the unit has been set-up, reset, or moved from one altitude to another (i.e. -
Page 8: Manual Settings
Sun with Clouds—indicates that the weather is expected to be fair (not that the weather will be sunny with clouds). Clouds with Rain—indicates that the weather is expected to get worse (not that the weather will be rainy). The weather icons change when the unit detects a change in air pressure. The icons change in order, from “sunny”... - Page 9 LCD CONTRAST SETTING After entering the manual setting mode as described above, the LCD contrast can be set within 8 levels, from LCD 0 to LCD7 (Default setting is LCD 5): The LCD contrast digit will start fashing in LCD2. (Default setting "5“). Select the desired LCL contrast level by pressing and releasing the + key.
-
Page 10: Hour Time Display
TIME RECEPTION SETTING (ON/OFF) In area where reception of the WWVB time is not possible, the WWVB time reception function can be turn OFF. The clock will then work as a normal Quartz clock. (Default setting is ON). The ON digit will start flashing on LCD1. Set the RCC ON or OFF by pressing the + key. Press and release the SET key to enter the “Language Setting“. - Page 11 Set the desired hours by pressing and releasing the + key followed by pressing the SET key. Now the minute digits will start flashing. Set the desired minutes by pressing and releasing the + key. If the + key is held, the units will increase by 5.
-
Page 12: Changing The Display Mode
Note: The date can only be set in conjunction with the selected month. For example, it is not possible to set the date 30 if the month of February is selected. Press and release the SET key to exit the setting mode and switch back to the normal display mode. -
Page 13: Outdoor Temperature Transmitter
TO DEACTIVATE THE ALARM: Alarm icon (((•))) (ON) The alarm will be automatically ON when the alarm time is set. To deactivate the alarm (OFF), press and release once the ALM key in normal mode display. The alarm icon will disappear, the alarm is now off. -
Page 14: Positioning
Note: When the 433 MHz signal is received correctly, do not re-open the battery cover of either the outdoor temperature transmitter or radio-controlled clock, as the batteries may spring free from the contacts and force a false reset. Should this happen accidentally then reset all units (see Setting-up above) otherwise transmission problems may occur. - Page 15 POSITIONING THE RADIO-CONTROLLED CLOCK: There are two possible ways to mount the radio-controlled clock: • use of the foldout table stand, or • wall mounting FOLDOUT TABLE STAND The foldout table stand leg is located on the backside. Pull the stand out from the bottom center edge of the radio-controlled clock, below the battery compartment.
- Page 16 POSITIONING THE OUTDOOR TEMPERATURE TRANSMITTER The outdoor temperature transmitter can be mounted in two ways: • with the use of screws, or • using the adhesive tape. MOUNTING WITH SCREWS Remove the mounting bracket from the outdoor temperature transmitter. Place the mounting bracket over the desired location. Through the three screw holes of the bracket, mark the mounting surface with a pencil.
-
Page 17: Troubleshooting
TROUBLESHOOTING: Problem: The LCD is faint. Solution: 1) Replace the batteries. Problem: No reception of WWVB signal Solution: 1) It may help reception to face the front of the radio-controlled clock in the general direction of Ft. Collins, Colorado. 2) Wait overnight for signal. 3) Be sure the radio-controlled clock is at least 6 feet (2 meters) from any electrical devices, i.e. -
Page 18: Care And Maintenance
CARE AND MAINTENANCE: • Avoid placing the units in areas prone to vibration and shock as these may cause damage. • Avoid areas where the units can be exposed to sudden changes in temperature, i.e. direct sunlight, extreme cold and wet/moist conditions as these will lead to rapid changes which reduces the accuracy of readings. - Page 19 La Crosse Technology, Ltd or La Crosse Technology, Ltd’s authorized service center. La Crosse Technology, Ltd will repair or replace this product, at our option and at no charge as stipulated herein, with new or reconditioned parts or products if found to be defective during the limited warranty period specified above.
- Page 20 LA CROSSE TECHNOLOGY, LTD WILL NOT ASSUME LIABILITY FOR INCIDENTAL, CONSEQUENTIAL, PUNITIVE, OR OTHER SIMILAR DAMAGES ASSOCIATED WITH THE OPERATION OR MALFUNCTION OF THIS PRODUCT. THIS PRODUCT IS NOT TO BE USED FOR MEDICAL PURPOSES OR FOR PUBLIC INFORMATION.
- Page 21 This device complies with part 15 of the FCC rules. Operation is subject to the following two conditions: (1) this device may not cause harmful interference, and (2) this device must accept any interference received, including interference that may cause undesired operation. Freq. 433.92 MHz La Crosse Technology Made in China WS-8157U FCC ID: OMO-01RX (Receiver)
Need help?
Do you have a question about the WS-8157U and is the answer not in the manual?
Questions and answers