Advertisement
Table of Contents
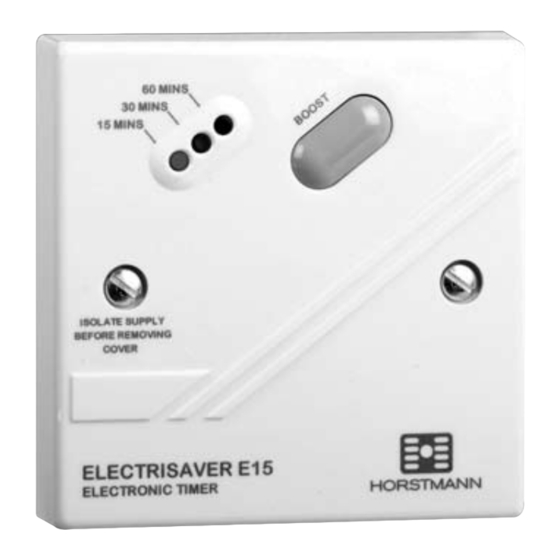
Electrisaver User and
Installation Instructions
The Electrisaver push button boost timer can be used to control immersion elements and
other electrical appliances up to 3kW or as an override/extension timer for central heating
systems.
INSTALLATION AND CONNECTION SHOULD ONLY BE CARRIED OUT BY A SUITABLY QUALIFIED
PERSON AND IN ACCORDANCE WITH THE CURRENT EDITION OF THE IEE WIRING REGULATIONS.
WARNING : ISOLATE MAINS SUPPLY BEFORE COMMENCING INSTALLATION
ENSURE THE UNIT IS PROPERLY EARTHED.
1
Advertisement
Table of Contents

Subscribe to Our Youtube Channel
Related Manuals for Horstmann Electrisaver


Summary of Contents for Horstmann Electrisaver
- Page 1 Electrisaver User and Installation Instructions The Electrisaver push button boost timer can be used to control immersion elements and other electrical appliances up to 3kW or as an override/extension timer for central heating systems. INSTALLATION AND CONNECTION SHOULD ONLY BE CARRIED OUT BY A SUITABLY QUALIFIED PERSON AND IN ACCORDANCE WITH THE CURRENT EDITION OF THE IEE WIRING REGULATIONS.
- Page 2 Electrisaver. Installation of a 100 mA RCD will provide additional protection for the unit. If the Electrisaver is to be connected to a ring main then the spur feeding the controller should be protected in the same way.
- Page 3 Use twin and earth cable with a minimum conductor size of 2.5mm to connect the Electrisaver to the supply. Use a suitably rated three-core flexible cord (see below) to connect the Electrisaver to the appliance to be switched. For appliances up to 2kW rating use minimum 1.0mm conductors.
- Page 4 The supply Earth conductor and appliance Earth conductor must use the separate terminal connections provided. Clamp all surface wiring to the wall adjacent to the Electrisaver or use trunking where appropriate. The flexible cord to the appliance should be passed through the cable entry hole in the bottom edge of the Electrisaver, and secured under the cable clamp provided.
- Page 5 Specification Purpose of control: Electronic Timer (Independently mounted) Classification: Type 1C Action (RL1) Contact rating: 13(3)A 230V AC Suitable for loads up to 3kW Power supply: 230V AC 50Hz Operating temperature range: 0ºC to 35ºC Shock protection: Class 1 (Live parts enclosed) Dirt protection: Normal situations Enclosure protection:...
- Page 6 User Instructions To use the Electrisaver simply press the BOOST button in quick succession until the indicator light for the required boost period is illuminated (see table below). BOOST PERIOD PRESS BOOST BUTTON TO SELECT LENGTH OF REQUIRED BOOST. Once...
Need help?
Do you have a question about the Electrisaver and is the answer not in the manual?
Questions and answers