
Related Manuals for Fluke 805


Summary of Contents for Fluke 805
- Page 1 Vibration Meter Users Manual May 2012, Rev.1, 9/12 © 2012 Fluke Corporation. All rights reserved. Specifications are subject to change without notice. All product names are trademarks of their respective companies.
- Page 2 LIMITED WARRANTY AND LIMITATION OF LIABILITY Each Fluke product is warranted to be free from defects in material and workmanship under normal use and service. The warranty period is one year and begins on the date of shipment. Parts, product repairs, and services are warranted for 90 days. This warranty extends only to...
-
Page 3: Table Of Contents
Table of Contents Title Page Introduction ........................1 How to Contact Fluke ....................1 Safety Information ......................2 Symbols ......................... 3 Accessories ........................3 Specifications ........................ 3 Before You Start ......................5 Unpack and Inspect ....................5 Storage ........................5 Battery ........................ - Page 4 Users Manual Backlight Timeout ....................11 Language ......................12 Device Info ......................12 Battery Selection ....................13 Emissivity Selection ....................13 Power Saving ......................14 Flashlight ........................14 Accessory Connectors ....................14 External Sensor ....................14 Audio ........................16 USB ........................17 About Measurements .....................
- Page 5 Vibration Meter Contents (continued) ISO 10816-3 ......................36 ISO 10816-7 ......................37 Export Data ........................37 General Maintenance ....................40 Care .......................... 40 How to Clean ......................40 Battery Replacement ....................40 Firmware Upgrades ....................... 41 How to Troubleshoot ...................... 42...
- Page 6 Users Manual...
- Page 7 List of Tables Table Title Page Symbols ..........................3 Accessories .......................... 3 Keypad and Connectors ....................... 6 LED Status ..........................7 Crest Factor Plus ........................19 Severity Scale ........................35 Vibration Severity - ISO 10816-1 ..................35 Troubleshooting ........................42...
- Page 8 Users Manual...
- Page 9 List of Figures Figure Title Page 805 Vibration Meter ......................6 Flashlight ..........................14 External Sensor Connection ....................15 Audio Connection ......................... 16 Meter to PC Connection ......................17 Measurement Display ......................18 Import Database ........................38 Open CSV Format File ......................38 Plot Options ..........................
- Page 10 Users Manual viii...
-
Page 11: Introduction
Introduction How to Contact Fluke The 805 Vibration Meter (the Meter or Product) is a To contact Fluke, call one of the following telephone screening tool for bearings and overall vibration numbers: measurements on machines. The Meter includes these Technical Support USA: 1-800-44-FLUKE... -
Page 12: Safety Information
Users Manual Safety Information Comply with local and national safety codes. Use personal protective equipment A Warning identifies the conditions and procedures that (approved rubber gloves, face protection, are dangerous to the user. A Caution identifies the and flame-resistant clothes) to prevent conditions and procedures that can cause damage to the shock and arc blast injury where Product or the equipment under test. -
Page 13: Symbols
Amplitude Units Instrumentation” product. Do not dispose of this Acceleration ........ g, m/sec product as unsorted municipal waste. Go to Velocity ........in/sec, mm/sec Fluke’s website for recycling information. Displacement ......mils, m Infrared Thermometer Battery or battery compartment. Temperature Measurement Low battery when shown on display. - Page 14 Upgrade ..........through USB Bias Current (to supply power) ... 5 mA Memory ..........Up to 3,500 measurements Note Fluke supports, but does not provide, external sensors. Environmental Vibration Meter Operating Temperature ....... -20 C to 50 C (-4 F to 122 F) Low Frequency Range Storage Temperature ......
-
Page 15: Before You Start
Vibration Meter Before You Start Electromagnetic Interference ....Standard EN 61000-4-3 Battery RE ..........Standard CISPR 11, Class A Before you use the Meter for the first time, install the two EMI, RFI, EMC, RF ..... EN 61326-1:2006, AA lithium non-rechargeable batteries (included). See EN 61326-2-2:2006 Battery Replacement on page 40 for more information. -
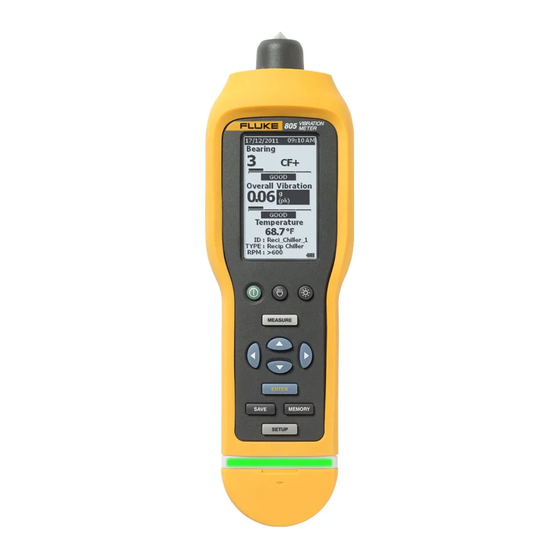
Page 16: Controls And Connections
Users Manual Controls and Connections Table 3. Keypad and Connectors Figure 1 shows the location of the controls and Item Control connections for the Meter. Table 3 is a key. Power on/off Measure Navigation VIBRATION TESTER Enter ... -
Page 17: Measurement Status Leds
Vibration Meter Before You Start Measurement Status LEDs Table 4. LED Status The Meter has a status light for visual feedback about the measurement. Green and red LEDs show the measurement status and that a good measurement has 90˚ been taken. Table 4 is a list of the status as the LED BEARING BEARING BEARING... -
Page 18: Power On
2. Push to restart the Meter. Power Off If Meter does not restart or the problem persists, A soft shutdown is the preferred method to turn off the contact Fluke. Meter: 1. Push . 2. At the prompt, select Yes. -
Page 19: How To Operate
Vibration Meter How to Operate How to Operate This section is about the operation of the Meter. It includes measurement tips and step-by-step instructions. Navigation For general operation: moves the cursor through the menu options and edits the options opens next menu or sets the selection ... -
Page 20: Time
Users Manual 6. Push to update the Meter and exit the 4. Push to set the option. menu. 5. Push and to highlight am or pm. 7. Push and to move to the next page for more 6. -
Page 21: Backlight Timeout
Vibration Meter How to Operate To change the date: Backlight Timeout The backlight turns off in a preset time limit. If you do not 1. Push and to highlight the option for Day, push a key during this time limit, the backlight turns off to Month, and Year. -
Page 22: Language
Users Manual Language Device Info To change the language for the display: Information about your Meter is in the Device Info menu. This information includes the serial number, software 1. Push and to highlight a language. version, emissivity value, internal sensor sensitivity, and memory status. -
Page 23: Battery Selection
Vibration Meter How to Operate Battery Selection Emissivity Selection To change the battery type: The correct emissivity value is important for you to make the most accurate temperature measurements. Most 1. Go to the Device Settings menu. painted or oxidized surfaces have an emissivity of 0.93 (default value set in the Meter). -
Page 24: Power Saving
Users Manual gqi96.bmp 4. Push and to highlight a value. 5. Push to update the Meter and exit the menu. Power Saving gqi06.eps Figure 2. Flashlight The Meter bypasses battery power when it is connected to Accessory Connectors a PC with the USB cable. - Page 25 Vibration Meter How to Operate Note After you connect the external sensor, a pop-up message opens on the Meter display and then Fluke supports, but does not provide, external opens the Enter Sensitivity menu. sensors. gqi14.eps Note gqi05.eps The sensitivity must be set in mV/g units.
-
Page 26: Audio
Users Manual Figure 4 shows how to make the audio connection to the Audio Meter. The Meter has an audio connector for headphones. Headphones are useful for detection of unusual machine sounds. To listen to a machine: 1. Open the connector cap of the Meter and connect the audio connector. -
Page 27: Usb
Vibration Meter How to Operate Data transfer between the Meter and PC is through the USB cable connection. The Meter turns on and stays on when it is connected to the PC. Figure 5 shows how to connect a PC to the Meter with a USB cable. When connected, the Meter is a USB 2.0 mass storage device with two functions: to export Meter data to an MS Excel spreadsheet (see... -
Page 28: About Measurements
Users Manual Figure 6 identifies the parts of the measurement display. About Measurements The Meter measures bearing health and the overall vibration condition of a machine. Three types of measurements are available: bearing vibration, overall High Frequency Bearing Vibration vibration, and temperature. Vibration measurement units (CF+) 4,000 Hz to 20,000 Hz are user-selectable. -
Page 29: Crest Factor+ (High Frequency Measurement)
Vibration Meter About Measurements Crest Factor+ (High Frequency Measurement) Quick Measurement Crest Factor is the ratio of the peak value / RMS value of a A quick measurement is a measurement without setup time domain vibration signal. Vibration analysts use this steps to get a fast measurement for bearing vibration, ratio to find bearing faults. -
Page 30: Overall Vibration (Low Frequency) Measurement With Severity Scale
Users Manual Note Overall Vibration (Low Frequency) Measurement with Severity Scale Severity scales do not show if the RPM range is <600 RPM. An overall vibration, or low frequency, measurement includes a severity scale. The severity scale is an on- Make measurements with the accelerometer as close screen tool that interprets the vibration wear as good, as possible to the bearing housing. -
Page 31: Machine Category
Vibration Meter About Measurements Horizontal Centrifugal End Suction Pumps - Direct Machine Category Coupled The Machine Category identifies the type of machine for Horizontal Centrifugal Double Suction Pumps- Direct the test. The Meter has a list of predefined categories: Coupled Boiler Feed Pumps (Turbine or Motor Driven) Chillers (Refrigeration) Reciprocating (Open Motor and Compressor Separate) - Page 32 Users Manual To select a Machine Category: When the Machine Category is set, the Measurement screen shows the overall vibration, 1. Push . severity scale, and the Machine Category in the TYPE field. 2. Push and to highlight Machine Category and RPM Range.
-
Page 33: Create New Setup
Vibration Meter About Measurements 5. Push to set the category and open the Create New Setup RPM Range menu. A Setup is the group of test parameters you set for a machine. This set of parameters includes the Machine Category. -
Page 34: Add To Setup
Users Manual 7. Push to set the range and open the the measurement is taken from, such as, Bearing_1 on FAN1. Create Setups menu for the First Level ID. gqi94.bmp gqi18.eps 8. Push and to highlight a letter or number. When done, select No to go back to the Setup menu. - Page 35 Vibration Meter About Measurements 5. Push and to highlight a letter or number. 6. Push to set the letter or number. 7. Repeat steps 5 and 6 to make a unique name for the setup. 8.
-
Page 36: How To Save A Measurement
Users Manual How to Save a Measurement Auto Save As you make measurements with the Meter, you can save The Auto Save option saves the measurement to memory these measurements to memory. Quick measurements are with a sequential number that starts at 0001. saved as sequential files that start at 0001. -
Page 37: Save To Current Setup
Vibration Meter About Measurements 2. Choose the option for how to sort the machine IDs Save to Current Setup or category. This option saves the measurement to the current setup in the Meter. Push to save the measurement. by Name: shows a list of machine IDs in alphabetical order. - Page 38 Users Manual 4. Push to save the current measurement with a new name. gqi18.eps You can continue this process and set up as many Second Level IDs as necessary for the job. When gqi94.bmp done, select No to go back to the Measurement The Meter prompts you to give the setup a Second Results menu.
-
Page 39: How To Recall A Setup For Measurements
Vibration Meter About Measurements How to Recall a Setup for Measurements Last Used: shows the last used machine ID. You can recall a Setup file from memory for frequent measurements done on the same machine. A Setup file saves time when the parameter selection is already done and stored to memory. -
Page 40: Access To Memory
Users Manual The Measurement screen shows the selected Access to Memory Setup with machine ID in the ID field. The Memory screen contains a list of machine IDs and the saved data. You can make changes or delete the records from Meter memory with this screen. -
Page 41: View All Data
Vibration Meter Access to Memory 4. Push and to see additional pages. View All Data The View ALL Data screen shows you all the 5. Push and to highlight a file. measurements saved in the Meter. 6. -
Page 42: View Setups
Users Manual View Setups The View Setups option is how you can view a setup that is saved to memory. To view or recall a Setup: 1. Push to open the MEMORY screen. 2. Push and to highlight View Setups in the Memory screen. - Page 43 Vibration Meter Access to Memory The Sort Setups screen is how to look up the 8. Push and to highlight the ID line. saved Machine Setups: 9. Push to open the Edit Setups screen for by Name: shows a list of Machine Setups by the ID.
-
Page 44: Clear All Data
2. Push and to highlight Clear ALL Data. time, then the machine can have a problem. Fluke 3. Push . recommends that you consult a vibration specialist for more tests to find the root cause of these problems. -
Page 45: Iso 10816 Standards
Vibration Meter Interpret Results ISO 10816 Standards Table 6. Severity Scale As an alternative to the Overall Vibration Severity Scale Scale Action included in the Meter, you can use the ISO Standard 10816-1 to evaluate the severity of overall vibration levels. No repair action is recommended. -
Page 46: Trending
Users Manual Class III: Large prime-movers and other large Trending machines with rotating masses mounted on rigid and Trending, or repeated vibration measurements kept in a heavy foundations that are relatively stiff in the spreadsheet over time, is the best method to track direction of the vibration measurements. -
Page 47: Iso 10816-7
Vibration Meter Export Data Group 2: Medium-sized machines with rated power Export Data above 15 kW up to and including 300 kW, electrical The export data feature lets you move data from the Meter machines with shaft height 160 mm ≤ H <315 mm. to a PC through the USB connection. - Page 48 Users Manual connected to the PC. See USB on page 17 for more information. 3. Open the template on the PC. gqi204.bmp Figure 8. Open TXT Format File 5. Click Open. Note The Trending template only reads data from files in TXT file format.
- Page 49 Y-axis required Units Option for a secondary Y-axis (shows on the right side of the graph) Option to show the Fluke Overall Vibration Severity Scale 10. Click Plot Graph. Figure 10 is an example of a graph you can make with measurement data from the Meter.
-
Page 50: General Maintenance
Users Manual General Maintenance How to Clean For the best accuracy of temperature measurements, Maintenance is not necessary for the Meter. clean the IR temperature sensor window with moist cloth W Caution before you take measurements. Clean the external case of the Meter at regular intervals with a moist cloth and a weak No part of the Meter is serviceable by the user. -
Page 51: Firmware Upgrades
Vibration Meter Firmware Upgrades Firmware Upgrades At intervals, upgrades are available for the Meter firmware. Contact Fluke for upgrade availability. If you have registered your Meter purchase, Fluke will send an upgrade notice to you automatically. To upgrade the Meter: 1. -
Page 52: How To Troubleshoot
40 for more information. The battery connection is 2. Ensure the batteries are properly aligned and secured. loose. 3. If the problem continues, contact the Fluke Service Center for technical support. Buttons do not operate. 1. Restart the Meter.
Need help?
Do you have a question about the 805 and is the answer not in the manual?
Questions and answers