MTD 463 Operator's Manual
462 thru 465 series
Hide thumbs
Also See for 463:
- Operator's manual (32 pages) ,
- Operator's manual (16 pages) ,
- Operator's manual (17 pages)
Advertisement
Available languages
Available languages
OPERATOR'S MANUAI
Chipper Shredder
Model Series
462 thru 465
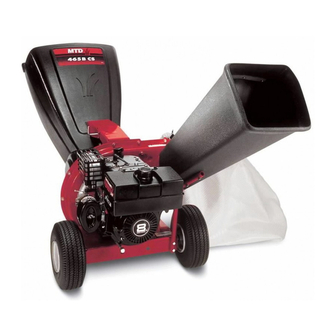
Model 465 Shown
IMPORTANT:
READ SAFETY RULES AND INSTRUCTIONS
CAREFULLY
Warning:
This unit is equipped with an internal combustion engine and should not be used on or near any unimproved forest-
covered, brush-covered
or grass-covered
land unless the engine's exhaust system is equipped with a spark arrester meeting
applicable
local or state laws (if any). If a spark arrester is used, it should be maintained
in effective working order by the operator.
In the State of California the above is required by law (Section 4442 of the California Public Resources Code). Other states may have
similar laws. Federal laws apply on federal lands. A spark arrester for the muffler is available through your nearest engine authorized
service dealer or contact the service department,
P.O. Box 361131 Cleveland, Ohio 44136-0019.
MTD LLC, P.O. BOX 361131 CLEVELAND,
OHIO 44136-0019
PRINTED IN U.S.A.
FORM NO. 770-10048E
(5/02)
Advertisement

Related Manuals for MTD 463


Summary of Contents for MTD 463
- Page 1 Federal laws apply on federal lands. A spark arrester for the muffler is available through your nearest engine authorized service dealer or contact the service department, P.O. Box 361131 Cleveland, Ohio 44136-0019. MTD LLC, P.O. BOX 361131 CLEVELAND, OHIO 44136-0019 PRINTED IN U.S.A.
-
Page 2: Table Of Contents
TABLE OF CONTENTS Content Page Important Safe Operation Practices ..............Assembling Your Chipper Shredder ..............Know Your Chipper Shredder ................Operating Your Chipper Shredder ..............Maintaining Your Chipper Shredder ..............Troubleshooting ....................Parts List ......................FINDINGMODELNUMBER This Operator's Manual is an important part of your new chipper shredder. It will help you assemble, prepare and maintain the unit for best performance. -
Page 3: Important Safe Operation Practices
SECTION 1: IMPORTANT SAFEOPERATION P RACTICES WARNING: This symbol points out important safety instructions which, if not followed, could endanger the personal safety and/or property of yourself and others. Read and follow all instructions in this manual before attempting to operate this machine. Failure to comply with these instructions may result in personal injury. - Page 4 j. Toreduce a firehazard, k eepmachine f ree 10. Keep all guards, deflectors and safety devices in ofgrass, l eaves, o rotherdebris build-up. place and operating properly. Cleanupoilorfuelspillage andremove any 11. Keep your face and body back and to the side of fuelsoaked debris.
-
Page 5: Assembling Your Chipper Shredder
understand and follow the warnings and instructions in this manual and on the machine. WARNING: - YOUR RESPONSIBILITY: Restrict the use of this power machine to persons who read, NOTE: Not all safety labels shown may apply to your chipper shredder. WARNINGi DO NOT OPERATE TH_S... - Page 6 Attaching TheHopper Assembly (A, • Place second spacer over hex bolt inside other M odels) hinge and secure with hex lock nut. • Remove six hex nuts and washers from the weld • Secure both sides of discharge chute to impeller studs on the impeller housing.
-
Page 7: Know Your Chipper Shredder
SECTION 3: KNOW YOUR CHIPPER SHREDDER Read this operator's manual and safety rules before Material can be raked into hopper assembly by operating your chipper shredder. Compare the lowering the hopper assembly. See Figure 5. illustrations in Figure 5 with your unit to familiarize (NotShown) yourself with the location of various controls and Collects shredded or chipped material fed through the... - Page 8 StartingEngine • Attach spark plug wire to spark plug. Make certain the metal cap on the end of the spark plug is fastened securely over the metal tip on the spark plug. • Engines with choke lever: Move choke lever on engine to CHOKE position. (A warm engine may not require choking).
-
Page 9: Maintaining Your Chipper Shredder
SECTION 5: MAINTAINING YOUR CHIPPER SHREDDER Customer R esponsibilities MAINTENANCE SERVICE SCHEDULE DATES Lubricate Release Bracket Lubricate Hopper Assembly Lubricate Discharge Chute Check Chipper Blade Check Oil Change Oil 7& Clean Air Filter Clean Engine Check Spark Plug • The spark plug should be cleaned and the gap nect spark plug,... - Page 10 NOTE: Make certain blades are reassembled with the • Remove the two hairpin clips from each clevis pin which extend through the housing and remove the sharp edge facing upward. pins. See Figure 8. Sharpening OrReplacing TheShredder • Remove the flail screen from inside the housing and clean the screen by scraping or washing with Blade water.
-
Page 11: Troubleshooting
• An unbalanced blade will cause excessive vibration Storing YourChipper Shredder when rotating at high speeds and may cause • Clean the equipment thoroughly. damage to the unit. The blade can be tested by • Wipe equipment with an oiled rag to prevent rust. balancing it on a screwdriver or nail. -
Page 12: Parts List
ModelSeries462 Thru465 "33 //_/._ __47... - Page 13 ModelSeries462 Thru465 Ref. Ref. Part No. Part No. Part Description Part Description 728-0175 781-0735 Pop Rivet Pin Clip Flail Blade 731-1899 719-0329 Chipper Chute 735-0249 711-0833B Clevis Pin Chute Flap 781-0633 715-0166 Chute Flap Strip 681-0095 Flat Washer 3/8 x 1.25 736-0247 Chipper Chute t 681-0068A...
- Page 14 Notes...
- Page 15 (N6mero de modelo) (N6mero de serie) Copie el ndmero del modelo en este espacio: -- Copie el ndmero de serie en este espacio: MTD PRODUCTS INC CLEVELAND, OHIO 44136 SERVIClOTELEFONICODE ASISTENCIAAL CLIENTE En caso de tener problemas para ensamblar este producto o de tener dudas con respecto a los controles, funcionamiento o mantenimiento del mismo, por favor comunfquese con el Departamento de asistencia al cliente.
- Page 16 SECCION 1: MEDIDAS IMPORTANTES D ESEGURIDAD ADVERTENCIA: La presencia de este simbolo indica que se trata de instrucciones importantes de seguridad que debe respetar para evitar poner en riesgo su seguridad personal y / o material y de otras personas. Lea y siga todas las instrucciones contenidas en este manual antes de intentar poner esta m_.quina en funcionamiento.
- Page 17 Inspeccione minuciosamente todo el material que desea triturar Nunca levante o transporte la mAquina cuando el motor estA encendido. y saque los objetos metAlicos, piedras, botellas, latas u otros objetos extra5os que pueden ocasionar lesiones o da5ar la MANTENIMIENTO Y ALMACENAMIENTO mAquina.
- Page 18 SECCION 2: MONTAJE DELAC0RTADORA TRITURADORA IMPORTANTE: Esta unidad se envia sin gasolina ni aceite en C010caci6n d elm0ntajedela t01va(T0d0s el motor. Antes de operar la m_.quina cargue el motor con m0del0s) gasolina y aceite como se indica en el manual separado del mismo.
- Page 19 • Saque l atuerca d eseguridad hexagonal, NOTA: No se enseSa el motor para m#s claridad. separadores yelbul6n hexagonal delaparte superior de • Saque los bulones hexagonales, las tuercas de lacaja delmotor. seguridad, y las arandelas planas de los dos agujeros del •...
- Page 20 Detenci6n del motor • Desconecte el cable de la bujia de la misma y pSngalo de manera que haga masa contra el motor. • Mueva las palancas de control del regulador a la posici6n STOP (detenciSn) u OFF (apagado). Cortadora Canal Tolva / Montaje...
- Page 21 Vacfe l abolsa y vuelva a colocarla enlaabertura del montaje del motor, el mismo ser_. descargado hacia afuera canal dedescarga. Oprima e lpulsador delacuerda d e por la abertura o hacia adentro de la bolsa colectora. $61o tiroytiredelamisma h asta que labolsa q uede a justada utilice la mAquina para triturar o picar el material integrante de alrededor delaabertura del c anal.
- Page 22 ADVERTENCIA: Detenga siempre el motor, Descarga desconecte la bujia y haga masa contra Canal motor antes de limpiar, lubricar o de realizar todo tipo de mantenimiento de la mdquina. Lubricaci6n Varilla de liberaci6n: Lubrique la varilla y el resorte de liberaciSn con aceite liviano una vez por temporada.
- Page 23 Cuando afile lashojas, prot_jase lasmanos m ediante el Saque los dos tornillos exteriores de la hoja usando una uso deguantes ysiga el_.ngulo original demolido. Ilave allen de 3/16" y una Ilave de 1/2". Adem_.s asegt_rese desacar una cantidad igual decada Ver Figura 10.
- Page 24 SECCION 6: GUIAPARA LASOLUCION DEPROBLEMAS Problema Causa Soluci6n El motor no arranca Se ha desconectado el cable de la bujfa. Conecte el cable a la bujfa. El tanque de combustible estA vacfo o el Llene el tanque con gasolina limpia y fresca. combustible es viejo.
- Page 27 MTD garantiza este producto por defectos materiales y de d. MTD no extiende ninguna garantia para los productos fabricaci6n por un periodo de dos (2) aSos a partir de la vendidos o exportados...
- Page 28 MANUFACTURER'S LIMITED WARRANTY FOR: The limited warranty set forth below is given by MTD LLC with MTD LLC does not extend any warranty for products respect to new merchandise purchased and used in the sold or exported outside of the United States, its posses- United States, its possessions and territories.
Need help?
Do you have a question about the 463 and is the answer not in the manual?
Questions and answers