Table of Contents
Advertisement
Advertisement
Table of Contents

Related Manuals for Pfaff hobbylock 4752


Summary of Contents for Pfaff hobbylock 4752
- Page 1 hobbylock 4752 Instruction Manual...
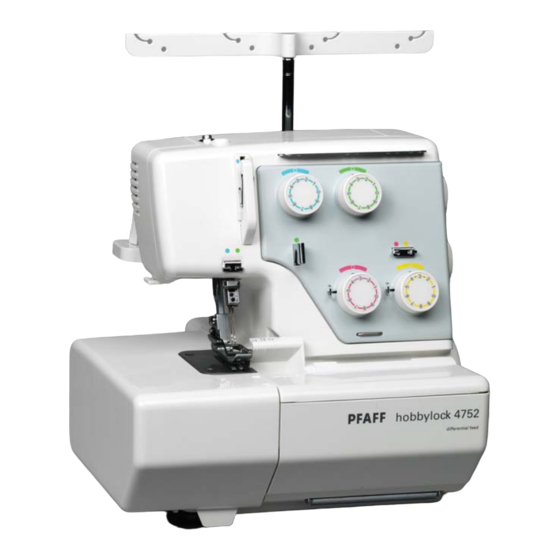
- Page 2 Parts of the hobbylock 4752 Right needle thread tension (green) Telescoping thread guide Setting screw for presser Thread guides foot pressure Left needle thread tension (blue) Thread spool pin Cone thread adapter Thread spool stand Swivel plate Setting knob for stitch length Foot control plug with power...
- Page 5 If you have any further questions, just ask your aut- horized PFAFF dealer. Your dealer is happy to be of service with any help or advice. Let’s get started! We wish you many enjoyable hours...
-
Page 6: Table Of Contents
Contents Page Accessories ......... 6 Accessories, optional . - Page 7 Seam width, setting ........19 Securing the seam ........27, 28 Sewing.
-
Page 8: Accessories
Accessories screw driver tweezers groove looper cover waste container Attaching the waste container Guide the lug into the groove on the looper cover. thread nets thread unreeling discs needle system wrench waste container looper threading aid accessory box Storing the accessory box cleaning Place the accessory box in the waste con- brush... -
Page 9: Connecting The Machine
wall socket lead cord/plug connection socket foot control plug main switch foot control main switch Connecting the machine to the mains power supply Switch the main switch to OFF. Plug the foot control plug into the connection socket on the machine. Plug the lead cord/plug into the wall socket. -
Page 10: Foot Control
foot control handwheel Sewing speed Direction of rotation of the handwheel The sewing speed is regulated by activating Always turn the handwheel towards you, as the foot control. The further you press the shown in the illustration (i.e. counterclock- foot control down, the faster the machine wise). -
Page 11: Cone Thread Adapter
telescoping thread guide thread guides stops standard presser foot spool pin presser foot lifter Telescoping thread guide Presser foot lifter Pull the telescoping thread guide upward to The presser foot can be raised and lowered its highest position. using the presser foot lifter. The two upper telescopes must be rotated The presser foot must always be lowered slowly until their locking balls are heard to... -
Page 12: Threading The Machine
Threading the machine thread guides left needle right needle upper looper thread thread thread lower looper thread thread guide plate... -
Page 13: Changing A Spool On A Threaded Machine
Before the machine leaves the factory, In order to replace spools, cut the threads threads are already threaded and their ends between the thread guides and the thread are cut off. Tie one of these thread ends to guide plate. Thread the new threads in the the thread from a spool with an overhand manner described opposite. -
Page 14: Threading The Upper Overedge Looper (Red)
Threading the upper looper (red) Open the looper cover and the swivel plate. Place the spool on the second spool pin from the right. The guide points for the up- per looper thread are marked in red. Two threading diagrams are located behind the looper cover to help you with the threading. -
Page 15: Threading Aid For Looper Thread
Guide the thread through from the right bet- ween the tension discs and pull the thread tight from both sides. Feed the thread into the guide (5) for the up- per looper thread. guide (5) for the upper looper thread thread tensioner of the upper looper thread... -
Page 16: Threading The Lower Overedge Looper (Yellow)
Threading the lower looper (yellow) Open the looper cover and the swivel plate. Place the spool on the second spool pin. The guide points for the lower looper thread are marked in yellow. Two threading diagrams are located behind the looper cover to help you with the threading. - Page 17 guide (9) for the lower looper thread guide (5) for the lower looper thread guide (6) for the lower looper thread guide (8) for the lower thread tensioner of looper thread take-up lever (7) of the the lower looper lower looper thread thread Guide the thread through from the right bet- Feed the thread into the guide (6) for the lo-...
-
Page 18: Threading Aid For Needle Thread
Threading the left needle (blue) Place the spool on the left spool pin. The guide points for the left needle thread are marked in blue. Two threading diagrams are located behind the looper cover to help you with the threading. Guide the thread from the rear through the left thread guide (1) and both the left holes on the thread guide plate (2). -
Page 19: Threading The Needle(S)
Threading the right needle (green) Place the spool on the second spool pin from the left. The guide points for the right needle thread are marked in green. Two threading diagrams are located behind the looper cover to help you with the threading. Guide the thread from the rear through the second thread guide (1) from the left. -
Page 20: Threading, Important Note
Feed the thread from the left to the right into guide (6 for the the right guide (6) for the needle thread. needle thread Feed the thread from the left to the right into the thread guide (7). Feed the needle threading aid through the needle eye from the rear. -
Page 21: Seam Width Setting Knob
the right seam width Setting the seam width Set the seam width as follows: 1. Switch the main switch to OFF and pull out the lead cord/plug. 2. Open the looper cover and the swivel plate. 3. Move the upper blade to its lower position (see Page 24). 4. -
Page 22: Differential Feed
Setting the stitch length stitch length Turn the stitch length setting knob in such a setting knob way that the desired stitch length is indica- ted at the setting mark. The higher the num- ber, the longer the stitch. The stitch length can be adjusted between 1 and 5 mm. -
Page 23: Presser Foot Pressure
Presser foot pressure Standard setting The presser foot pressure does not need to be adjusted for most fabrics. If you are Top side of working with light or heavy fabrics then the machine you may need to adjust the pressure. In this case set the adjusting screw as follow: 2 mm –... -
Page 24: Needle Holder
fastening screw for the left needle fastening screw for the right needle Do not use bent or blunt needles. Changing the needle Switch the main switch to OFF. Move the needle(s) to the highest position. Loosen the fastening screw of the needle that is to be changed. -
Page 25: Needle Position
Use of the right needle only (for 3-thread seams with a narrow seam width) Turn the machine off. Remove the left needle and the left needle thread. Tighten the left needle fastening screw again slightly so it does not fall out. Use of the left needle only (for 3-thread seams with a wide seam width) -
Page 26: Upper Blade, Disengaging
Disengaging the upper blade Turn the machine off. ridged knob for lowe- ring the upper blade – Open the looper cover and the swivel plate. – Push the ridged knob for lowering the upper blade to the right and turn it towards you. -
Page 27: Stitch Width Latch
Setting the stitch width latch (for standard overlock seams or rolled hems) stitch width latch Switch the main switch to OFF. – Open the looper cover and the swivel plate. – Disengage the upper blade (see Page 24). – Press the stitch width setting knob setting towards the right and push the bed slide marks... -
Page 28: Seam Guidelines
Starting sewing Using the seam guidelines Lay the sewing material under the front of On the top side of the looper cover, you will the presser foot (it is not necessary to raise find seam guidelines which indicate the the presser foot). Turn the handwheel ca- distance from the needles. -
Page 29: Securing The Seam
Thread the thread chain into a needle with a Securing the seam ends large eye and pull the thread chain into the Leave a thread chain of approx. 5 cm (2”) in overlock stitches of the sewing fabric. length extending at the beginning and the end of the seam to prevent the seam from coming undone. - Page 30 Stitching the end of the seam 1. Sew 2-3 stitches off the end of your fa- bric. 2. Turn the needles to their highest position and raise the presser foot. 3. Flip the fabric over so the bottom side is now on the top.
-
Page 31: Thread Tensions, Setting
Threads and needles chart Light Medium-heavy heavy Knitwear fabrics fabrics fabrics organdy, cotton, tweed, knitwear georgette, linen, satin, upholstery Fabric batiste, standard fabric, denim, crepe-de-Chine, fabrics heavy cloth lining fabrics cotton: cotton: cotton: cotton: Thread no. 80 - 100 no. 50 - 100 no. -
Page 32: Program Overview
Program overview Program Application Needle position L = left R = right 3-thread Serging light (easily frayed) Program 01 overedge, fabrics. narrow 3-thread Serging tightly woven Program 02 overedge, (easily frayed) fabrics. wide 3-thread Serging medium-heavy Program 03 flatlock, fabrics. As a flatlock seam, narrow for joining stretch fabrics and decorative finished edges. - Page 33 Thread tension: The values refer to medium-heavy Stitch Position of fabrics and normal polyester thread length stitch width latch blue green yellow 8 – 9...
-
Page 34: Stitch Formation Correction Measures
Seam pattern Top side Top side Underside Underside Stitch formation correction measures The left needle thread (blue) is too loose. 4-thread overedge seam (program 07) Set the blue thread tension to a higher value. blue green yellow When all tensions are correctly set, the loops of both looper threads are directly on the edge of the fabric. - Page 35 Seam pattern Top side Top side Underside Underside The needle thread is too loose. 3-thread overedge seam (progr. 01, 02) Set the relevant needle thread tension to a blue green yellow higher value. wide blue green yellow narrow Top side Top side Underside Underside...
- Page 36 Seam pattern Top side Top side Underside Underside The needle thread is too tight. 3-thread flatlock seam (progr. 03, 04) Set the relevant needle thread tension to a blue green yellow lower value. wide blue green yellow narrow Top side Top side Underside Underside...
- Page 37 Seam pattern Top side Top side Underside Underside 3-thread rolled hem (progr. 05) The right needle thread (green) is too loose. Set the green thread tension to a higher value. blue green yellow Top side Top side Underside Underside The upper looper thread (red) appears on The lower looper thread (yellow) appears on the underside of the fabric.
- Page 38 Seam pattern Top side Top side Underside Underside Folded 3-thread rolled hem (progr. 06) The right needle thread (green) is too loose. Set the green thread tension to a higher value. blue green yellow 8 – 9 Top side Top side Underside Underside The upper looper thread (red) only partly...
-
Page 39: Accessories, Optional
Optional accessories Order No. 98-200 277-10/900 1 Blindstitch foot For serging blind hems on medium- heavy and thick fabrics. 98-200 278-10 2/3 Taping attachment with tape guide 98-200 278-10 Use to protect knit and other stretchy fabric from stretching out of shape when you sew a shoulder. -
Page 40: Cleaning The Machine
Machine maintenance Cleaning the machine Switch the main switch to OFF. Open the looper cover and swivel plate. Use the cleaning brush provided to remove any waste thread. In order to clean the upper blade and the feed dog, you may also use a vacuum cleaner. -
Page 41: Lubricating The Machine
Lubricating the machine Switch the main switch to OFF. Open the swivel plate. Apply a few drops of high-quality machine oil to the points marked with arrows. Oil the machine once a week for normal operation or every ten hours for continuous operation. -
Page 42: Upper Blade, Changing
Changing the upper blade Switch the main switch to OFF. Open the looper cover and the swivel plate. Move the upper blade to its lower position lower (see Page 24). blade Undo the hexagon-head screw of the upper hexagon- blade and remove the upper blade. head screw Insert the new upper blade into the blade blocking pin... -
Page 43: Light Bulb (Sewing Lamp), Changing
Changing the light bulb Switch the main switch to OFF. Loosen the fastening screw to the sewing light cover until the cover can be removed. fastening screw sewing light cover Removing the light bulb Bayonet holder: press the lamp in and turn to the left. -
Page 44: Sewing Problems And Their Solutions
Sewing problems and their solutions This machine has been developed with ease of operation in mind. No difficult or tricky set- tings need to be made. Sewing problems of the kind described below may occur as a result of minor adjustment and operating errors. They can be easily adjusted by following the instructions. - Page 45 Problem Cause Solution Fabric not neatly Waste thread between upper Upper blade is blunt. trimmed and lower blade. Clean blades. Replace upper blade (see Page 40). Puckered seams Thread tension too tight. Reduce thread tension. Incorrect setting of differential feed. Re-adjust differential feed (see Page 20) Thread has caught due to incorrect...
-
Page 46: Specifications
Specifications Maximum sewing speed 1200 stitches/min. Seam width 3.0 mm - 6.7 mm Stitch length 1.0 mm - 5.0 mm Presser foot exchangeable Lubrication manual Presser foot height 4.5 mm Overedge stroke 2.0 mm Needle system HAx1SP (130/705 H-PS) Needle size 80/12, 90/14 Number of threads 3, 4... - Page 47 Notes...
- Page 48 Notes...
- Page 49 Notes...
- Page 51 Parts of the hobbylock 4752 Movable up- Upper overedge per blade looper (red) Lower overedge looper (yellow) Fixed lower blade Standard presser foot Thread chain cutter Bed slide for stitch width latch Presser foot lifter Needle plate Ridged knob for lowering the upper blade Setting knob for seam width...
- Page 52 VSM Group AB • SE-561 84 Huskvarna • SWEDEN www.pfaff.com...
Need help?
Do you have a question about the hobbylock 4752 and is the answer not in the manual?
Questions and answers