
Related Manuals for Electrolux RH30WC60GSB


Summary of Contents for Electrolux RH30WC60GSB
- Page 1 Installation, Use & Care Guide 30" and 36" Free-Standing Range Hood Guia de Instalacibn, Uso y Cuidado 30" y 36" Campana extractora Guide d'installation, utilisation d'entretien 36" et 42" Hotte aspirante AUG/12...
-
Page 2: Table Of Contents
Please read and save this guide Thank you for choosing Electrolux, the new premium brand in home appliances. This Use & Care Guide is part of our commitment to customer satisfaction and product quality throughout the service life of your new iiiiiiiiiiiiiiiiiiiiiiiiiiiiiiiiiiiiiiiiiiiiiiiiiiiiiiiiiiiiiiiiiiiiiiiiiiiiiii appliance. -
Page 3: Important Safety Instructions
Important Safety Instructions Impo ant Safety Instructions Read all instruclions before using this appliance. Save lhese instruclions for future references Approved for residenlial appliances For residential use only Do not attempt to install or operate your appliance until you have read the safety precautions in this manual. - Page 4 ,m0ortantsafety,nstractions ililililililililililililililililililililililililililililililililililililililili READ AND SAVE THESE INSTRUCTIONS iiiiiiiiiiiiiiiiiiiiiiiiiiiiiiiiiiiiiiiiiiiiiiiiiiiiiiiiiiiiiiiiiiiiiiiiiiiiiii Impo£ant safety Instructions CAUTION FOR GENERAL VENTILATING USE ONLY. DO NOT USE Automatically Operated Device - To Reduce The TO EXHAUST HAZARDOUS OR EXPLOSIVE Risk Of Injury Disconnect From Power Supply Before Servicing.
-
Page 5: Electrical & Installation Requirements
Important safety Instructions - Electrical & Installation requirements READ AND SAVE THESE INSTRUCTIONS Electrical & Installation requirements Electrical requirements Before installing the hood IMPORTANT For the most effcient air flow exhaust, use a straight run or as few elbows as possible. Observe all governing codes and ordinances. -
Page 6: List Of Materials
List of Materials List of Materials Parts included in your hood iiiiiiiiiiiiiiiiiiiiiiiiiiiiiiiiiiiiiiiiiiiiiiiiiiiiiiiiiiiiiiiiiiiiiiiiiiiiiii ° Hood structure assembly with blower, transition. Upper • Lamps already installed. • Grease filter. _Lamp Duct cover • Duct cover supports • Bottom. • Top. • Hardware bag with: •... -
Page 7: Installing The Hood
Installing the hood the hood • For the most eficient air flow exhaust, use a The hood may be installed vented to the outdoors, or straight run or as few elbows as possible. it can be installed for recirculating operation (recirculating accessories not supplied with the hood). -
Page 8: Examples Of Possible Ducting
iiiiiiiiii_1i_i_!_iiiiiiiiiiiiiiiiiiiiiiiiiiiiiiiiiiiiiiiiiii_iii_iiiiiiiiiiiiiiiiiiiiiiiiiiiiiiiiiiiiiiiiiiiiiiiiiiiiiiiiiiiiiiiiiiiiiiiiiiiiiiiiiiiiiiiiiiiiiiiiiiiii_i_i_!!!!!!i Installing the hood iiiiiiiiiiiiiiiiiiiiiiiiiiiiiiiiiiiiiiiiiiiiiiiiiiiiiiiiiiiiiiiiiiiiiiiiiiiiiii _lllllllllllllllllllllllllllllllllllllllllllllllllllllllllllllllllllllllllllllll Examples of possible ducting fl_ao_inP_hndW/ca _lllllllllllllllllllllllllllllllllllllllllllllllllllllllllllllllllllllllllllllll _lllllllllllllllllllllllllllllllllllllllllllllllllllllllllllllllllllllllllllllll _lllllllllllllllllllllllllllllllllllllllllllllllllllllllllllllllllllllllllllllll _lllllllllllllllllllllllllllllllllllllllllllllllllllllllllllllllllllllllllllllll _lllllllllllllllllllllllllllllllllllllllllllllllllllllllllllllllllllllllllllllll _lllllllllllllllllllllllllllllllllllllllllllllllllllllllllllllllllllllllllllllll _lllllllllllllllllllllllllllllllllllllllllllllllllllllllllllllllllllllllllllllll Zr n, ton_ Zr n, Sidewalk cap w/ gravity damper Recirculatinc Vertical discharge Ductwork installation guidelines Ductwork and wiring locations • Determine the exact location of the vent hood. For safety reasons, ducting should vent directly outdoors (not into an attic, underneath the house, •... -
Page 9: Mounting The Duct Cover Bracket
Installing the hood Mounting the duct cover bracket Ceiling ducting The duct bracket should be installed against the If the duct will vent straight up to the ceiling: back wall and flush with the ceiling. This bracket will • Use level to draw a line straight up, from the hold the telescopic duct cover in place at the top centerline on the template to the ceiling. -
Page 10: Install Framing For Hood Support
Installing the hood Install supporlnstall framing for hood support Mounting the hood iiiiiiiiiiiiiiiiiiiiiiiiiiiiiiiiiiiiiiiiiiiiiiiiiiiiiiiiiiiiiiiiiiiiiiiiiiiiiii _iiiiiiiiiiiiiiiiiiiiiiiiiiiiiiiiiiiiiiiiiiiiiiiiiiiiiiiiiiiiiiiiiiiiiiiiiiiiiii _iiiiiiiiiiiiiiiiiiiiiiiiiiiiiiiiiiiiiiiiiiiiiiiiiiiiiiiiiiiiiiiiiiiiiiiiiiiiiii _iiiiiiiiiiiiiiiiiiiiiiiiiiiiiiiiiiiiiiiiiiiiiiiiiiiiiiiiiiiiiiiiiiiiiiiiiiiiiii • If drywall is present, mark the screw hole Install the 8" round transition as shows the image below. iiiiiiiiiiiiiiiiiiiiiiiiiiiiiiiiiiiiiiiiiiiiiiiiiiiiiiiiiiiiiiiiiiiiiiiiiiiiiii The installation screws and the 8" round transition are _iiiiiiiiiiiiiiiiiiiiiiiiiiiiiiiiiiiiiiiiiiiiiiiiiiiiiiiiiiiiiiiiiiiiiiiiiiiiiii locations. - Page 11 Installing the hood Mark "lower" wood screw holes locations in the • Remove the hood. wall using a pencil. • Drive "lower" wood screws by hand. Remove screws. Mount the hood onto the "upper" screws. Drive and tighten the "upper" wood screws, by hand.
-
Page 12: Connecting The Ductwork
Installing the hood Connecting the ductwork Air deflector installation iiiiiiiiiiiiiiiiiiiiiiiiiiiiiiiiiiiiiiiiiiiiiiiiiiiiiiiiiiiiiiiiiiiiiiiiiiiiiii • Install ductwork, making connections in the (Recirculating accessories) iiiiiiiiiiiiiiiiiiiiiiiiiiiiiiiiiiiiiiiiiiiiiiiiiiiiiiiiiiiiiiiiiiiiiiiiiiiiiii direction of airflow as illustrated. • Push duct over the exhaust outlet. • Assemble the air deflector with the duct cover •... -
Page 13: Making The Electrical Connections
Installing the hood Metal electrical Making the electrical connections conduit WARNING Electrical Shock Hazard Warning: Turn off at the service panel before wiring House this unit. wiring 120 V AC, 15 or 20 Amp circuit required. UL listed ELECTRICAL GROUNDING INSTRUCTIONS wire nut THIS APPLIANCE IS FI-I-rED WITH AN ELECTRICAL JUNCTION BOX WITH _, WIRES, ONE OF WHICH... -
Page 14: Mounting The Duct Cover
Control buttons • Secure the bottom of the duct with 2 assembly Mounting the duct cover screws provided. Position the duct cover over the mounted hood. Slide the bottom of the duct onto the glass area. Position the top of the duct over the duct mounting bracket. -
Page 15: Features
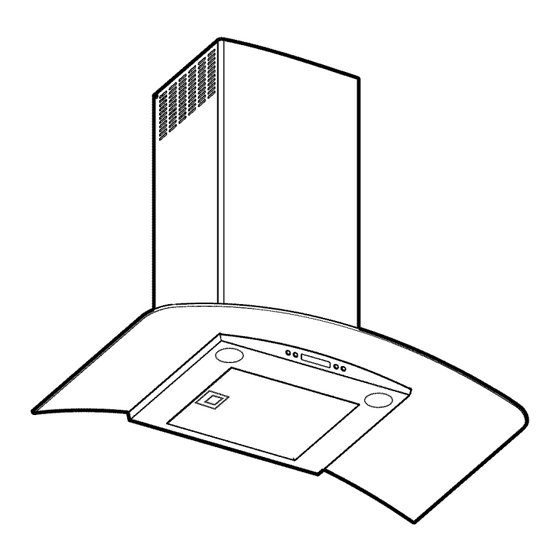
Features Blower and light controls Lamp housings Grease Filter Handle Grease Filter Canopy Duct cover ° Bottom Louver holes (User for Recirculating accessories) ® iiiiiiiiiiiiiiiiiiiiiiiiiiiiiiiiiiiiiiiiiiiiiiiiiiiiiiiiiiiiiiiiiiiiiiiiiiiiiiiiii_ iiiiiiiiiiiiiiiiiiiiiiiiiiiiiiiiiiiiiiiiiiiiiiiiiiiiiiiiiiiiiiiiiiiiiiiiiiiiiiiiii_ iiiiiiiiiiiiiiiiiiiiiiiiiiiiiiiiiiiiiiiiiiiiiiiiiiiiiiiiiiiiiiiiiiiiiiiiiiiiiiiiii_ iiiiiiiiiiiiiiiiiiiiiiiiiiiiiiiiiiiiiiiiiiiiiiiiiiiiiiiiiiiiiiiiiiiiiiiiiiiiiiiiii_ iiiiiiiiiiiiiiiiiiiiiiiiiiiiiiiiiiiiiiiiiiiiiiiiiiiiiiiiiiiiiiiiiiiiiiiiiiiiiiiiii_ iiiiiiiiiiiiiiiiiiiiiiiiiiiiiiiiiiiiiiiiiiiiiiiiiiiiiiiiiiiiiiiiiiiiiiiiiiiiiiiiii_ iiiiiiiiiiiiiiiiiiiiiiiiiiiiiiiiiiiiiiiiiiiiiiiiiiiiiiiiiiiiiiiiiiiiiiiiiiiiiiiiii_ iiiiiiiiiiiiiiiiiiiiiiiiiiiiiiiiiiiiiiiiiiiiiiiiiiiiiiiiiiiiiiiiiiiiiiiiiiiiiiiiii_ iiiiiiiiiiiiiiiiiiiiiiiiiiiiiiiiiiiiiiiiiiiiiiiiiiiiiiiiiiiiiiiiiiiiiiiiiiiiiiiiii_ iiiiiiiiiiiiiiiiiiiiiiiiiiiiiiiiiiiiiiiiiiiiiiiiiiiiiiiiiiiiiiiiiiiiiiiiiiiiiiiiii_ iiiiiiiiiiiiiiiiiiiiiiiiiiiiiiiiiiiiiiiiiiiiiiiiiiiiiiiiiiiiiiiiiiiiiiiiiiiiiiiiii_ iiiiiiiiiiiiiiiiiiiiiiiiiiiiiiiiiiiiiiiiiiiiiiiiiiiiiiiiiiiiiiiiiiiiiiiiiiiiiiiiii_ iiiiiiiiiiiiiiiiiiiiiiiiiiiiiiiiiiiiiiiiiiiiiiiiiiiiiiiiiiiiiiiiiiiiiiiiiiiiiiiiii_ iiiiiiiiiiiiiiiiiiiiiiiiiiiiiiiiiiiiiiiiiiiiiiiiiiiiiiiiiiiiiiiiiiiiiiiiiiiiiiiiii_ iiiiiiiiiiiiiiiiiiiiiiiiiiiiiiiiiiiiiiiiiiiiiiiiiiiiiiiiiiiiiiiiiiiiiiiiiiiiiiiiii_ iiiiiiiiiiiiiiiiiiiiiiiiiiiiiiiiiiiiiiiiiiiiiiiiiiiiiiiiiiiiiiiiiiiiiiiiiiiiiiiiii_ iiiiiiiiiiiiiiiiiiiiiiiiiiiiiiiiiiiiiiiiiiiiiiiiiiiiiiiiiiiiiiiiiiiiiiiiiiiiiiiiii_ iiiiiiiiiiiiiiiiiiiiiiiiiiiiiiiiiiiiiiiiiiiiiiiiiiiiiiiiiiiiiiiiiiiiiiiiiiiiiiiiii_ iiiiiiiiiiiiiiiiiiiiiiiiiiiiiiiiiiiiiiiiiiiiiiiiiiiiiiiiiiiiiiiiiiiiiiiiiiiiiiiiii_... -
Page 16: Control Buttons
Control buttons Control buttons This hood is equipped with an electronic motor and ° If the fan is at second speed and the "V" lamp control. button is pressed, the fan will be set to first speed. iiiiiiiiiiiiiiiiiiiiiiiiiiiiiiiiiiiiiiiiiiiiiiiiiiiiiiiiiiiiiiiiiiiiiiiiiiiiiii The control is able to set 4 diferent fan speeds, turn °... -
Page 17: Special Functions
Control buttons - Special functions Special functions Clock programming ° The clock can be reprogrammed at any time except during an active timed function. • The clock can be displayed in a twelve hour format and valid clock times are from 1:00 to 12:59. •... -
Page 18: For Best Results
Care and cleaning For Best results • Continuous use of the fan system while cooking helps keep the kitchen comfortable and less humid. • It also reduces cooking odors and soiling moisture that create a frequent need for cleaning. • Turn the blower on before starting to cook. -
Page 19: Filters
Care and cleaning Care and Cleaning The eficiency of the range hood system depends on Lights the cleanliness of the intake and filters. The frequency of cleaning depends on the amount and type of cooking. • Do not use the ventilating system without the Before replacing the lamps, switch power off at filters in place or with grease-laden filters or service panel and lock service panel disconnecting... -
Page 20: Optional Charcoal Filters
Clear and Cleaning Optional Charcoal Filters _iiiiiiiiiiiiiiiiiiiiiiiiiiiiiiiiiiiiiiiiiiiiiiiiiiiiiiiiiiiiiiiiiiiiiiiiiiiiiii _iiiiiiiiiiiiiiiiiiiiiiiiiiiiiiiiiiiiiiiiiiiiiiiiiiiiiiiiiiiiiiiiiiiiiiiiiiiiiii _iiiiiiiiiiiiiiiiiiiiiiiiiiiiiiiiiiiiiiiiiiiiiiiiiiiiiiiiiiiiiiiiiiiiiiiiiiiiiii If the model is not vented to the outside, the air will be recirculated through disposable charcoal filters that _iiiiiiiiiiiiiiiiiiiiiiiiiiiiiiiiiiiiiiiiiiiiiiiiiiiiiiiiiiiiiiiiiiiiiiiiiiiiiii help remove smoke and odors. _iiiiiiiiiiiiiiiiiiiiiiiiiiiiiiiiiiiiiiiiiiiiiiiiiiiiiiiiiiiiiiiiiiiiiiiiiiiiiii The charcoal filters cannot be cleaned. iiiiiiiiiiiiiiiiiiiiiiiiiiiiiiiiiiiiiiiiiiiiiiiiiiiiiiiiiiiiiiiiiiiiiiiiiiiiiii _iiiiiiiiiiiiiiiiiiiiiiiiiiiiiiiiiiiiiiiiiiiiiiiiiiiiiiiiiiiiiiiiiiiiiiiiiiiiiii They must be replaced. -
Page 21: Warranty Information
Warranty Information Your appliance is covered by a one year limited warranty. For one year from your original date of purchase, Electrolux will pay all costs for repairing or replacing any parts of this appliance that prove to be defective in materials or workmanship when such appliance is installed, used and maintained in accordance with the provided instructions. - Page 22 _!!!!!!!!!!!!!!!!!!!!!!!!!!!!!!!!!!!!!!!!!!!!!!!!!!!!!!!!!!!!!!!!!!!!!!!!!!!!!!!!!!!!!!!!!!!!!!!!!!!!!!!!!!!!!!!!!!!!!!!!!!!!!!!!!!!!!!!!!!!!!!!!!!!!!!!!!!!!!!!!!!!!!!!!!!!!!!!!!!!!!!!!!!!!!!!!!!!!!!!!!!!!!!!!!!!!!!!!!!!!!!!!!!!!!!!!!!!!!!!!!!!!!!!!!!!!!!!!!!!!!!!!!!!!!!!!!!!!!!!!!!!!!!!!!!!!!!!!!!!!!!!!!!!!!!!!!!!!!!!!!!!!!!!!!!!!!!
- Page 23 Installation, Use & Care Guide 30" and 36" Free-Standing Range Hood Guia de Instalacibn, Uso y Cuidado 30" y 36" Campana extractora Guide d'installation, utilisation d'entretien 36" et 42" Hotte aspirante AUG/12...
-
Page 24: Mounting The Glass Canopy
Please read and save this guide Thank you for choosing Electrolux, the new premium brand in home appliances. This Use & Care Guide is part of our commitment to customer satisfaction and product quality throughout the service life of your new iiiiiiiiiiiiiiiiiiiiiiiiiiiiiiiiiiiiiiiiiiiiiiiiiiiiiiiiiiiiiiiiiiiiiiiiiiiiiii appliance. -
Page 25: Important Safety Instructions
Important Safety Instructions Impo ant Safety Instructions Read all instruclions before using this appliance. Save lhese instruclions for future references Approved for residenlial appliances For residential use only Do not attempt to install or operate your appliance until you have read the safety precautions in this manual. - Page 26 ,m0ortantsafety,nstractions ililililililililililililililililililililililililililililililililililililililili READ AND SAVE THESE INSTRUCTIONS iiiiiiiiiiiiiiiiiiiiiiiiiiiiiiiiiiiiiiiiiiiiiiiiiiiiiiiiiiiiiiiiiiiiiiiiiiiiiii Impo£ant safety Instructions CAUTION FOR GENERAL VENTILATING USE ONLY. DO NOT USE Automatically Operated Device - To Reduce The TO EXHAUST HAZARDOUS OR EXPLOSIVE Risk Of Injury Disconnect From Power Supply Before Servicing.
-
Page 27: Electrical & Installation Requirements
Important safety Instructions - Electrical & Installation requirements READ AND SAVE THESE INSTRUCTIONS Electrical & Installation requirements Electrical requirements Before installing the hood IMPORTANT For the most effcient air flow exhaust, use a straight run or as few elbows as possible. Observe all governing codes and ordinances. -
Page 28: List Of Materials
List of Materials List of Materials Parts included in your hood iiiiiiiiiiiiiiiiiiiiiiiiiiiiiiiiiiiiiiiiiiiiiiiiiiiiiiiiiiiiiiiiiiiiiiiiiiiiiii ° Hood structure assembly with blower, transition. Upper • Lamps already installed. • Grease filter. _Lamp Duct cover • Duct cover supports • Bottom. • Top. • Hardware bag with: •... -
Page 29: Installing The Hood
Installing the hood the hood • For the most eficient air flow exhaust, use a The hood may be installed vented to the outdoors, or straight run or as few elbows as possible. it can be installed for recirculating operation (recirculating accessories not supplied with the hood). -
Page 30: Examples Of Possible Ducting
iiiiiiiiii_1i_i_!_iiiiiiiiiiiiiiiiiiiiiiiiiiiiiiiiiiiiiiiiiii_iii_iiiiiiiiiiiiiiiiiiiiiiiiiiiiiiiiiiiiiiiiiiiiiiiiiiiiiiiiiiiiiiiiiiiiiiiiiiiiiiiiiiiiiiiiiiiiiiiiiiiii_i_i_!!!!!!i Installing the hood iiiiiiiiiiiiiiiiiiiiiiiiiiiiiiiiiiiiiiiiiiiiiiiiiiiiiiiiiiiiiiiiiiiiiiiiiiiiiii _lllllllllllllllllllllllllllllllllllllllllllllllllllllllllllllllllllllllllllllll Examples of possible ducting fl_ao_inP_hndW/ca _lllllllllllllllllllllllllllllllllllllllllllllllllllllllllllllllllllllllllllllll _lllllllllllllllllllllllllllllllllllllllllllllllllllllllllllllllllllllllllllllll _lllllllllllllllllllllllllllllllllllllllllllllllllllllllllllllllllllllllllllllll _lllllllllllllllllllllllllllllllllllllllllllllllllllllllllllllllllllllllllllllll _lllllllllllllllllllllllllllllllllllllllllllllllllllllllllllllllllllllllllllllll _lllllllllllllllllllllllllllllllllllllllllllllllllllllllllllllllllllllllllllllll _lllllllllllllllllllllllllllllllllllllllllllllllllllllllllllllllllllllllllllllll Zr n, ton_ Zr n, Sidewalk cap w/ gravity damper Recirculatinc Vertical discharge Ductwork installation guidelines Ductwork and wiring locations • Determine the exact location of the vent hood. For safety reasons, ducting should vent directly outdoors (not into an attic, underneath the house, •... -
Page 31: Mounting The Duct Cover Bracket
Installing the hood Mounting the duct cover bracket Ceiling ducting The duct bracket should be installed against the If the duct will vent straight up to the ceiling: back wall and flush with the ceiling. This bracket will • Use level to draw a line straight up, from the hold the telescopic duct cover in place at the top centerline on the template to the ceiling. -
Page 32: Install Framing For Hood Support
Installing the hood Install supporlnstall framing for hood support Mounting the hood iiiiiiiiiiiiiiiiiiiiiiiiiiiiiiiiiiiiiiiiiiiiiiiiiiiiiiiiiiiiiiiiiiiiiiiiiiiiiii _iiiiiiiiiiiiiiiiiiiiiiiiiiiiiiiiiiiiiiiiiiiiiiiiiiiiiiiiiiiiiiiiiiiiiiiiiiiiiii _iiiiiiiiiiiiiiiiiiiiiiiiiiiiiiiiiiiiiiiiiiiiiiiiiiiiiiiiiiiiiiiiiiiiiiiiiiiiiii _iiiiiiiiiiiiiiiiiiiiiiiiiiiiiiiiiiiiiiiiiiiiiiiiiiiiiiiiiiiiiiiiiiiiiiiiiiiiiii • If drywall is present, mark the screw hole Install the 8" round transition as shows the image below. iiiiiiiiiiiiiiiiiiiiiiiiiiiiiiiiiiiiiiiiiiiiiiiiiiiiiiiiiiiiiiiiiiiiiiiiiiiiiii The installation screws and the 8" round transition are _iiiiiiiiiiiiiiiiiiiiiiiiiiiiiiiiiiiiiiiiiiiiiiiiiiiiiiiiiiiiiiiiiiiiiiiiiiiiiii locations. - Page 33 Installing the hood Mark "lower" wood screw holes locations in the • Remove the hood. wall using a pencil. • Drive "lower" wood screws by hand. Remove screws. Mount the hood onto the "upper" screws. Drive and tighten the "upper" wood screws, by hand.
-
Page 34: Connecting The Ductwork
Installing the hood Connecting the ductwork Air deflector installation iiiiiiiiiiiiiiiiiiiiiiiiiiiiiiiiiiiiiiiiiiiiiiiiiiiiiiiiiiiiiiiiiiiiiiiiiiiiiii • Install ductwork, making connections in the (Recirculating accessories) iiiiiiiiiiiiiiiiiiiiiiiiiiiiiiiiiiiiiiiiiiiiiiiiiiiiiiiiiiiiiiiiiiiiiiiiiiiiiii direction of airflow as illustrated. • Push duct over the exhaust outlet. • Assemble the air deflector with the duct cover •... -
Page 35: Making The Electrical Connections
Installing the hood Metal electrical Making the electrical connections conduit WARNING Electrical Shock Hazard Warning: Turn off at the service panel before wiring House this unit. wiring 120 V AC, 15 or 20 Amp circuit required. UL listed ELECTRICAL GROUNDING INSTRUCTIONS wire nut THIS APPLIANCE IS FI-I-rED WITH AN ELECTRICAL JUNCTION BOX WITH _, WIRES, ONE OF WHICH... -
Page 36: Mounting The Duct Cover
Control buttons • Secure the bottom of the duct with 2 assembly Mounting the duct cover screws provided. Position the duct cover over the mounted hood. Slide the bottom of the duct onto the glass area. Position the top of the duct over the duct mounting bracket. -
Page 37: Features
Features Blower and light controls Lamp housings Grease Filter Handle Grease Filter Canopy Duct cover ° Bottom Louver holes (User for Recirculating accessories) ® iiiiiiiiiiiiiiiiiiiiiiiiiiiiiiiiiiiiiiiiiiiiiiiiiiiiiiiiiiiiiiiiiiiiiiiiiiiiiiiiii_ iiiiiiiiiiiiiiiiiiiiiiiiiiiiiiiiiiiiiiiiiiiiiiiiiiiiiiiiiiiiiiiiiiiiiiiiiiiiiiiiii_ iiiiiiiiiiiiiiiiiiiiiiiiiiiiiiiiiiiiiiiiiiiiiiiiiiiiiiiiiiiiiiiiiiiiiiiiiiiiiiiiii_ iiiiiiiiiiiiiiiiiiiiiiiiiiiiiiiiiiiiiiiiiiiiiiiiiiiiiiiiiiiiiiiiiiiiiiiiiiiiiiiiii_ iiiiiiiiiiiiiiiiiiiiiiiiiiiiiiiiiiiiiiiiiiiiiiiiiiiiiiiiiiiiiiiiiiiiiiiiiiiiiiiiii_ iiiiiiiiiiiiiiiiiiiiiiiiiiiiiiiiiiiiiiiiiiiiiiiiiiiiiiiiiiiiiiiiiiiiiiiiiiiiiiiiii_ iiiiiiiiiiiiiiiiiiiiiiiiiiiiiiiiiiiiiiiiiiiiiiiiiiiiiiiiiiiiiiiiiiiiiiiiiiiiiiiiii_ iiiiiiiiiiiiiiiiiiiiiiiiiiiiiiiiiiiiiiiiiiiiiiiiiiiiiiiiiiiiiiiiiiiiiiiiiiiiiiiiii_ iiiiiiiiiiiiiiiiiiiiiiiiiiiiiiiiiiiiiiiiiiiiiiiiiiiiiiiiiiiiiiiiiiiiiiiiiiiiiiiiii_ iiiiiiiiiiiiiiiiiiiiiiiiiiiiiiiiiiiiiiiiiiiiiiiiiiiiiiiiiiiiiiiiiiiiiiiiiiiiiiiiii_ iiiiiiiiiiiiiiiiiiiiiiiiiiiiiiiiiiiiiiiiiiiiiiiiiiiiiiiiiiiiiiiiiiiiiiiiiiiiiiiiii_ iiiiiiiiiiiiiiiiiiiiiiiiiiiiiiiiiiiiiiiiiiiiiiiiiiiiiiiiiiiiiiiiiiiiiiiiiiiiiiiiii_ iiiiiiiiiiiiiiiiiiiiiiiiiiiiiiiiiiiiiiiiiiiiiiiiiiiiiiiiiiiiiiiiiiiiiiiiiiiiiiiiii_ iiiiiiiiiiiiiiiiiiiiiiiiiiiiiiiiiiiiiiiiiiiiiiiiiiiiiiiiiiiiiiiiiiiiiiiiiiiiiiiiii_ iiiiiiiiiiiiiiiiiiiiiiiiiiiiiiiiiiiiiiiiiiiiiiiiiiiiiiiiiiiiiiiiiiiiiiiiiiiiiiiiii_ iiiiiiiiiiiiiiiiiiiiiiiiiiiiiiiiiiiiiiiiiiiiiiiiiiiiiiiiiiiiiiiiiiiiiiiiiiiiiiiiii_ iiiiiiiiiiiiiiiiiiiiiiiiiiiiiiiiiiiiiiiiiiiiiiiiiiiiiiiiiiiiiiiiiiiiiiiiiiiiiiiiii_ iiiiiiiiiiiiiiiiiiiiiiiiiiiiiiiiiiiiiiiiiiiiiiiiiiiiiiiiiiiiiiiiiiiiiiiiiiiiiiiiii_ iiiiiiiiiiiiiiiiiiiiiiiiiiiiiiiiiiiiiiiiiiiiiiiiiiiiiiiiiiiiiiiiiiiiiiiiiiiiiiiiii_... -
Page 38: Control Buttons
Control buttons Control buttons This hood is equipped with an electronic motor and ° If the fan is at second speed and the "V" lamp control. button is pressed, the fan will be set to first speed. iiiiiiiiiiiiiiiiiiiiiiiiiiiiiiiiiiiiiiiiiiiiiiiiiiiiiiiiiiiiiiiiiiiiiiiiiiiiiii The control is able to set 4 diferent fan speeds, turn °... -
Page 39: Special Functions
Control buttons - Special functions Special functions Clock programming ° The clock can be reprogrammed at any time except during an active timed function. • The clock can be displayed in a twelve hour format and valid clock times are from 1:00 to 12:59. •... -
Page 40: For Best Results
Care and cleaning For Best results • Continuous use of the fan system while cooking helps keep the kitchen comfortable and less humid. • It also reduces cooking odors and soiling moisture that create a frequent need for cleaning. • Turn the blower on before starting to cook. -
Page 41: Filters
Care and cleaning Care and Cleaning The eficiency of the range hood system depends on Lights the cleanliness of the intake and filters. The frequency of cleaning depends on the amount and type of cooking. • Do not use the ventilating system without the Before replacing the lamps, switch power off at filters in place or with grease-laden filters or service panel and lock service panel disconnecting... -
Page 42: Optional Charcoal Filters
Clear and Cleaning Optional Charcoal Filters _iiiiiiiiiiiiiiiiiiiiiiiiiiiiiiiiiiiiiiiiiiiiiiiiiiiiiiiiiiiiiiiiiiiiiiiiiiiiiii _iiiiiiiiiiiiiiiiiiiiiiiiiiiiiiiiiiiiiiiiiiiiiiiiiiiiiiiiiiiiiiiiiiiiiiiiiiiiiii _iiiiiiiiiiiiiiiiiiiiiiiiiiiiiiiiiiiiiiiiiiiiiiiiiiiiiiiiiiiiiiiiiiiiiiiiiiiiiii If the model is not vented to the outside, the air will be recirculated through disposable charcoal filters that _iiiiiiiiiiiiiiiiiiiiiiiiiiiiiiiiiiiiiiiiiiiiiiiiiiiiiiiiiiiiiiiiiiiiiiiiiiiiiii help remove smoke and odors. _iiiiiiiiiiiiiiiiiiiiiiiiiiiiiiiiiiiiiiiiiiiiiiiiiiiiiiiiiiiiiiiiiiiiiiiiiiiiiii The charcoal filters cannot be cleaned. iiiiiiiiiiiiiiiiiiiiiiiiiiiiiiiiiiiiiiiiiiiiiiiiiiiiiiiiiiiiiiiiiiiiiiiiiiiiiii _iiiiiiiiiiiiiiiiiiiiiiiiiiiiiiiiiiiiiiiiiiiiiiiiiiiiiiiiiiiiiiiiiiiiiiiiiiiiiii They must be replaced. -
Page 43: Warranty Information
Warranty Information Your appliance is covered by a one year limited warranty. For one year from your original date of purchase, Electrolux will pay all costs for repairing or replacing any parts of this appliance that prove to be defective in materials or workmanship when such appliance is installed, used and maintained in accordance with the provided instructions. - Page 44 _!!!!!!!!!!!!!!!!!!!!!!!!!!!!!!!!!!!!!!!!!!!!!!!!!!!!!!!!!!!!!!!!!!!!!!!!!!!!!!!!!!!!!!!!!!!!!!!!!!!!!!!!!!!!!!!!!!!!!!!!!!!!!!!!!!!!!!!!!!!!!!!!!!!!!!!!!!!!!!!!!!!!!!!!!!!!!!!!!!!!!!!!!!!!!!!!!!!!!!!!!!!!!!!!!!!!!!!!!!!!!!!!!!!!!!!!!!!!!!!!!!!!!!!!!!!!!!!!!!!!!!!!!!!!!!!!!!!!!!!!!!!!!!!!!!!!!!!!!!!!!!!!!!!!!!!!!!!!!!!!!!!!!!!!!!!!!!
Need help?
Do you have a question about the RH30WC60GSB and is the answer not in the manual?
Questions and answers