FujiFilm FINEPIX S700 Owner's Manual
Hide thumbs
Also See for FINEPIX S700:
- Owner's manual (180 pages) ,
- Quick start (2 pages) ,
- Owner's manual (191 pages)
Table of Contents
Advertisement
Advertisement
Table of Contents

Related Manuals for FujiFilm FINEPIX S700


Summary of Contents for FujiFilm FINEPIX S700
- Page 1 Gettin Usin Advanc • Playback • Movie I OWNER'SMANUAL I Camera Cent This manual will show you how to use your FUJIFILM DIGITAL CAMERA FinePix $5700 / FinePix $700 correctly, Please follow the instructions carefully. BL00607-201(1) ExifPrint Picte,ldge xD-Picture Card...
-
Page 2: Warning
I Warning For customers in Canada To prevent fire or shock hazard, do not expose the unit to rain or moisture. CAUTION For customers in the U.S.A. This Class B digital apparatus complies with Canadian ICES-003. Tested To Comply With FCC Standards Please read the Safety Notes (*p.175) and make FOR HOME OR OFFICE... -
Page 3: Important
Be sure to read this page before using the software. Ownership, I_[aJl[_]: All copyrights and other proprietary rights to Software and Documentation owned and retained by FUJIFILM or the third pedy suppliers as indicated BEFORE OPENING THE CD-ROM PROVIDED FUJIFILM or in Software or Documentatic_l. -
Page 4: Ec Declaration Of Conformity
I EC Declaration of Conformity Name: FUJIFILM Europe GmbH Heesenstrasse Address: 40549 Dusseldorf, Germany declare that the product Product Name: FUJIFILM DIGITAL CAMERA FinePix S5700/FinePix S700 Manufacturer's Name: FUJIFILM Corporation Manufacturer's Address: 7-3, AKASAKA 9-CHOME, MINATO-KU, TOKYO 107-0052, JAPAN conforms to the following... -
Page 5: Disposal Of Electric And Electronic Equipment In Private Households
I Disposal of Electric andElectronic Equipment in PrivateHouseholds Disposal of used Electrical & Electronic Equipment (Applicable in the European Union and other European countries with separate collection systems) product shall not be treated as household waste, Instead it should be taken to an applicable collection point for the recycling of electrical and electronic This symbol on the product, or in the manual and in the warranty,... -
Page 6: Table Of Contents
I Contents Warning ..............Erasing the Images/Movies ......IMPORTANT ............Using the erase button (#/A) ....EC Declaration of Conformity ........ Erasing the images using Disposal of Electric and Electronic Equipment Playback menu ........Private Households ......... Contents ..............Preface ..............Using the Photography Functions About... - Page 7 Setting the SHOOTING MENU ....Setting the F-MODE MENU F-MODE MENU (Photography) ......(Playback) ..........Changing the sensitivity setting Setting the PLAYBACK MENU ....(_ ISO) ........... /C-MODE MENU (Playback) ......Changing the quality setting Setting automatic playback (DQUALITY) .......... (_1 SLIDE SHOW) ........
- Page 8 ..Notes on the xD-Pietare Card the SD Memory Card and the Internal Memory ..148 Warning Displays ..........Troubleshooting ..........Specifications ..........160 } Explanation of Terms ........FUJIFILM Digital Camera Worldwide Network ............ Safety Notes ..........
- Page 9 If any of the following image to make sure that the camera is working normally, situations arise, take the urgent action indicated. • FUJIFILM Corporation cannot accept liability for any • If liquid crystal comes in contact with your skin incidental...
-
Page 10: Preface
Preface • Notes on Electrical Interference If the camera is to be used in hospitals or aircrafts, please note that this camera may cause interference to other equipment in the hospital or aircraft, For details, please check with the applicable regulations. •... -
Page 11: About This Manual
I About this Manual Icons indicate the modes that are available. I_i_, Macro (Close-up) AvaiE_ble....Ph_t°gr_phy modeS: _ _, _ CAUTION Press,_ ('q)to sslec_ Ma_,omode The Macromo4esetth_gchanges each t_meyoupre_sthe This mark denotes issues that may affect the ('9) camera's operation. CHECK This mark denotes points... - Page 12 I Accessories Included • AA-size Alkaline Batteries (LR6) (4) • CD-ROM Software for FinePix CX • Strap (1) • Owner's Manual (this manual) (1) • Lens cap (1 set) • A/V cable (1) • USB cable (1)
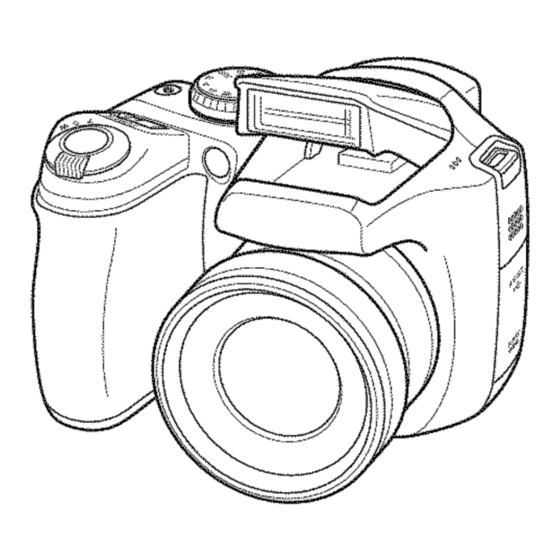
- Page 13 I Camera Parts and Features • Refer to the pages in parentheses for information on using the camera parts or features. _1 Strap mount (p.17) _2 Zoom lever (p.36) _3 Shutter button Power switch (p.25) Continuous shooting button (p.71) _6 Mode dial Continued...
-
Page 14: Camera Parts And Features
Camera Parts and Features ® _7 AF-assist illuminator (p.36)/Self-timer lamp (p.70) USB socket/AN (Audio/Visual output) socket (p.123) _9" DC IN 5V (power input) socket (p.124) t0 Auto popup flash (p.67) @ Microphone @ Speaker @ Terminal cover... - Page 15 _4_Viewfinder (EVF) Indicator lamp (p,33) _6 LCD monitor @ Tripod mount _8 DISP (Display)/BACK button (p.37, 39) [] Exposure compensation button (p.64, 91) _ Cover lock release button (p.19) @ Battery cover (p.19) @ EVF/LCD (monitor selector) button (p.30) @ [] Playback mode button...
-
Page 16: Example Of Screen Text Display
I Example of screen Text Display • Photography mode @ ISO 100 Sensitivity (p.79) Self-timer (p.69) N Quality mode (p.80) O? @ Flash (p.67) t_ Number of available frames _4 D Photography mode (p.51) (p.164) @ _r FinePix COLOR (p.81) _'_ _._"""_'_5_ . - Page 17 I Attaching the Strap and Lens Cap Attaching the strap Pull the lens cap cord through the strap. 1 Attach the strap to the strap mounts on the _={{{{{{{{{{{{{{{{{ camera. Once you have attached both ends !_i!!!{{{{{{{ of the strap, check carefully to make sure that the strap is firmly secured.
-
Page 18: Attaching The Strap And Lens Cap
Attaching the Strap and Lens Cap Attaching the lens cap Attach the lens cap to the lens by pressing in on both sides of the cap. - Page 19 I Loading the Batteries Batteries are required to operate the digital camera. While pressing the cover lock release first, load the batteries in the camera. button, slide and open the battery cover. Compatible batteries AA size alkaline batteries (4) or AA size NiMH <= rechargeable batteries (4) (sold separately)
-
Page 20: Loading The Batteries
Loading the Batteries Load the batteries correctly as indicated Press on the battery cover to push the batteries down. Slide the cover closed. the polarity icons. CAUTION Match the polarity icons and _) of the batteries those on the inside of the battery cover. -
Page 21: Checking The Battery Charge
• Depending on the camera mode, the transition from to _ may occur more quickly. • Use Fujifilm Battery charger (sold separately) to charge AA-size Ni-MH batteries. • See p.144-145 for information on the batteries. - Page 22 2GB/Ultra Tf-512MB, 1GB 2GB MEMO • Compatible models will be updated in our website: http://www.fujifilm.com/products/digital/ Gold contact area • Depending on the SD Memory Card, recording of movies may be interrupted. Align the gold marking with the gold contact area,...
- Page 23 CAUTION Close the slot cover. Be sure to unlock the protection of tile SD Memory Card before inserting it. If it is locked, recording/deleting images, as well as formatting are not available. To unlock the protection, slide the switch back, and the SD Memory Card will work normally.
-
Page 24: Card
Record images to a Memory Card. • Operation of this camera is only guaranteed when it is [Playback images]: Playback images in a Memory Card. used with FUJIFILM xD-Picture Card and operation- checked SD Memory Card (_p.22). When a Memory Card (sold separately) is not inserted •... -
Page 25: Turning On And Off
I Turning On and Off Turning the camera on in Turning the camera on in Photography mode Playback mode Slide the Power switch to turn the camera on in Press [] for about 1 second to turn the camera on in Photography mode. -
Page 26: Date, And Time
Turning On and Off Setting the language, date, and Set the date and time. time When using the camera for the first time after purchasing, the language, date, and time are cleared. Set the language, date, and time. W,MM,DB 1. I 12:60 u _/LANG. - Page 27 7_! MEMO Change the date format. START MENU screen also appears when the batteries have been removed and the camera has been left for a long period. Once the AC power adapter has been connected or the batteries have been installed for 10 hours or more, the camera...
- Page 28 I Correcting the Date and Time Open the SET-UP menu. Display the DATE/TIME screen. :_1_' Press MENU/OK to open the menu _I_X,_I_ ,_1,Press '_ or _1_ to select _1, _"_'_ 29, Press • or • to select [] SET-UP. ,_2_ Press • to move to menu item.
-
Page 29: Selecting The Language
I Selecting the Language Open the SET-UP menu. Display the _ _/LANG. screen. :_1_' Press MENU/OK to open the menu JI_ ,_, Press _ or _ to select ,_2, _"_'_ 29, Press • or • to select [] SET-UP. ,_2_ Press • to move to menu item. - Page 30 I Taking Pictures (IBri'_ AUTO Mode) HHHHHHHHHHHHHHi_ iiiiiiiiiiiiiiiiiiiiiiiiiiiiiii This section describes the basic operations. Switch the display. iiiiiiiiiiiiiiiiiiiiiiiiiiiiiii Press the EVF/LCD to alternate the display between the iiiiiiiiiiiiiiiiiiiiiiiiiiiiiii Turn the camera on. viewfinder (EVF) and the LCD monitor. iiiiiiiiiiiiiiiiiiiiiiiiiiiiiii (1_ Slide Power switch.
- Page 31 Focus on the main subject in the AF frame Holding the camera correctly and press the shutter button down halfway. Brace your elbows against your sides and hold the camera with both hands. Using the viewfinder (EVF) allows for a steady arm position, preventing picture blur, AF frame AF frame...
- Page 32 Taking Pictures (l_llil_ AUTO Mode) 4 Press the shutter button fully. Flash ! Dou6ie\, Pressing the shutter button halfway when the flash is not popped up, camera pops the flash up as required by the '\_ beep/ shooting conditions. Halfway pressed Fully pressed CAUTION appears on the screen.
- Page 33 • Indicator lamp display Compatible filters The indicator lamp lights or blinks when pressing the shutter 46 mm-diameter commercial available filters can be attached. button etc, The indicator lamp shows the camera status. CAUTION • Do not use more than one filter at a time. Indicator lamp •...
-
Page 34: Taking Pictures With The Focus And Exposure Locked
Taking Pictures (l_llt'l_ AUTO Mode) Taking pictures with the focus I Using AF/AE lock and exposure locked 1 Move the camera slightly so that one of the subjects is in the AF frame. In the above composition, the subjects are not in the AF frame. - Page 35 _iiii_i, ii/i iiiiiiiiiiiiiiii_Mii_iMiiiii_iiMiiiiiiiiiiiiiiiiiiiiiiiiiiiiiiiiiiiiiiiiiiiiiiiiiiiiiiiiiiiiiiiiiiiiiiiiiii Continue to hold the shutter button down Subjects suitable for autofocus halfway. Move the camera back to the FinePix $5700 / FinePix $700 uses a high-precision original image and press the shutter button autofocusing mechanism. However, it may have difficulty focusing on the following: fully.
-
Page 36: Af-Assist Illuminator
Taking Pictures (l_lri'l_ AUTO Mode) AF-assist illuminator Using zoom function Use this illuminator to focus on the subject in dimly lit Use the zoom dial to take pictures with zoom function. conditions. The zoom bar appears on the screen while the zoom dial When pressing the shutter button down halfway, the is being used. -
Page 37: Adjusting The Shot Composition
Adjusting the shot composition MEMO • Select Macro mode to take close-up shots (_p.66). Select the screen display. • Use digital zoom when you want to shoot the subject closer(*p.118). Press DISP/BACK to change the screen display. Text displayed _ No text displayed Post shot assist window Framing guideline displayed... - Page 38 Taking Pictures (l_lri'l_ AUTO Mode) • Format of post shot assist window IBest framing Position the main subject at the intersection of two lines in this frame or align one of the horizontal lines with the horizon. Use this frame as a guide to the subject's size and the balance of the shot while composing a shot.
-
Page 39: Mode
FinePix $5700 / FinePix $700 or still images (excluding some Sorting by date uncempressed images) recorded on any FUJIFILM digital camera that supports xD-Picture Cards or SD Memory Cards. Clear playback or playback zooming may net be... - Page 40 Viewing the Images Single-frame playback IPlayback zoom Zoom in / Zoom out. To zoom in an image during single-frame playback: W: wide zoom dial T: tele zoom dial (zoom out) (zoom To select the required image: ml_ Press _1: last image Press Ibm:next image Zoom bar ISelecting images...
- Page 41 Sorting by date Display another part of the image. In sorting by date mode, you can view all images taken on the same day. Navigation screen (Current displayed image) <t_, _ Press A, V, _l, or • to display another part of the image.
- Page 42 Viewing the Images Multi-frame playback ISelecting the date Use this function to display a single frame, 2 frames or 9 frames. You can compare and select images using the Multi-frame display. Use the zoom dial to change the display. (colored frame) to <:_ on the upper left _;_D_ _1_ Press A, •, ,_, or •...
- Page 43 2 frames playback images you want to compare (such as the images taken in _/_ NATURAL & ,_ _l_;_m_ (1_Press A •, ,_ or • to select the mode). :127 Press MENU/OK to enlarge the image, 9 frames playback colored frame and select an image, Press •...
-
Page 44: Using The Erase Button (#/A)
Setting the camera to [] I H Erasing the Images/Movies Playback mode (*p.39) Erasing the images using Use this mode to erase unnecessary images or movies to have ample free space on the Memory Card or internal Playback menu memory. Your camera calls images "frames". Using the erase button (_/A) Pressing _ (A) erases images easily. - Page 45 Setting the camera to [] playback mode (*p.39) IErasing one frame at a time (FRAME) IErasing all frames (ALL FRAMES) :_1"_' Press '_ or • to se ect the eras ng frame ,_17 Press '_ or • to select OK. (file).
- Page 46 m Erasing the Images/Movies Setting the camera to [] playback mode (*p.39) MEMO • When using a Memory Card, the images in tile Memory Card are erased. When not using a Memory Card, images in the internal memory are erased. •...
-
Page 47: Functions
I Using the Photography Functions -- Procedure of Setting Specify the camera settings for taking pictures to get the This is the easiest mode for taking best result. A general guide is given below. pictures (*p.51). Used for selecting a fast shutter speed that reduces camera... -
Page 48: Using The Photography Functions
Using the Photography Functions -- Procedure of Setting • Specifying functions using buttons Specify the photography settings. Used for close-up shots (*p.66). Pressing buttons or selecting menu allows you to Used for shots in dark locations or for specify photography functions. -
Page 49: Functions
• Specifying functions using F-MODE MENU (F • Specifying functions using SHOOTING MENU button) (MENU/OK button) Press F button for about 0.5 seconds to open the F- MODE MENU. Continued Use to specify required sensitivity setting (_p.79). Use to specify required image size... -
Page 50: Functions
Using the Photography Functions -- Procedure of Setting Use to select the best setting for the scene being shot. Choose from types of scene (set the Mode dial to SP1 or SP2)(*p.53). Use to select light metering method set the Mode dial to P, A, S or M) (*p.82). -
Page 51: Auto
I Setting the Shooting Mode /t_\ Picture Stabilization You can select the most suitable setting according to the subject by selecting one of the Shooting modes. Use this mode to select a fast shutter speed that reduces camera shake and moving-subject blurring. -
Page 52: Natural Light
Setting the Shooting Mode Natural Light _;_/¢NATURAL & This mode produces beautiful images that retain the This mode shoots 2 images continuously without flash natural ambience when shots are taken in low-light and with flash. Shooting with flash allows you to take a conditions. -
Page 53: Sp1, Sp2 Scene Position
SP1, S P2SCENE POSITION • Selecting Scene position setting This mode provides the best Scene position setting for the scene being shot, Choose from 12 types of scene, Select the Scene position setting in the SCENE POSITION menu, Set the Mode dial to SP1or SP2. - Page 54 Setting the Shooting Mode [_ PORTRAIT I_ SPORT Use this mode for Use this mode to take photography to get beautiful pictures of a moving skin tones and soft overall subject. tone. It gives priority to faster shutter speeds. L_ CHECK When setting _ SpoM mode, the camera sets to [] IA LANDSCAPE...
- Page 55 I_:_FIREWORKS I._ SUNSET Use this mode to shoot Use this mode to shoot fireworks, sunset, making the colors more vivid. It is effective for taking more vivid shots of fireworks with a slow shutter, CHECK • Flash cannot be used in the Fireworks mode.
- Page 56 Setting the Shooting Mode I_ MUSEUM I-_ FLOWER Use this mode to take Use this mode for taking pictures in places such as clear close-up shots when museum where the use of zooming up a flower. flash and making an It is effective for taking more vivid shots of flower operation sound and a...
-
Page 57: P Program Ae
P Program AE ® ,{_:> P ress [] to open the setting screen. This is an automatic mode to specify the settings except for the shutter speed and aperture setting. (2) Select different shutter speed and aperture This is a simple way to take pictures the same as the A setting combinations without changing the Aperture-priority... -
Page 58: A Aperture Priority Ae
Setting the Shooting Mode Aperture Priority AE • Setting the aperture This is an automatic mode to set the aperture. Use this mode to have the area in front of and behind the subject out of focus (large aperture) or have both near and far subjects in focus (small aperture). - Page 59 CAUTION Aperture When the correct exposure By adjusting the aperture, you can change the depth of focus cannot be obtained with (depth of field). Selecting a larger number of aperture (closed) selected aperture setting, the obtains a larger depth of focus. Selecting a smaller number...
-
Page 60: S Shutter Priority Ae
Setting the Shooting Mode S Shutter Priority AE • Setting the shutter speed This is an automatic mode to set the shutter speed. Use this mode to freeze a moving subject (fast shutter speed) or convey the impression of movement (slow shutter speed). - Page 61 CAUTION Shutter speed When the correct When shooting a moving subject, you can either "freeze the exposure cannot be motion" or "capture the sense of movement" by adjusting the obtained with selected shutter speed. shutter speed, the Freezes the motion of the aperture setting appears subject.
-
Page 62: M Manual
Setting the Shooting Mode M Manual • Setting the shutter speed This is a shooting mode that allows for settings including the shutter speed and aperture. Set the Photography functions to manual to easily control yourself. Set the Mode dial to M. Shutter speed ®... - Page 63 • Setting the aperture The exposure indicator Use the exposure indicator on the screen as a guide when setting the exposure.When Aperture brightness of the subject is outside the camera's brightness metering range, the exposure indicator disappears on the screen. :_!_'Press [] to open the set ng screen l_ 2_, Press •...
-
Page 64: The Image Brightness
I Adjusting the Image Brightness Exposure Compensation) Use this menu for shots to get the correct brightness (exposure), such as shots with extremely high contrast between the subject and the background, Available Photography modes: P, A, S ( _p.57, 58, [===_ Exposure Compensation Adjusting exposure... - Page 65 positive (+) compensation • Very bright scenes (such as snowfields) and highly negative (-) compensation reflective subjects: +3 steps (+1 EV) CHECK • Compensation range: -2 EV to +2 EV (13 steps in 1/3 EV increments) • Explanation of Terms "EV"...
-
Page 66: Macro (Close-Up)
Macro (Close-up) ¢_ CHECK Use this mode to take close-up shots. Available Photography modes: IE_i'_l,/JSk_, _I_, _/$, • Focal range SP1, SP2, P, A, S, M Wide angle: Approx. 4 cm to 3.0 m (1.6 in. to 9.8 ft.) Press ('_) to select Macro... - Page 67 Setting the Flash (Intelligent Flash) Flash photography is useful for taking pictures at night or MEMO Red-eye effect indoor dark locations. Choose from 6 flash modes When using the flash to take a picture of people in low- according to the type of shot. See p.68 for information light conditions, their eyes sometimes appear red in the the available Photography...
- Page 68 Setting the Flash (Intelligent Flash) CHECK ¢_ CHECK List of available flash modes in each Photography mode Effective flash range (_ : 800) Approx. 50 cm to 6.2 m (1.6 ft. to 20 ft.) AUTO If you take pictures outside of the effective flash range,...
-
Page 69: Self-Timer
d.) Self-Timer The self-timer is used in situations where the Taking pictures using self-timer photographer is included in the shot. Available Photography modes: All Press the shutter button down halfway Setting self-timer focus on the subject press the shutter button fully. - Page 70 Self-Timer Take pictures in selected time. Using the 2-second serf-timer This is useful when you worry about camera shake even if attaching the camera on a tripod, A picture is taken after the self-timer lamp changes from lit to blinking (only blinks with the 2-second...
-
Page 71: Taking Pictures Continuously
Taking pictures continuously CAUTION Use this mode to take pictures of a moving subject. • Shooting continues as long as holding the shutter button down. In auto bracketing mode however, just press the shutter button once to shoot 3 frames. •... -
Page 72: Menu
Taking pictures continuously TOP 3 continuous shooting I_t_ Auto bracketing Available Photography modes: All (except for <_/_) Available Photography modes: P, A, S, M This mode shoots the same Shooting continues as long as holding the shutter button image with different exposure settings. - Page 73 1_ LONG PERIOD continuous shooting Available Photography modes: All (except fer _/,_) Shooting continues as long as the shutter button is held down (max. 0.6 frames/sec,), This mode shoots up to Memory Card or internal memory end. Press shutter button. Release shutter button.
-
Page 74: Brightness
I -:.6;- Increasing LCD Monitor Brightness MEMO This is useful when checking the shot composition outdoor scenes. • This function is automatically canceled after each shot. • When this function is active, it will increase the amount Increasing the LCD monitor of speckling in images on the screen. - Page 75 I Using F-MODE MENU (Photography)/SHOOTING MENU Setting the SHOOTING MENU Use these menus to adjust image quality or focus. You can take pictures in a wide range of conditions. Setting the F-MODE MENU (Photography) ,_1 Press MENU/OK to open the SHOOTING MENU.
-
Page 76: Method
Using F-MODE MENU (Photography)/SHOOTING MENU • List of F-MODE MENU options Specifies required sensitivity setting of the ambient light around subject. AUTO/AUTO (800)/ AUTO The larger value of the sensitivity, the higher sensitivity is obtained. AUTO (400)/1600/ The higher sensitivity settings will allow you to take... - Page 77 P, A, S or M. HARD/STANDARD/ This setting can be used when the Mode dial is set to STANDARD SOFT Use this setting to soften or emphasize the outline of an image. -2/3 EV to +2/3 EV This setting can be used when the Mode dial is set to P, A, S or M.
- Page 78 Using F-MODE MENU (Photography)/SHOOTING MENU MEMO Note that tile shooting menu will vary depending on the selected shooting mode. SP1, SP2 • (The shooting menu options will vary depending on the mode selected.) *P,A,S,M...
- Page 79 F-MODE MENU (Photography) Setting the menu (*p.75) Changing the sensitivity setting MEMO P, A, S and M (r_ Iso) • When anything other than in the Photography mode is selected, only AUTO can be selected for the ISO (sensitivity) setting Use this menu to specify required sensitivity setting of the •...
- Page 80 F-MODE MENU (Photography) Setting the menu (*p.75) Changing the quality setting M iiii_iii_ii_i _iiiiiiiiiiiiiiiiiiiiiiiiiiiiiiiiiiiiiiiiiiiiiiiiiiiiiiiiiiiiiiiiiiiiiiiiiiiiiiiiiiiiiiiiii Area shot and quality setting QUALITY) Area shot excluding Area shot with I_1 Use this menu to specify the image size (number of recorded pixels). Select the quality setting for the scene being shot. •...
-
Page 81: Changing The Finepix Color Setting
Setting the menu (*p.75) Changing the FinePix COLOR I%; MEMO setting ([_ FinePix COLOR) • The FinePix COLOR setting is retained even wben tile camera is off or the mode setting is changed. • F-CHROME have little visible effect with some Use this menu to specify required color tone, subjects or the scene... - Page 82 I SHOOTING MENU Setting the menu (*p.75) Selecting light metering method To use the photometry modes effectively PHOTOMETRY) • MULTI In this ='node, the camera uses automatic scene recognition Available Photography modes: P, A, S, M to analyze the subject and provide optimum exposure...
- Page 83 Setting the menu (*p.75) Adjusting color balance I,._ Custom white balance (17J_J WHITE BALANCE) _l"_'Select _ custom white balance (*p.75). _2_Hold a piece of white paper under the light source for Available Photography modes: P, A, S, U setting the white balance, so that it fills entire the Adjust the color balance based on white to suit the color screen.
- Page 84 SHOOTING MENU Setting the menu (*p.75) Focusing the shot quickly compensation again, using HIGH-SPEED SHOOTING) a negative value (-) when [OVER] appears and a Available Photography modes: All positive value (+) when _N0_ Set the exposure [UNDER] appears (*p.64). Use this mode to reduce the time required...
- Page 85 Setting the menu (*p.75) Specifying the focusing mode I[] CONTINUOUS (1"_1 FOCUSING) Use this setting to take pictures of a moving subject. The camera continues to focus on the main subject in the AF Available Photographymodes: P, A, S, M frame.
- Page 86 SHOOTING MENU Setting the menu (*p.75) I[]s,.G,E A F I°MF Use this setting to take picture of a static subject such as This mode is used in situations where you focus manually. Use this setting for alternative focusing or for a landscape.
- Page 87 Setting the menu (*p.75) Specifying the focusing area Ir_ MULTI (_=J AF MODE) When pressing the shutter button down halfway, the camera recognizes any strongly contrasting subject near P, A, S, M Available Photography mode: the center of the screen and displays the AF frame over subject in focus.
- Page 88 SHOOTING MENU Setting the menu (*p.75) I@ AREA :/3[ Press the shutter button to take pictures. The camera changes the focusing position on the screen. Use this setting when composing the shot using a tripod and changing the focusing position. MEMO •...
-
Page 89: Adjustment))
Setting the menu (*p.75) Adjust the image outline (hard/ Adjust the amount of light soft) (0 SHARPNESS) emitted by the flash FLASH (Brightness Available Photographymodes: P, A, S, M Adjustment)) Use this setting to soften or emphasize the outline and quality of an image, Available Photography... - Page 90 SHOOTING MENU Setting the menu (*p.75) Photograph the same image with CAUTION • If tile underexposed or overexposed frame is outside different exposure the camera's control range, the picture is not taken with BRACKETING) the specified setting increments. • Flash photography cannot be used.
- Page 91 I Playback Information Use this function to check the photography information. CAUTION Press [] to check the information, Press [] again to • Highlight warning return to playback mode. Overexposed area blinks in black. = Highlight warning Histograms A histogram is a chart showing the distribution of brightness...
-
Page 92: Setting The F-Mode Menu
I Using F-MODE MENU (Playback)/PLAYBACK MENU Use these menus to playback photographed images. Setting the F-MODE MENU Setting the PLAYBACK MENU (Playback) _1_Set the camera to Playback mode (*p.39). ,_ Set the camera to Playback mode (*p.39). ,_2_ Press MENU/OK to open the PLAYBACK MENU. -
Page 93: Menu (Playback)
F-MODE MENU (Playback) Setting the menu (*p.92) Setting automatic playback DPOF set frame SLIDE SHOW) (Fq PRINT ORDER (DPOF)) Use this mode to playback photographed images You can specify the image, number of prints, with or continuously, You can select type of image transition, without date of printing with a DPOF-compatible printer. - Page 94 F-MODE MENU (Playback) Setting the menu (*p.92) MEMO Canceling DPOF setting IWITH DATE / WITHOUT DATE _1" Press F to open the F-MODE MENU and press • Selecting WITH DATE[_, [_ appears on the screen and • to select PRINT ORDER (DPOF).
- Page 95 Setting the menu (*p.g2) MEMO IRESET ALL • When DPOF settings were specified on another camera. To cancel all DPOF settings: .<, When the data includes a frame (file) with DPOF Select RESET ALL in the F-MODE MENU (*p.93). settings that were specified on another camera,...
-
Page 96: Print Order (Dpof))
F-MODE MENU (Playback) Setting the menu (*p.92) • -_- PRINT ORDER (DPOF) for images shot using a digital camera on media such as a Memory Card. The recorded specifications include DPOF stands for Digital Print Order Format and refers to a format that is used for recording printing specifications information on which frames are to be printed, ,'.,Some printers de net support date and time imprinting or specification... -
Page 97: Menu
I PLAYBACK MENU Setting the menu (*p.92) Rotating the images IMAGE ROTATE) When shooting in the vertical position, the image appears horizontal on the screen. Use this mode to rotate an image and to display correct direction. Your camera calls images "frames", CAUTION _5_Press •... -
Page 98: Protecting The Images
PLAYBACK MENU Setting the menu (*p.92) Protecting the images ISET ALL (_PROTECT) Use this mode to prevent frames (files) from being accidentally erased. Your camera calls images "frames". IFRAME SET/RESET To protect or unprotect only the selected frame (file) Press MENU/OK to protect all the frames (files). -
Page 99: Copying The Images Copy)
Setting the menu (*p.g2) Copying the images MEMO To stop the procedure midway COPY) It is possible to transfer saved images between the internal memory and a Memory Card. Your camera calls images "frames". • Selecting COPY If the images are very large, protecting or unprotecting... - Page 100 PLAYBACK MENU Setting the menu (*p.92) ICopying one frame at a time (FRAME) (file). _X,_l ,{_}Press '_ or _1_to select the copying frame _1}Press • or • to select FRAME. ,{4}Press MENU/OK to copy the currently displayed frame (file). _}, Press MENU/OK. MEMO To copy another frame (file), repeat steps ,_ and _.4.
- Page 101 Setting the menu (*p.92) JCopying all frames (ALL FRAMES) I00-0001 ITBAYTAKE ,_ Press MENU/OK to copy all the frames (files). .<, _1_Press • or • to select ALL FRAMES. CAUTION • When [[2_] MEMORY FULL] or [1_1 MEMORY FULL] appears on the screen, copying the data...
-
Page 102: Adding Voice Memos To The Images
PLAYBACK MENU Setting the menu (*p.92) Adding voice memos to the images ([] VOICE MEMO) Voice memos of up to 30 seconds can be added to still images. IRecording voice memos ,_5;, Press MENU/OK to start recording. t_l"_' Press • or •... - Page 103 Setting the menu (*p.92) IPlaying back voice memo a voice memo. _ appears on the screen. ,{_,Press '_ or • to select an image file with memo, ,{2;, P ress • to start playing back the voice (6}The voice memo ends when pressing MENU/OK midway or 30 seconds pass.
- Page 104 PLAYBACK MENU Setting the menu (*p.92) • Playing back voice memos [Adjusting volume of voice memos Volume can be adjusted while playing back voice memos. Playback Playback begins. The voice memo stops when playback ends. Pause/ Pauses the voice memo during Resume playback.
-
Page 105: Trimming The Images
Setting the menu (*p.92) Trimming the images ([_J TRIMMING) Navigation screen (Current displayed image) Use this mode to trim the required part of the photographed image. C_'_ CHECK Before selecting TRIMMING, select the trimming frame (file). part of the image. W:wide zoom dial T:tele zoom dial ._;,_/_1... - Page 106 PLAYBACK MENU Setting the menu (*p.92) MEMO • A saved image size varies depending oil the zoom scale of step (_). For 0.3 M, _ YES option appears in yellow. • linage sizes Printing at up to 6R (15.2 x 20.3 cm/6 x 8 in.) / A5 size Printing...
-
Page 107: Movies
Recording Movies Use this mode to record movies with sound. Record movies. Set the camera to R.VMovie mode. Set the Mode dial to _,_. P°.ypressed ,1 o ,c __ Press the shutter button down fully to start recording. During recording, OREC and a counter that shows the remainingtimeappearonthescreen. - Page 108 Recording Movies • Zooming the image CHECK Recording movies Turn the zoom dial to zoom in or out during shooting. • Specifications: Motion JPEG (_p.166), Monaural sound • Quality selection method: (640 x 480 pixels) (320 x 240 pixels) • Frame rate ( _p.166): 30 frames per second...
-
Page 109: Using The Image Stabilization Function
Using the Image Stabilization Changing movie size Function Press F to open the F-MODE MENU. IMAGE STABILIZATION enables you to take stable and blur-free images even under difficult shooting conditions. such as telephoto shooting. Press MENU/OK to open the shooting menu. ._ Press,. - Page 110 m _ Recording Movies MEMO • The quality setting is retained even when the camera turned off or the mode setting is changed. • In _,_ Movie mode, you cannot set the [_ (sensitivity) setting and [] FinePix COLOR setting. •...
-
Page 111: Back Movies
Setting the camera to [] I i- -I Playing Back Movies Playback mode (*p.39) • Playing back movies Playback stops when the end of Playback the movie is reached. Playback begins. Pause playback, Resume Press • again to resume Pauses the movie during playback. -
Page 112: Playing Back Movies
Playing Back Movies Setting the camera to [] Playback mode (*p.39) MEMO IAdjusting volume of movies If tile subject of the shot is very bright, white vertical streaks or black horizontal streaks may appear in the Volume can be adjusted while playing back... -
Page 113: Using The Set-Up Menu
Using the SET-UP menu Change the setting. Open the SET=UP menu, (!",'Press MENU/OK to open the menu _'_/_ (2) Press • or • to select [] SET-UP. _3)Press II_. ,_1) Press • or • to select the menu. Change page. Different type of screen appears ,_2j= Press •. -
Page 114: Set-Up Menu Option
SET-UP How to use the SET-UP menu (*p.113) SET-UP menu option CONTINUOUS/3 SEC/ Sets the way for displaying the check image screen 1.5 SEC/ZOOM 1.5 SEC (photograph result) after taking a picture. The color (CONTINUOUS)/OFF tones in images recorded may differ from actual color. - Page 115 How to use the SET-UP menu (*p.113) B;_-_/ENGUSH/ FRANCAIS/DEUTSCH/ ESPA_OL/FALIANO/ m_/_/_ ENGLISH Specifies the language used for screen display. PYCCKH_I/PORTUGUES/ NEDERLANDS/FORKOE/ CESKY/[vtAGYAR/ PO SKI/SVENSKA 5 MIN/2 MIN/OFF 2 MIN Sets the time of turning camera off when camera not used. 1_3"/-("_ Specifies the time difference...
- Page 116 SET-UP How to use the SET-UP menu (*p.113) • Enlarging images IIMAGE DISP. Use this setting to specify the way for displaying the check image screen (photograph result) after taking a picture. Navigation screen (Current displayed image) CONTINUOUS: The results are always displayed after you shoot. Press the MENU/OK to take another picture.
- Page 117 How to use the SET-UP menu (pp.113) (_CHECK IFRAME NO. Use this function to specify whether frame numbers are assigned consecutively from previous numbers or begin Frame number again, <CONTINUOUS><RENEW> File number O00l 0001 Directory number 0_05 0005 313 /2007 10:00 AM The last 4 digits of the 7-digit number in the top right 0006...
- Page 118 SET-UP How to use the SET-UP menu (*p.113) CHECK IDIGITAL ZOOM • Optical zoom focal length* Use this function to shoot enlarged images than Approx. 38 mm to 380 mm maximum optical zoom scale, • Digital zoom focal length* Approx. 380 mm to 1824 mm Max.
- Page 119 How to use the SET-UP menu (*p.113) ILCO B R GNTNESS IPLAYBACK VOLUME Use this function to adjust volume while playing back Use this function to adjust the screen brightness, movie and voice memo, ,_) Press • or • to adjust the screen ®...
- Page 120 SET-UP How to use the SET-UP menu (*p.113) IFORMAT IAUTO POWER OFF When this function is active and the camera remains Initialize (format) the Memory Card or internal memory for use with the camera. unused for 2 or 5 minutes, it turns camera off.
- Page 121 How to use the SET-UP menu (pp.113) Move to TIME DIFFERENCE screen. ITIME DIFFERENCE Use this function when traveling to destinations different time zones. This function sets a time difference relative to the date and time currently set. When this setting is enabled, the specified time difference is applied when pictures are taken.
- Page 122 SET-UP How to use the SET-UP menu (*p.113) _v'_ CHECK Available time setting -23:45 to +23:45 (in 15-minute increments) MEMO In the time difference Ir'_E_ QN 16 setting, when you changeto ISOl_ the Photography mode, -.,L-r "13 and the date is displayed for 3 seconds, the date display turns yellow.
- Page 123 I Connecting to a TV When connecting to a TV images can be displayed on wider screen. Using slide show function (_p.93) together, you can have fun with folks. Plug the A/V cable (included) into the A/V OUT (Audio/Visual output) socket of the camera. Video (yellow) 4,,,...
- Page 124 I Using the AC power adapter (sold separately) Always use a FUJIFILM AC Power Adapter AC-5VX (sold CAUTION separately) (*p.141). • Only connect and disconnect tile AC power adapter Use the AC power adapter to prevent losing power at when the camera is off.
- Page 125 I Connecting Camera Directly to Printer -- PictBridge Function When a printer that supports PictBridge _, Connect the camera to a printer and turn the printer on. available, images can be printed by Press [] for about 1 second to turn the camera on. connecting the camera directly to the "lE_USB"appearson PictBridge-compatible...
-
Page 126: Connecting Camera Directly To Printer
Connecting Camera Directly to Printer -- PictBridge Function Specifying images for printing (PRINT WITH DATE / PRINT TOTAL :9 SHEE_ WITHOUT DATE) _4_Press MENU/OK again to download data to the printer and start printing the specified number of prints. MEMO Even if MENU/OK is pressed with total number of images set at 0 (zero), the screen printing once appears on the screen. - Page 127 Printing with DPOF setting (.D. PRINT DPOF) ,_4:, Press MENU/OK again to download data to the printer and start printing the specified frames (files) continuously. C_ CHECK {_1_ P ress DISP/BACK to open the menu. To select -c_PRINT DPOF, the DPOF settings must be ®...
-
Page 128: Pictbridge Function
Connecting Camera Directly to Printer PictBridge Function MEMO MEMO DPOF setting can be specified for images oil internal memory. CAUTION • In PictBridge function, images photographed oil other than a camera may not be printed. • The camera cannot be used to specify printer settings such as the paper size and print... - Page 129 I Installation on a Windows Pre-installation checklist • Hardware and software requirements To run this software, you must have the hardware and software described below, Check your system before you begin the installation. Windows 98 SE Windows Millennium Edition (Windows Windows 2000 Professional,:...
-
Page 130: Installation On A Windows Pc
Installation on a Windows • Recommended system Windows Windows Vista 2 GHz Pentium 4 or better recommended 3 GHz Pentium 4 or better recommended 512 MB or better recommended 1 GB or better recommended 2 GB or better 15 GB or better 1024x 768 pixels or better, Highest... -
Page 131: Cd-Rom
Do not connect the camera to your PC <_ CHECK until the software installation is For Windows Vista users: When loading the bundled CD-ROM on your PC, the completed. "AutoPlay" window may appear. In this case, click "SETU P.exe". 1 Install FinePixViewer as instructed in the When "User Account... - Page 132 I Installation on a Mac OS X Pre-installation checklist • Hardware software requirements To run this software, you must have the hardware software described below. Check your system before begin installation. Power Macintosh G3 ,:,2, PowerBook G3 ,:,2, Power Macintosh G4, iMac, iBook, Power...
- Page 133 CAUTION Turn your Macintosh on and start up Mac Formoreinformationonwhat is installed,click the [Read OS X. Do not launch any other applications. buttonand button. Me First] [Using FinePixViewer] When the bundled CD-ROM is loaded into 5 The "Authenticate" dialog appears. the CD-ROM drive, the "FinePix"...
-
Page 134: Installation On A Mac Os
Installation on a Mac OS X 13Select "Other..." from "When a camera is ImageMixer VCD2 LE for FinePix connected, open". installer automatically starts up and window showing the installation progress 14Select "FPVBridge" from "FinePixViewer" appears (Installation may take several folder in the "Applications" folder and click minutes). -
Page 135: Software For Finepix Cx
• Do not format tile Memory Card in tile camera oil the • Use the Memory Card with images taken by a FUJIFILM Digital camera. • When connecting to a PC, if the Memory Card contains large image or movie files,... -
Page 136: Connecting To A Pc
A PTP/MTP-compatible camera is a camera which can recognize the PC and printer automatically when connected. CAUTION • Always use the FUJIFILM AC Power Adapter AC-SVX The Windows CD-ROM may also be required during (sold separately). If the camera suddenly... - Page 137 Windows XP / Vista IDisconnecting the camera _1 The help message appears in the bottom-right corner Windows of your screen. This message will close when the settings are completed, No action is required, Once the image has been saved, the window below appears (Save Image Wizard window), To disconnect CAUTION...
-
Page 138: Using Finepixviewer
Connecting to a PC Using FinePixViewer ,_l,Slide the Power switch to turn the camera off. _2: _Unplug the USB cable from the camera. IMastering FinePixViewer For all information on FinePixViewer functions refer to •_:;_ USB socket "How to Use FinePixViewer" in the Help menu for details. - Page 139 IUninstalling the software Only perform this operation when you no longer require the installed software or when the software was not installed correctly. To remove FinePixViewer Windows IFinePixViewer Ver.5.3 I-'_= _1 Check that the camera is not connected to the PC, To remove the driver _2_Quit all currently running applications.
- Page 140 I System Expansion Option iiiiiiiiiiiiiiiiiiiiiiiiiiiii_ iiiiiiiiiiiiiiiiiiiiiiiiiiiiiii By using FinePix S5700 / FinePix S700 together with other optional FUJIFILM products, your system can be expanded to fill iiiiiiiiiiiiiiiiiiiiiiiiiiiiii a wide range of uses. iiiiiiiiiiiiiiiiiiiiiiiiiiiiiii Accessory availability may vary by country. Please check with your local Fujifilm representative to confirm product availability.
- Page 141 I Accessories Guide Visit the FUJIFILM site for the latest information on camera accessories. http://www.fujifilm.com/products/digital/ind ex.ht ml Accessory availability vary by country. Please check with your local Fujifilm representative to confirm product availability. xD-Picture Card Use tile following xD-Picture Cards:...
-
Page 142: Accessories Guide
Accessories Guide PC Card Adapter DPC-AD The PC Card Adapter allows tile xD-Picture Card and SmartMedia to be used as a PC Card Standard ATA-compliant (PCMCIA 2.1 ) PC card (Type Tf ). -Compatible with xD-Picture Card of 16 MB to 512 MB, and SmartMedia of 3.3 V, 2 MB to 128 MB. , This is net compatible with the SD Memory Card. -
Page 143: Using Your Camera Correctly
If any soil remains, apply • Extremely cold places a small amount of lens cleaning liquid to a piece of • Places with strong vibration FUJIFILM lens cleaning paper and wipe gently, • Places with smoke or steam •... - Page 144 I Power Supply and Batteries r_,r,r,r,r,r,_,_ i'p,__ l"41 = ._b"i 1'_ f'€¢'4_ • If you do not intend to use the camera for a long period of time, remove the batteries from the camera. Note if • In the camera, use AA-size alkaline or Ni-MH (nickel- the camera is left with the batteries removed, the time metal hydride) rechargeable batteries.
- Page 145 • To charge Ni-MH batteries, use the quick battery •As apower source indigital cameras, AA-size Ni-MH charger (sold separately). Refer to the instructions batteries (referred tohereafter as Ni-MH batteries) supplied with the charger to make sure that the charger superior toalkaline batteries inseveral...
-
Page 146: Power Supply And Batteries
FUJIFILM Digital camera. Use the Discharging rechargeable batteries function in • Turn off the FUJIFILM Digital camera before the following situations: disconnecting the cord from the FUJIFILM Digital • When the batteries only last for a short time after being camera's DC input terminal. - Page 147 To discharge rechargeable batteries: DISCHARGE OK? IT MAY TAKE A WHILE FORDISCHARGING _1_ Press [] toturn t he camera ,_7 Press •. _}_, Press MENU/OK todisplay the menu on the screen. ,_B, P ress MENU/OK. _'_) _3_:, Press • or • toselect [] SET-UP. •_X_ ,_9 Press •...
-
Page 148: Memory Card And The Internal Memory
Picture Cards other than those manufactured repairer. FUJIFILM are used. • The Memory Card may feel warm when it is removed • Using Memory Card or Internal Memory with a PC from the camera after taking pictures. - Page 149 FOCUS ERROR the lens. ZOOM ERROR • Turn the camera off and on again. If the message still appears, contact your FUJIFILM dealer. Memory Card is not inserted when transferring NO CARD Insert a Memory Card. images. • The Memory...
-
Page 150: Warning Displays
Memory Card is damaged, • Inserted Memory Card is not compatible with your • Insert a compatible Memory Card that is operation- camera. checked at FUJIFILM Corporation. MEMORY FULL The internal memory or Memory Card is full. Erase some images... - Page 151 Ifthe m essage still appears, replace the M emory Card. • Camera fault. • Contact your FUJIFILM dealer. • An a ttempt was made to play back the i mage or t he • The m ovie and image cannot be played back.
- Page 152 Warning Displays NOT SET DPOF An attempt was made to specify DPOF settings for a DPOF printing cannot be used with this image movie or an image that is not supported by DPOF. format. SET DPOF ROTATE An attempt was made to rotate a movie or an image These images...
- Page 153 I Troubleshooting • Getting ready The batteries have run out. Load new or fully charged batteries. The batteries are loaded backward. Load the batteries in the corrected direction. Nothing happens when sliding The batteries cover or slot cover is not Close the batteries cover or slot cover...
-
Page 154: Troubleshooting
Troubleshooting • Setting menu etc. • Shooting The Memory Card or internal memory is Insert a new Memory Card or erase some 22, 44 full. unnecessary frames, The Memory Card or internal memory Format the Memory Card or internal 113, not formatted. - Page 155 Cannot set the The Shooting mode is set to '_, ,_,, t,,4k, Change the Shooting mode. Macro camera to Macro £÷, @, '_*, &1, or _'. (close-up) mode. The shutter button was pressed while the Wait until the charging is completed before flash was charging.
- Page 156 Troubleshooting The lens is dirty. Clean the lens. !AF appeared when taking pictures. Check the focus on the subject and take The image )ictures. blurred. Photographed images _o appeared when taking pictures. It may cause camera shake. Hold the camera steadily.
- Page 157 • Playing back The camera volume is set too low. Adjust the volume. 104, 112, 113, The camera does Playing back The microphone was blocked during Take care net to block the microphone movie / voice not emit any shooting/recording, during shooting/recording.
- Page 158 Troubleshooting • Connecting The camera is not connected to the TV Connect the camera and TV correctly. correctly. The included A/V cable was connected After the movie playback mode is stopped, 111, There is no image during movie playback. connect the camera and TV correctly.
- Page 159 AC power adapter. Then reload The camera batteries or reconnect the AC power longer works adapter and try again. If you think the 124, correctly. camera is faulty, contact your FUJIFILM dealer. &...
-
Page 160: Specifications
7.1 million pixels 1/2.5-inch Storage media Internal memory (approx. 27 MB)/xD-Picture Card (16/32/64/128/256/512 MB/1 GB/2 GB)/SD Memory Card (FUJIFILM recommendation (*p.22)) File format Still image: DCF-compliant Compressed: Exif ver.2.2 JPEG, DP©F-compatible ,',,Design rule for Camera File System compliant/DPOF compatible Movie:... - Page 161 Sensitivity AUTO/Equivalent to I SO 64/100/200/400/800/1600 (Standard output sensitivity) Photometry TTL 256-zones metering Multi, Spot, Average Exposure control Program AE (When using P mode : Program Shift is enabled)/Shutter priority AE/Aperture priority Manual exposure Scene position (NATURAL LIGHT), (NATURAL & _), _ (PORTRAIT), At, (LANDSCAPE), "4&...
- Page 162 Specifications White balance Automatic scene recognition/Preset (Fine, Shade, Fluorescent (Daylight), Fluorescent (Warm White), Fluorescent (Cool White), Incandescent)/Custom Self-timer Approx. 2 sec./lO sec. Flash type Popping the flash up automatically Effective range: 800): approx. 50 cm-6.2 m (1.6 ft.-2O ft.) (Macro): approx.
- Page 163 Power supply Use one of the following: • 4x AA-size alkaline batteries • 4x AA-size Ni-MH (Nickel-Metal Hydride) batteries (sold separately) • AC Power Adapter AC-SVX (sold separately) Guide to the number available frames for battery operation According to the CIPA (Camera &...
- Page 164 Specifications • Standard number of available frames/recording time per xD-Picture Card, SD Memory Card and internal memory The number of available frames, recording time or file size varies slightly depending on the subjects photographed. Note also that the divergence between standard number of frames and the actual number of frames is greater for Memory Card with higher capacities.
-
Page 165: Owner's Manual (This Manual)
These specifications are subject to change without notice. FUJIFILM shall not be held liable for damages resulting from errors in this Owner's Manual. ,'., T he LCD monitor on your digital camera is manufactured using advanced high-precision technology. Even so, small bright points and anomalous colors (particularly around text) may appear on the monitor. - Page 166 I Explanation of Terms Deactivated batteries Leaving an Ni-MH battery unused in storage for a long period may cause a rise in the level of substances that inhibit current flow inside the battery and result in a dormant battery, A battery in this state is referred to as deactivated. Because current flow is inhibited in a deactivated Ni-MH battery, the battery's original level of performance cannot be achieved,...
- Page 167 White Balance Whatever the kind of the light, the human eye adapts to it so that a white object still looks white, On the other hand, devices such as digital cameras see a white subject as white by first adjusting the color balance to suit the color of the ambient light around the subject.
- Page 168 I FUJIFILM Digital Camera Worldwide Network If you have technical questions or if you need repair service, ask the following local distributor. Please present the warranty card and your purchase receipt when you ask for repairs. Refer to the warranty card for conditions of the warranty.
- Page 169 Color B.A. Pablo Bermudez 111 Apartado 3794 - Esq. Arequipa - Lima 11 Technical support & TEL +51 14 33 5563 FAX +51 14 33 7177 jalvarado@fujifilm.com.pe Repair service Uruguay Fotocamara S.B.L. Cuareim 1439, montevideo, Uruguay Technical support &...
-
Page 170: Fujifilm Digital Camera Worldwide Network
France FUJIFILM France 2, Avenue Franklin, 78186 Saint-Quentin en Yvelines, France Technical support & FAX 33 1 01 30 58 58 65 direction.technique@fujifilm.fr Repair service Germany FUJIFILM Europe GmbH Heesenstr. 70, 40549 DOsseldod Technical support & International call TEL +49 211 50890 FAX +49 211 5089668 service@fujifilm.de... - Page 171 Slovakia Pribylinska 2,831 04 Bratislava, Slovakia Technical support TEL 00421 2 44 888 077 FAX 00421 2 44 689 300 fujifilm@fujifilm.sk Repair service FIS Tatracentrum, Hodzovo nam. 4 - Tatracentrum, 811 06 Bratislava, SIovakia TEL 00421 2 54 647 347 fis.tatracentrum@stonline.sk...
- Page 172 Camera Worldwide Network Sweden Fujifilm Sverige Sveav&gen 104 35 Stockhokn Technical support TEL 46 8 506 141 76 FAX 46 8 506 142 09 kamera@fujifilm.se Repair service Sveav&gen 104 35 Stockholm TEL46850651354 FAX46850651354 kameraverkstaden@fujifilm.se Switzerland Fujifilm (Switzerland) Niederhaslistrasse 12, 8157 Dietlikon,...
- Page 173 Kenya Fuji Kenya Ltd P.O.Box 41669-00100, Fuji Plaza, Chiromo Road, Nairobi, Kenya. Repair service TEL (254-20)4446265-8 FAX (254-20)4448515 / 7 info @fujifilm.co.ke Australia FUJIFILM Australia Pty Ltd Locked Bag 5100, Brookvale, NSW, 2100 Technical support & TEL 1800 226 355 FAX +61 (2) 9466 2854 digital@fujifilm.com.au...
- Page 174 24 Sto. Domingo St., Quezon City 1100, Philippines TEL 632-7436601-06 FAX 632-7324661 tech services@ykicolor.com Singapore FUJIFILM (Singapore) Pte Ltd 10 New Industrial Road Fujifilm Building Singapore 536201 Technical support & TEL 65-6380 5557 FAX 65-6281 3594 service@fujifilm.com.sg Repair service South Korea...
- Page 175 Do not use the camera when it has been action that must be performed ('Required"). illed circles with an exclamation mark tell you an This can cause a fire or electric shock. • Contact your FUJIFILM dealer. Do not disassemble.
-
Page 176: Safety Notes
Do not store the batteries with metallic (_'_ If the cord is damaged, contact your FUJIFILM dealer. products. Do not use chargers other than the Do not place the camera on an unstable specified model to charge the batteries. - Page 177 Do not use this camera in locations When discarding or storing batteries, cover the battery terminals with affected by oil fumes, steam, humidity or dust. insulation tape. This can cause a fire or electric shock. Contact with other metallic objects batteries could cause the batteries to ignite...
- Page 178 Request regular internal testing and cleaning for your camera. Build-up of dust in your camera can cause a fire or electric shock. /.'k Contact your FUJIFILM dealer to request internal cleaning every 2 years. Please note this is not a free of charge service.
- Page 179 FLiJIFiLm FUJIFILM Corporation 7-3, AKASAKA 9-CHOME, MINATO-KU, TOKYO 107-0052, JAPAN http://www.fujifilm.com/products/digital/ Y/Y-709103 Printed in Indonesia 1AG6P1P3429-A...