Table of Contents
Advertisement
Available languages
Available languages
Owner's
Manual
CRAFTSMAN°
6.25 Horsepower
Power-Propelled
22" Side Discharge
Model No.
917.379100
Espahol, p. 18
CAUTION:
Read and follow all
Safety Rules and Instructions
before operating this equipment
Sears, Roebuck and Co., Hoffman Estates, IL 60179
Visit our Craftsman website: www.sears.com/craftsman
U.S.A.
Advertisement
Table of Contents

Related Manuals for Craftsman 917.379100


Summary of Contents for Craftsman 917.379100
- Page 1 CRAFTSMAN° 6.25 Horsepower Power-Propelled 22" Side Discharge Model No. 917.379100 Espahol, p. 18 CAUTION: Read and follow all Safety Rules and Instructions before operating this equipment U.S.A. Sears, Roebuck and Co., Hoffman Estates, IL 60179 Visit our Craftsman website: www.sears.com/craftsman...
- Page 2 Sears Service ......Back Cover LIMITED TWO YEAR WARRANTY ON CRAFTSMAN POWER MOWER For two years from date of purchase, when this Craftsman Lawn Mower is maintained, lubricated, and tuned up according to the operating and maintenance instructions in the...
- Page 3 L GENERAL OPERATION Always wear safety goggles or safety glasses with side shields when operating * Read, understand, and follow all mower. instructions on the machine and in the manual(s) before starting. Be thoroughly H. SLOPE OPERATION familiar with the controls and the proper Slopes are a major factor...
- Page 4 Neverfill containersinside a vehicle,on Keepnuts and bolts, especially blade a truck or trailerbed with a plasticliner. attachmentbolts, tight and keepequip- Alwaysplace containerson the ground ment in good condition. awayfrom your vehicle beforefilling. Nevertamper with safety devices.Check Removegas-poweredequipmentfrom their proper operationregularly. the truck or trailer and refuel it on the Keepmachinefree of grass, leaves,or ground.
- Page 5 Repair Protection Agreements Congratulations on making a smart pur= Fast help by phone = phone support chase. Your new Craftsman® product from a Sears technician on products designed and manufactured for years requiring in-home repair, plus conve- dependable operation. But like all prod- nient repair scheduling.
- Page 6 Read these instructions and this manual HOW TO SET UP YOUR MOWER its entirety before you attempt to assemble TO UNFOLD HANDLE or operate your new lawn mower. mMPORTANT: Unfold handle carefully mMPORTANT: This lawn mower is shipped as not to pinch or damage control cables.
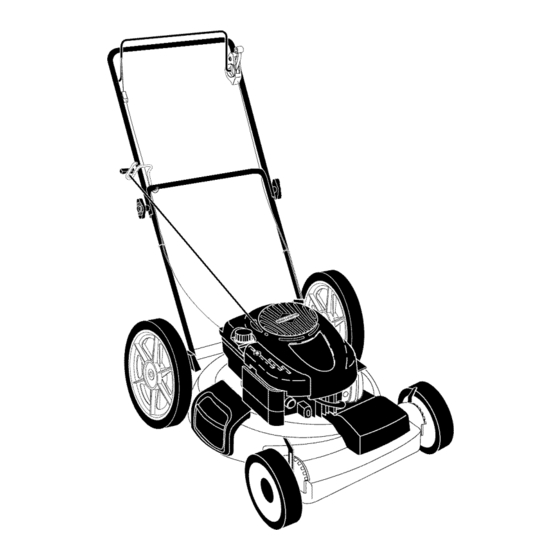
- Page 7 KNOWYOUR LAWN MOWER READ THIS OWNER'S MANUAL AND ALL SAFETY RULES BEFORE OPERATING YOUR LAWN MOWER. Compare the illustrations with your lawn mower to familiarize yourself with the location of various controls and adjustments. Save this manual future reference. These symbols may appear on your...
- Page 8 TO ADJUST CUTTmNG HEmGHT The operationof any lawn Raise wheels for low cut and lower wheels SA_ETYGLASSES mowercan result in foreign objectsthrown into the for high cut, adjust cutting height to suit eyes, which can result in your requirements. Medium position best for most lawns.
- Page 9 CAUTmON: Alcohol blended fuels (called gasohol or using ethanol or metha- nol) can attract moisture which leads to separation and formation of acids during storage. Acidic gas can damage the fuel system of an engine while in storage. avoid engine problems, the fuel system should...
- Page 10 MOWING TiPS MULCHING MOWING TiPS ,, Under certain conditions,such as very iMPORTANT: For best performance, tall grass, it may be necessaryto raise keep mower housing free of built-up the height of cut to reduce pushing grass and trash. See "CLEANING" in the effort and to keep from overloading Maintenance...
- Page 11 MAINTENANCE BEFORE AFTER EVERY EVERY EVERY BEFORE EACH EACH 25HOURS SCHEDULE HOURS OR SEASON HOURS STORAGE Check for Loose Fasteners Clean / Inspect Grass Catcher Check Tires Check Drive Wheels Clean Lawn Mower ..Clean under Drive Cover *** Check Drive Belt / Putleys *** Check / Sharpen / Replace Blade...
- Page 12 LAWN MOWER Poskion blade on the blade adapter aligning the two (2) holes in the blade Always observe safety rules when per- with the raised lugs on the adapter. forming any maintenance. Be sure the trailing edge of blade (oppo- site sharp edge) is up toward engine.
- Page 13 GEAR CASE Stop adding oil when you reach FULL mark on the dipstick. Wait a To keep your drive system working minute to allow oil to settle. properly, the gear case and area around Continue adding small amounts of oil, the drive should be kept clean and free rechecking...
- Page 14 MUFFLER Clean the underside of your lawn mower Inspect and replacecorroded muffler as it by scraping to remove build-up of grass and trash. could create a fire hazardand/or damage. Clean engine often to keep trash from accumulating. A clogged engine runs SPARK PLUG hotter and shortens...
- Page 15 5. Squeezelower handle in and position holes onto mountingpins on handle ENGINE SPEED bracket. Your engine speed has been factory set. 6. Reassembleupper handleand all Do not attempt to increase engine speed parts removedfrom lower handle. or it may result in personal injury.
- Page 16 found on stabilizer container. Run engine SQUEEZE at least 10 minutes after adding stabilizer TO FOLD to allow the stabilizer to reach the car- Lower handle _'_-_" buretor. Do not empty the gas tank and carburetor if using fuel stabilizer. ENGINE Drain oil (with engine warm)
- Page 17 TROUBLESHOOTING o See appropriate section in manuam unmess directed Repair to a Sears Parts & Center. CORRECTmON PROBLEI_I CAUSE Does not start Control bar defective. Replace control bar. 10. Turn fuel valve lever (continued) 10. Fuel valve lever (if so equipped) in OFF position.
- Page 18 Programa de Mantenimbnto ......GARANTiA LUMUTADADE DOS ANOS PARA LA SEGADORA A MOTOR CRAFTSMAN Por dos (2) a_os, a partir de Uafecha de compra, cuando esta Segadora Craftsman se mantenga, Uubrique y afine segun Uasinstrucciones para Uaoperaci6n y eUmantenimbnto en eUmanuaU deU due_o, Soars reparara"...
- Page 19 L OPERACION Siempre use gafas de seguridad o anteojos con protecci6n lateral cuando opere la sega- ° Antes de empezar, debe famHiarizarse dora. compUetamente con UoscontroUes y eUuso correcto de Uamaquina. Para esto, debe Ueer y comprender todas Uasinstrucciones HoOPERAClON SOBRE LAS CUESTAS aparecen en ]a maqu[na yen ]os manuaUes Los accidentes ocurren con mas frecuencia en...
- Page 20 o Nunca repostar la maquina al interior de un o Mantenga las tuercas y los pernos, espeo local. cialmente los pernos del accesorio de la Nunca guardar la maquina o el contenedor cuchilla, apretados y mantenga el equipo en buenas condicione& de gasolina donde hay una llama abierta, chispa o luz piloto como una caldera u otros Nunca manipule de forma indebida los...
- Page 21 Ayuda r_pida pot tei6fono - soporte te[e= nuevo producto Craftsman® est,. disefiado fan[co per parte de un t6cn[co Sears sobre y fabricado para funcionar de mode fiabUe per productos que requieren un arreglo en casa, muchos aSos.
- Page 22 COMO PREPARAR SU SEGADORA Lea estas instrucciones y este manual comple° tamente antes de tratar de montar u operar su PARA DESDOBLAR EL MANGO segadora nueva. IMPORTANTE: Despliegue el mango con IMPORTANTE: Este cortac6sped viene SiN mucho cuidado para no pellizcar o da_ar los ACEITE O GASOLINA en el motor.
- Page 23 FAMmUARICESE CON SU SEGADORA LEA ESTE MANUAL DEL DUENOY LAS REGLAS DE SEGURIDAD ANTES DE OPARAR SU SEGADORA. Compare las ilustraciones con su segadora para familiarizarse con la ubicaci6n de los diversos controles y ajustes. Guarde este manual para referencia en el futuro. Estos s_mbolos pueden apareser sobre su segadora o en la literatura proporcionada...
- Page 24 PARA AJUSTAR LA ALTURA DE CORTE La operaci6n de cuaUquier Levante las ruedas para el corte bajo y baje las segadora puede hacer que ruedas para el corte alto., ajuste la altura de saUten objetos extra_os dentro de corte para que se acomode a sus requisitos. La sus ojos, Uoque puede producir posici6n del medic es la mejor para la mayoria da_os graves en 6stos.
- Page 25 _PRECAUCKSN: Los combustibles mezciados con alcohol (conocidos como gasohol, o el uso de etanol o metanol) pueden atraer Hahumedad, Haque conduce a Ha separaci6n y formaci6n de acidos durante el aimacenamiento. La gasolina acidica puede daSar el sistema del combustible de un motor durante el aimacenamiento.
- Page 26 CONSEJOS PARA SEGAR CONSEJOS PARA SEGAR Y ACOLCHAR o Bajo cbrtas condbiones, taUcomo c6sped IMPORTANTE: Para obtener el mejor muy auto, puede ser necesario eUebvar Ua rendimiento mantenga la caja de la segadora aUtura deUcorte para reducir eUesfuerzo sin acumulacion de cesped y basur& Vea necesano para empujar Uasegadora y para "LIMPIEZA"...
- Page 27 PROGRAMA ANTES DESPUES CADA CADA CADA ANTES DEL DE CADA DE CADA 25HORAS ALMACE- MANTENIMIENTO HORAS TEMPORADA HORAS NAMmENTO Revisar si hay Sujetadores Sueltos Limpiar/Inspeccionar el Recogedor de C6sped * Controlar los Neumaticos Controlar las Ruedas Motrices *** Limpiar la Segadora ..
- Page 28 SEGADORA Ponga la cuchilla en el adaptador de 6sta alineando los dos (2) agujeros en la cuchilla Siempre observe UasregUas de seguridad cuo con las salientes elevadas en el adaptador. ando haga eUmantenimiento. Asegurese de que el borde de salida de LLANTAS la cuchilla (opuesto al borde afilado) est6 o Mantenga UasHantas sin gasoHna, aceite o...
- Page 29 CAJADEENGRANAJES Parar de afadir aceite cuando se alcanza la o Paramantener e [sistema de[mpuUsi6n seffal de Ileno (FULL) en lavarilla. Esperar un funcionando e nformaadecuada, [acaja minuto para dejar que el aceite se arregle. deengranajes y e[AreaaUrededor de[a Continue agregando cantidades pequeas [mpuUsi6n tienenquemantenerse H mpias y de aceite y vuelva a inspeccionar...
- Page 30 SILENCIADOR burador queden mirando hacia ardba. Limpb Unspeccione y cambb eUsHenciador si esta [a parte inferior de su segadora rasp_.ndoUa corroido puede producir un peHgro de incendio para remover UaacumuUaci6n de c6sped y basura. y/o daSo. o Limpb el motor a menudo para evitar que BUJ[A se acumub la basura.
- Page 31 I_IOTOR VELOCIDAD DEL MOTOR La velocidad del motor ha sido ajustada en la fabrica. No trate de aumentar la velocidad del motor pues se pueden producir lesiones personales. Si cree que el motor esta funcio- nando demasiado rapido o demasiado lento, Heve su segadora a mas con su centro de servicio Sears o con un otto centro de servicio cuaHficado.
- Page 32 tanque de combustible o en el envase para el APRIETE PARA DOBLAR almacenamiento. Siempre siga la proporci6n de mezcla que se encuentra en el envase del estabio lizador. Haga funcionar el motor por Io menos 10 Mango inferior minutos despues de agregar el estabilizador, para permitir que este llegue al carbu rador.
- Page 33 PROBLE_IA CAUSA CORRECCm6N No arranca 11. Bateria d6bi (si equipada). 11. Cague Habateria. (continuado) 12. Desconecte eHconector 12. Conecte Habateria aMmotor. de Habateria (si equipada). Faita de Eieve Haaitura de corte. CuchHia desgastada, dobiada fuerza o sueita. Eleve la altura de corte. Aitura de Hasruedas dispareja.
- Page 34 [_23...
- Page 35 CRAFTSMAN ROTARY LAWN MOWER o - MODEL NUMBER 917.379100 PART PART DESCRIPTION DESCRmPTION 166860X479 150406 Screw, Hex Head, Threaded, Roiled 3/8-16 x 1-1/8 Upper Handle 156581 152124 Engine Zone Control Cable Spring, Torsion 66426 Wire Tie 73800400 Locknut, Hex 136376...
- Page 37 CRAFTSMAN ROTARY LAWN MOWER o - MODEL NUMBER 917.379100 PART PART DESCRIPTION DESCRIPTION 184588 Drive Control Assembly 701037 Knob, Selector 88058 Drive Cover Bearing, Wheel Adjuster 154990 143603 Screw, Tapping, Pan Head #10-24 x 2-3/4 132010 Locknut, Hex 158755 Screw, Machine, Pan Head 1/4-20 x 2-3/16...
- Page 38 CRAFTSMAN ROTARY LAWN MOWER -- MODEL NUMBER 917.379100 GEAR CASE ASSEMBLY - - PART NUMBER 187211 PART DESCRiPTiON 183497 Case, Lower 183498 Case, Upper 183499 Gear, 27Teeth 183500 Lever, Clutch 183501 Spring, Return 183502 Shaft, hput 183503 Dog, Movable 183504...
- Page 39 BRmGG$ & $TRATTON 4=CYCLE ENGmNE MODEL NUMBER 123K02-0313-E1 1019 LABEL KI'I 1 383_ 718_ 868 40 4_ 307_ 32A_...
- Page 40 BRIGG$ & $TRATTON 4=CYCLE ENGINE MODEL NU_'IBER 123K02-0313-E1 443_ 970_ 977 CARBURETOR 633 @ GASKET SET 365_ 7_633 276_ 276_(-_ 127_ 121 CARBURETOR OVERHAUL 276_ 127_...
- Page 41 BRJGG$ & $TRATTON 4=CYCLE ENGINE MODEL NUMBER 123K02-0313-E1 363_ 6o81 592_ 456@ 597_ 1036 EMISSIONS LABEL...
- Page 42 BRmGGS & STRATTON 4=CYCLE ENGmNE MODEL NUMBER 123K02-0313-E1 358 ENGINE GASKET 3© 617_ I 1329 REPLACEMENT ENGINE I 1330 REPAIR MANUAL I 6150 692"_21_._ 505 ° MANUAL OWNER'S PART PART DESCRiPTiON DESCRmPTmON Lock-Piston Pin 691866 697322 Cylinder Assembly Pin-Piston 499423 399269 Kit-Bushing/SeaI 299819...
- Page 43 BRmGGS & STRATTON 4=CYCLE ENGmNE MODEL NUMBER 123K02-0313-E1 PART PART DESCRiPTiON DESCRmPTmON 690837 Screw (Rewind Starter) 690800 Nut (Rewind Starter) 691108 Screw (Flywheel Guard) 691696 Screw (Pawl Friction Plate) 691740 Lock-Muffler Screw 95162 Clamp-Hose Cover-Control 691636 Screw (Throttle Valve) 698588 696565 Shaft-Throttle 497680...
- Page 44 Your Home For repair - in your home - of all major brand appliances, lawn and garden equipment, or heating and cooling systems, no matter who made it, no matter who sold it! For the replacement parts, accessories owner's manuals that you need to do-it-yourself. For Sears professional installation of home appliances...
Need help?
Do you have a question about the 917.379100 and is the answer not in the manual?
Questions and answers
Need to know what air filter I need
The compatible air filter for Craftsman part number 917.379100 is a paper cartridge type. Replace it after 100 hours of operation or more often in dusty conditions.
This answer is automatically generated