Table of Contents
Advertisement
Available languages
Available languages
Owner's Manual
®
OTARY LAWN
160cc Honda Engine
Power-Propelled
22" Multi-Cut
MOWER
Model No.
917.370601
• EspaSol, p. 20
CAUTION'.
Read and follow all
Safety Rules and Instructions
before operating this equipment
Sears Brands Management Corp., Hoffman Estates, IL 60179
Visit our Craftsman website: www.sears.com/craftsman
U.S.A.
Advertisement
Table of Contents

Related Manuals for Craftsman 917.370601


Summary of Contents for Craftsman 917.370601
- Page 1 160cc Honda Engine Power-Propelled 22" Multi-Cut Model No. 917.370601 • EspaSol, p. 20 CAUTION'. Read and follow all Safety Rules and Instructions before operating this equipment U.S.A. Sears Brands Management Corp., Hoffman Estates, IL 60179 Visit our Craftsman website: www.sears.com/craftsman...
- Page 2 7-11 Repair Parts ........38-47 Maintenance Schedule ......Sears Service ......Back Cover CRAFTSMAN 2=YEAR FULL WARRANTY For TWO YEARS from the date of purchase, this product is warranted against any defects in material or workmanship. Defective product will receive free repair or replacement if repair is unavailable.
- Page 3 I. GENERAL OPERATION • Always wear safety goggles or safety glasses with side shields when operating • Read, understand, and follow all mower. instructions on the machine and in the manual(s) before starting. Be thoroughly II. SLOPE OPERATION familiar with the controls and the proper Slopes are a major factor related to slip &...
- Page 4 • Never fill containers inside a vehicle, on • Keep nuts and bolts, especially blade a truck or trailer bed with a plastic liner. attachment bolts, tight and keep equip- Always place containers on the ground ment in good condition. away from your vehicle before filling.
- Page 5 Repair Protection Agreements Congratulations on making a smart pur- • Fast help by phone- phone sup- chase. Your new Craftsman® product is port from a Sears representative designed and manufactured for years of products requiring in-home repair, plus dependable operation.
- Page 6 Read these instructions and this manual in its entirety before you attempt to assemble or operate your new lawn mower. IMPORTANT: This lawn mower is shipped WITHOUT OIL OR GASOLINE in the engine. Your new lawn mower has been assembled at the factory with the exception of those parts left unassembled for shipping purposes.
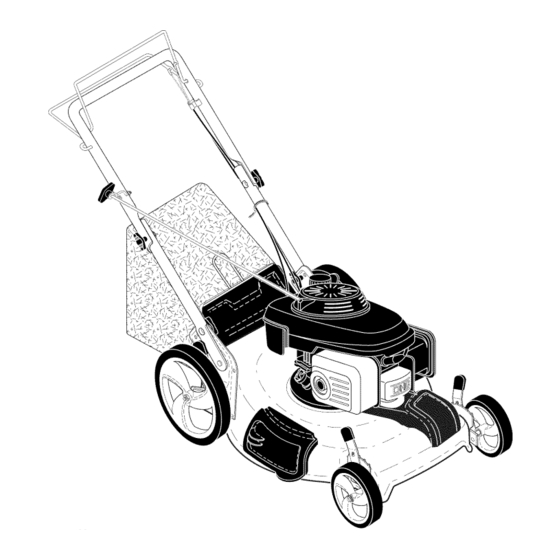
- Page 7 KNOW YOUR LAWN MOWER READ THIS OWNER'S MANUAL AND ALL SAFETY RULES BEFORE OPERATING YOUR LAWN MOWER. Compare the illustrations with your lawn mower to familiarize yourself with the location of various controls and adjustments. Save this manual for future reference. These symbols may appear on your lawn mower or in literature supplied with the...
- Page 8 TO ADJUST CUTTING HEIGHT The operation of any lawn Raise wheels for low cut and lower wheels SAFETY GLASSES mower can result in foreign objectsthrowninto the eyes, for high cut, adjust cutting height to suit whichcanresultinsevereeye your requirements. Medium position is best for most lawns.
- Page 9 TO EMPTY GRASS CATCHER To convert to mulching or bagging operation, discharge deflector must be 1. Lift up on grass catcher using the removed and mulcher door must be frame handle. closed and locked. Remove grass catcher with clippings from under lawn mower handle. Empty clippings from bag using both frame handle and bag handle.
- Page 10 TO STOP ENGINE ADD GASOLINE • Fill fuel tank to bottom of tank filler neck. * To stop engine, release operator pres- ence control bar. Wait until blade and Do not overfill. Use fresh, clean, regular unleaded gasoline with a minimum of all moving parts have stopped and turn 87 octane.
- Page 11 MOWING TiPS MULCHING MOWING TiPS _, CAUTION: Do not use de-thatcher IMPORTANT: For best performance, blade attachments on your mower. Such keep mower housing free of built-up attachments are hazardous, will damage grass and trash. See "CLEANING" in the Maintenance section of this manual.
- Page 12 MAINTENANCE BEFORE A FTER EVERY EVERY EVERY BEFORE EACH EACH 25 HOURS SCHEDULE USE USE HOURS OR SEASON HOURS STORAGE Check for Loose Fasteners _ Clean / Inspect Grass Catcher * Check Tires _ Check Drive Wheels Clean Lawn Mower ..M Clean under Drive Cover *** O Check Drive Belt / Pulleys *** Check / Sharpen / Replace Blade...
- Page 13 LAWN MOWER IMPORTANT: To ensure proper assembly, center hole in blade must align with star Always observe safety rules when per- on blade adapter. forming any maintenance. 3. Be sure trailing edge of blade (opposite TIRES sharp edge) is up toward the engine. •...
- Page 14 GRASS CATCHER 1. Disconnect spark plug wire from spark plug and place wire where it cannot The grass catcher may be hosed with come in contact with plug. water, but must be dry when used. 2. Remove oil fill cap/dipstick; lay aside Check your grass catcher often for dam- on a clean surface.
- Page 15 TO CLEAN AIR FILTER out. Water in engine can result in short- 1. Remove cover. ened engine life. WATER WASHOUT FEATURE 2. Carefully remove cartridge. 3. Clean by gently tapping on a flat sur- Your lawn mower is equipped with a fitting face.
- Page 16 A WARNING: To avoid serious injury,before performing any service and adjustments: 1. Releasecontrol bar and stop engine. 2. Make sure the blade and all moving parts have completely stopped. 3. Disconnectspark plug wire from spark plug and place wire where it cannot come in contact with plug.
- Page 17 ENGINE SPEED CARBURETOR Your engine speed has been factory set. Your carburetor is not adjustable. If your Do not attempt to increase engine speed engine does not operate properlydue or it may result in personal injury. If you to suspected carburetor problems, take believe that the engine is running too fast your lawn mowerto a Sears or other or too slow, take your lawn mowerto a...
- Page 18 ENGINE ENGINE OIL FUEL SYSTEM Drain oil (with engine warm) and replace with clean engine oil. (See "ENGINE" IMPORTANT: It is important to prevent the Maintenance section of this manual). gum deposits from forming in essential fuel CYLINDER system parts such as carburetor, fuel filter, 1.
- Page 19 PROBLEM CAUSE CORRECTION Rear of lawn mower Loss of power 1. Raise cutting height. housing or cutting blade dragging in heavy grass. Cutting too much grass. 2. Raise cutting height. Dirty air filter. 3. Clean/replace air filter. 4. Clean underside of mower Buildup of grass, leaves, and trash under mower.
- Page 20 Esta garantia SOLO cubre defectos de material y mano de obra. La cobertura de la garantia NO incluye: •...
- Page 21 I. OPERACION • Siempre use gafas de seguridad o anteojos con protecci6n lateral cuando opere la sega- • Antes de empezar, debe familiarizarse dora. completamente con los controles y el uso correcto de la maquina. Para esto, debe leer II. OPERACION SOBRE LAS CUESTAS y comprender todas las instrucciones que...
- Page 22 • Nuncarepostar l a m_.quina a l interior de un • Mantenga lastuercasy lospernos, e spe- local. cialmente lospernosdelaccesorio de la • Nunca guardarla m_.quina o el contenedor cuchilla, a pretados y mantenga el equipoen buenascondiciones. de gasolina dondehayunallamaabierta, chispao luzpilotocomounacalderau otros •...
- Page 23 Reparaci6n Congratulaciones por su buena compra. • Ayuda rapida pot telefono - soporte tele- nuevo producto Craftsman® estb. disehado f6nico pot parte de un representante Sears y fabricado para funcionar de modo fiable pot sobre productos que requieren un arreglo en muchos ahos.
- Page 24 Lea estas instrucciones y este manual completamente antes de tratar de montar u operar su sega- dora nueva. IMPORTANTE: Este cortac_sped viene SIN ACEITE O GASOLINA en el motor. Su segadora nueva ha sido montada en la f_.brica con la excepci6n de aquellas partes que se de- jaron sin montar por razones de env[o.
- Page 25 FAIVllLIARICESE CON SU SEGADORA LEA ESTE MANUAL DEL DUENO Y LAS REGLAS DE SEGURIDADANTES DE OPARAR SU SEGADORA. Compare las ilustraciones con su segadora para familiarizarse con la ubicaci6n de los diversos controles y ajustes. Guarde este manual para referencia en el futuro. Estos simbolos pueden apareser sobre su segadora o en la literatura proporcionada...
- Page 26 PARA AJUSTAR LA ALTURA DE CORTE Laoperaci6n de cualquier s e- gadorapuedehacerquesalten Levante las ruedas para el corte bajo y baje las ruedas para el corte alto., ajuste la altura de objetosextrahos dentrodesus ojos,Ioquepuedeproducir corte para que se acomode a sus requisitos. La posici6n del medio es la mejor para la mayoria dahosgravesen_stos.Siempre de los c6spedes.
- Page 27 Paraconvertir a laoperaci6n de ensacado PARA VACIAR EL RECOGEDOR o dedescarga, e l desviador d e la descarga ClaSPED debeset removido y la protecci6n contrala Levante el recogedor de c6sped usando el descarga debeestarcerrada y trabado. mango del bastidor. Remueva el recogedor de c_sped, con los recortes, de debajo del mango de la sega- dora.
- Page 28 AGREGUE GASOLINA PARA PARAR EL MOTOR • Llene el estanque de combustible hasta la _,--Para parar el motor y si no intenta ponerlo en parte inferior del cuello de relleno del es- marcha de nuevo, alivie la barra de control tanque de gasolina.
- Page 29 CONSEJOS PARA SEGAR CONSEJOS PARA SEGAR Y ACOL- _PRECAUCl6N: No utilizar dispositivos anti- CHAR paja de la hoja en la segadora ya que estos iMPORTANTE: Para obtener el mejor accesorios son peligrosos, pueden dahar su rendimiento mantenga la caja de la segadora segadora y anular su garanfia.
- Page 30 PROGRAMA ANTES DESPUES CADA CADA CADA ANTES DEL DE CADA DE CADA 25 HORAS O ALMACE- MANTEN|M|ENTO HORAS TEMPORADA HORAS NAMIENTO Revisar si hay Sujetadores Sueltos Limpiar/Inspeccionar el Recogedor de Cesped Controlar los Neumaticos Controlar las Ruedas Motrices Limpiar la Segadora ..
- Page 31 SEGADORA Ponga la cuchilla en el adaptador. IMPORTANTE: Para asegurar la instalacion ap- Siempre observe las reglas de seguridad cu- ropiada, posicione el agujero central de la cuchilla ando haga el mantenimiento. con la estrella del conjunto del adaptador. LLANTAS AsegOrese de que el borde de salida de •...
- Page 32 RECOGEDOR DE ClaSPED Desconecte el alambre de la buj[a y • El recogedor de c_sped puede ser rociado p6ngalo de modo que no pueda entrar en contacto con _sta. con el agua de la manguera pero tiene que estar seco cuando se vaya a usar. Remueva la tapa del dep6sito del aceite;...
- Page 33 PARA LIMPIAR ELFILTRO DEAIRE DERRUBIO DEL AGUA 1. Remuevalacubierta. Su cortac_spedes de c_sped se equipa de una 2. Cuidadosamente, remueva el cartucho. guarnici6n que permita la limpieza rb.pida y fb.cil del superficie inferior de la cubierta. Para utilizar 3. Limpielo golpe_.ndolo suavemente e nuna superficie plana.
- Page 34 _,ADVERTENCiA: Paraevitarlesi6nes serias,antesde darcalquier s ervico o de hacerajustes: 1. Sueltelabarrade control y pareel motor. 2. AsegOrese quela cuchilla y quetodaslaspartesmovibles se hayandetenido completamente. 3. Desconecte e l alambre de la buj[ay p6ngalo en dondenopuedaentrarencontacto con6sta. 6. ReJnstale l a fijadordela correay cubierta SEGADORA de laimpulsi6n.
- Page 35 VELOCIDAD DEL MOTOR CARBURADOR La velocidad del motor ha sido ajustada en Su carburador tiene un chorro principal fijo no la fb.brica. No trate de aumentar la velocidad ajustable para controlar la mezcla. Si su motor no est,. funcionando en forma adecuada debido del motor pues se pueden producir lesiones personales.
- Page 36 ACEITE DEL MOTOR MOTOR Drene el aceite (con el motor caliente) y cb.mbielo SISTEMA DE COMBUSTIBLE con aceite de motor limpio. (Vea "MOTOR" en la iMPORTANTE: Es importante evitar que secci6n de Mantenimento de este manual.) se formen depositos de coma en partes fundamentales del sistemade combustible tales...
- Page 37 SOLUCION DE PROBLEMAS - Yea ia seccion apropiada en el manual amenos este dirigido a un centro de servico Sears. CAUSA PROBLEMA CORRECClON Falta de Eleve la altura de corte. Cuchilla desgastada, doblada fuerza o suelta. Eleve la altura de corte. AItura de las ruedas dispareja.
- Page 38 96 84 54 65...
- Page 39 CRAFTSMAN ROTARY LAWN MOWER - - MODEL NUMBER 917,3"/0601 PART PART PART DESCRIPTION DESCRIPTION DESCRIPTION 427615X479 420019 MulcherDoor 17411312 Screw, Hex Washer Head Upper Handle 420939 419946X615 Pivot Bracket #13 x 3/4 Engine Zone Control Cable 429930X004 Locknut, Hex 5/16-18...
- Page 40 13 12...
- Page 41 CRAFTSMAN ROTARY LAWN MOWER - - MODEL NUMBER 917,3"/0601 PART PART DESCRIPTION DESCRIPTION 424919 Drive Control Cable 443262 Drive Pulley V-Belt 194185X428 Bar, Drive Control 196853 194231X460 Wheel & Tire Assembly, Front 431142 Wheel Adjuster Assembly, LH 12000058 E-Ring (Includes Bearing, Key #17)
- Page 42 HONDA 4-CYCLE ENGINE MODEL NUMBER GCV160-LAOS3A CRANKSHAFT CYLINDER BARREL _" ® 3/8 24UNF 2B TAP _86,7 135,7-- CARBURETOR I "1"_. I,+-+ ,N._ ,---- _Z:_ RECOIL STARTER ____L___+ -2o% I _2 .._o._ i__+_-+--...
- Page 43 HONDA 4=CYCLE ENGINE MODEL NUMBER GCV160-LAOS3A CYLINDER BARREL CONTROL PART PART DESCRIPTION DESCRIPTION 1 12000-ZOL-406 1 16551-ZM0-010 Arm, Governor Cylinder Assembly 12000-ZOL-840 2 16555-ZOL-801 Rod, Governor Cylinder Assembly 3 12310-Z0J-000 Cover, Cylinder Head 3 16561-ZOL-000 Spring, Governor 12311 -ZL8-D00 Cover, Head 4 16562-ZM0-000 Spring, Throttle Return 12311 -ZL8-000...
- Page 44 HONDA 4=CYCLE ENGINE MODEL NUMBER GCV160=LAOS3A IE44 i FLYWHEEL --17 AiR CLEANER i MUFFLER...
- Page 45 11 90018-ZE1-000 16 17636-ZOL-000 Gauge, Fuel Level Bolt, Flange (#6 x 23) 21 19610-ZOL-861ZC Cover Assembly, (CT200) 12 90018-ZE1-000 "T89" (Craftsman Red) Bolt, Flange (#6 x 23) 19610-ZOL-861ZA Cover Assembly, (CT200) 13 90201-ZOT-800 "T89" CNHI") (Black) Nut, Special (14 mm)
- Page 46 HONDA 4=CYCLE ENGINE MODEL NUMBER GCV160=LAOS3A <> CAMSHAFT PULLEY 13 ---O "1_ 1](_ CONNECTING ROD %_'_-_-41 __-_:T- "...
- Page 47 HONDA 4-CYCLE ENGINE MODEL NUMBER GCV160-LAOS3A CAMSHAFT PULLEY PISTON / CONNECTING PART PART DESCRIPTION DESCRIPTION 1 14320-ZL8-010 1 13101-Z2A-010 Piston Pulley, Camshaft 2 14324-ZL8-000 2 13111-ZE0-000 Pin, Piston Shaft, Cam Pulley 3 14400-ZOJ-014 3 13200-ZOJ-000 Belt, Timing Connecting Rod Assembly 4 90001-ZE1-000 (84HU7 G-200) Bolt, Connecting...
- Page 48 HONDA EMiSSiON CONTROL SYSTEM WARRANTY Your new Honda Power Equipment engine complies with the U.S. EPA, Environment Canada, and State of California emission regulations (models certified for sale in California only). American Hon- da Motor Co., Inc. provides the emission warranty coverage for engines in the United States and its territories.
- Page 49 Only Honda approved replacement parts may be used in the performance of any warranty repairs and must be provided without charge to the owner. The use of replacement parts not equivalent to the original parts may impair the effectiveness of your engine emission control system. If such a replacement part is used in the repair or maintenance of your engine, and an authorized...
- Page 50 S_RV|C_ NOTES...
- Page 51 NOTAS S_RV|C|O...
- Page 52 NEED MORE HELP? Your Home For repair - in your home - of all major brand appliances, lawn and garden equipment, or heating and cooling systems, no matter who made it, no matter who sold it! For the replacement parts, accessories and owner's manuals that you need to do-it-yourself.
Need help?
Do you have a question about the 917.370601 and is the answer not in the manual?
Questions and answers