Advertisement
Available languages
Available languages
Quick Links
Operator's M anual
®
2700 PSi MAX
2.3 GPM MAX
Model No. 580.752280
PRESSURE WASHER
CUSTOMER HELPLINE
HOURS: Non. - Fri. 8 a.m. to 5 p.m. (CT)
WARHIHG
Before using this product, read this
manual and follow all Safety Rules
and Operating Instructions.
ADVERTENCIA
Antes de utilizar el producto, lea este
manual y siga todas las Regias de
Seguridad e Instrucciones de Uso.
,, Safety
,, Assembly
,, Operation
,, Maintenance
,, Parts
,, Espafiol,p. 32
This pressure washer is rated in accordance to the Pressure Washer Manufacture Association
(PWMA) standard PWl01 (Testing and Rating Performance of Pressure Washers).
Esta limpiadora a presi6n est_ clasificada conforme a la norma PWl01 (comprobaci6n y clasificaciOn de rendimiento de limpiadoras
a presiOn) de la Asociaci6n de fabricantes de bombas a presiOn(Pressure Washer Manufacture Association, PWMA).
Sears, Roebuck and Co., HoffmanEstates,IL 60179 U.S.A.
Visit our Craftsman website: www.craftsman.com
Part No. 206016GS Draft B (05/01/2008)
3
Advertisement

Related Manuals for Craftsman 580.752280


Summary of Contents for Craftsman 580.752280
- Page 1 Esta limpiadora a presi6n est_ clasificada conforme a la norma PWl01 (comprobaci6n y clasificaciOn de rendimiento de limpiadoras a presiOn) de la Asociaci6n de fabricantes de bombas a presiOn(Pressure Washer Manufacture Association, PWMA). Sears, Roebuck and Co., HoffmanEstates,IL 60179 U.S.A. Visit our Craftsman website: www.craftsman.com Part No. 206016GS Draft B (05/01/2008)
- Page 2 If this pressure washer fails due to a defect in material or workmanship within one year from the date of purchase, return it to any Searsstore, other Craftsman outlet, or Sears Parts & Repair Center in the United States or Canadafor free repair (or replacementif repair proves impossible).
- Page 3 WARHIHG WARHJNG The engine exhaustfrom this productcontains chemicalsknownto the State of California to cause Fueland its vapors are extremely flammable and explosive. cancer,birthdefects, or otherreproductive harm. death. Fireor explosion can cause severe burns or WARNING WHENADDING OR DRAINING FUEL Certain components in this productand relatedaccessories containchemicalsknownto the State of California to cause •...
- Page 4 WARHJHG WARHIHG Starter cord kickback (rapid retraction) can result The high pressure stream of water that this in bodily injury. Kickback will pull hand and arm equipment produces can cut through skin and its _,_.< toward engine faster than you can let go. )ossible amputation.
- Page 5 NOTICE WARHJHG High pressure spray may damage fragile items including lass. Starter and other rotating parts can entangle hands, hair, clothing, or accessories. DO NOT point spray gun at glass when using red (0 °) nozzle. NEVERaim spray gun at plants. * NEVERoperate pressure washer without protective housing or covers.
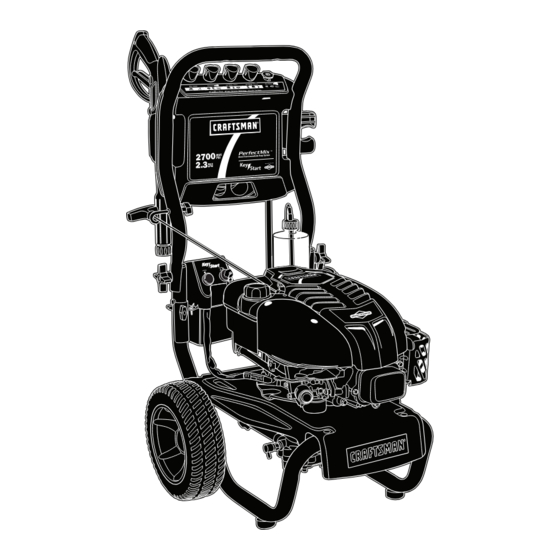
- Page 6 KNOWYOURPRESSURE WASHER _Read the Operator'sManual and safety rules before operatingyour pressurewasher. Compare the illustrations with your pressure washer to familiarize yourself with the locations of various controls and adjustments. Savethis manual for future reference. A - Spray Gun -- Controls the application of water onto P - Oil Fill/Dipstick -- Check, add and drain engine oil here.
- Page 7 Identify all contents with the illustration on page 6. If any parts are missing or damaged, call the pressure washer helpline at 1-800-222-3136. ASSEMBLING PRESSURE WASHER Your Craftsman pressure washer will need assembly before operation: Insert PrecisionSpray nozzlesand other supplied Fill out and send in registration card.
- Page 8 Attach rope guide (A) through handle with plastic knob Attach bottle bracket (K) to handle with carriage bolt (L) (B). Tighten by hand. Route engine recoil rope through and black plastic knob (M). Tighten by hand. guide. Align hose wrap (C) to the back side of accessory tray. Locate notch with "unlock"...
-
Page 9: Warranty
Cleanarea around fuel fill cap, remove cap. Add Engine 0iJ Placepressure washer on a flat, ]eve]surface. Slowly add regular unleadedfuel (A) to fuel tank (B). Be careful not to overfill. Allow about 1.5" (4 cm) (C) of tank Cleanarea around oil fill and remove yellow oil fill space for fuel expansion. - Page 10 WARHIHG WARHIHG The high pressure stream of water that this Risk of eye injury. _Spray can splash back or propel objects. quipment produces can cut through skin and its underlying tissues, leading to serious injury and Alwayswearsafetygoggles whenusingthis equipment o r in )ossible amputation.
- Page 11 To Start Your Pressure Washer HOWTO USEYOUR PRESSURE WASHER To start your engine-powered pressure washer for the first If you haveany problems operating your pressure washer, time, follow these instructions step-by-step. This information please call the pressure washer helpline at 1-808-222-3136. also applies whenever you start the engine after you have let Pressure Washer Location the pressure washer sit idle for at least a day.
- Page 12 Move throttle lever (A) to "Fast" position, shown here as WARHIHG a rabbit. Starter cord kickback (rapid retraction) can result in bodily injury. Kickback will pull hand and arm _< toward engine faster than you can let go. Broken bones, fractures, bruises, or sprains could result.
- Page 13 14.After e ach starting a ttempt, where e ngine f ails to run, How to Use PrecisionSpray Hozzle System always point g uninsafe direction, press redbutton and The quick-connect on the nozzle extension allows you to squeeze spray gun trigger t orelease highpressure. switch between five different PrecisionSpray system nozzles.
- Page 14 Select magenta jet soap PrecisionSpray nozzleto NOTE:Detergentcannot be applied with the high pressure nozzles (Cyan,Orange or Red). launch soap to second story siding and windows. Make sure garden hose is connected to water inlet. Checkthat high pressure hose is connected to spray gun and pump.
- Page 15 8. Apply d etergent toa drysurface, starting a tlower Cleaning DetergentSiphoning Tube portion o farea tobewashed and workupward, using If you used the clear detergent siphoning tube, you must long, e ven, overlapping strokes. flush it with clean water before stopping the engine. 9.
- Page 16 EHGINETECHNICALJNFORMATIOH PRODUCTSPECIFICATiOHS This is a single cylinder, overhead valve (OHV), air cooled Pressure Washer Specifications engine, it is a low emissions engine. Max Outlet Pressure ....... 2,700 PSi In the State of California, Model 120000 engines are certified Max Flow Rate ......2.3 GPM by the California Air Resources Board to meet emissions Detergent Mix ......
-
Page 17: Assembly
OWHER'SRESPOHSIBILiTIES General Recommendations Regular maintenancewill improve the performance and Follow the hourly or calendar intervals, whichever occurs extend the life of the pressure washer. See any Sears or first. More frequent service is required when operating in adverse conditions noted below. other qualified service dealer for service. - Page 18 PRESSURE W ASHER MAINTENANCE ALWAYS point spray gun in a safe direction, press red button and and squeezespray gun trigger to release Clean Debris retained high water pressure. Daily or before use, dean accumulated debris from pressure WARNING washer. Keep linkage, spring and controls clean. Keep area around and behind muffler free from any combustible debris.
-
Page 19: Operation
ENGINEMAINTENANCE Checking OffLevel Oil level should be checked prior to each use or at least every WARHJHG 8 hours of operation. Keep oil level maintained. Make sure pressure washer is on a level surface. Remove oil dipstick and wipe dipstick with clean cloth. f','_ Unintentional sparking can result in fire or Replaceand tighten dipstick. -
Page 20: Specifications
ServiceSpark Plug Change oil while engine isstiffwarm from running, a s fellows: Drain fuel tank by running pressure washer until fuel Service the spark plug every 100 hours of operation or tank is empty. yearly, whichever occurs first. Disconnect spark plug wire and keep it away from spark Cleanarea around spark plug. -
Page 21: Maintenance
AFTEREACHUSE Air Coeling System Overtime debris may accumulate in cylinder cooling fins and Water should not remain in the unit for long periods of time. cannot be observed without partial engine disassembly. For Sediments or minerals can deposit on pump parts and this reason, we recommend you have an qualified Sears "freeze"... - Page 22 WJHTER STORAGE Oil CyJinder Bore Removespark plug and pour about 1/2 ounce (15 m]) of t¥ NOTICE clean engine oil into the cylinder. Install spark plug and pull starter handle slowly to ou must protect your unit from freezing temperatures. distribute oil.
- Page 23 Problem Cause Correction Low pressure nozzle installed. Replacewith high pressure nozzle. Water inlet is blocked. Clearinlet. Inadequate water supply. Provide adequatewater flow. Inlet hose is kinked or leaking. Straighten inlet hose, patch leak. Pump has following problems: Checkand clean inlet hose strainer. Clogged inlet hose strainer.
- Page 24 CRAFTSMAH2700 PSi Pressure Washer 580.752280 Main UflJt-- ExpJodedView /--88 - ._pp...
- Page 25 CRAFTSMAH2700 PSI Pressure Washer 580.752280 Main Unit -- Parts List Parts Not Illustrated Item Part # Description 205961GS BASE,wNib Mounts Part # Description B204257GS HANDLE 206016GS MANUAL, Operator's AB3061BGS OIL BOTTLE 206606GS KIT, Billboard w/Clips & Decals 195964GS Clips, Tree 206013GS COVER,Static 205290GS...
- Page 26 EHGIHE, BrJggs& Stratton, 12R685 - Exploded View 684 _ ..to22 [4o_ _ ......71034 45/'_ _. _ ..v 1029 914_ 1022 615 t_ sos 1> 24 [_ 1102 1095 VALVE GASKET...
- Page 27 EHGIHE, Briggs & Stratton, 12R605 - Exploded View 9751_ 137_ 9661 259 @ 613__#_.j 883 _,'__ CARBURETOR GASKET 276 (_...
- Page 28 EHGIHE, Briggs & Stratto., 12R605 - ExpJodedView CARBURETOR OVERHAUL 127 (_ 276 _ 104 m% 51_o 1340 459 _I 121 @ 163_ 51B_ !210 592 ® 1005 ® 742@ 937_ 783 0 784_651 785_ 513_ 783A...
- Page 29 ENGINE, 8riggs & Stratton, 12R685 - Parts List Item Part # Oescriptien item Part # Description 697893 Cylinder Assembly 692390 Wire-Stop 399269 Kit-Bushing/Seal (Magneto Side) 792384 Gasket Set-Engine 299819s ¥ Seal-Oil (Magneto Side) 691129 Screw (Carburetor) 493279 Sump-Engine 690272 Wasber (Governor Crank) 792381 Head-Cylinder 690244...
- Page 30 Sears, Roebuck and Co., U.S.A. (Sears), the Cafifornia Air Resources Board (CARD) and the United States Environmental Protection Agency (UoSoEPA) Emissions Control System Warranty Statement (Owner's Defect Warranty Rights and Obfigations} The California Air Resources Board (CARD), U.S. EPA and Sears are Carburetor and internal parts pleased to explain the Emissions Control System Warranty on your Fuel Pump...
- Page 31 Emission information Certain engines will be certified to meet the United States Environmental Protection Agency (USEPA)Phase 2 emission Enginesthat are certified to meet the California Air Resources standards. For phase 2 certified engines, the Emissions Board (CARB) Emission Standards must display information Compliance Period referred to on the Emissions Compliance regarding the Emissions Durability Period and Air Index.
- Page 32 Si la limpiadora a presi6n falla debido a defectos de materiales o mano de obra en el plazo de un a_o a partir de la fecha de compra, devu61vala a cualquier almac_n Sears, punto de venta de Craftsman o centro de reparaci6n y repuestos de Sears de los Estados Unidos o Canada.para su reparaci6n gratuita o, en caso de que _sta no sea posible, para su sustituci6n.
- Page 33 ADVERTENCIA ADVERTENCIA El escape del motor de este preducto contiene eiementos quimicos recenocidos en el Estado de California La. gasolina y sus vapores son extremadamente inflamables y explosivos. producir c _ncer, d efectos de nacimiento g otros danes de ripe reproductive. severas e inclusive la muerte.
- Page 34 ADVERTEHCiA ADVERTEHCiA El retroceso (repliegue r_.pido) del cable del arrancador El chorro de agua a alta presi6n que este equipo produce,puede piel tejidos puede producir lesiones. El retroceso impedir_ que el atravesar la y los _,tk usuario suelte el cable a tiempo y tirar_, de su mano y brazo hacia el motor.
- Page 35 AVISO ADVERTEHCIA El rociado de alta presi6n puede dafiar elementos fr_.giles, incluyendo el vidrio. El arrancador y otras piezas que rotan pueden enredar las manos, el pelo, la ropa, o los accesorios. NO dirija la pistola rociadora hacia un cristal cuando utilice la boquilla MAX (punta de alfiler).
- Page 36 CONOZCA SU MAQUIHA SISTEMADE LIMPIEZA !i _!i_!i] Lea el Manual del Operarioy las regias de seguridadantes de poneren marcba su sistema de limpieza. I....6ompare las iluetracionescon su sistema de limpiezapara familiarizarse con las ubicaciones de los diferentes controles y ajustes. Guarde este manual para referencias futuras.
- Page 37 Su sistema delimpieza requiere decierto e nsamble yestar_ lista 5. A_ada gasolina altanque decombustible. para s er usado 8nicamente despu_s dehaber depositado 6. Conecte manguera aalta presi0n apistola rociadora yabomba. combustible yelaceite recomendado. Conecte el suministro de agua a bomba. t iene prohlemas conel ensamhle de su m_quina limpiadora a Conecte boquilla la extension al pistola rociadora.
- Page 38 Fije laguia d elacuerda (A)alasa con elpomo d epl_stico Fije los soporte para botellas (K) al asa con perno de cabeza negro ( B). A priete amano. Pase lacuerda del a rrancador por e l redonda (L) y pomo de plAstico negro (IVl).Apriete a mano. fijador.
- Page 39 Este motor est,. certificado para funcionar con gasolina. Su sistema Agregue Aceite de Motor de control de emisiones es EM (Modificaciones del motor). Coloque la linlpiadoraa presi6n en una superficie plana y Limpie el Area alrededor de la tapa de Ilenado del combustible, nivelada.
- Page 40 ADVERTENCIA Riesgo de lesiones oculares. • El agua rociada puede salpicar o propulsar objetos. • Utilicesiernpre gafasde protecci6n cuandoutiliceesteequipoo si se ADVERTENCIA encuentra cercade derideseest_utilizando. • Antesde poneren rnarchalalirnpiadora a presi6n,aseg_rese de Ilevar gafasde protecci6n adecuadas. produce, puedeatravesar la piel y los tejidos EI chorro de agua a alta presiOnque este equipo •...
- Page 41 COMOUSARSU SISTEMA DE LIMPIEZA Para Porter en Marcha eJ Sistema de Limpieza Para darle arranque a su sistema de limpieza movido a motor por Si tiene problemas con el funcionamiento de su m_.quinalimpiadora primera vez, siga estas instrucciones paso a paso. Esta informaci6n a presi6n, por favor Ilamea la lineade ayuda de la m_quina acerca de la puesta en marcha inicial tambi@ es v_.lida para cuando limpiadora a presi6n al 1-808-222-3136.
- Page 42 Muevael control de la vAIvula de admisiOn (A) a la posici6n ADVERTENCIA "R_.pido" ("Fast"), que se distingue con la figura de un conejo. El retroceso (repliegue r_.pido) del cable del arrancador puede producir lesiones. El retroceso impedir_ que el usuario suelte el cable a tiempo y tirar_, de su mano y brazo hacia el motor.
- Page 43 14. Despu6sde cada intento de arranque, cuando el motor no Coloque la pistola rociadora en el orificio situado a la derecha consiga arrancar apunte con la pistola rociadora hacia una de la bandeja de accesorios. direcci6n segura, presione el seguro (bot6n rojo), y apriete el Inserte las puntas de rociado de colores en los espacios gatillo para descargar la presi6n.
- Page 44 SISTEMA DE INYECCI6N"2 EN 1" Seleccione la boquilla azul verdoso PrecisionSpray de chorro de agua de alto caudal para limpiar revestimientos y ventanas de plantas altas. Limpieza y aplicaci6n de detergente con el sistema de inyecci_n Project Pro®PerfectMix A PeECAUClbe Los productos quimicos pueden provocar lesiones de gravedad /y/o da_os materiales.
- Page 45 Limpieza del Tubo de Inyecci6n de Detergente NOTA: No se puedeaplicar detergente con las puntas de rociado de alta presi6n (azul verdoso, naranja o roja). Si us6 el tubo, debe lavarlo con agua limpia antes de parar el motor. 6. AsegOresede que la manguera del jardin est_ conectada a la Coloque el filtro y la inyecci6n de detergente en un balde Ileno entrada de agua.
- Page 46 JNFORMACI6H TECHJCA SOBREEL MOTOR ESPECIFICACIONES DELPRODUCTO El motor es de uno cilindros, de v_.lvulasen cabeza (OHV), Especificaciones de JaM_quina Limpiadora a refrigerado por aire y de baja emisi6n. Presi6n En el Estado de California.,los motores de 120000 han obtenido la Presi6n de salida m_.xima ......
- Page 47 RECOMENDACiONES G ENERALES Remba de Aceite NO realice ninguna operaci6n de mantenimiento con el aceite de la Plan de mantenimiente bomba. La bomba se suministra prelubricada y sellada en f_brica, y no requiere lubricaci6n adicional durante su vida Otil. Siga los interva]os de horas o de calendafio, los que sucedan antes.
- Page 48 ADVERTEHCIA produce, puedeatravesar la piel y los tejidos EI chorro de agua a alta presiOn que este equipo subcutAneos, provocando lesiones de gravedad que Instalede nuevola puntade rocioen la extension. podrian dar lugar a la amputaciOn de un miembro. Conectede nuevola extension de la boquillaa la pistola •...
- Page 49 Aceite AV/SO Recomendacienes sebreel aceite El Ilenadode aceiteen excesopuedeimpedir el arranquedel motor o )rovocardificultades de arranque. Paraobtenerel mejorrendimiento, r ecomendamos u tilizaraceites NOIleneen exceso. certificados con garantiaBriggs& Stratton.Tambi_n se pueden utilizarotros aceitesdetergentes de altacalidadcon clasificaci6n de Si el niveldeaceiteest_per encimade lamarcaFULL(LLENO) de la varilla,vacieaceiteparareducirelnivelhastala mamaFULL(LLENO) servicioSF,SG,SH,SJo superior.NOutilice aditivosespeciales.
- Page 50 Si el motor ha estado funcionando, el silenciador estar_,bastante Para dar servi¢ioal tiltro de aire, siga los pasos que se detallan a continuaci6n: caliente. Dejeque el silenciador se enfrie para poder darle servicio al Aflojedos tomillos (A) y levantelejoscubierta (B). apagachispas.
- Page 51 DESPUESDE CADAUSO Desconectemanga del fusil del rocio y salida alta de presiOn en la bomba. DesagOe agua de la manga, del fusil, y de la No deber_,haber agua en la unidad por largos periodos de tiempo. extensi6n de boquilla. Use un harapo para quitar la manga. Los sedimentos de minerales se pueden depositar en partes de la Saquetodos los liquidos de la bomba halando la manija de bombay "congelar"...
- Page 52 ALMACENAMIEHTO PARA JNVJERNO Cambiode aceite Con el motor todavia caliente, drene el aceite de la caja del cigiJe_al. AV/SO Vuelva a Ilenarlo con el grado de aceite recomendado. Yea Cambio de Aceite del Motor en la secci6n Mantenimiento de/Motor. Usted deber_,proteger su unidad de las temperaturas de _elamiento.
- Page 53 Prohlema Soluci6n Causa Est,. usando la puntas de rocio de baja Cambie la puntas de rocio a una de las dos presi6n (neora). puntas de rocio de alta presi6n. La entrada de aoua est_ bloqueada. Limpie la entrada. Suministro de agua inadecuado. Proporcione flujo de agua adecuado.
- Page 54 Sears, Roebuck andCo., U.S.A.(Sears),CaliforniaAir Resources B oard (Consejo de Recursos sobreel Aire de California,CARB,por sus siglas en ingles)y United StatesEnvironmental ProtectionAgency(Agenciade Protecci6n A mhiental de EE.UU., EPA,porsos siglas en ingles). Declaraci6n degarantiadel sistema decontrol de emisiones (derechos y obligacionesdel propietario p arala garantiacontra deiectos) California Air Resources Board (CARB), U.S.
- Page 55 InformatiOn sobre emisiones Algunos motores cuentan con la certificaci6n de cumplimiento de la fase 2 de las normas sobre emisiones de la United States Los motores con certificaci6n de cumplimiento de la normativa Environmental Protection Agency (USEPA,Agencia estadounidense sobre emisiones del California Air ResourcesBoard (CARB) deben de protecciOndel medioambiente ).
-
Page 56: Troubleshooting
Your Home For expert troubleshooting and home solutions advice: www.managemyhome.com For repair - in your home - of all major brand appliances, lawn and garden equipment, or heating and cooling systems, no matter who made it, no matter who sold it! For the replacement parts, accessories and owner's manuals that you need to do-it-yourself.
Need help?
Do you have a question about the 580.752280 and is the answer not in the manual?
Questions and answers