Eton American Red Cross SOLARLINK FR600 Owner's Manual
Self-powered digital am/fm/sw/noaa/s.a.m.e. weather radio with flashlight, siren, solar power and cell phone charger
Hide thumbs
Also See for American Red Cross SOLARLINK FR600:
- Owner's manual (69 pages) ,
- Owner's manual (33 pages) ,
- Owner's manual (18 pages)
Table of Contents
Advertisement
Available languages
Available languages
Advertisement
Table of Contents

Related Manuals for Eton American Red Cross SOLARLINK FR600


Summary of Contents for Eton American Red Cross SOLARLINK FR600
- Page 1 American Red Cross SOLARLINK FR600 Self-powered Digital AM/FM/SW/NOAA/S.A.M.E. Weather Radio with Flashlight, Siren, Solar Power and Cell Phone Charger American Red Cross Radio Line By Etón Corporation Owner’s manual...
-
Page 3: Do You Need Help
DO YOU NEED HELP? If you need help, please contact us, Monday-Friday, 8:00 a.m.-4:30 p.m., North American Pacific Time. 1-800-872-2228 from the U.S; 1-800-637-1648 from Canada; 650-903-3866, worldwide; FAX: 650-903-3867; web site, www.etoncorp. com; Etón Corporation, 1015 Corporation Way, Palo Alto, CA 94303, USA WARNING •... -
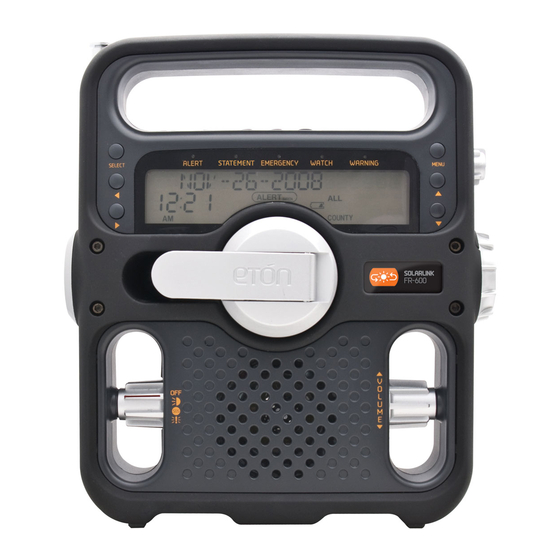
Page 4: Location Of Controls
LOCATION OF CONTROLS 1) Snooze: 5 Min Snooze 2) Alarm ON/OFF: activate/deactivate alarm function 3) ALERT ON/OFF:open/close alert bell 4) Select Button 5) Direction Buttons 6) Flashlight 7) Hand Crank 8) Multifunctional Knob 9) Alert Indicator Light 10) Statement Indicator Light 11) Emergency Indicator Light 12) Watch Indicator Light 13) Warning Indicator Light... - Page 5 14) Power Supply Knob 15) Band Selecting Knob 16) Volume Adjusting Knob 17) Speaker 18) PHONE CHARGER:USB Jack for Charging the Cellphone 19) DC in:USB Jack for charging the Radio(small) 20) DC in Jack (Adaptor) 21) Earphone Jack 22) Audio Jack 23) Battery Compartment POWERING AND TURNING ON THE RADIO The unit is powered with 3 AA batteries, the solar cell, the...
-
Page 6: Battery Power
SOLARLINK FR600 OWNER’S MANUAL position to turn it on. Turn it off by placing the Band Selecting Knob in the OFF position. Note: The radio can be played while it’s charging. BATTERY POWER Open the battery compartment cover, you can find two groups of sockets for installing the batteries. -
Page 7: Volume Control
SOLARLINK FR600 OWNER’S MANUAL DC-IN 5V ADAPTOR (not included) This socket is located on the back of the radio, under the rubber plugs. Plug in the AC adapter to the DC IN 5 volt socket. This also charges the Ni-MH battery. DC-IN USB COMPUTER SOCKET (USB cord not included) This socket is located on the back of the radio, under the rubber plugs. -
Page 8: Setting The Date
Not following these instructions may cause damage to your cell phone for which Eton disclaims any liability and will not be held liable for any actual or consequential damages related to this matter. SETTING THE DATE 1. -
Page 9: Setting The Clock
6. Press <> or <> shortly to set “MONTH--DAY--YEAR” option. 7. After setting, press <SELECT> shortly to save. SETTING THE CLOCK 1. Revolve the <Band Selecting Knob> to the “OFF” position. 2. Press <MENU> button shortly to enter the setting menu. 3. - Page 10 SETTING THE BEEPER ALARM This radio’s alarm beeps when it activates. 1. SETTING THE ALARM TIME 1) Revolve the <Band Selecting Knob> to the “OFF” position. 2) Press <MENU> button shortly to enter the setting menu. 3) Press <> or <> shortly to select “SET UP ALARM--ALM” option.
-
Page 11: Activating And Deactivating The Alarm
SOLARLINK FR600 OWNER’S MANUAL 2. ACTIVATING AND DEACTIVATING THE ALARM Press <ALARM ON/OFF> shortly to activate or deactivate the alarm. If the alarm function is activated, the alarm symbol “ AL” and alarm time will appear in the display. When the alarm time is reached, the unit will beep. -
Page 12: Broadcast Reception
BROADCAST RECEPTION 1. Select the power supply mode. 2. Select the band: FM Band: Revolve the <Band Selecting Knob> to “FM” position. AM Band: Revolve the <Band Selecting Knob> to “AM” position. SW Band: Revolve the <Band Selecting Knob> to “SW”... - Page 13 SHORTWAVE LISTENING To learn about shortwave we recommend the two publications below, published yearly and available from major booksellers. Additionally, the Internet is a great resource for learning about shortwave. Type ‘shortwave reception’ into your favorite search engine. PASSPORT TO WORLD BAND RADIO Published by International Broadcasting Services (IBS);...
- Page 14 Use the frequency ranges (Bands) below for shortwave broadcast reception: BANDE MEGAHERTZ (MHz) 120 m 2.300-2.495 MHz 90 m 3.20-3.40 MHz 75 m 3.90-4.05 MHz 60 m 4.750-5.1 MHz 49 m 5.8-6.2 MHz 41 m 7.1-7.60 MHz 31 m 9.4-10 MHz 25 m 11.5-12.2 MHz 22 m...
-
Page 15: Setting Alert Mode
SETTING TO RECEIVE WEATHER ALERTS Weather alerts are received in three ways: 1. Alert indicator light is on. 2. Alert forecast appears in the display. 3. Alert bell rings. To set the channel for receiving alerts, use the method below and set it to your strongest channel. - Page 16 4) Press <SELECT> shortly once to enter the alert mode setting mode. 5) Press <> or <> shortly to select the alert mode (SIREN & VOICE). Note: The selected alert mode will appear in the display. 6) After setting, press <SELECT> shortly to save. SETTING COUNTY CODES (CLC CODES IN CANADA) County code setting is described below.
- Page 17 3) Press or shortly to select the “COUNTY CODE” option. 4) Press <SELECT> shortly once to enter the county code setting mode (MULTI, SINGL or ALL), which blinks in the display. 5) If you don’t know your county code, select ALL with or and press <SELECT>...
- Page 18 RECEPTION OF EVENT CODES Your radio can receive ‘event code’ information during weather alerts. These codes are identified at http://www.nws.noaa.gov/ os/eas_codes.shtml. Canadian Weather Alerts are addressed at: http://www.msc-smc.ec.gc.ca/cd/brochures/warning_e.cfm#top. SELECTING DISABLE/ENABLE Alert modes can be selected to not appear by selecting DISABLE or to appear by selecting ENABLE.
-
Page 19: Multifunction Knob
OPEN / CLOSE THE ALERT BELL While the alert bell is ringing, you can press the <ALERT-ON/ OFF> button (in the space above the display – right side) shortly to shut off the ringing, then press it shortly again to resume ringing. -
Page 20: Limited Warranty
SOLARLINK FR600 OWNER’S MANUAL LIMITED WARRANTY Retain the warranty information from your warranty card with your proof of purchase or the Limited Warranty information can also be viewed at www.etoncorp.com. SERVICE FOR YOUR PRODUCT To obtain service for your product, we recommend first contacting an Etón service representative at 1-800-872-2228 US, 1-800-637-1648 Canada, (650) 903-3866 US, customersvc@ etoncorp.com or your respective country distributor in Europe (see... - Page 21 SOLARLINK FR600 OWNER’S MANUAL...
-
Page 23: Avez-Vous Besoin D'aide
AVEZ-VOUS BESOIN D’AIDE? Si vous avez besoin d’aide, veuillez nous contacter, Du Lundi au Vendredi, 8:00 à.- 16:30., Fuseau horaire du Pacifique Amérique du Nord. 1-800-872-2228 depuis les U.S.A; 1-800-637-1648 depuis le Canada; 650-903-3866, ailleurs dans le monde; FAX: 650-903-3867; site Internet, www.etoncorp.com;... -
Page 24: Emplacement Des Commandes
EMPLACEMENT DES COMMANDES 1) SNOOZE (Répétition d’alarme) : Snooze de 5 Min 2) ALARME Marche/Arrêt:Activer/Désactiver la fonction alarme 3) ALERTE Marche/Arrêt: lance/ferme la sonnerie d’alerte 4) Bouton de sélection 5) Bouton de direction 6) Flash 7) Manivelle 8) Molette multifonctionnelle 9) Indicateur lumineux d’alerte 10) Indicateur lumineux d’état 11) Indicateur lumineux d’urgence... - Page 25 15) Molette de sélection de bande 16) Molette de réglage du volume 17) Haut parleur 18) CHARGEUR DE TÉLÉPHONE: prise USB pour charger un téléphone portable (grosse) 19) Entrée courant continu: prise USB pour charger la radio (petite) 20) Entrée courant continu (Adaptateur) 21) Prise écouteurs 22) Prise audio 23) Compartiment des piles...
-
Page 26: Alimentation Par Piles
SOLARLINK FR600 GUIDE DE L’UTILISATEUR DU sous le couvercle en caoutchouc. Après mise en place de l’alimentation, sélectionnez la bonne position avec la molette d’alimentation et mettez la molette de sélection de bande sur AM, FM, SW (Onde Courte OC), WB (Emission météo ou sur la position Alerte pour la mettre en marche. -
Page 27: Contrôle Du Volume
SOLARLINK FR600 GUIDE DE L’UTILISATEUR DU ALIMENTATION PAR DYNAMO La batterie rechargeable au Ni-MH (hydrure nickel-métal) est dans le compartiment à piles. Pour l’utiliser branchez la batterie à la prise adjacente à cette dernière, puis mettez le commutateur d’alimentation sur la position DYNAMO. Vous pouvez avoir besoin de charger la batterie;... -
Page 28: Réglage De La Date
5 secondes avant de recommencer à tourner la manivelle. Ne pas suivre ces instructions peut endommager votre téléphone portable pour lequel Eton se déclare non responsable et ne sera pas tenu responsable pour tout dommages réel ou consécutif relatif à ce cas. -
Page 29: Réglage De L'horloge
3. Appuyez brièvement sur <> ou <> pour sélectionner l’option “Réglage de la date” (“SET UP---DATE”). 4. Appuyez brièvement une fois sur <SELECT> pour entrer le mode de configuration de la date. 5. Appuyez brièvement sur <> ou <> pour sélectionner l’option “MOIS-JOUR-ANNÉE”... - Page 30 4. Appuyez brièvement sur <SELECT> une fois pour entrer dans le mode de configuration de l’heure. 5. Appuyez brièvement sur <> ou <> pour sélectionner l’option “HEURE: MINUTE” ( “HOUR : MINUTE”). 6. Appuyez brièvement sur <> ou <> pour régler l’option “HEURE:MINUTE”...
-
Page 31: Activation Et Désactivation De L'alarme
4) Appuyez brièvement une fois sur <SELECT> pour entrer dans le mode de configuration de la date. 5) Appuyez brièvement sur <> ou <> pour sélectionner l’option “HEURE:MINUTE” (“HOUR : MINUTE”). 6) Appuyez brièvement sur <> ou <> pour régler l’option “HEURE:MINUTE”... - Page 32 3. BOUTON SNOOZE (Répétition d’alarme) Lorsque l’alarme est active, le fait d’appuyer brièvement sur le bouton <SNOOZE> désactive l’alarme pendant 5 minutes (“ “ apparaît sur l’affichage), puis elle redémarre. RÉCEPTION D’ÉMISSIONS 1. Sélectionnez le mode d’alimentation. 2. Sélectionnez la bande: Bande FM: mettez la <molette de sélection de bande>...
- Page 33 5. Sauvegarde de stations: Pendant la réception de la station, appuyez brièvement une fois sur <MENU> , “MEMORY” apparaît à l’affichage. Appuyez brièvement sur <> ou <> pour sélectionner l’adresse de sauvegarde. Puis appuyez brièvement sur <SELECT> pour sauvegarder la station. (REMARQUE: FM: 20 mémoires;...
- Page 34 Les ondes courtes permettent d’écouter des émissions sur de grandes distances incluant d’autres pays et d’autres continents. Les informations suivantes vous aideront à obtenir les meilleurs résultats. • Durant le jour, les fréquences au dessus de 13 MHz sont généralement meilleures. •...
- Page 35 RÉCEPTION DES FRÉQUENCES MÉTÉO Pour écouter votre station locale météo, dépliez l’antenne, allumez la radio et sélectionnez WB avec le sélecteur de bande. Augmentez le volume et appuyez sur les boutons pour entendre les 7 canaux météo. Vous n’entendrez probablement qu’un canal, mais si vous entendez plus d’un canal météo, sélectionnez le plus puissant.
- Page 36 4) Appuyez brièvement une fois sur <SELECT> pour entrer dans le mode de configuration météo. 5) Appuyez brièvement sur <> ou <> pour sélectionner le canal météo le plus puissant (CH1~7). 6) Après réglage, appuyez brièvement sur <SELECT> pour sauvegarder. RÉGLAGE DU MODE ALERTE 1) Tournez la <molette de sélection de bande>...
- Page 37 6) Après réglage, appuyez brièvement sur <SELECT> pour sauvegarder. RÉGLAGE DES CODES DE RÉGION (COMTÉ) (Codes CLC Au Canada) Le réglage de code de comté est décrit ci-dessous. Un code de comté indique à la radio de ne recevoir qu’une Alerte lorsque le code est programmé...
- Page 38 4) Appuyez brièvement une fois sur <SELECT> pour entrer dans le mode de configuration du code de comté (MULTI, SINGL ou ALL), qui va clignoter à l’affichage. 5) Si vous ne connaissez pas votre code de comté, sélectionnez ALL avec ou et appuyez sur <SELECT> et puis sur <MENU>...
- Page 39 RÉCEPTION DES CODES D’ÉVÈNEMENT Votre radio peut recevoir des informations de type ‘Code d’évènement’ durant les alertes météo. Ces codes sont identifiés sur http://www.nws.noaa.gov/os/eas_codes.shtml. Les alertes météo canadienne sont sur: http://www.msc-smc. ec.gc.ca/cd/brochures/warning_e.cfm#top. SÉLECTION DE DÉSACTIVER (DISABLE)/ ACTIVER (ENABLE) Les modes d’alerte peuvent être sélectionnés pour ne pas apparaître en sélectionnant DISABLE ou pour apparaître en sélectionnant ENABLE.
- Page 40 SOLARLINK FR600 GUIDE DE L’UTILISATEUR DU ALERTE Avant d’utiliser la fonction ALERTE, réglez la radio sur la station météo la plus puissante. Après réglage, tournez la <Molette de sélection de bande> sur la position “ALERT”. Le voyant indicateur d’alerte s’éclaire. MARCHE/ARRËT DE LA SONNERIE D’ALERTE Lorsque la sonnerie d’alerte retentit, vous pouvez appuyez sur le bouton <ALERT-ON/OFF>...
-
Page 41: Enregistrement De La Garantie
ENREGISTREMENT DE LA GARANTIE Pour pièces de rechange et main d’oeuvre.Afin d’assurer une couverture complète de la garantie et les mises à jour du produit, l’enregistrement de votre produit doit être effectué le plus tôt possible après l’achat ou la réception. Vous pouvez utiliser une des options suivantes pour enregistrer votre produit: 1. - Page 42 SOLARLINK FR600 GUIDE DE L’UTILISATEUR DU MAINTENANCE DE VOTRE PRODUIT Pour obtenir la maintenance de votre produit, nous recommandons de contacter d’abord le service clientèle Etón au 800-872-2228 US, 800-637-1648 Canada or (650) 903-3866 pour déterminer le problème et le dépannage. Si une intervention complémentaire est nécessaire, l’équipe technique vous indiquera la façon de procéder suivant que la radio est toujours sous garantie ou si elle nécessite une...
- Page 43 SOLARLINK FR600 GUIDE DE L’UTILISATEUR DU...
-
Page 45: Necesita Ayuda
Hora del Pacífico Norteamericano. 1-800-872-2228 en Estados Unidos; 1-800-637-1648 en Canadá; 650-903-3866, para el resto del mundo; FAX: 650-903-3867; sitio web, www.etoncorp.com; Eton Corporation, 1015 Corporation Way, Palo Alto, CA 94303, USA ATENCIÓN • No exponer este aparato a la lluvia ni a la humedad. -
Page 46: Ubicación De Los Controles
UBICACIÓN DE LOS CONTROLES 1) SIESTA: Siesta de 5 min. 2) ALARMA ENCENDIDO/APAGADO: Activa/desactiva la función de alarma 3) ALERTA ENCENDIDO/APAGAFO: abre/cierra el timbre de alerta 4) Botón Seleccionar 5) Botón Dirección 6) Linterna 7) Manivela 8) Botón multifuncional 9) Luz indicadora de alerta 10) Luz indicadora de comunicado 11) Luz indicadora de emergencia 12) Luz indicadora de atención... - Page 47 13) Luz indicadora de advertencia 14) Botón de suministro eléctrico 15) Botón de selección de banda 16) Botón de ajuste del volumen 17) Altavoz 18) Enchufe USB para cargar el teléfono móvil (grande) 19) Entrada DC: Enchufe USB para cargar la radio (pequeño) 20) Enchufe de entrada DC (Adaptador) 21) Enchufe para audífono 22) Enchufe para audio...
- Page 48 SOLARLINK FR600 MANUAL DEL USUARIO DEL seleccione entre BATTERY (batería), SOLAR o DYNAMO (dínamo) Las ranuras de alimentación están en la parte trasera de la radio, bajo las cubiertas de caucho. Después de aplicar electricidad, seleccione la posición correcta con el Botón de suministro eléctrico y coloque el Botón de selección de banda en la posición AM, FM, SW, WB o Alerta y enciéndala.
- Page 49 SOLARLINK FR600 MANUAL DEL USUARIO DEL ALIMENTACIÓN POR DÍNAMO La batería Ni-MH (níquel-metal-hidrido) recargable está en el compartimento para baterías. Para usarlo conecte la batería en la toma adyacente, luego ajuste el interruptor de alimentación a la posición DYNAMO (dínamo). Es posible que tenga que cargar la batería, para esto gire la manivela durante 90 segundos.
- Page 50 5 segundos antes de empezar de nuevo. El no seguir estas instrucciones puede causar el daño de su teléfono móvil y por lo tanto Eton renuncia a cualquier responsabilidad y no se hará responsable por ningún daño como consecuencia de este tema.
- Page 51 4. Presione el botón <SELECCIONAR> brevemente una vez para entrar al modo de ajuste de fecha. 5. Presione <> o <> brevemente para seleccionar la opción “MES--DIA--AÑO”. 6. Presione <> o <> brevemente para ajustar la opción “MES--DIA--AÑO”. 7. Después de ajustar, presione <SELECCIONAR> brevemente para guardar.
- Page 52 4. Presione <SELECCIONAR> brevemente una vez para entrar al modo de ajuste de hora. 5. Presione <> o <> brevemente para seleccionar la opción “HORA : MINUTO”. 6. Presione <> o <> brevemente para ajustar la opción “HORA : MINUTO”. 7.
- Page 53 4. Presione el botón <SELECCIONAR> brevemente una vez para entrar al modo de ajuste de fecha. 5. Presione <> o <> brevemente para seleccionar la opción “HORA : MINUTO”.. 6. Presione <> o <> brevemente para ajustar la opción “HORA : MINUTO”. 7.
- Page 54 3. BOTÓN DE SIESTA Cuando la alarma se activa, al presionar el botón <SIESTA > brevemente la alarma se desactivará por 5 minutos (“ aparecerá en la pantalla), luego empezará de nuevo. RECEPCIÓN DE TRANSMISIÓN 1. Seleccione el modo de alimentación eléctrica. 2.
- Page 55 5. Como guardar estaciones: mientras reciba la estación deseada, presione <MENU> una vez brevemente, “MEMORIA” aparecerá en la pantalla. Presione <> o <> brevemente para seleccionar la posición de memoria. Luego presione <SELECCIONAR> brevemente para guardar la estación. (Nota: FM: 20 memorias; AM: 10 memorias; SW: 10 memorias.) 6.
- Page 56 La onda corta permite el escuchar transmisiones a gran distancia incluso sobre países y continentes. La siguiente información le ayudará a obtener los mejores resultados. • Durante el día, las frecuencias sobre 13 MHz son genera mente mejores. • En la noche, las frecuencias bajo 13 MHz son generalmente mejores.
- Page 57 RECEPCIÓN DE FRECUENCIAS DELCLIMA Para escuchar su estación del clima total, extienda la antena, encienda la radio y seleccione WB con el selector de banda. Suba el volumen y presione los botones para escuchar todos los 7 canales del clima. Probablemente usted escuchará un solo canal, pero si usted escucha la transmisión en más de un canal, seleccione el más fuerte.
- Page 58 4) Presione <SELECCIONAR> brevemente una vez para entrar al modo de ajuste del clima. 5) Presione <> o <> brevemente para seleccionar el canal de clima más fuerte (CH1~7). 6) Después de ajustar, presione <SELECCIONAR> brevemente para guardar. COMO AJUSTAR EL MODO DE ALERTA 1) Gire el <Botón de selección de banda>...
- Page 59 COMO AJUSTAR LOS CÓDIGOS DE CONDADO (CÓDIGOS CLC EN CANADA) El ajuste de los códigos de condado se describe a continuación. Un código de condado le indica a la radio solamente recibir una ALERTA cuando el código esté programado. Para buscar los códigos de condado en Estados Unidos diríjase al siguiente sitio web: http://www.nws.noaa.gov/nwr/indexnw.htm#sametable...
- Page 60 4) Presione <SELECCIONAR> brevemente una vez para entrar al modo de ajuste del código de condado (MULTI, SINGL o ALL), el cuál parpadeará en la pantalla. 5) Si usted no conoce su código de condado, seleccione ALL (todo) con o y presione <SELECCIONAR> y luego <MENU>...
- Page 61 RECEPCIÓN DE CÓDIGOS DE EVENTOS Su radio puede recibir información de ‘códigos de eventos’ durante alerta del clima. Estos códigos son identificados en http://www.nws.noaa.gov/os/eas_codes.shtml. Las alertas del clima Canadienses están señaladas en: http:// www.msc-smc.ec.gc.ca/cd/brochures/warning_e.cfm#top. COMO HABILITAR/DESABILITAR Los modos de alertas pueden seleccionarse para no aparecer seleccionando DESABILITAR o aparecer seleccionando HABILITAR.
-
Page 62: Botón Multifunción
SOLARLINK FR600 MANUAL DEL USUARIO DEL ALERTA Antes de usar la función de ALERTA, ajuste la radio a la estación del clima más fuerte. Después, gire el <Botón de selección de banda> a la posición “ALERT” (alerta). La luz del indicador de alerta se encenderá. ABRIR/CERRAR EL TIMBRE DE ALERTA Mientras el timbre de alerta suena, usted puede presionar el botón <ALERTA-ENCENDIDO / APAGADO>... -
Page 63: Garantía Limitada
Para obtener un servicio de reparación de su producto, recomendamos, lo primero, que usted se ponga en contacto con un representante del servicio de reparación de Eton, llamando al 800-872-2228 EE.UU., 800-637-1648 Canadá ó (650) 903-3866 para determinar el problema y su solución. - Page 64 MANUAL DEL USUARIO DEL GARANTÍA – Si su producto aún se encuentra en garantía y el representante de servicio de reparación de Eton determina que es necesario un servicio de garantía, se emitirá una autorización de envío de vuelta acompañada de instrucciones de envío a una tienda autorizada de servicio de reparación de garantía.
- Page 65 SOLARLINK FR600 MANUAL DEL USUARIO DEL...
- Page 66 SOLARLINK FR600 MANUAL DEL USUARIO DEL...
- Page 67 SOLARLINK FR600 MANUAL DEL USUARIO DEL...
- Page 68 Etón Corporation Corporate Headquarters 1015 Corporation Way Palo Alto, California 94303 USA tel +1 650-903-3866 tel +1 800-872-2228 fax +1 650-903-3867 Etón Canada 1 Yonge Street, Suite 1801 Toronto, Ontario M5E 1W7 Canada tel +1 416-214-6885 American Red Cross Radio Line Designed by Etón Corporation and assembled in China. v.
Need help?
Do you have a question about the American Red Cross SOLARLINK FR600 and is the answer not in the manual?
Questions and answers