Table of Contents

Related Manuals for Yard-Man 5010-1 3 H.P


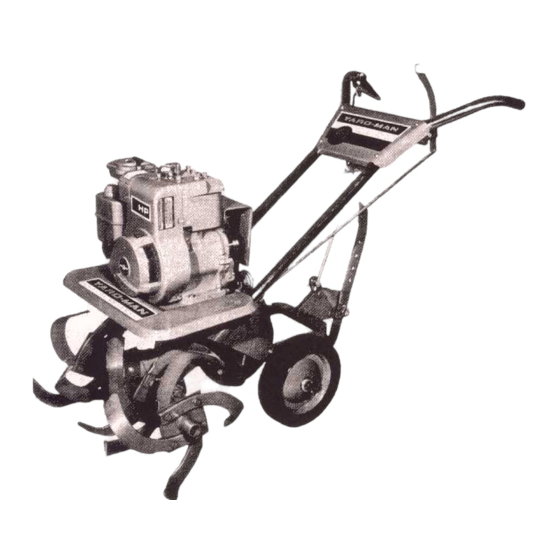
Summary of Contents for Yard-Man 5010-1 3 H.P
- Page 1 STOCK NO. MODEL 5010-1 3 H.P. 08-28- 08.28-08':'48~ 5020.1 4 H.P. S030~1 50C-4 5 H~P~ EARTH:8.1RD TfLLERS r'., ;:f,..t.(.)',,~."" :"~/U~(.': -'" '""/C- .~ ~ ~ "iC~:;!; " " /' " YAR-D ':' MAN p, O. BOX 36940 ,CLEVELAND) OHIO 44136 PRINTEO IN U.S.A.
- Page 2 R UtES---F'OR' S:AF'E O'PER A nO'N Yo\)r EARTHBI AD Tiller "is a precision piece of tilling equipment, engineering skill and experience have been combined tq prpvide the L/ltima~fJ' in ae~f;!.ty andetficiency. However, as wj~h any type of power equipment. carelessnf!sS or::error on th~par' of the oper~t. or can result in injury, 'There.fo~e.
- Page 3 SUG'GESTI,p'NS FOR MORE 'EFF1CIENT, AN:O MAINTENANCE- , ::, FREE OPERAr.JON' GrNERAl TILLING: Keep area to be tilled cl.t!ared of vines. glass, wire, and stones. ' ..': ':' '" Always start engine with machine on level surface with master' clutch disengaged, Aftecr: starting, let engine warm up several mInutes at slow speed before:starting ,to;...
- Page 4 UN,' ';(111 6 AND SiT.UP 1, Be sure carton is right side up. cut end panels out and fold flat on flo~r '. Re~Ql/e i(!ner pack and roll unit out 9f carton,: 2. Assemble the right and left handle tubes to the unit with the rigl1t and left hatJdJe socket caps and bO;Jts.
- Page 5 BlfGR:£stARTlHG £"61"1. Fill the fuel tank With ~ good ,grade of regular 9a.sollne. Do not mix oil with gasoline. Plac~ m~chine on 9 level surface, Remove oil filler cap and fill cr~n~~s!'J'..""ith909(;j quality geterger'lt..oit. Above 32~F use :SAE .~O~;,~el~w 32°;:yse SAE l()W. Fill t6 over: f.ll::i~i!iga:~d r~p.lace~ap;...
- Page 6 fliNTS:' '. .. NOTE: Make all adju$tment~ with engine turned off and wire removed ~rom the sparkplug, (Fasten wire to ~Ylinder head ~t t$Q$'t 1" Qway from spirkpl\J9.1 tEll aIPlA«MINT .":I;:~": IDlIR WHEE.lADJUS1MINT' CAUTION: belt adjustment the engine :;hQuld be stopped and tile sPIlrl<p!ug wire 'removed.
- Page 7 CH'AMGING tN&IN} 0:1(' Drain oil when engine is warm. ~emove oil drain plug and allow oi! to drain completely. Replat;e drQin plug and tighten securely. engine ~anual fpt. cQmplete englr'!e l.ubric8tion and ~rVjce instructions" (U'RJCAT:~N 'POINtS ,l,.UBRICATE THE PARTS,PERIODICALLY AS,:llL~STRATED The following points are to be lubricated every five hour~ of operation with SAE 20 weight light duty oil, uniess otherwise noted,...
- Page 10 PARTS I.IST Your Tiller is Right Hand IA.H.t or Left Hand (L,H.I as You Operate Machine. NOTE: Unless othe,wis~ specified parts listed are used on all Models. PA RT No. OE~CRIP-rtON 40~:!.3 Tine, 6010 (L,H,) 5/,6x 1~1/4 It 14" dia. (5020.1.5030-1 only) 42050 Tine, Bol6 \L.H.j'13/6.4...
- Page 11 PAl'S LIST Your Tiller i$ Right Hand (A.H.) or left Hand tl.H.) as You OperauMachint. NOTE: Unless ot!1erwi,e specified P8Y:ts listed ate used on all Models. R~F, PART NO. DEscRIPTION QTV. Decal, El1gine 15020-1 OI1IV) 4233,5 42336 Decal, C ngine 1$030.1 Ol1lyl atilt, Hex Head, 5/16.18)( 1-1/2 401,$2...
Need help?
Do you have a question about the 5010-1 3 H.P and is the answer not in the manual?
Questions and answers
I have a yard man tiller, not sure what model number because I can’t not find anything on it. But I need the sheer pin inside the gear house case. I’m pretty Sure it’s just one long one and I’m not sure how it’s held in. When I removed the housing to check it was split into 2 and metal fragments everywhere. It’s inside the gear that attaches to the shaft of the tiller. If you can find anything please let me know. I don’t have a picture of it since I put the cover back on but it’s about 2 inches long by .25ish inches wide.
The replacement shear pin size for the Yard-Man tiller part number 5010-1 3 H.P is a grooved pin, 5/16 inch diameter by 2 inches long. To install it, align the holes in the tine and shaft, insert the shear pin, and secure it in place.
This answer is automatically generated