Table of Contents
Advertisement
Available languages
Available languages
Owner's Manual
IC..FTSMnWl
ROTARY LAWN MOWER
4.5 Horsepower
21" Rear Discharge
Model No.
917.388531
• EspaSol, p. 18
CAUTION:
Read and follow all
Safety Rules and Instructions
before operating this equipment
Sears, Roebuck and Co., Hoffman Estates, IL 60179
U.S.A.
Visit our Craftsman website: www.sears.com/craftsman
Advertisement
Table of Contents

Related Manuals for Craftsman 917.388531


Summary of Contents for Craftsman 917.388531
- Page 1 ROTARY LAWN MOWER 4.5 Horsepower 21" Rear Discharge Model No. 917.388531 • EspaSol, p. 18 CAUTION: Read and follow all Safety Rules and Instructions before operating this equipment Sears, Roebuck and Co., Hoffman Estates, IL 60179 U.S.A. Visit our Craftsman website: www.sears.com/craftsman...
- Page 2 Warranty service is available by returning the Craftsman power mower to the nearest Sears Parts & Repair Center in the United States. This warranty applies only while this product is used in the United States.
- Page 3 I. GENERAL OPERATION II. SLOPE OPERATION • Read, understand, and follow all Slopes are a major factor related to slip instructions on the machine and in the and fall accidents which can result in manual(s) before starting. Be thoroughly severe injury. All slopes require extra cau- familiar with the controls and the proper tion.
- Page 4 Record both serial number and date of purchase in space provided above. Repair Protection Agreements Congratulations on making a smart pur- Fast help by phone - phone support chase. Your new Craftsman® product is from a Sears technician on products designed and manufactured for years of requiring in-home repair, plus conve- dependable operation.
- Page 5 These accessories were available when this lawn mower was produced. They are not shipped with your mower. They are also available at most Sears retail outlets and service centers. Some of these accessories may not apply to your lawn mower. LAWN MOWER PERFORMANCE CLIPPING...
- Page 6 Read these instructions and this manual in Operator presence its entirety before you attempt to assemble control bar or operate your new lawn mower. IMPORTANT: This lawn mower is shipped WITHOUT OIL OR GASOLINE in the engine. Your new lawn mower has been as- LIFT sembled at the factory with the excep- tion of those parts left unassembled...
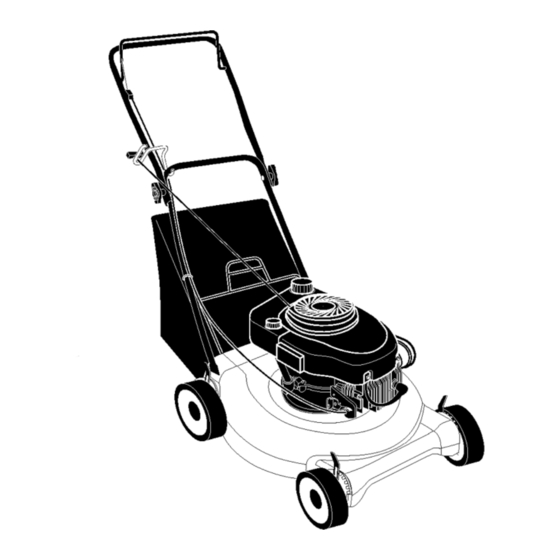
- Page 7 KNOW YOUR LAWN MOWER READ THIS OWNER'S MANUAL AND ALL SAFETY RULES BEFORE OPERATING YOUR LAWN MOWER. Compare the illustrations with your lawn mower to familiarize yourself with the location of various controls and adjustments. Save this manual for future reference. These symbols may appear on your lawn mower or in literature supplied with the product.
- Page 8 TO CONVERT MOWER The operationof any lawn mowercan result in foreign Your lawn mower was shipped ready to be objectsthrown into the used as a mulcher. To convert to bagging: • Lift rear door of the lawn mower and eyes, which can result in severeeye damage.Always place the grass catcher frame hooks wearsafety glasses or eye shields while...
- Page 9 BEFORE STARTING ENGINE 3asoline ADD OIL filler cap Your lawnmower is shipped without oil in the engine. For type and grade of oil to use, see "ENGINE" in the Maintenance section of this manual. CAUTION: DO NOT overfill engine with oil, or it will smoke heavily from the muffler on startup.
- Page 10 MULCHING MOWING TIPS MOWING TIPS IMPORTANT: For best performance, • Under certain conditions, such as very keep mower housing free of built-up tall grass, it may be necessary to raise grass and trash. See "CLEANING" in the the height of cut to reduce pushing Maintenance section of this manual.
- Page 11 MAINTENANCE BEFORE APTER EVERY EVERY EVERY BEFORE EACH EACH 25HOURS SCHEDULE HOURS ORSEASON HOURS STORAGE Check for Loose Fasteners Clean / Inspect Grass Catcher * Check Tires Check Drive Wheels Clean Lawn Mower ..M Clean under Drive Cover *** O Check Drive Belt / Pulleys *** Check / Sharpen / Replace Blade R Lubrication...
- Page 12 TO SHARPEN BLADE LAWN MOWER Always observe safety rules when per- NOTE: We do not recommend sharpening the blade - but if you do, be sure the blade forming any maintenance. is balanced. TIRES Care should be taken to keep the blade •...
- Page 13 TO CHANGEENGINEOIL Clean the inside of the cover and the NOTE: Beforetipping lawn mowerto drain collar to remove any dirt accumulation. Insert new filter into cover. oil, empty fuel tank by runningengine until Put air filter cover and filter into collar fuel tank is empty.
- Page 14 _WARNING: To avoid serious injury, Mowing before performing any service and adjustments: 1. Release control bar and stop engine. 2. Make sure the blade and all moving parts have completely stopped. 3. Disconnect spark plug wire from spark plug and place wire where it cannot come in contact with plug.
- Page 15 Immediatelyprepareyour lawn mowerfor Operator presence storageat the end of the season or if the control bar unit will not be usedfor 30 days or more. LAWN MOWER Lower When lawn mower is to be stored for a period of time, clean it thoroughly, remove all dirt, grease, leaves, etc.
- Page 16 CYLINDER • If possible, store your unit indoors and cover it to protect it from dust and dirt. 1. Remove spark plug. • Cover your unit with a suitable protec- 2. Pour one ounce (29 ml) of oil through tive cover that does not retain moisture. spark plug hole into cylinder.
- Page 17 TROUBLESHOOTING - See appropriate section in manual unless directed to a Sears Service Center. PROBLEM CAUSE CORRECTION Loss of power 1. Rear of lawn mower 1. Raise cutting height. housing or cutting blade dragging in heavy grass. 2. Cutting too much grass. 2.
- Page 18 Contratapa GARANTiA LIMITADA DE DOS AI_IOS PARA LA SEGADORA A MOTOR CRAFTSMAN Per dos (2) aSos, a partir de la fecha de compra, cuando esta Segadora Craftsman se mantenga, lubrique y afine segSn las instrucciones para la operaci6n y el mantenimiento en el manual del dueSo, Sears repararA gratis todo defecto en el material y la mane de obra.
- Page 19 HACER: I. OPERAClON • Antes de empezar, debe familiarizarse comple- • Puede recortar a trav6s de la superficie de tamente con los controles y el uso correcto de la cuesta, nunca hacia ardba y hacia abajo. la maquina. Para esto, debe leer y comprender Proceda con extrema precauci6n cuando todas las instrucciones que aparecen en la ma- cambie de direcci6n en las cuestas.
- Page 20 • Ayuda rapida por telefono - soporte tele- nuevo producto Craftsman® estA diseSado f6nico per parte de un t6cnico Sears sobre y fabricado para funcionar de modo fiable por productos que requieren un arreglo en casa, muchos aSos.
- Page 21 Estos accesorios estaban disponibles cuando se produjo la segadora. No son facilitados junto al ¢ortacesped. Tambi6n estAn disponibles en la mayorfa de las tiendas de Sears y en los centros de servicio. Algunos de estos accesorios tat vez no se apliquen a su segadora. RENDIMIENTO DE LA SEGADORA DESVIADOR...
- Page 22 Lea estas instrucciones y este manual comple- Barra de control c la presencia del operador tamente antes de tratar de montar u operar su Mango superior segadora nueva. IMPORTANTE: Este cortac_sped viene SIN ACEITE O GASOLINA en el motor. Mango Inferior Su segadora nueva ha side montada en la LEVANTAR f&brica con la excepci6n de aquellas partes que...
- Page 23 FAMILIARICESE CON SU SEGADORA LEA ESTE MANUAL DEL DUENO Y LAS REGLAS DE SEGURIDAD ANTES DE OPARAR SU SEGADORA. Compare las ilustraciones con su segadora para familiarizarse con la ubicaci6n de los diversos controles y ajustes. Guarde este manual para referencia en el futuro. Estos simbolos pueden apareser sobre su segadora o en la literatura proporcionada con el producto.
- Page 24 PARA CONVERTIR LA SEGADORA La operaci6n de cualquier Su segadora fue enviada lista para usarse segadora puede hacer que como acolchadora de capa vegetal. Para con- satten objetos extrafios dentro de vertir la a una operaci6n de ensacado: sus ojos, Io que puede producir •...
- Page 25 ANTES DE HACER ARRANCAR MOTOR rapa del rellenador AGREGUE ACEITE de gasolina Su segadora fue enviada sin aceite en el motor. Para el tipo y el grado del aceite a utilizar, vea el "MOTOR" en la secci6n del Mantenimiento este manual. _PRECAUCI(_N: NO sobrellene el motor con aceite, o fumar&...
- Page 26 CONSEJOS PARA SEGAR CONSEJOS PARA SEGAR Y ACOL- • Bajo ciertas condiciones, tal como c_sped CHAR muy alto, puede ser necesario el elevar la IMPORTANTE: Para obtener el mejor altura del corte para reducir el esfuerzo rendimiento mantenga la caja de la segadora necesario para empujar la segadora y para sin acumulacion de cesped y basura.
- Page 27 PROGRAMA DESPUES CADA ANTES DE CADA 25 HORAS O ALMACE- MANTENIMIENTO TEMPORAD. E_ Umpiadlnspeccionar el RecogedordeC_sped Controlar tos Neum_ticos Controlar tas Ruedas Mortices Umpiar la Segadora ..Umpiar debajo la Cubierta de la TransmisiSn Revisar las Correas y las Poteas Impulsadas •Jr Revisar / Afitar / Cambiar la Cuchilta...
- Page 28 PARA AFILAR LA CUCHILLA SEGADORA Siempre observe las reglas de seguridad cu- AVISO: No recomendamoselafilarlacuchilla-pero ando haga el mantenimiento. silo hace, asegQrese de que quede balanceada. LLANTAS Se tiene que tener cuidado de mantenerla balanceada. Una cuchilla que no est& bal- •...
- Page 29 PARA CAMBIAR EL ACEITE DEL MOTOR Limpie la parte interior de ta cubierta y el collar para remover toda acumulaci6n AMISO: Antes de inclinar la segadora para drenar mugre. el aceite, drene el tanque de combustible hacien- Inserte el filtro nuevo en la cubierta. do correr el motor hasta que el tanque est6 vacio.
- Page 30 _._,DVERTENCIA: Para evitar lesi6nes serias, antes de dar calquier servico o de hacer ajustes: Suelte la barra de control y pare el motor. Asegt]rese que la cuchilla y que todas las partes movibles se hayan detenido comple- tamente. Desconecte el alambre de ta bujfa y p6n- galo en donde no pueda entrar en contacto con 6sta.
- Page 31 Inmediatamente prepare su segadora para el Barra de control que almacenamiento al final de cada temporada o si operador la unidad no se va a usar por 30 dias o mas. SEGADORA Cuando se va a guardar la segadora por cierto Mango periodo de tiempo, limpiela cuidadosamente, remueva toda la mugre, la grasa, las hojas, etc.
- Page 32 CILINBRO polvo y la mugre. Remueva la bujia. • Cubra su unidad con un forro protector Vacfe una onza (29 ml) de aceite a trav_s adecuado que no retenga la humedad. No del agujero de la bujfa en el cilindro. use pl_,stico.
- Page 33 SOLUCION DE PROBLEMAS - Vea la secci6n apropiada en el manual amenos estd dirigido a un centro de servico Sears. PROBLEMA CAUSA CORRECCION Falta de 1. Cuchilla desgastada, doblada 1. Ajuste a la posici6n de ruerza o suelta. "Corte m&s alto" Altura de las ruedas dispareja.
- Page 34 CRAFTSMAN ROTARY LAWN MOWER - - MODEL NUMBER 917.388531 39 I...
- Page 35 189262 Grass Bag 188987 Rear Skirt 188813 Frame, Grass Bag 168360X004 Selector Spring, Front - - - Engine, Craftsman, Model Number 186612 Rear Door Assembly Kit (Includes Springs) 143.044500 (See Breakdown) 73930500 Looknut 5/16-18 132004 Nut, Hex 166111X479 Handle Bracket Assembly, Left...
- Page 36 TECUMSEH 4-CYCLE ENGINE MODEL NUMBER 143.044500 _--370K 110, 279119 182 216 _82 / /_" 370C...
- Page 37 Screw, T-15 #8-32x19/64" 35797 Air Cleaner Filter 33578 Extension Spring 35066 32600 Oil Seal 35065 Air Cleaner Cover (Craftsman) 37804 Crankshaft 36980B Blower Housing Screw #10-24 x 9/16" 40053 Piston, Pin & Ring Set (Standard) 30200 Screw 1/4-20 x 1/2"...
- Page 38 TECUMSEH 4-CYCLE ENGINE MODEL NUMBER 143.044500 PART DESCRIPTION 640339 Carburetor (Includes Key Number 184 of Engine Parts List) 631615 Throttle Shaft & Lever Assembly 631767 Throttle Return Spring 631184 Dust Seal Washer 631183 Dust Seal (Throttle) 64O07O Throttle Shutter 650506 Shutter Screw 631807 Fuel Fitting...
- Page 39 TECUMSEH 4-CYCLE ENGINE MODEL NUMBER 143.044500 _"ql PART DESCRIPTION 590694 Recoil Starter 590599A Spring Pin (Includes Key Number 4) 590600 Washer 590696 Retainer 590601 Washer 590697 Brake Spring 590698 Starter Dog 590699 Dog Spring 590700 Pulley & Rewind Spring Assembly 590695A Starter Housing Assembly (40 degree Grommet)
- Page 40 Your Home For repair - in your home - of all major brand appliances, lawn and garden equipment, or heating and cooling systems, no matter who made it, no matter who sold it! For the replacement parts, accessories owner's manuals that you need to do-it-yourself. For Sears professional installation of home appliances...
Need help?
Do you have a question about the 917.388531 and is the answer not in the manual?
Questions and answers