Weslo CADENCE 1005 User Manual
Wltl39091
Hide thumbs
Also See for CADENCE 1005:
- User manual (19 pages) ,
- User manual (19 pages) ,
- User manual (18 pages)
Advertisement
Quick Links
Model No. WLTL39091
Serial No.
Serial
Number
Decal
QUESTIONS?
As a manufacturer, we are com-
miffed to providing complete
customer satisfaction. If you
have questions, or if there are
missing or damaged parts, we
will guarantee complete satis-
faction through direct assistance
from our factory.
TO AVOID UNNECESSARY
DE-
LAYS, PLEASE CALL DIRECT TO
OUR TOLL-FREE CUSTOMER
HOT LINE. The trained techni-
cians on our Customer Hot Line
will provide immediate assis-
tance, free of charge to you.
CUSTOMER HOT LINE:
1-800-999-3756
Mon.-Fri.,
6 a.m.-6 p.m. MST
CAUTION
Read all precautions and instruc-
tions in this manual before using
this equipment. Save this manual
for future reference.
SER'S
UAL
www.wesIo.com
new products,
prizes,
fitness
tips, and much
more!
Advertisement

Related Manuals for Weslo CADENCE 1005


Summary of Contents for Weslo CADENCE 1005
- Page 1 Model No. WLTL39091 Serial No. SER'S Serial Number Decal QUESTIONS? As a manufacturer, we are com- miffed to providing complete customer satisfaction. If you have questions, or if there are missing or damaged parts, we will guarantee complete satis- faction through direct assistance from our factory.
- Page 2 TABLE OF CONTENTS IMPORTANT PRECAUTIONS ..............BEFORE YOU BEGIN ............... ASSEMBLY ................OPERATION AND ADJUSTMENT ............. HOW TO FOLD AND MOVE THE TREADMILL ..........MAINTENANCE AND TROUBLE-SHOOTING ........... CONDITIONING GUIDELINES ............... ORDERING REPLACEMENT PARTS ..........Back Cover LIMITED WARRANTY ............... Back Cover Note: An EXPLODED DRAWING and PART LIST are attached in the center of this manual.
- Page 3 14.Neverstart thetreadmillwhileyouarestand- 19. Do not change the incline of the treadmill by ing onthe walkingbelt.Alwaysholdthe placing objects under the treadmill. handrailswhileusingthe treadmill. 20. When folding or moving the treadmill, make 15.Thetreadmillis capableof highspeeds. sure that the storage latch is fully closed. Adjustthe speedin smallincrements to avoid suddenjumps in speed.
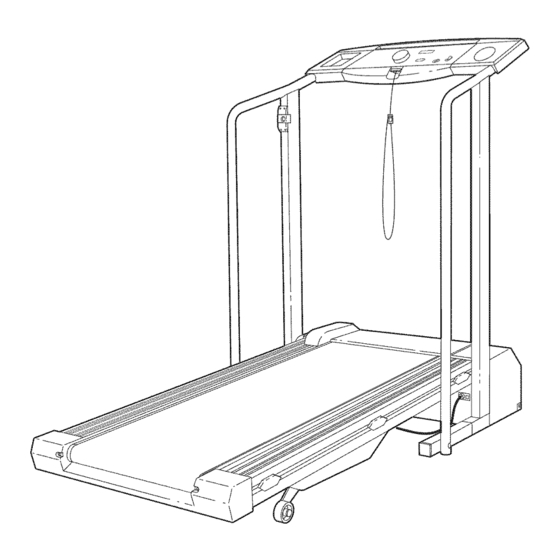
- Page 4 BEFORE YOU BEGIN Thank you for selecting the WESLO 'R; CADENCE 1005 please call our Customer Service Department toll-free treadmill. The CADENCE 1005 treadmill combines ad- at 1-800-999-3756, Monday through Friday, 6 a.m. vanced technology with innovative design to let you until 6 p.m.
- Page 5 ASSEMBLY Assembly requires two people. Set the treadmill in a cleared area and remove all packing materials. Do not dispose of the packing materials until assembly is completed. Refer to the drawings below to identify the small parts used in assembly. Assembly requires the included allen wrench...
- Page 6 3. Cut the plastic tie holding the cage nut in the upper end of Left Handrail (2). Position the Left Handrail (2) on the left Upright (14). The lower end of the Left Handrail should be on the outside of the Extension Leg (41) as shown.
- Page 7 OPERATION AND ADJUSTMENT THE PERFORMANT LUBE WALKING BELT electric shock. This product is equipped with a cord having an equipment-grounding conductor and a Your treadmill features a walking belt coated with grounding plug. Plug the power cord into a surge PERFORMANT LUBE a high-performance...
- Page 8 DIAGRAM OFTHECONSOLE ACAUTION: Before operating the • Adjust the speed in small increments. console, read the following precautions. • The training zones marked around the speed • Do not stand on the walking belt when turning control are general guidelines only. See page on the power.
- Page 9 Measure your pulse, if desired. Reset the console and start the walking belt. Turn the speed To measure your Pulse Sensor control to the RESET pulse, stand on the foot rails and position. Note: Each time the walking belt place your thumb on the is stopped, the speed control...
- Page 10 HOW TO FOLD AND MOVE THE TREADMILL HOW TO FOLD THE TREADMILL FOR STORAGE Unplug the power cord. Caution: You must be able to safely lift 45 pounds (20 kg) in order to raise, lower, or move the treadmill. 1. Hold the treadmill with your hands in the locations shown at the right.
- Page 11 HOW TO LOWER THE TREADMILL FOR USE 1. Hold the upper end of the treadmill with your right hand as shown. Using your left thumb, press the storage latch and hold it. Pivot the treadmill until the frame and foot rail are past the storage latch.
- Page 12 MAINTENANCE AND TROUBLE-SHOOTING Most treadmill problems can be solved by following the steps below. Find the symptom that applies, and follow the steps listed. If further assistance is needed, please call our Customer Service Department toll- free at 1-800-999-3756, Monday through Friday, 6 a.m. until 6 p.m. Mountain Time (excluding holidays). PROBLEM: The power does not turn on SOLUTION: a.
- Page 13 PROBLEM: The walking belt slows when walked on SOLUTION: a. Use only a UL-listed surge protector, rated at 15 amps, with a 14-gauge cord of five feet or less in length. If the walking belt is overtightened, treadmill perfor- mance may decrease and the walking belt may be permanently damaged.
- Page 14 CONDITIONING GUIDELINES Fat Burning _WARNING: Before beginning this To burn fat effectively, you must exercise at a relatively or any exercise program, consult your physi- low intensity level for a sustained period of time. During cian. This is especially important for individu- the first few minutes of exercise, your body uses easily als over the age of 35 or individuals with pre- accessible carbohydrate calories for energy.
- Page 15 Exercise Frequency tween workouts. After a few months, you may com- plete up to five workouts each week if desired. The key To maintain or improve your condition, complete three to success is to make exercise a regular and enjoyable workouts each week, with at least one day of rest be- part of your everyday life.
- Page 16 PART LIST-- Model No. WLTL39091 Rl199A Key No, Qty, Description Key No, Qty, Description Motor Locknut Key/Clip Left Handrail Belt Guide Cage Nut Belly Pan Incline Control Releasable Tie Rear Isolator Screw Cable Tie Clamp Console Base Motor Belly Pan Screw Speed Control Knob 8"...
- Page 17 ',.o .>...
- Page 18 ING in the center of this manual). If possible, place the treadmill near your telephone for easy reference when calling. WESLO is a registered trademark of ICON Health & Fitness, Inc. LIMITED WARRANTY ICON Health & Fitness, Inc. (ICON), warrants this product to be free from defects in workmanship and material, under normal use and service conditions, for a period of ninety (90) days from the date of pur- chase.
Need help?
Do you have a question about the CADENCE 1005 and is the answer not in the manual?
Questions and answers