
Related Manuals for Gigabyte GV-R96P128D


Summary of Contents for Gigabyte GV-R96P128D
- Page 1 GV-R96P128D Radeon 9600 PRO Graphics Accelerator USER'S MANUAL ¤¤¤å¨Ï¥Î¤â¥U Rev. 102 12MD-R96P128D-102...
- Page 2 Corporation and other rights owners. Use of this copyright protection technology must be authorized by Macrovision Corporation, and is intended for home and other limited viewing uses only unless otherwise authorized by Macrovision Corporation. Reverse engineering or disassembly is prohibited. June 20, 2003 Taipei, Taiwan GV-R96P128D Graphics Accelerator - 2 -...
-
Page 3: Table Of Contents
Table of Contents 1. INTRODUCTION ................. 4 1.1. PREFACE ....................4 1.2. KEY FEATURES ..................4 2. HARDWARE INSTALLATION .............. 5 2.1. UNPACKING ....................5 2.2. BOARD LAYOUT ..................6 2.3. HARDWARE INSTALLATION ..............7 3. SOFTWARE INSTALLATION .............. 9 3.1. -
Page 4: Introduction
® the freedom to create more complicated and realistic visual effects than ever before. GV-R96P128D supports the new AGP 8X standard, which allows large volumes of texture and vertex data to be transferred faster from system memory to the chip. -
Page 5: Hardware Installation
DO NOT APPLY POWER TO YOUR SYSTEM IF IT HAS BEEN DAMAGED ON THE CARD. In order to ensure your graphics card working correctly, please use official Gigabyte BIOS only. Use none official gigabyte BIOS might cause problem on the graphics card. - 5 -... -
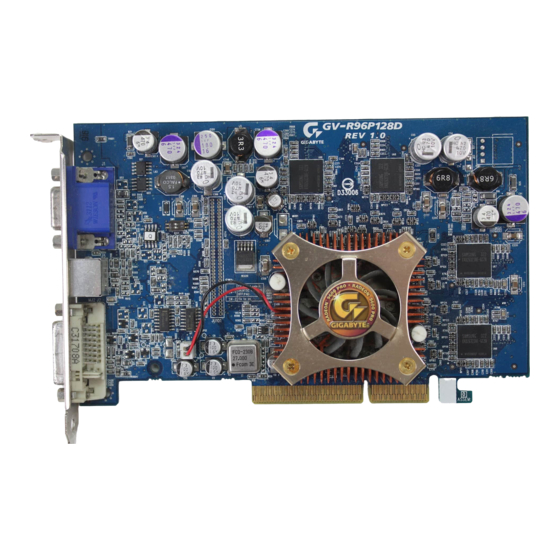
Page 6: Board Layout
2.2. BOARD LAYOUT 1) GV-R96P128D (128MB DDR) VGA Monitor Connector (15pin) TV-Out DVI Connector VGA Output Analog Monitor Analog LCD Monitor VGA Monitor Connector (15pin) AV Output NTSC / PAL TV TV-out S-VideoOutput Projector DVI Output DVI Connector Digital LCD Monitor... -
Page 7: Hardware Installation
2.3. HARDWARE INSTALLATION Installing Your Graphics card. Now that you have prepared your computer, you are ready to install your graphics accelerator card. To install your graphics accelerator card: 1. Power off the computer and monitor, then disconnect the display cable from the back of your computer. - Page 8 Graphics card with the AGP slot, and press it in firmly until the card is fully eated. GV-R96P128D Graphics card AGP Slot 5. Replace the screw to fasten the card in place, and replace the computer cover.
-
Page 9: Software Installation
GV-R96P128D graphics accelerator. 3.1.1. Operating system requirement If your OS is Microsoft Windows, when loading the GV-R96P128D drivers for the system, please make sure your system (Windows 98/98SE, Windows2000 or Windows ME) has installed DirectX 9 or later version. -
Page 10: Directx Installation
98/ 98SE/ Windows 2000/ Windows ® ® ® ME or Windows XP, you must install DirectX 9(or later version) first. ® 1. Install DirectX Driver: Click "Install DirectX 9" Item. 2.Click "Next" icon. 3.Click "Next" icon. GV-R96P128D Graphics Accelerator - 10 -... - Page 11 4.Click "Finish" item. Then the DirectX 9 installation is completed. - 11 - Software Installation...
-
Page 12: Driver Installation
The following is the step-by-step installation guide. Step 1: New Hardware Found After GV-R96P128D is inserted into your computer at the first time, the windows will automatically detect a new hardware in the system and pop out a "New Hardware Found"... - Page 13 3.Click "No" icon. After the system has finished loading, insert the GV-R96P128D driver CD disk into your CD-ROM, and then you can see the AUTORUN window. If it does not show up, please run "D:\setup.exe". Step 5: Driver Setup (Pictures below are shown in Windows XP) 1.
- Page 14 3.Click "Yes". 4. Click "Express" or "Custom" icon. 5. Click "Finish" to restart computer. GV-R96P128D Graphics Accelerator - 14 -...
-
Page 15: Utilities On Driver Cd
3.1.4. Utilities on driver CD The utilities include Display Driver and V-Tuner utilities. Please follow the steps. Install V-Tuner : 1. Click "V-Tuner" item. 2.Click "Next". 3. Enter your name and company. 4. Click "Finish" to restart computer. - 15 - Software Installation... - Page 16 Install Hydravision : 1. Click "Hydravision Install" item. 2.Click "Next". 3.Click "Yes". 4.Click "Next". GV-R96P128D Graphics Accelerator - 16 -...
- Page 17 5.Click "Next". 6. Click "Finish" to restart computer. - 17 - Software Installation...
-
Page 18: Taskbar Icon
Settings. Click the appropriate tab to change your display settings. Right click the icon. You can link to GBT website for updated information about the graphics card, latest drivers, and other information. GV-R96P128D Graphics Accelerator - 18 -... - Page 19 (Core Clock and Memory Clock) Min V-Tuner Display & Adjust Close V-Tuner Core Clock Display Core Clock Display Memory Clock Display & Adjust Memory Clock Link to the Websit of Gigabyte Help Description Close V-Tuner To system Tray - 19 - Software Installation...
- Page 20 VGA Information VGA Info lists the relevant information about your card. Color Adjust Color Adjust allows you to make color adjustments, such as brightness, contrast and gamma values for each or all of RGB colors. GV-R96P128D Graphics Accelerator - 20 -...
- Page 21 GV- ™ R96P128D graphic cards that have more than one display output can benefit fully from this software. A GV-R96P128D with only one display output can still take advantage of the many features of HYDRAVISION ™...
-
Page 22: Display Properties
Disable quick resolution feature is accessible by left-clicking the ATI icon in the taskbar. Reduce DVI frequency on high-resolution displays enables or disables to reduce the DVI frequency when using high-resolution. Alternate DVI operational mode enables or disables alternate DVI operational mode. GV-R96P128D Graphics Accelerator - 22 -... - Page 23 OpenGL Properties: The OpenGL properties page gives you complete control of the OpenGL settings. Main Settings slider Moving the slider to the left will maximize application performance, while moving the slider to the right will pro- vide excellent 3D image quality. Moving this slider from one position to the next changes the individual Custom Set- tings sliders found below.
- Page 24 Defaults button allows you to reset the OpenGL Compat- ibility Settings to default values. Defaults button This button allows you to reset the OpenGL Settings to de- fault values. GV-R96P128D Graphics Accelerator - 24 -...
- Page 25 Direct 3D Properties: The Direct 3D properties page allows you to adjust the Direct 3D settings. Main Settings slider Moving the slider to the left will maximize application performance, while moving the slider to the right will provide excellent 3D image quality. Moving this slider from one posi- tion to the next changes the individual Custom Settings slid- ers found below.
- Page 26 Defaults button allows you to reset the Direct 3D Compatibility Settings to default values. Defaults button This button allows you to reset the Direct 3D Settings to default values. GV-R96P128D Graphics Accelerator - 26 -...
- Page 27 Color Properties: The Color Properties is used to adjust the color settings. It also allows gamma control for video playing of the Video Overlay. The color settings affect all display devices mapped to the view. You can change red, green, and blue display colors. Set Desktop and Video Overlay brightness (gamma) levels can also be changed.
- Page 28 4. Looking at the back of your computer, locate your S-Video Out. Using an S-Video cable or the supplied adapter cable, attach one end of the cable to your graphics card and the other to your television (or VCR). 5. Turn on your television (or VCR) then your computer. GV-R96P128D Graphics Accelerator - 28 -...
- Page 29 Overlay Properties: The Overlay Properties is used to adjust the Brightness / Contrast / Saturation / Hue / Gamma settings. Overlay properties allows for the viewing of full-motion video on your PC. However, there is only one video overlay, which is only available on the Primary display. The video overlay controls are automatically activated during playback of any video file type that supports overlay adjustments.
- Page 30 SMARTGART Properties: ™ The SMARTGART Properties ensures system stability by automatically performing a ™ variety of bus tests that determine your optimal graphics accelerator settings. Changing these settings might result in system instability. GV-R96P128D Graphics Accelerator - 30 -...
-
Page 31: Windows 2000 Driver Installation
® 2 (or later) before installing the graphics accelerator driver. With Windows 2000 running on your computer, you need to install the GV-R96P128D ® driver to take advantage of the higher performance, resolutions, and special graphic features of the Graphics card. To ensure you install the latest driver, use the Installation CD that shipped with your GV-R96P128D Graphics card. -
Page 32: Troubleshooting Tips
For more assistance, use the Troubleshooting Guide located in the Windows ® Help or contact your computer manufacturer. If necessary, adjust your monitor's setting by monitor's adjust panel to make the screen looks focused, crisp, and sharp. (Please refer to the monitor’s manual.) GV-R96P128D Graphics Accelerator - 32 -... -
Page 33: Appendix
5. Appendix 5.1. How to reflash the BIOS? We use GV-AR64SH VGA card and Atiflash BIOS flash utility as example. How to reflash the BIOS for your graphics card? 1. Extract the Zip file to the drive C: or A: 2. -
Page 34: Resolutions And Color Depth Table (In Windows ® Xp)
5.2. Resolutions and Color Depth Table (In Windows ® GV-R96P128D 2D Single Display Modes Display Refresh Color Depth (bpp) Screen Rate 8bpp(256 color) 16bpp(65K color) 32bpp(16.7M) Resolution (Hz) Standard mode High mode True mode 640 x 480 800 x 600... - Page 35 Display Refresh Color Depth (bpp) Screen Rate 8bpp(256 color) 16bpp(65K color) 32bpp(16.7M) Resolution (Hz) Standard mode High mode True mode 1152 x 864 (interlaced) (interlaced) (interlaced) (interlaced) (interlaced) (interlaced) 1280 x 768 1280 x 960 1280 x 1024 (interlaced) (interlaced) (interlaced) (interlaced) (interlaced)
- Page 36 1792 x 1344 1800 x 1440 1856 x 1392 1920 x 1080 1920 x 1200 1920 x 1440 2048 x 1536 * Lower maximum refresh rates at some resolutions when using lower bandwidth memory configuration. GV-R96P128D Graphics Accelerator - 36 -...
- Page 37 - 37 - Appendix...
- Page 38 GV-R96P128D Graphics Accelerator - 38 -...
Need help?
Do you have a question about the GV-R96P128D and is the answer not in the manual?
Questions and answers