Advertisement
Available languages
Available languages
Quick Links
Download this manual
See also:
Owner's Manual
Owner's Manual
ROTARY LAWN MOWER
700 Series Briggs& Stratton Engine
Power-Propelled
22" Multi-Cut
Model No.
917.370680
• EspaSol, p. 20
CAUTION:
Read and follow all
Safety Rules and Instructions
before operating this equipment
Sears, Roebuck and Co., Hoffman Estates, IL 60179 U.S.A.
Visit our Craftsman website: www.sears.com/craftsman
Advertisement

Related Manuals for Craftsman 917.370680


Summary of Contents for Craftsman 917.370680
- Page 1 700 Series Briggs& Stratton Engine Power-Propelled 22" Multi-Cut Model No. 917.370680 • EspaSol, p. 20 CAUTION: Read and follow all Safety Rules and Instructions before operating this equipment Sears, Roebuck and Co., Hoffman Estates, IL 60179 U.S.A. Visit our Craftsman website: www.sears.com/craftsman...
- Page 2 If this Craftsman Lawn Mower fails due to manufacturer defects in material or workmanship within two years from the date of purchase, return it to any Sears store, Parts & Repair Center or other Craftsman outlet for free repair (or replacement if repair proves impossible).
- Page 3 GENERAL OPERATION • Always wear safety goggles or safety Read, understand,and follow all glasses with side shields when operating mower. instructionson the machine and in the manual(s) before starting. Be thoroughly II. SLOPE OPERATION familiar with the controls and the proper Slopes are a major factor related to slip &...
- Page 4 • Never fill containers inside a vehicle, on • Keep nuts and bolts, especially blade a truck or trailer bed with a plastic liner. attachment bolts, tight and keep equip- Always place containers on the ground ment in good condition. away from your vehicle before filling.
- Page 5 Repair Protection Agreements Congratulations on making a smart pur- • Fast help by phone- phone sup- chase. Your new Craftsman® product is port from a Sears representative on designed and manufactured for years of productsrequiringin-home repair, plus dependable operation. But like all prod- convenient repair scheduling.
- Page 6 Read these instructions and this manual in its entirety before you attempt to assemble or operate your new lawn mower. IMPORTANT: This lawn mower is shipped WITHOUT OIL OR GASOLINE in the engine. Your new lawn mower has been assembled at the factory with the exception of those parts left unassembled for shipping purposes.
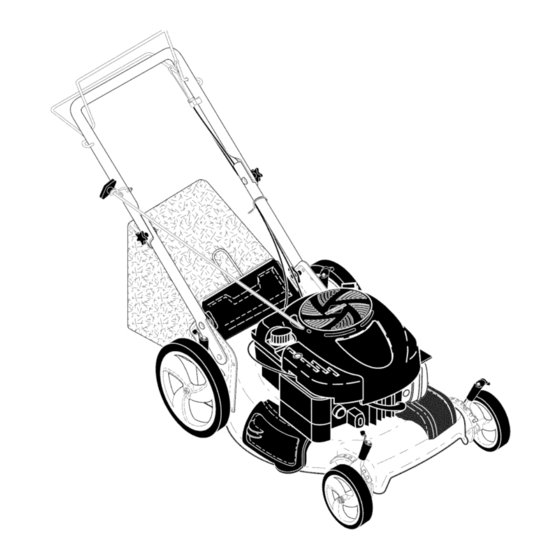
- Page 7 KNOW YOUR LAWN MOWER READ THIS OWNER'S MANUAL AND ALL SAFETY RULES BEFORE OPERATING YOUR LAWN MOWER. Compare the illustrationswith your lawn mower to familiarize yourself with the locationof variouscontrolsand adjustments, Save this manual for future reference. These symbols may appear on your lawn mower or in literature supplied with the product.
- Page 8 The operation of any lawn mower can result in foreign objects thrown into the eyes, which can result in severe eye dam- Operator age. Always wear safety glasses or eye presence shields while operating your lawn mower control bar or performing any adjustments or repairs. We recommend a standard safety glasses or wide vision safety mask worn over DRIVE...
- Page 9 TO CONVERT MOWER Your lawn mower was shipped ready to be used as a mulcher. To convert to bagging or discharging: REAR BAGGING • Lift rear door of the lawn mower and place the grass catcher frame hooks Unloc_ ontothe grass bag brackets, latch •...
- Page 10 TOEMPTY GRASS C ATCHER CAUTION: Wipe off any spilled oil or 1. Liftup on grass catcher using the fuel. Do not store, spill or use gasoline frame handle. ar an open flame. CAUTION: Alcohol blended fuels 2. Remove grass catcher with clippings from under lawn mower handle.
- Page 11 MULCHING MOWING TIPS MOWING TIPS A CAUTION: Do not use de-thatcher IMPORTANT: For best performance, blade attachments on your mower. Such keep mower housingfree of built-up attachments are hazardous, will damage grass and trash. See "CLEANING" in the Maintenance section of this manual. your mower and couldvoid your warranty.
- Page 12 MAINTENANCE AFTER EVERY EVERY BEFORE EVERY BEFORE EACH EACH 25 HOURS SCHEDULE HOURS STORAGE HOURS OR SEASON Check for Loose Fasteners Clean / Inspect Grass Catcher * Check "Fires Check Drive Wheels *** Clean Lawn Mower **** Clean under Drive Cover *** Check Drive Belt / Pulleys *** Check / Sharpen / Replace Blade Lubrication...
- Page 13 LAWN MOWER IMPORTANT: To ensure proper assembly, center hole in blade must align with star Always observe safety rules when per- on blade adapter. forming any maintenance. 3. Be sure trailing edge of blade (opposite TIRES sharp edge) is up toward the engine. •...
- Page 14 GRASS CATCHER 2. Remove engine oil cap; lay aside on a clean surface. • The grass catcher may be hosed with 3. Tip lawn mower on its side as shown water, but must be dry when used. and drain oil into a suitable container. •...
- Page 15 Back plate CLEANING IMPORTANT: For best performance, keep mower housing free of built-grass and trash. Clean the underside of your mower after each use. _kCAUTION: Disconnect spark plug wire from spark plug and place wire where it cannot come in contact with plug. •...
- Page 16 _1_ WARNING: To avoid serious injury, before performing any service and adjustments: 1. Release control bar and stop engine. 2. Make sure the blade and all moving parts have completely stopped. 3. Disconnect spark plug wire from spark plug and place wire where it cannot come in contact with plug.
- Page 17 ENGINE to suspected carburetor problems, take your lawn mower to a Sears or other ENGINE SPEED qualified service center for repair and/or Your engine speed has been factory set. adjustment. Do not attempt to increase engine speed IMPORTANT: Never tamper with the or it may result in personal injury.
- Page 18 ENGINE ENGINE OIL FUEL SYSTEM Drain oil (with engine warm) and replace with clean engine oil. (See "ENGINE" in IMPORTANT: tt is important to prevent the Maintenance section of this manual). gum deposits from forming in essential fuel CYLINDER system parts such as carburetor, fuel filter, 1.
- Page 19 CAUSE PROBLEM CORRECTION Rear of lawn mower Loss of power 1, Raise cutting height. housing or cutting blade dragging in heavy grass. Cutting too much grass. 2. Raise cuttingheight. Dirty air filter. 3. Clean/replace air filter. 4. Clean underside of mower Buildupof grass, leaves, and trash undermower.
-
Page 20: Table Of Contents
Sears, al Centro de Repuestos y Reparaci6n, o a otro comercio donde se vendan los equipos Craftsman, a efectos de que se la reparen sin costo (o bien se la reemplacen, en caso que no sea posible repararla). - Page 21 I, OPERACION • Siempre use gafas de seguridad o anteojos con protecci6n lateral cuando opere la sega- • Antes de empezar, debe familiarizarse dora. completamente con los contrales y el uso correcto de la maquina. Para esto, debe leer y comprender todas las instrucciones que II, OPERACION SOBRE LAS CUESTAS...
- Page 22 • Nunca repostar la mAquina al interior de un • Mantenga las tuercas y los pernos, espe- local. cialmente los pernos del accesorio de la • Nunca guardar la maquina o el contenedor cuchilla, apretados y mantenga el equipo en de gasolina donde hay una llama abierta, buenas condiciones.
- Page 23 Acuerdos de Protecci6n para la Reparaci6n • Ayuda rdpida por teldfono - soporte tele- Congratulaciones por su buena comprs. Su nuevo producto Craftsman® estd diseSado fSnico por parte de un representante Sears y fabdcado para funcionar de modo fiable por sobre productos que requieren un arreglo en muchos a_os.
- Page 24 Lea estas instrucciones y este manual completamente antes de tratar de montar u operar su sega- dora nueva. IMPORTANTE: Este cortac_sped viene SIN ACEITE O GASOLINA en el motor. Su segadora nueva ha sido montada en la fAbrica con la excepci6n de aquellas panes que se de- jaron sin montar por razones de envfo.
-
Page 25: Reglas De Seguridad
FAMILIARICESE CON SUSEGADORA LEA ESTE MANUAL DEL D UENO YLAS REGLAS DE SEGURIDAD ANTES DE OPARAR SEGADORA. Compare las ilustraciones con su segadora para familiarizarse con la ubicaci6n de los diversos controlesy ajustes. Guarde este manual para referencia en el future. Estos sfmbolos pueden apareser sobre su segadora o en la Iiteratura proporcionada con el producto, Aprenda y comprenda sus significados. - Page 26 La operaci6n de cualquier segadora puede hacer que salten objetos extrafios dentro de sus ojos, Io que puede producir dafios graves en _stos. Siempre use anteojos de seguridad o protecci6n para Barra con control los ojos mientras opere su segadora o cuando que exigela haga ajustes o reparaciones.
- Page 27 PARA CONVERTIR LA SEGADORA Su segadora fue enviada lista para usarse como acolchadora de capa vegetal. Para convertirla a una operaci6n de ensacado o de descarga: SEGADORAS CON DESCARGA TRASERA • Levantar la puerta trasera de cortacdsped y colocar los ganchos del armaz6n de la Abr;...
- Page 28 PARA VACIAR EL RECOGEDOR _PRECAUCI6N: Limpie el aceite o el ClaSPED combustible derramado. No almacene, derrame 1. Levante el recogedor de c6sped usando el o use gasolina cerca de una llama expuesta. mango del bastidor. _I_PRECAUCI6N: Los combustibles Remueva el recogedor de c6sped, con los mezclados con alcohol (conocidoscome recortes, de debajo del mango de la sega- gasohol, o el uso de etanol o metanol) pueden...
- Page 29 CONSEJOS PARA SEGAR Y ACOL- OpNSEJOS PARA SEGAR RECAUCION; No utilizar dispositivosanti- CHAR paja de la hoja en la segadora ya que estos IMPORTANTE: Para obtener el mejor accesofios son peUgrosos,pueden dafiar su rendimiento mantenga la caja de la segadora segadora y anular su garantfa.
-
Page 30: Programa De Mantenimiento
PROGRAMA ANTES DESPUES CADA CADA CADA ANTESDEL DECADA DECADA 25 HORASO ALMACE- MANTENIMIENTO HORASTEMPORADARORAS NAMIENTO Revisar si hay Sujetadores Sueltos Limpiar/Inspeccionar el Recogedor de C_sped* Controlar los Neumdticos Controfar las Ruedas Motdces "'* A ] Limpiar ta Segadora ..Limpiar debajo la Cubierta de la Transrnisi6n... - Page 31 SEGADORA Ponga la cuchilla en el adaptador. IMPORTANTE" Para asegurar la instalacion ap- Siempre observe las reglas de seguridad cu- ropiada, posicione el agujero central de la cuchilla ando haga el mantenimiento. con la estrell a del conjunto del adaptador. LLANTAS 3.
- Page 32 RECOGEDOR DE ClaSPED 1. Desconecte el alambre de la bujfa y • El recogedor de c_sped puede ser rociado p6ngalo de modo que no pueda entrar en con el agua de la manguera pero tiene que contacto con _sta. estar seco cuando se vaya a usar. 2.
- Page 33 Instale el cartucho, luego vuelva a porter la LIMPIEZA cubierta asegur&ndose que las orejas est6n IMPORTANTE: Para obtener el mejor alineadas con las ranuras en la plancha rendimineto, mantenga la caja de la segadora trasera. Apdete el tornillo en forma segura. sin acumulaeion de cesped y basura.
- Page 34 _,ADVERTENClA: Para evitar lesi6nes serias, antes de dar calquier servico o de hacer ajustes: 1. Suelte la barra de control y pare el motor. 2. AsegQrese que la cuchilla y que todas las partes movibles se hayan detenido completamente. Desconecte el alambre de la bujfa y p6ngalo en donde no pueda entrar en contacto con 6sta. 6, Reinstale la fijador de la correa y cubierta SEGADORA de la impulsiSn.
-
Page 35: Almacenamiento
MOTOR debido a problemas que se sospecha vienen del carburador, Ileve su segadora a contacto VELOClDAD DEL MOTOR con su centro de servicio Sears o con un otro La velocidad del motor ha sido ajustada en centro de serviciocualificado para reparada y/o la f_brica. - Page 36 MOTOR ACEITE DEL MOTOR SISTEMA DE COMBUSTIBLE Drene el aceite (con el motor caliente) y c_mbielo con aceite de motor limpio. (Vea "MOTOR" en la IMPORTANTE: Es importante evitar que secci6n de Mantenimento de este manual.) se formen depositos de coma en partes fundamentales del sistemade combustible tales come el carburador, el filtro del combustible, CILINDRO...
- Page 37 SOLUCION DE PROBLEMAS - Vea la secci6n apropiada en el manual amenos que est_ dirigido a un centro de servico Sears. PROBLEMA CAUSA CORRECCION Falta de 1. Cuchilladesgastada, doblada 1. Eleve la altura de corte. fuerza o suelta. 2. Altura de las ruedas dispareja. 2.
- Page 38 '\/'...
- Page 39 "0 • X_'- o_ 0 • _8 ° "" >o _.__ ___0._ _o'_.__ _ o gg.5 _D.Z 00Lore _r) co "_t ,,.- "r?n ,,,m rr 0_ ._ "o • • _z._ .O0.t_ _" "8 -_ ° "_ ._x:: >_e ,, 0._.
- Page 40 /° '\./...
- Page 41 ,,-N ._-- O ...o < < "'0...
- Page 42 BRIGGS & STRATTON 4-CYCLE ENGINE MODEL NUMBER 128T02-1270-B1 48 SHORT BLOCK I 1058 OPERATOR'S MANUAL I 1329REPLACEMENTENGINE 1330 REPAIR MANUAL 11(_ 718_ S" 307_ 404 _'...
- Page 43 BRIGGS & STRAT'rON 4-CYCLE ENGINE MODEL NUMBER 128T02-1270-B1 36s _, 0127 957A_ 209J202J...
- Page 44 BRIGGS & STRATTON 4-CYCLE ENGINE MODEL NUMBER 128T02-1270-B1 1036 EMISSIONS LABEL 66_, €'_...
- Page 45 BRIGGS & STRATTON 4-CYCLE ENGINE MODEL NUMBER 128T02-1270-B1 121 CARBURETOR OVERHAUL KIT ,2,° 1°3 27o,= °3 o 358 ENGINE GASKET SET 1770 163 d 617 O "10"€ 5 V'_LVE GA_ I_ET SET I Engine Power Rating Information The gross power rating for individual gas engine models is labeled in accordance with SAE (So- ciety of Automo-tive Engineers) code Jl1940 (Small Engine Power &...
- Page 46 BRIGGS & STRATTON 4-CYCLE ENGINE MODEL NUMBER 128T02-1270-B1 PART PART DESCRIPTION DESCRIPTION 697322 Cylinder Assembly 499423 Pin-Piston (Used Before 399269 Kit-Bushing / Seal Code Date 09041700). (Magneto Side) 797306 Rod-Connecting (Used After 299819S Seal-Oil (Magneto Side) Code Date 09041600). 493279 Sump-Engine 499424 Rod-Connecting...
- Page 47 BRIGGS & STRATTON 4-CYCLE ENGINE MODEL NUMBER 128T02-1270-B1 PART PART DESCRIPTION DESCRIPTION 690783 Lever-Governor Control 690959 Pin-Locating 271716 Washer-Sealing 795755 Gear-Timing (Includes Shim) 690940 Screw (Dipstick Tube) 691648 Screw (Brake) 790830 Thermostat 692047 Dipstick/Tube Assembly 790828 Muffler 493880s Terminal-Spark Plug 790826 697338 Seal-Valve...
- Page 48 You ll find the answer and more on managemyhome.com - for free! i " Find this and all your other product manuals online. i " Get answers from our team of home experts. i " Get a personalized maintenance plan for your home. ! •...
Need help?
Do you have a question about the 917.370680 and is the answer not in the manual?
Questions and answers