Table of Contents
Advertisement
Quick Links
Advertisement
Table of Contents

Subscribe to Our Youtube Channel
Related Manuals for Simmons CaptureView CV-4


Summary of Contents for Simmons CaptureView CV-4
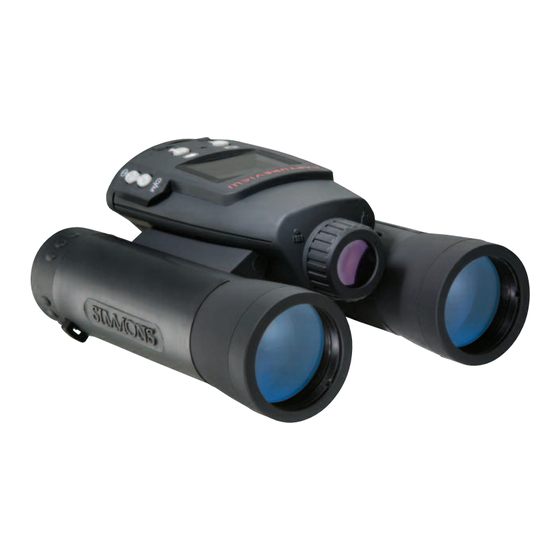
- Page 1 ® CV-4 8 x 30 Digital Camera Binocular...
-
Page 3: Table Of Contents
Contents Quick Start ..................4 Features .................... 7 Introduction..................9 How to Use Your Binocular..............10 Adjust Eye Relief, Adjust the Barrels..........10 Focus the Binocular ..............11 Seal Your Camera, Insert Batteries ..........12 Camera Modes..................13 Move through Menus ................14 Near and Far Focus ................15 Take a Picture ..................16 Capture Video ..................17 Use Flashback ..................18... -
Page 4: Quick Start
Quick Start How to start taking pictures... DSC Icon Install 2 AAA batteries. (Not included.) Menu Button Shutter Turn on camera. Button Left Press and hold down the Menu Right Button button for 3 seconds. Button Select the Still Camera Mode. Press the Menu button. - Page 5 Quick Start How to use Flashback... Have you ever wanted to record just the play of the game (your daughter kicking the winning goal) or capture just the highlight of an event (your son receiving his diploma)? Flashback Flashback when you want to capture icon video of short activities like these—without using up all your memory.
- Page 6 Quick Start How to download your pictures... USB Cable Plug in. Connect CaptureView to your PC or Mac (OS 9.0 or higher) using the included USB cable. Sit back and relax a minute. If using Windows 98ME or higher, CaptureView automatically installs on your PC.
-
Page 7: Features
Features Fig. 2 Fig. 1: Top View 1. Eyepieces 2. Up Button 3. Down Button 4. Left Button 5. Right Button 6. Shutter 7. Menu Button (Power) 8. LCD 9. Barrel 10. Camera Lens 11. Focus Ring 12. Objective Lens 13. - Page 8 Features Fig. 3 1& Fig. 3: Front View 10. Camera Lens 11. Focus Ring 17. Far Focus indicator 18. Near Focus indicator Fig. 4: Inside Battery Compartment 19. USB Port 20. SD Card Port 21. Slots for Batteries (battery polarity indicated) Fig.
-
Page 9: Introduction
Introduction ® ® Congratulations on purchasing a Simmons CaptureView CV-4. CV-4 is an 8 x 30mm full-featured binocular. It is integrated with a waterproof digital camera that requires no film to capture pictures or video. This manual is designed to quickly guide you through the operation of your CaptureView CV-4. -
Page 10: How To Use Your Binocular
Using Your Binocular If you want to... Do this... Adjust Eye Relief If you wear eyeglasses, fold down the Fold down rubber eyecups and hold the eyepieces up against your glasses. Adjust the Barrels 1. Hold CaptureView up to your eyes in the normal viewing position. -
Page 11: Focus The Binocular
Using Your Binocular If you want to... Do this... Focus the Binocular 1. Set the Diopter Scale on underside of CaptureView at its center point Diopter scale between “+” and “-.” 2. Choose an object (such as a telephone pole) that is at least 50 feet (15m.) away. -
Page 12: Seal Your Camera, Insert Batteries
Seal Your Camera CV-4 is waterproof and seals in the electronics, batteries, memory card and USB port. However, this means that you will need to install the batteries and SD or MMC card, and carefully seal the compartment to ensure waterproofing. If you want to... -
Page 13: Camera Modes
Camera Modes CaptureView has three modes: Menu, Preview (Still, Movie and Flashback) and Playback. If you want to... Do this... Use the Preview mode When you first turn on the camera or when you exit the Menu mode, the Preview mode is operational and the Down Shutter LCD screen displays a live image. -
Page 14: Move Through Menus
Moving Through the Menus If you want to... Do this... Turn on Camera Press and hold the Menu button for 3 seconds to turn on the camera. Press the Menu button to display the Display Menus menus. Press the Left button to turn off the display screen. -
Page 15: Near And Far Focus
Near and Far Focus If you want to... Do this... Select Near or Far Focus 1. Press and hold down the Mode button for 3 seconds to turn on the camera. 2. The binocular can be focused using the focus knob. However, the camera can be set to Near or Far focus using the focus ring, and is not affected by the focus knob. -
Page 16: Take A Picture
Taking Pictures and Video CaptureView performs best under good lighting conditions. Take some time to practice capturing still pictures and video. If you want to... Do this... Take a Still Picture 1. Press and hold the Menu button for 3 to 5 seconds to turn on the camera. -
Page 17: Capture Video
Taking Pictures and Video If you want to... Do this... Capture Video 1. Press and hold the Menu button for 3 to 5 seconds to turn on the camera. Point the binoculars and images will appear on the LCD. 2. Press the Menu button again and a Down... -
Page 18: Use Flashback
Other Menu Options If you want to... Do this... Use Flashback For example, you may want to record a baseball pitcher throwing a pitch: This feature is very useful when you 1. Select the Settings menu and press short activity, wish to capture a Menu button. -
Page 19: Some Suggestions For Using Flashback
Other Menu Options Some suggestions for using Flashback Let’s say your daughter is on the varsity basketball team. And right now, she’s dribbling down the court. You’d like to capture her patented hook shot on video. This is a job for Flashback. Select Flashback with a recording period of 10 seconds and press the shutter button as she sets off down court. -
Page 20: Playback
Playback If you want to... Do this... Playback Images To playback your captured images: 1. To see the image(s) that you have captured, move the selection box to Note: A counter appears at the the Playback menu (the right upper left. If the counter reads 3/5, pointing triangle icon) and press the for example, it means the third of Menu... -
Page 21: Playback Options
Playback Options If you want to... Do this... Use the Zoom Function • While in Playback mode, press the Down down buttons to zoom Note: The Zoom feature only in on a still image on the works with still images. display. -
Page 22: Delete Images, Format Storage Media
Playback Options If you want to... Do this..Use Other Playback Options • While in Playback mode, press the Menu button once to display Besides playing back images and Playback setting submenus. video, the Playback menu provides other options: • Select “Back” to exit to Preview mode. -
Page 23: Change Resolution
Playback Options If you want to... Do this... 1. Use the Right Left button to Change Resolution move the selection box over the Resolution menu (the "2M" icon) CaptureView provides four resolution and press the Menu button to settings (displayed as 3M, 2M, display. -
Page 24: Change The Exposure Setting
Playback Options If you want to... Do this... Change the Exposure Setting • Select “Auto” to allow CaptureView to automatically select dark-light The Exposure menu provides exposure of the image. Normally, four options: Auto, Cloudy, you will use this setting. This is the Fluorescent and Tungsten. -
Page 25: Other Menu Options
Other Menu Options If you want to... Do this... Use the Settings Menu Options • Move the selection box over the Settings Menu icon and press the Menu button to display the Settings submenus. The Settings menu provides the following options: Time and Date, Beep, Effects and Screen, Date Stamp, Flicker, Flashback Period and Default. -
Page 26: Adjust The Beep, Select An Effect, Turn Icons On Or Off
Other Menu Options If you want to... Do this... Adjust the Beep • Choose this icon to turn the beep on or off. • Select “Normal” for capturing images Select an Effect without any effects. The Effects and Screen menu •... -
Page 27: The Date Stamp, The Flicker Rate
Other Menu Options If you want to... Do this... • Choose the Date Stamp icon and Record the Date Stamp then select “On” to record the date stamp (the current time and date) while taking still pictures. The date appears in the lower right corner of all pictures. -
Page 28: Mass Storage, Card Present, Battery Life
Other LCD Icons This icon displays... To provide this information... Mass Storage • You are downloading pictures or video to a PC. Card Present Note: You cannot load to • An SD card is in the camera. a Unix system using To load or eject memory card: the camera's USB port—this Press the card in and release when... -
Page 29: Install The Image Editing Software
Installing Software If you want to... Do this... 1. Insert supplied CD Rom into your Install Image Editing Software PC’s drive. (Ulead Photo Express) 2. A splash screen displays. Click on “Ulead Photo Express.” 3. Follow on-screen instructions. 4. After you click “Finish,” the Ulead Photo Express icon appears on your desktop. -
Page 30: A Word About Waterproofing
A Word about Waterproofing CV-4 is designed to be used by the sportsperson, boater or casual user in an environment in which exposure to water, such as rain, mist, splashing and so forth, might be a possibility. However, it is not designed to take pictures underwater nor is it intended for any application underwater. -
Page 31: Other Software And System Requirements
Other Software The included CD ROM contains other software programs by Ulead that will assist you in editing your images, allow you to transfer images to email, and provide you with other useful functions. Ulead Photo Express , Photo Explorer, and Cool 360 , and ®... -
Page 32: Maintenance And Troubleshooting
Maintenance Care of Your CaptureView 1. Remove dust or stains with a soft cloth dampened with water or neutral detergent. Keep in a dry, cool dust-free environment or a container when it is not being used. Do not spray liquid cleaners directly onto LCD. Using only gentle pressure, wipe the LCD with a slightly dampened cleaning cloth. -
Page 33: Specifications
Specifications Binocular power Binocular objective lens diameter 30mm Binocular optical design Folding roof prism, fully-coated Binocular close focus 16 ft. Camera Field of view (diagonal) 7.9° Binocular field of view 367 ft. at 1000 yds. Image capture resolution 1280 x 1024 (1.3 megapixel), 1600 x1200 (2.0 megapixel) 2048 x1536 (3.0 megapixel, interpolated) 640 x 480 (VGA), 24-bit color... - Page 34 ONE YEAR from the date of original purchase in the U.S.A. and Canada. At its option, Simmons will repair or replace the product, or part thereof, found upon inspection by Simmons to be defective, provided the defective part or product is returned to Simmons, as explained below. This warranty applies to the original purchaser only and is non-transferable.
- Page 36 Simmons Outdoor Corporation 6001 OAK CANYON, IRVINE, CALIFORNIA 92618 (949) 451-1450 www.simmonsoptics.com 82-243-01020 v1.0 08/04A...
Need help?
Do you have a question about the CaptureView CV-4 and is the answer not in the manual?
Questions and answers