
Related Manuals for Hanna Instruments HI 4221


Summary of Contents for Hanna Instruments HI 4221
- Page 1 Instruction Manual HI 4221 & HI 4222 pH/mV/ISE/Temperature Bench Meters w w w. h a n n a i n s t . c o m...
-
Page 2: Warranty
Dear Customer, Thank you for choosing a Hanna Instruments product. This manual will provide you with the necessary information for correct use of the instrument. Please read this instruction manual carefully before using the instrument. If you need additional technical information, do not hesitate to e-mail us at tech@hannainst.com or see the back side of this manual for our worldwide sales and technical service contacts. -
Page 3: Table Of Contents
TABLE OF CONTENTS TABLE OF CONTENTS TABLE OF CONTENTS TABLE OF CONTENTS TABLE OF CONTENTS WARRANTY ............................2 PRELIMINARY EXAMINATION ......................4 GENERAL DESCRIPTION ........................4 FUNCTIONAL DESCRIPTION ........................ 5 SPECIFICATIONS ..........................8 OPERATIONAL GUIDE ........................9 DISPLAYING MODES ......................... 11 SYSTEM SETUP .......................... -
Page 4: Preliminary Examination
PRELIMINARY EXAMINATION PRELIMINARY EXAMINATION PRELIMINARY EXAMINATION PRELIMINARY EXAMINATION PRELIMINARY EXAMINATION Remove the instrument from the packing material and examine it carefully to make sure that no damage has occurred during shipping. If there is any damage, notify your dealer or the nearest Hanna Service Center. The meters are supplied complete with: •... -
Page 5: Functional Description
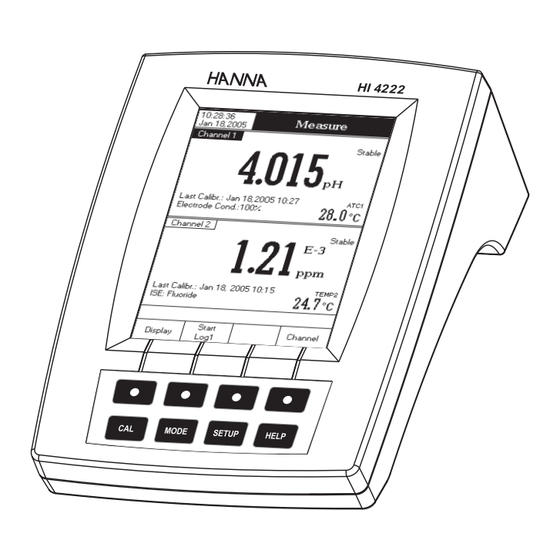
FUNCTIONAL DESCRIPTION FUNCTIONAL DESCRIPTION FUNCTIONAL DESCRIPTION FUNCTIONAL DESCRIPTION FUNCTIONAL DESCRIPTION HI 4221 DESCRIPTION FRONT PANEL REAR PANEL 1) Liquid Crystal Display (LCD) 2) Main Keyboard 3) USB connector 4) ON/OFF switch 5) Power adapter socket 6) RS232 serial communication connector 7) Temperature probe socket 8) BNC electrode connector for pH/ORP measurements 9) Reference input socket... - Page 6 HI 4222 DESCRIPTION FRONT PANEL REAR PANEL 1) Liquid Crystal Display (LCD) 2) Main Keyboard 3) USB connector 4) ON/OFF switch 5) Power adapter socket 6) RS232 serial communication connector 7) Temperature probe socket (Channel 2) 8) BNC electrode connector for pH/ORP/ISE measurements (Channel 2) 9) Reference input socket (Channel 2) 10) Temperature probe socket (Channel 1) 11) BNC electrode connector for pH/ORP/ISE measurements (Channel 1)
- Page 7 KEYBOARD DESCRIPTION FUNCTION KEYS To enter/exit calibration mode. To select the desired measurement mode, pH, mV, Rel mV (or ISE – HI 4222 only). To enter Setup (System, pH, mV or ISE) and to access Log Recall function. To obtain general informations about the selected option/operation. VIRTUAL KEYS The upper row keys are assigned to the virtual keys placed on the bottom of the LCD, which allow you to perform the displayed function, depending on the current menu (e.g.
-
Page 8: Specifications
SPECIFICATIONS SPECIFICATIONS SPECIFICATIONS SPECIFICATIONS SPECIFICATIONS 0 . 2 0 . 0 – 0 . 0 ± 9 . 9 . c n – 6 – 0 . 0 . 0 2 º 0 0 . 4 0 . 8 F º 5 1 . -
Page 9: Operational Guide
OPERATIONAL GUIDE OPERATIONAL GUIDE OPERATIONAL GUIDE OPERATIONAL GUIDE OPERATIONAL GUIDE POWER CONNECTION Plug the 12 Vdc adapter into the power supply socket. Notes: • These instruments use non volatile memory to retain the pH, Ion calibrations and all other settings, even when unplugged. •... - Page 10 CHANNEL SELECTION (HI 4222 only) • Press while in Measure mode to access channel selection menu. Four available options will be displayed: Channel 1, Channel 2, or multi-channel with the first or the second channel focused. The “Choose Channel Configuration” message is displayed in the Reminder messages area.
-
Page 11: Displaying Modes
D I S P L A Y I N G M O D E S D I S P L A Y I N G M O D E S D I S P L A Y I N G M O D E S D I S P L A Y I N G M O D E S D I S P L A Y I N G M O D E S For each measurement mode (pH, mV, Rel mV or Ion) the following display configurations are available:... - Page 12 Graph Accessing this option, the online graph with currently logged values (pH, mV, Rel mV, or ISE vs. Seconds) will be displayed. If there is no active log, the previously logged data for the selected parameter will be plotted. Notes: • If no data were logged, the graph displaying mode will not be accessible. •...
- Page 13 When the online graph is displayed: • Use to move the graph along X (Time) axis. • Press to access the zoom menu for Y axis. Use for zooming Y (parameter) axis. • Press to return to the main menu. When the offline graph is displayed: •...
-
Page 14: System Setup
SYSTEM SETUP SYSTEM SETUP SYSTEM SETUP SYSTEM SETUP SYSTEM SETUP The System Setup menu allows the user to customize the user interface, consult the meter information, set the external serial communication interface and to restore the manufacturer settings. Accessing System Setup while in Measure mode. - Page 15 • Use to select the Beeper option. • Press and use to highlight the desired beeper status option you want to modify. • Press and use to highlight the desired option. • Press to confirm your selection and return to the Beeper menu or press to return to the Beeper menu without changing.
- Page 16 To set the GLP Data: while in Measure mode. • Press • Press • Use to select the GLP Data option. • Press and use to highlight the desired option. • Press to edit the desired information. The Text Editor menu will be displayed on the LCD.
- Page 17 • Use to select the Date & Time option. • Press and use to highlight the desired option you want to modify. • Press to confirm your selection. Use to select next/previous entry to be edit. Press and use to set the desired value, then press to save the modified value (for Set Date and Time option).
- Page 18 Language This option allows the user to choose the desired language in which all information will be displayed. To select the Language: • Press while in Measure mode. • Press • Use to select the Language option. • Press and use to highlight the desired language.
- Page 19 Note: All the instruments are factory calibrated for mV and temperature. After one year following factory calibration, the “Factory Calibration Due” message will appear on the LCD, in the Reminder messages area, notifying the user that the instrument should be taken to the nearest Hanna Customer Service for factory calibration.
-
Page 20: Ph Setup
p H S E T U P S E T U P S E T U P S E T U P S E T U P The pH Setup menu allows the user to set the parameters associated with pH measurement and calibration. These parameters can be set specifically for each channel (HI 4222 only). - Page 21 To set one of the Temperature options: while in pH Measure mode. • Press • Press • Use to select the Temperature option. • Press and use to highlight the desired Temperature option you wish to modify. • Press and use to highlight the desired option (for Temperature Source &...
- Page 22 1st Cal. Point Two options are available for the 1st Cal. Point parameter: Point and Offset. If Point option is selected, the slope values adjacent to the calibration points will be reevaluated (normal calibration). If at least a two-point calibration has been performed and an offset correction of the electrode is wanted (maintaining the existing slope values), perform a one-point calibration using the Offset option.
- Page 23 • Press to exit custom buffer edit menu. If the Saving Confirmation is enabled, press to accept the modified option, to escape without saving or to return to the editing mode. Otherwise, the modified option is saved automatically. • Use key to select the next custom buffer to be set or press to return to Calibration options.
- Page 24 Set Reminder Period If choosing Daily or Periodic options for the Calibration Reminder, the Set Remind Period must be accessed in order to set the time interval until next calibration. The time interval between two calibrations can be set up to 1 day / 1 year for Daily / Periodic options.
- Page 25 Sample ID This option allows the user to give to the measured samples an identification number/name. Two Sample ID options are available: ID Increment Mode and Edit Sample ID. ID Increment Mode Two increment modes for the sample ID can be selected: –...
- Page 26 the user to select the desired character. It is also possible to delete the last character by positioning the cursor on the Backspace character and pressing • Press to return to Sample ID options. If the Saving Confirmation is enabled, press to accept the modified option, to escape without saving or...
- Page 27 To set the Reading Mode: while in pH Measure mode. • Press • Press • Use to select the Reading Mode option. • Press and use to highlight the desired option. • Press to confirm your selection or press cancel operation. This option allows the user to edit the logging settings: Logging Type, Logging Data Configuration, Sampling Period and New Lot.
- Page 28 To set the Logging Data Configuration: while in pH Measure mode. • Press • Press • Use to select the Log option. • Press and use to highlight the Logging Data Configuration option. • Press and use to highlight the desired parameter to be logged in file.
- Page 29 • Use to select the Log option. • Press and use to highlight the New Lot option. • Press to generate a new manual lot. A pop-up menu will be displayed asking for confirmation. • Press to confirm or press to escape without saving and return to the Log options.
- Page 30 To set the Alarm Limits: while in pH Measure mode. • Press • Press • Use to select the Alarm option. • Press and use to highlight the Alarm Limits option. • Press and use to select next/previous entry to be edit. •...
- Page 31 pH Resolution Accessing this option, the desired pH resolution can be set, with one (x.x), two (x.xx) or three (x.xxx) decimals. To set the pH Resolution: • Press while in pH Measure mode. • Press • Use to select the pH Resolution option. •...
-
Page 32: Mv Setup
SETUP SETUP mV SETUP SETUP SETUP The mV Setup menu allows the user to set the parameters associated with mV and Relative mV measurements. These parameters can be set specifically for each channel (HI 4222 only). The settings will be applied only to the active channel. Accessing mV Setup while in Measure mode and then •... -
Page 33: Ise Setup (Hi 4222 Only)
SETUP (HI 4222 SETUP (HI 4222 only only only) ) ) ) ) ISE SETUP (HI 4222 SETUP (HI 4222 SETUP (HI 4222 only only The ISE Setup menu allows the user to set the parameters regarding ISE measurement and calibration. These parameters can be set specifically for each channel. - Page 34 Analyte Addition This method is similar to the Known Addition method, with the difference that an aliquot of sample is added to a standard of known concentration. The sample and standard contain the same ion to be measured. The ion concentration is then calculated using the difference in mV potential.
- Page 35 • Press to confirm your selection or press to cancel operation. Note: If an ISE calibration was performed and the Temperature Compensation option is changed, a warning message appears on the LCD informing the user to perform a new calibration or to set the previous option in order to perform accurate measurements.
- Page 36 To set the Electrode Type: while in ISE Measure mode. • Press • Press • Use to select the Electrode Type option. • Press and use to select the desired standard ISE or a custom one from the list. For standard ISE: •...
- Page 37 • To select the appropriate Electric Charge/Slope use and then press . If the Ion electric charge is None, its slope can be manually set by pressing . A pop-up menu will be displayed on the LCD, in which the slope value can be set using .
- Page 38 Isopotential Point This option allows the user to edit the isopotential point of the electrode used for ion measurements. The ion selective electrodes have different isopotential points. If temperature compensation is desired for the ion measurements, the isopotential point value is absolutely necessary. The isopotential point is always edited in ppm (mg/L) units.
-
Page 39: Ph Calibration & Measurements
pH CALIBRATION & MEASUREMENTS pH CALIBRATION & MEASUREMENTS pH CALIBRATION & MEASUREMENTS pH CALIBRATION & MEASUREMENTS pH CALIBRATION & MEASUREMENTS p p p p p H CALIBRATION H CALIBRATION H CALIBRATION H CALIBRATION H CALIBRATION Calibrate the instrument often, especially if high accuracy is required. The instrument should be recalibrated: •... - Page 40 Three buffer entry types are available: Automatic, Semiautomatic and Manual Selection. The default option is Manual Selection. To calibrate the instrument using Manual Selection buffer entry type: • Press . If the instrument was calibrated before and calibration was not cleared, the old calibration can be cleared by pressing .
- Page 41 • When in MTC mode, if pressing after entering calibration and while a custom pH calibration buffer is selected, a pop-up menu will be displayed on the LCD in which the custom buffer and the temperature value can be ajusted by pressing and then keys.
- Page 42 • Unrecognized buffer. Please check the buffer or the buffer list (for Semiautomatic and Automatic buffer entry type): this message appears if the current buffer value is not close to any of the buffers from the buffer list/group. Check if the current buffer is present in the buffer list or the appropriate buffer group was selected. •...
- Page 43 • To return to normal Measure mode press Note: If the reading is out of range, “-----” will be displayed on the LCD. Outside Cal Range feature warns the user if the current reading is out of the calibrated area. The calibrated area is that part of the pH range in which the calibration point assures an accurate reading.
-
Page 44: Mv & Relative Mv Measurements
mV & Relative mV MEASURE mV & Relative mV MEASURE MENT MENT MENT S S S S S mV & Relative mV MEASURE mV & Relative mV MEASURE mV & Relative mV MEASURE MENT MENT mV/ORP mV/ORP MEASUREMENTS mV/ORP MEASUREMENTS MEASUREMENTS MEASUREMENTS mV/ORP... - Page 45 Relative mV Relative mV Relative mV Relative mV Relative mV MEASUREMENTS MEASUREMENTS MEASUREMENTS MEASUREMENTS MEASUREMENTS To measure the Relative mV of a sample: • Press and then to enter Relative mV Measure mode. • The instrument will display the measured Relative mV value on the LCD, together with a short GLP information about the last calibration or “Not Calibrated”...
-
Page 46: Ise Calibration & Measurements (Hi 4222 Only)
ISE CALIBRATION & MEASURE ISE CALIBRATION & MEASURE MENT MENT MENT S S S S S ISE CALIBRATION & MEASURE ISE CALIBRATION & MEASURE ISE CALIBRATION & MEASUREMENT MENT (HI 4222 only) (HI 4222 only) (HI 4222 only) (HI 4222 only) (HI 4222 only) ISE CALIBRATION ISE CALIBRATION... - Page 47 Two standard entry types are available: ManualSelection and Custom Standard. The default option is Manual Selection. A. To calibrate the instrument using Manual Selection standard entry type: • Press . If the instrument was calibrated before and calibration was not cleared, the old calibration can be cleared by pressing .
- Page 48 • If the standard solution concentration is validated, will appear on the LCD. Press to update calibration. The calibration point value will be added to the Calibrated Standards section. • The “Please wait...” message will appear on the LCD until the reading is stable and 10 seconds elapsed, time in which immerse the Ion Selective Electrode and the temperature probe into the next standard solution and follow the above procedure or press to exit calibration.
- Page 49 • Wrong new slope. Please check the standard solution: this message appears if the current slope exceeds slope window (50% to 120% of default slope for the corresponding ion charge - see ISE Theory section for details, page 54). Recalibrate the instrument using fresh standards. •...
- Page 50 • Add ISAB to the sample solution. • Submerge the Ion Selective Electrode tip and the temperature probe approximately 4 cm (1½”) into the sample to be tested. Allow time for the electrode to stabilize. • The measured concentration value will be displayed on the LCD. If pressing , the “AutoHold”...
- Page 51 • When the reading is stable, press to store the first mV reading. The second step of the method will be displayed on the LCD in which the user is notified to add the Standard Volume of set concentration to the sample. The method parameters are also displayed on the LCD. •...
- Page 52 • Press to change the desired method parameters as indicated in the first step of the method. • Press to take the second mV reading. • When the reading is stable, press to store the second mV reading. The ISE measurement results will be displayed on the LCD.
- Page 53 • If pressing , the method parameters can be changed and the sample concentration will be recalculated. • Press to start another measurement. Note: Press at any time to stop the measurement and return to ISE Measure mode. ANALYTE SUBTRACTION To measure the concentration of a sample using the Analyte Subtraction incremental method: •...
- Page 54 ISE THEORY ISE THEORY ISE THEORY ISE THEORY ISE THEORY An Ion Selective Electrode (ISE) is an electrochemical sensor that changes voltage with the activity or concentration of ions in solutions. The change in voltage is a logarithmic relationship with concentration and is expressed by the Nernst equation: where: E - the measured voltage;...
- Page 55 The Nernst equation can be rewritten: ION SELECTIVE ANALYSIS METHODS Direct Analysis Direct Analysis Direct Analysis Direct Analysis Direct Analysis This method is a simple procedure for measuring multiple samples. It should only be used in the linear working regions of the sensor. A direct reading instrument such as the HI 4222 determines concentration of the unknown by a direct reading after calibrating the instrument with the standards.
- Page 56 where: C - the sample concentration; - the difference of potential from the electrode; SAMPLE - the standard concentration; S - the electrode slope, determined in a previous calibration; - the sample volume; SAMPLE f - the stoichiometric ratio between sample - the standard volume;...
-
Page 57: Logging
L O G G I N G L O G G I N G L O G G I N G L O G G I N G L O G G I N G This feature allows the user to log pH, mV (or ISE - HI 4222 only) measurements, together with temperature automatically. - Page 58 • If accessing Log History option while logging, last logged data can be visualized on the LCD (see Display Mode section for details, page 11). • To stop the logging session, press . The Log Save screen will be displayed in which the logged lot parameters can be set: •...
- Page 59 The “Logging”, sampling period and “AutoHold” indicators will be displayed on the LCD. Note: While automatic logging is running, the measured unit setup is not available. A warning message will be dis- played on the LCD if the setup is accessed. •...
- Page 60 • To store another frozen value, press to return to normal logging mode and then again. • The records will be stored in one lot. In order to change the logging lot, see the measured unit Setup for details, Log option, New Lot generation. LOGGING MODE 5 This logging mode can be used for multiple samples measurement.
- Page 61 • Press to select the desired Log Report type. All logged lots for the selected Log Report type will be displayed on the LCD. • To filter the displayed lots, press and then the desired unit ( HI 4222 only). –...
-
Page 62: Pc Interface
To delete lots: while in Log Recall mode. • Press • Press to access delete or delete all mode. to return to Log Recall view mode. Otherwise, press • After selecting one of the deleting modes, use to select one lot and then press to delete the selected lot or all lots. -
Page 63: Ph Buffer Temperature Dependence
p p p p p H BUFFER TEMPERATURE H BUFFER TEMPERATURE H BUFFER TEMPERATURE H BUFFER TEMPERATURE H BUFFER TEMPERATURE D E P E N D E N C E D E P E N D E N C E D E P E N D E N C E D E P E N D E N C E D E P E N D E N C E... -
Page 64: Electrode Conditioning & Maintenance
E L E C T R O D E C O N D I T I O N I N G E L E C T R O D E C O N D I T I O N I N G E L E C T R O D E C O N D I T I O N I N G E L E C T R O D E C O N D I T I O N I N G E L E C T R O D E C O N D I T I O N I N G... - Page 65 For AmpHel For AmpHel For AmpHel For AmpHel For AmpHel electrodes: electrodes: electrodes: electrodes: electrodes: ® ® ® ® ® If the electrode does not respond to pH changes, the battery run down and the electrode should be replaced. MEASURE Rinse the pH electrode tip with distilled water.
-
Page 66: Troubleshooting Guide
T R O U B L E S H O O T I N G G U I D E T R O U B L E S H O O T I N G G U I D E T R O U B L E S H O O T I N G G U I D E T R O U B L E S H O O T I N G G U I D E T R O U B L E S H O O T I N G G U I D E... -
Page 67: Temperature Correlation For Ph Sensitive Glass
TEMPERATURE CORRELATION TEMPERATURE CORRELATION TEMPERATURE CORRELATION TEMPERATURE CORRELATION TEMPERATURE CORRELATION FOR p p p p p H SENSITIVE GLASS H SENSITIVE GLASS H SENSITIVE GLASS H SENSITIVE GLASS H SENSITIVE GLASS The resistance of glass electrodes partially depends on the temperature. The lower the temperature, the higher the resistance. -
Page 68: Accessories
A C C E S S O R I E S A C C E S S O R I E S A C C E S S O R I E S A C C E S S O R I E S A C C E S S O R I E S pH BUFFER SOLUTIONS HI 6001... - Page 69 ORP PRETREATMENT SOLUTIONS HI 7020L Test Solution 200-275 mV, 500 mL bottle HI 7021L Test Solution 240 mV, 500 mL bottle HI 7022L Test Solution 470 mV, 500 mL bottle HI 7091L Reducing Pretreatment Solution, 500 mL HI 7092L Oxidizing Pretreatment Solution, 500 mL pH ELECTRODES All electrodes part numbers ending in B are supplied with a BNC connector and 1 m (3.3') cable, as shown below:...
- Page 70 HI 1131B Glass-body, single junction, refillable, combination pH electrode. Use: general purpose. HI 1330B Glass-body, semimicro, single junction, refillable, combination pH electrode. Use: laboratory, vials. HI 1331B Glass-body, semimicro, single junction, refillable, combination pH electrode. Use: flasks. HI 1230B Plastic-body (PEI ), double junction, gel-filled, combination pH electrode.
- Page 71 HI 2031B Glass-body, semimicro, conic, refillable, combination pH electrode. Use: semisolid products. HI 1332B Plastic-body (PEI ), double junction, refillable, combination pH electrode. ® Use: general purpose. HI 1413B Glass-body, single junction, flat tip, Viscolene, non-refillable, combination pH electrode. Use: surface measurement. FC 100B Plastic-body (PVDF ), double junction, refillable, combination pH electrode.
- Page 72 FC 200B Plastic-body (PVDF ), open junction, conic, Viscolene, non-refillable, combination pH electrode. ® Use: meat & cheese. FC 210B Glass-body, double junction, conic, Viscolene, non-refillable, combination pH electrode. Use: milk, yogurt. FC 220B Glass-body, triple-ceramic, single junction, refillable, combination pH electrode. Use: food processing.
- Page 73 ORP ELECTRODES HI 3131B Glass-body, refillable, combination platinum ORP electrode. Use: titration. HI 3230B Plastic-body (PEI ), gel-filled, combination platinum ORP electrode. ® Use: general purpose. HI 4430B Plastic-body (PEI ), gel-filled, combination gold ORP electrode. ® Use: general purpose. Consult the Hanna General Catalog for more electrodes with screw-type or BNC connectors.
- Page 74 EXTENSION CABLE FOR SCREW-TYPE ELECTRODES (SCREW TO BNC ADAPTER) HI 7855/1 Extension cable 1 m (3.3') long HI 7855/3 Extension cable 3 m (9.9') long HI 7855 SERIES CABLE CONNECTORS CONNECTOR AND 3.0 mm (0.12") CABLE WITH BNC CONNECT TO THE CONNECT TO BNC SOCKET SCREW TYPE...
- Page 75 To avoid electrical shock, do not use these instruments when voltages at the measurement surface exceed 24 Vac or 60 Vdc. To avoid damage or burns, do not perform any measurement in microwave ovens. Hanna Instruments reserves the right to modify the design, construction and appearance of its products without advance notice.
- Page 76 SALES AND TECHNICAL SERVICE CONTACTS SALES AND TECHNICAL SERVICE CONTACTS SALES AND TECHNICAL SERVICE CONTACTS SALES AND TECHNICAL SERVICE CONTACTS SALES AND TECHNICAL SERVICE CONTACTS Australia: Tel. (03) 9769.0666 • Fax (03) 9769.0699 China: Tel. (10) 88570068 • Fax (10) 88570060 Egypt: Tel.
Need help?
Do you have a question about the HI 4221 and is the answer not in the manual?
Questions and answers