Elmo Ceiling Presenter HV-C1000XG Instruction Manual
Ceiling presenter
Hide thumbs
Also See for Ceiling Presenter HV-C1000XG:
- Catalogue (4 pages) ,
- Brochure & specs (2 pages)

Related Manuals for Elmo Ceiling Presenter HV-C1000XG


Summary of Contents for Elmo Ceiling Presenter HV-C1000XG
- Page 1 CEILING PRESENTER HV-C1000XG INSTRUCTION MANUAL Please read this instruction manual carefully before using this product and keep it for future reference.
-
Page 2: Important Safeguards
IMPORTANT SAFEGUARDS I Read Instructions – All the safety and operating instructions should be read before the appliance is operated. I Retain Instructions – The safety and operating instructions should be retained for future reference. I Heed Warnings – All warnings on the product and in the operating instructions should be adhered to. - Page 3 I Grounding or Polarization – This product may be equipped with either a polarized 2-wire AC line plug (a plug having one blade wider than the other) or a 3-wire grounding type plug, a plug having a third (grounding) pin. The 2-wire polarized plug will fit into the power outlet only one way.
- Page 4 I Damage Requiring Service – Unplug this product from the wall outlet and refer servicing to qualified service personnel under the following conditions: G When the power-supply cord or plug is damaged. G If liquid has been spilled, or objects have fallen into the product.
- Page 5 lightning flash arrowhead symbol, within an equilateral triangle, is intended to alert the user to the presence of uninsulated "dangerous SA 1965 voltage" within the product's enclosure that may be of sufficient magnitude to constitute a risk of electric shock to persons.
- Page 6 BEFORE YOU USE I Use this product under the rated electrical conditions. I Do not leave this product under direct sunlight or by heaters, or this product may be discolored, deformed, or damaged. I Do not place this product in any humid, dusty, windy or vibrating location.
-
Page 7: Table Of Contents
4. INSTALLATION Installation of the Unit ...14 Setting of Auto Focus Operating Range ...14 Connection to Monitor and Projector ...15 Connection to the analog RGB-out terminal ...15 Connection to the composite video-out terminal ...15 Connection to the S video-out terminal ...15 5. - Page 8 1. PART NAMES AND FUNCTIONS 2. WIRELESS REMOTE CONTROL 3. MOUSE 4. INSTALLATION 5. OPERATION PROCEDURES 6. VARIOUS FUNCTION AND OPERATIONS 7. OSD 8. RS-232C SPECIFICATIONS 9. REPLACING THE LAMP 10. TROUBLESHOOTING HINTS 11. SPECIFICATIONS CONTENTS 8. RS-232C SPECIFICATIONS Setting Up...32 Cable Connection...32 Connection ...33 Transmission Specifications ...33...
-
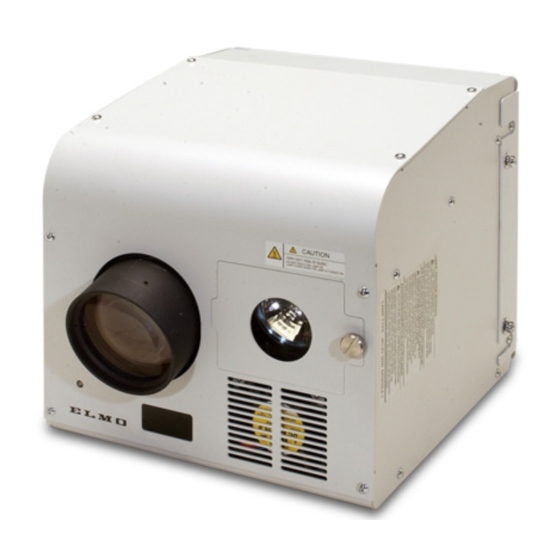
Page 9: Part Names And Functions Appearance
PART NAMES AND FUNCTIONS Appearance Lens Ceiling mounting screw hole Lamp cover Setscrew Ventilation outlet Halogen lamp Infrared ray receptor... -
Page 10: Connector Panel
PC. Image is output when this terminal is connected to RGB input equipment (e.g., LCD projector, multi-sync monitor). To connect the mouse (supplied accessory)(*1). If connected to personal computer with the attached USB cable, it is possible to... - Page 11 Name Power Cord Receptacle Connected to the power cord connector. [ AC IN ] Power Supply Switch To turn ON/OFF the power supply. [POWER] Wireless Remote Control POWER POWER PAUSE PAUSE PRESET PRESET . SET PRESET . CALL POSI/NEGA COLOR/B&W POSI/NEGA COLOR/B&W MENU...
- Page 12 Button Name POWER PAUSE DIGITAL MAGNIFICATION ARROWS MEMORY NO. PRESET . SET STATUS PRESET . CALL IMAGE . SET IMAGE IMAGE . CALL POSI/NEGA COLOR/B&W CONTRAST LAMP MENU IMAGE ROTATION F.A.M. ZOOM TELE WIDE FOCUS NEAR AUTO FOCUS IRIS NORMAL OPEN CLOSE Function...
-
Page 13: Wireless Remote Control
WIRELESS REMOTE CONTROL Receivable Range Point the infrared emitting part of the wireless remote control at the infrared sensor of this product, and press the button for desired function. The receivable range may be narrowed or the light may not be received when this product is placed under sunlight, near an inverter fluorescent lamp or in any other unfavorable surroundings. -
Page 14: Mouse
If the cable is extended, use the commercial cable for extension or consult the distributor. The OSD menu is assumed to be used for large projection sizes with a projector or the like. Therefore, the display on a hand monitor or a TV may be hard to see. -
Page 15: Installation Installation Of The Unit
For the ceiling mounting metal piece, VB-1000 separately available, any product approved by UL Standard for projector which is capable of supporting a load of 8-10 kg or more, or similar product also approved by UL Standard shall be used. Request your distributor to install this product on the ceiling. -
Page 16: Connection To Monitor And Projector
At this time, the position of the display may be deviated from the center. If deviated, manually adjust the horizontal and vertical positions on the connected equipment. Also, vertical stripes may appear on the screen of the LCD projector. That can be alleviated by manually adjusting the dot clock frequency on the projector. -
Page 17: Operation Procedures Simple Steps For Presenting Printed Material
OPERATION PROCEDURES Simple Steps for Presenting Printed Material Push the [POWER] button of the wireless remote control to turn ON the power (Indicator LED on the unit turns from red to green). Connection with the monitor should be done in advance. -
Page 18: Various Functions And Operation
VARIOUS FUNCTIONS AND OPERATION Lighting Lighting for presenting information such as printed materials is provided. When the [LAMP] button on the wireless remote control is pressed, the lamp is lit. When the [LAMP] button is pressed again, the lamp goes off. T o o b t a i n a s h a r p i m a g e w i t h g o o d c o l o r rendering, it is sometimes necessary to use the lighting. -
Page 19: Digital Magnification
Digital Magnification To double the image, press the [2x] button on the wireless remote control or click the Right button of the mouse. Enlarged screen can be scrolled by operating the arrow button on the wireless remote control or by operating the mouse. -
Page 20: Color / B&W Selection
Color / B&W Selection To present the B&W (Black&White) material such as documents. Sharper image with no color blur on the monitor can be produced. If the [COLOR/B&W] button on the wireless remote control is pressed, images are switched. When PAUSE is effective, COLOR/B&W selection does not work. -
Page 21: Posi / Nega Conversion
Posi / Nega Conversion To show a negative film. Press the [POSI / NEGA] button on the wireless remote control, the image will be converted to the NEGA mode accordingly. When the [POSI / NEGA] button is pressed again, the POSI mode is resumed. When using the NEGA conversion mode, use of the following is restricted. -
Page 22: Pause
Pause When the [PAUSE] button on the wireless remote control is pressed, the image from the unit’s camera pauses. When the [PAUSE] button is pressed again, the PAUSE mode is canceled. W h e n P A U S E c o n v e r s i o n , I M A G E R O A T I O N , C O L O R / B &... -
Page 23: Frame Accumulate Mode)
F.A.M. (Frame Accumulate Mode) This is used to reduce artifacts of the image, and is appropriate to take pictures of still objects. Press the [F.A.M.] (Frame Accumulate Mode) button on the wireless remote control, and the [F.A.M.] is selected. Press the [F.A.M.] (Frame Accumulate Mode) button again, and the normal status is resumed. -
Page 24: Focus
Focus Adjust the focus of the object. I Auto Focus When the [AF](AUTO FOCUS) button on the wireless remote control is pressed, the focus is set automatically. This product features a one-push AUTO FOCUS function. Once focusing is completed, the AUTO FOCUS function is released, and the focused position maintains unchanged (FOCUSFREE). -
Page 25: Powered Manual Focus
I Power Manual Focus To focus on specific part of the material, such as 3-D material. Press the FOCUS button FOCUS FOCUS ] on the wireless remote control. This product can finely adjust the focus. For minor adjustments, press the FOCUS button several times. For major adjustments, keep the FOCUS button p r e s s e d , t h e n t h e f o c u s b e g i n s t o m o v e m o r e quickly. -
Page 26: Preset Operation
Preset Operation Operation status of this product can be stored / read out in the memory (max. 8 states can be stored). Operation states that can be stored are as shown below. • Present zoom angle of view • Status of IRIS •... -
Page 27: Image Memory
"Utility Software CD-ROM" The attached "Utility Software CD-ROM" contains the PC link software "Image Mate" and the TWAIN driver "ELMO TWAIN DS, "and can be operated as shown below. • To transfer graphic data to PC. • To operate this product by PC. -
Page 28: Osd (On-Screen Display)
OSD (On-Screen Display) OSD (On-Screen Display) means the operating menu displayed on the screen (hereinafter called OSD menu). The OSD menu is operable by the wireless remote control or mouse. OSD Operation 1. When the [MENU] button on the wireless remote control is pressed, a pointer is displayed. -
Page 29: Main Menu
Main Menu Icon Name Lamp Color/B&W selection Posi/Nega conversion Image rotation Pause Aperture selection Pointer Function Reference Pages To turn ON/OFF the lighting. When power is turned ON, the previous saved setting remains. To switch the selection of the Color/B&W of the screen. When power is turned ON, the previous saved setting remains. - Page 30 Icon Name Status saving Initialization Focus Near/Far Auto Focus Zoom Tele/Wide Iris Close/Open Function Reference Pages To save initial status when power is turned ON. For the mouse pointer ON/OFF selection the same items stored in the Preset/Move operation are saved.
-
Page 31: Sub Menu
Sub Menu White Balance Adjustment menu Icon Name White Balance Auto One-push Manual Power Supply Off Gamma menu Timer Function Reference Page To display the White Balance Adjustment menu. When this button is pressed again, the White Blance Adjustment menu is closed. - Page 32 Icon Name Gamma adjustment Power Supply Off Timer Function Reference Page To change the Gamma setting value (00(1.0) / 01(0.9) / 02(0.8) / 03(0.7) / 04(0.6) / 05(0.5) / 06(0.4) / 07(0.3)). The factory setting is “04 (0.6).” Gamma cannot be adjusted when the CONTRAST is ON in the negative status.
-
Page 33: Setting Up
RS-232C SPECIFICATIONS This product can be controlled by a PC connected through the RS-232C terminal [RS-232C]. Setting Up Connect this product to a PC with an RS-232C connection cable. When using an RS-232C cable available in the market, select a cable with the connection shown below. -
Page 34: Connection
Connection If the RS-232C cable is not correctly connected between this product and the PC, no acknowledgement is transmitted. Connect the RS-232C cable correctly, and fix it firmly with the connector set screws before the operation. Transmission Specifications • Full duplex start-stop sync. mode •... -
Page 35: Response Data Format (Ceiling Presenter → Pc)
I Response data format (Ceiling Presenter→ PC) All response data is transmitted as ASCII code, and it covers parameter of the table of operation command table. • Status 0 Lamp Posi / on/off Nega • Status 2 γ Image adjustment rotation •... -
Page 36: Uart Communication Format
UART Communication Format Commands, parameters and data are all transmitted in ASCII code. Function Command Auto Focus Focus + (NEAR) adjustment – (FAR) 0 (STOP) Zoom + (TELE) adjustment – (WIDE) 0 (STOP) Iris adjustment + (OPEN) – (CLOSE) 0 (STOP) 1 (AUTO) 2 (MANUAL) Lamp... - Page 37 Function Command Parameter F.A.M. 0 (OFF) selection 1 (ON) Image Store Image Read Image Switch Contrast 0 (OFF) 1 (ON) Local Lockout 0 (OFF) 1 (ON) Default Status request Rom version ACK check 0 (OFF) 1 (ON) CR addition 0 (OFF) 1 (ON) Power Supply 0 (OFF)
-
Page 38: Replacing The Lamp
REPLACING THE LAMP Replacing the Lamp The lamp that is installed in the product has a certain life span. When the lamp is used for a long period, the lamp light may become dark or the lamp may go off due to the end of its life. (The life of the lamp varies according to the utilization condition.) In this case, replace the lamp. -
Page 39: Troubleshooting Hints
TV scanning lines or CCD pixels, which may be mitigated by changing the projection range. • When using an LCD projector, vertical stripes may appear on the screen. This may be mitigated by manually adjusting the dot clock frequency on the projector side (refer to P. 15). -
Page 40: Specifications
SPECIFICATIONS I General Item Power source AC100 - 240V 50Hz/60Hz Rated current 1.2 - 0.6A 226mm × 226mm × 239mm (8.9 × 8.9 × 9.4 in.) Dimensions (W × D × H) Weight 6.5 kg (14.3 lbs.) (main body only) Output terminal RGB output Composite Video output... -
Page 41: Camera
I Camera Item Lens f = 14.2 – 170mm (12 - time zoom), F2.6 – 2.7 Frame rate 20 frames / sec Shooting area(H × V) 662mm × 511mm (26.0 × 20.1 in.) max. (Projection -> photographing 53mm × 41mm (2.1 × 1.6 in.) min. distance: 2m(78.7in)) Limit of focus Distance from the unit to the text (object of shooting):... -
Page 42: Supplied Accessories
The above specifications are subject to change without notice. Trademark Acknowledgements VESA is a registered trademark of Video Electronics Standards Association. VGA, SVGA, XGA and SXGA are trademarks or registered trademarks of International Business Machines Corporation. , VISUAL PRESENTER, FOCUSFREE are trademarks of ELMO Co., Ltd. Name Quantity... - Page 43 [MEMO]...
- Page 44 U.S.A. ELMO Mfg. Corp. 1478 Old Country Road, Plainview, NY 11803-5034 Tel:(516)501-1400 E-mail: elmo@elmousa.com Web: http://www.elmousa.com/ Canada ELMO Canada Mfg. Corp. 44 West Drive, Brampton, Ontario L6T 3T6 Tel:(905)453-7880 E-mail: info@elmocanada.com Web: http://www.elmocanada.com/ Germany ELMO (Europe) G.m.b.H. Neanderstr. 18, 40233 Düsseldorf Tel:(0211)376051 E-mail: elmoeurope@AOL.com...
Need help?
Do you have a question about the Ceiling Presenter HV-C1000XG and is the answer not in the manual?
Questions and answers