Table of Contents
Advertisement
Advertisement
Table of Contents

Related Manuals for TerraTec Aureon 7.1 FireWire


Summary of Contents for TerraTec Aureon 7.1 FireWire
- Page 1 Manual (English) Mac and PC Version: 6/20/2007...
- Page 2 CE Declaration TerraTec Electronic GmbH, Herrenpfad 38, D-41334 Nettetal, Germany hereby declare that the product: SoundSystem Aureon 7.1 FireWire to which this declaration refers is in compliance with the following standards or standardizing documents: 1. EN 55022 Class B 2. EN 55024 The following are the stipulated operating and environmental conditions for said compliance: residential, business and commercial environments and small-company environments.
-
Page 3: Table Of Contents
Using the outputs as individual outputs (ASIO) (PC only) ........... 26 Speakers ........................... 29 Misc ..........................30 Surround sound for DVD night with your PC................31 Appendix A—Frequently Asked Questions (FAQ)..............32 Appendix B—Service at TerraTec....................32 SoundSystem Aureon 7.1 FireWire (English) - Page 4 Welcome! We're pleased that you have chosen a sound system by TerraTec and would like to congratu- late you on this decision. With this development, the highest-quality audio technology is finally at your disposal in the form of an attractive external device. You've purchased a sophis- ticated product representing the state of the art of audio technology.
- Page 5 We're convinced that even experienced users will profit from this guide. Thank you..your TerraTec Team SoundSystem Aureon 7.1 FireWire (English)
-
Page 6: From Opening The Package To Installation
Software and driver CD (Mac and PC) • Quick Setup Guide (Mac and PC) • Customer service card • TerraTec registration card with the serial number Before we continue, we have a couple of basic instructions. SoundSystem Aureon 7.1 FireWire (English) -
Page 7: Setup, Safety And Care Information
Setup, safety and care information. • To prevent fire, electric shock or damage to the device, always place it on a level and dry surface. • Keep it away from radiators and ensure that the player is at a safe distance from other hi-fi devices to prevent overheating. -
Page 8: Installation Under Mac Os
Installation under Mac OS 1. Insert the CD provided and open it using the CD / DVD symbol on your desktop. 2. A window with 3 folders opens. Double-click the Control Panel to open it. 3. This contains the installation file *.dmg. Double-click this file to launch the installation process. -
Page 9: The Control Panel In Mac Os
The Control Panel in Mac OS Open the Control Panel folder using the corresponding Aureon symbol. You should now see the following window. The individual faders: Input: The Input fader adjusts the volume of the individual inputs such as Line, Phone, Mic or S/PDIF (S/PDIF is enabled only if a signal is pre- sent). -
Page 10: Audio/Midi Configuration (Mac Only!)
Audio/MIDI configuration (Mac only!) The Audio/MIDI configuration (Local hard drive -> Programs -> Utilities) under Mac OS allows you to control each input and output individually. For example, this tool allows you to “map” any input to any output. Explanation of the individual segments: In the fields marked in red, “System settings”... -
Page 11: Configuring The Speakers (Mac Only!)
Configuring the speakers (Mac only!) To test the individual speakers and/or adjust them yourself, use the “Configure speakers” button in the Audio/MIDI configuration screen. Explanation of the individual segments: In the top section, you can select between “Stereo” and “Multichan- nel”... -
Page 12: Surround Sound For A Dvd Night With Your Mac
Surround sound for a DVD night with your Mac To provide the full enjoyment of eight separate speakers for a cozy DVD night with friends, your Mac needs software that supports 7.1 playback. This software must include a Dolby Decoder for you to be able to use the Dolby function. We recommend the VLC (VideoLAN Cli- ent) freeware program. -
Page 13: The Control Panel In Windows Xp / Vista
Start the Control Panel by clicking the speaker icon which has been installed on your desktop, or via “START > PROGRAMS > TERRATEC > Aureon 7.1 FIREWIRE > CONTROLPANEL”. You can see whether the Control Panel is currently active in memory by looking for the small speaker icon next to the clock. - Page 14 Mute LED. This diode indicates the mute status. To release the mute, push the master volume again. The other faders (for Windows XP only!). The WAVE controller affects the playback volume of programs such as Windows Media Player. If a program transmits MIDI signals to the software synthesizer, the volume can be adjusted using the “SYNTH”...
- Page 15 Either Sensaura®3D or Digital In. Because the Sensaura® program libraries run at a fixed sampling frequency of 48 kHz, a different sampling frequency, specified by another digital device, would cause severe mal- function. Therefore, the digital input is disabled when the Sensaura® feature is switched on. Note: Sensaura®3D works in Windows XP 32-bit only! None of the other operating systems, such as Windows XP 64-bit, Windows Vista 32-bit or Windows Vista 64-bit, have this function.
-
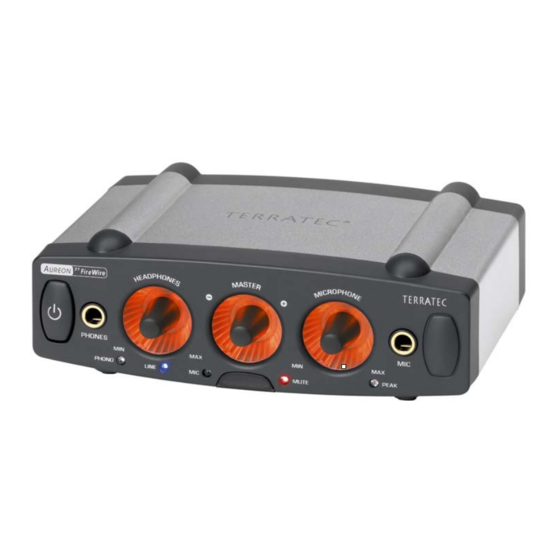
Page 16: An Overview Of The Aureon 7.1 Firewire Module
An overview of the Aureon 7.1 FireWire Module First, let's examine the connections, buttons and lamps on both sides of the module. The front … 1. Analog headphone audio output (for 1/4 " jack) 2. Volume controller for the headphone output (analog potentiometer) 3. - Page 17 … and the back A. FireWire connections (both are equivalent) B. Audio input for a turntable C. Audio line level input (for a tape deck, tuner etc.) D. Stereo output, or for multichannel applications, front left and front right E. Stereo output, or for multichannel applications, rear left and rear right F.
-
Page 18: The Firewire Connection
The FireWire connection Different symbols, but only one meaning. Regardless of whether your notebook or Mac / PC marks the connections with “FireWire”, “iLink”, “1394” or simply with a , all of them mean the same thing: the Aureon 7.1 FireWire (or other FireWire devices) is connected correctly. The jack on your PC can have either of two various forms: This port, which is significantly smaller than the other kind, is 4-pin... - Page 19 Connection to your stereo system. Before you finally connect the device, you should have already established the corresponding connections to recording and playback devices. Please make sure that any connected speak- ers or headphones are set at an appropriate volume to avoid damage to the devices, and to avoid damaging your hearing! You can find more detailed information on connecting these audio devices in the following chapters.
-
Page 20: The Audio Inputs
The audio inputs The microphone input The high-quality microphone input with microphone preamp is located on the front of the Aureon module. You can connect commercially available condenser microphones with “large” phone plugs (1/4") to this input. Use either of the included adapters if you want to connect a microphone with a 3.5mm phone plug (such as a headset mic) to the jack. -
Page 21: The Line Input
The line input A line input is located on the rear of the Aureon SoundSystem. You can use it to connect ana- log devices with line outputs, such as the audio output of a radio or video recorder. If you are not using a cassette deck, a connection to the output on your amplifier marked “TAPE OUT”... -
Page 22: The Digital Input
Thus you can use this input to transfer music from your old vinyl collection directly to your hard drive, process it and archive it on CD. You can find the required software on the included CD-ROM, along with tips and tricks to help you along. The digital input With this input, located on the back of the module (“DIGITAL IN”), you can connect devices using an optical cable (also called a fiber-optic cable or Toslink cable). - Page 23 function. Therefore, the digital input is disabled when the Sensaura® feature is switched on. Here, too, we refer you to page 14 (Advanced settings.) about the Control Panel. Technology. The digital interface supports bit-precise recording of digital signals in all relevant resolutions up to 24-bit, at a frequency of up to 96 kHz.
-
Page 24: The Audio Outputs
The audio outputs As you have probably already discovered, your Aureon SoundSystem has, in addition to head- phones, a digital output via 8 line outputs to allow fantastic home theater-quality gaming in surround sound with up to a 7.1 channel configuration. Let's check them out one at a time... The headphone output You can connect headphones to this 1/4 "... - Page 25 can be connected to which part of the surround system. The list is arranged according to the number of speakers, from the classic stereo speaker setup to the world of the 7.1 experience. STEREO FRONT (L) for the two front speakers STEREO FRONT (R) Left (L) and Right (R) 4.1 REAR (L)
-
Page 26: The Digital Output
4.1 is 4.0 is 4.1. If you want to integrate the module into a 4.1 system, connect the two rear speakers to the second stereo output according to the labels. Strictly speaking, the 4.1 designation is slightly misleading—as the digits may lead one to believe that the system has five separate channels, also referred to as discrete channels. - Page 27 software synthesizers with almost no latency, allowing you to use them in compositions and arrangements. However, the latency is directly dependent on the performance of your system as a whole, and therefore can vary greatly. To allow error-free operation on an individual basis, various latencies can be set using the Control Panel—for more information, see page 14 (Advanced settings.).
- Page 28 You now have the option of selecting the corresponding stereo output here. The assignments are as follows: 1 + 2 STEREO FRONT ( L ) + STEREO FRONT ( R ) 3 + 4 5.1 CENTER ( C ) + 5.1 SUBWOOFER ( SW ) 5 + 6 4.1 REAR ( L ) + 4.1 REAR ( R ) 7 + 8...
-
Page 29: Speakers
Speakers On this screen, you can adjust the relative volume levels of the various individual speakers. Corresponding to the speaker setup you have chosen under “Configuration”, the controllers you do not need are disabled. If a controller is at its maximum position, there is no attenua- tion of the signal. -
Page 30: Misc
Misc Settings. You can save and retrieve the current settings of the Control Panel in this section. In addition to the pure volume control and source selection, these settings include all the other options you have selected. We advise always saving at least the most common and frequently used settings, so that you have a verified fallback setup if you ever suffer from the “Why aren't I hearing anything?”... -
Page 31: Surround Sound For Dvd Night With Your Pc
Surround sound for DVD night with your PC To provide the full enjoyment of eight separate speakers for a cozy DVD night with friends, your PC needs software that supports 7.1 playback. This software must include a Dolby De- coder for you to be able to use the Dolby function. We recommend Intervideo WinDVD or Cyberlink PowerDVD, which you can download using these links: http://www.intervideo.com/jsp/Home.jsp... -
Page 32: Appendix A-Frequently Asked Questions (Faq)
Appendix B—Service at TerraTec. “Nothing seems to work!”—This can happen even on the best systems. If this happens to you, the TerraTec team is happy to offer its service and support. Hotline, Internet. In case of a serious problem—where you can neither solve the problem on your own nor with the guided help found in this manual, nor with the help of your dealer—please contact us... - Page 33 Broken?! Before you send the product back, be sure to contact us! Make a note of the name of your support contact and follow these simple instructions: • Please fill out the service request form provided with your device clearly and completely. The more clearly and detailed you describe the problem, the faster we will be able to help.
Need help?
Do you have a question about the Aureon 7.1 FireWire and is the answer not in the manual?
Questions and answers