Advertisement
Advertisement
Table of Contents

Related Manuals for White-Westinghouse Mighty Mender WW-100

Summary of Contents for White-Westinghouse Mighty Mender WW-100
- Page 1 01/30/2008 White-Westinghouse Mighty MenderTM ww-100 INSTRUCTION MANUAL...
- Page 2 -— —— — —...
-
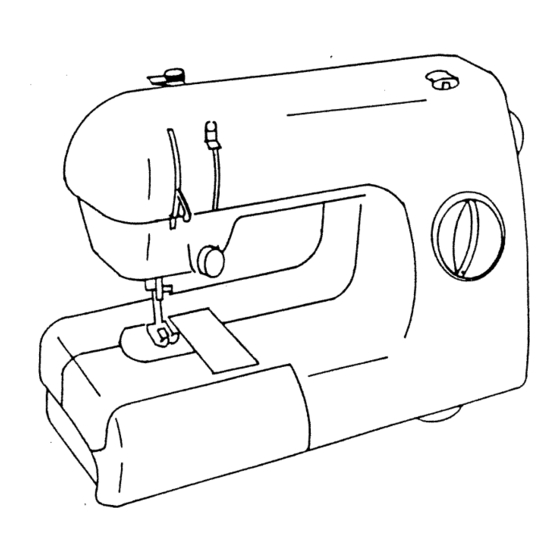
Page 3: Product View
01/30/2008 Bobbin Winder Bobbin Winder Tension Disc Needle Thread Tension I)iai Thread Stitch Length &. Reverse Knob Guides Needle Plate Presser Bar Lifter Presser foot Bobbin Winder Switch Switch Spool Pin AC Adaptor Receptacle Receptacle... -
Page 4: Accessories
8OOIOEI aafl1DI 4flIOSSDDV 1ossooV (unpLU suzqqoq (;unowU1 1pB1tT iztutu pxtç/zdd!1 IcmUOD POdS izdvpy pums podS tood/... -
Page 5: Bobbin Winding
01/30/20 08... -
Page 8: Place Wound Bobbin
01/30/2008 PLACE THE WOUND BORBII 1. Hold the thread end with 3” long by yoin left hand and place the wound bobbin into the bobbin case as shown. 2. Feed the thread through the two notches of Bobbin Case the bobbin case as shown. 1st notch 3. -
Page 9: Raise Bobbin Thread
01/30/2008 3’.A!3E THE BOBBIN THREAD pulling up the presser foot 1. Raise the presser bar lifter. 2. Hold the top thread and turn the handwheel counterclockwise to make the needle go down see a loop formed by and back up and you will the bobbin thread. - Page 10 01/30/2008 GETrING STARTED 1. Make sure the power switch is in the OFF position. Connect the foot control and AC adaptor plug. 2. Take the spool stand and spool pin from the accessory tray then assemble as the ñgure shown. 3.
- Page 11 01/30/2008 MENDING A SEAM desired stitch length 1. Set stitch control to your by the stitch control knob. PRE5SE SARLJFIER 2. Raise needle by turning the handwhed counterclockwise andliftupthepresserfoot. 3. Make swe both threads ends are pulled 4 back PRESSER FOOT behind the needle, 4.
- Page 12 01/30/20 08...
Need help?
Do you have a question about the Mighty Mender WW-100 and is the answer not in the manual?
Questions and answers
Where can I get the spool,pin,holder and cap
Do I need to oil my Mighty Mender White 100 sewing machine? I bought it used. Thank you.