AEG 2060 D Operating And Installation Instructions
Electrolux cooker hood operating and installation instructions 2060 d
Hide thumbs
Also See for 2060 D:
- Operating and installation manual (19 pages) ,
- Operating and installation manual (19 pages)
Table of Contents
Advertisement
Advertisement
Table of Contents

Related Manuals for AEG 2060 D


Summary of Contents for AEG 2060 D
- Page 1 2060 D Cooker hood Operating and Installation Instructions...
-
Page 2: Table Of Contents
Contents Safety warnings For the User For the Installer Description of the Appliance Extractor version Filter Version Control Panel Maintenance and care Cleaning the hood Metal grease filter Removing the metal grease filter Charcoal filter Changing the light bulb What to do if Service and Spare Parts Guarantee Conditions Technical Specifications... -
Page 3: Safety Warnings
Safety warnings For the User • The cooker hood is designed to extract unpleasant odours from the kitchen, it will not extract steam. • Always cover lighted elements, to prevent excess heat from damaging the appliance. In the case of oil, gas and coal fired cookers it is essential to avoid open flames. - Page 4 • It is advisable to apply for authorization from the relevant controlling authority when connecting the outlet to an unused chimney flue or combustion gas duct. The air outlet installation must comply with the regulations laid down by the relevant authorities. •...
-
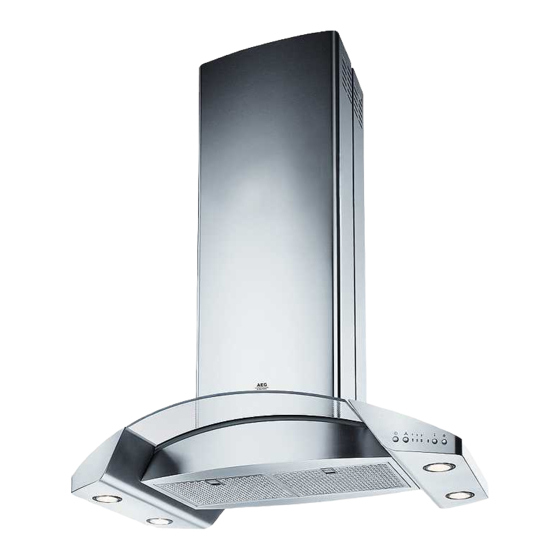
Page 5: Description Of The Appliance
Description of the Appliance • The hood is supplied as an extractor unit and can also be used with a filtering function by fitting one charcoal filter. • You will need an original AEG charcoal filter for this function (Available from you local AEG Service Force Centre). Extractor version •... -
Page 6: Control Panel
Control Panel • Best results are obtained by using a low speed for normal conditions and a high speed when odours are more concentrated. Turn the hood on a few minutes before you start cooking, you will then get an under pressure in the kitchen. The hood should be left on after cooking for about 15 minutes or until all the odours have disappeared.The control switches are located on the unit’s front panel:... -
Page 7: Led Indicator Lights For Veryfying The Saturation Of Filters
LED Indicator lights for veryfying the saturation of filters This hood is supplied without a charcoal filter. If the hood is to be used in the recirculation mode with a charcoal filter, the saturation indicator must be activated as follows: Depress and hold the A and B buttons simultaneously for 3 seconds. -
Page 8: Open The Metal Grease Filter
Maintenance and care • The hood must always be disconnected from the electricity supply before beginning any maintenance work. Cleaning the hood • Clean the outside of the hood using a damp cloth and a mild deter- gent. • Never use corrosive, abrasive or flammable cleaning products. •... -
Page 9: Charcoal Filter
Dishwasher Place grease filters in dishwasher. Select the most powerful washing programme and highest temperature, at least 65°C. Repeat the process. Refit the grease filters when they are dry. When washing the metal grease filter in the dishwasher a slight discolouration of the filter can occur, this does not have any impact on its performance. -
Page 10: Changing The Light Bulb
Warning • Failure to observe the instructions on cleaning the unit and changing the filters could cause a fire hazard. You are therefore strongly recommended to follow these instructions. • The manufacturer declines all responsibility for any damage to the motor or any fire damage linked to inappropriate maintenance or failure to observe the above safety recommendations. -
Page 11: Troubleshooting
What to do if If your appliance fails to work properly please carry out the following checks. Symptom The cooker hood will not start... The cooker hood is not working effectively.. The cooker hood has switched off during operation... If after all these checks, the problem persists, contact your local Service Force Centre, quoting the model and serial number. -
Page 12: Service And Spare Parts
Service and spare parts In the event of your appliance requiring service, or if you wish to purchase spare parts, contact your local AEG Service Force Centre by telephoning Your call will be automatically routed to the Service Centre covering your post code area. -
Page 13: Guarantee Conditions
Guarantee conditions AEG offer the following guarantee to the first purchaser of this appliance. 1. The guarantee is valid for 12 months commencing when the appliance is handed over to the first retail purchaser, which must be verified by purchase invoice or similar documentation. The guarantee does not cover commercial use. - Page 14 Before you move please contact your nearest Customer Care Centre, listed below, to give them details of your new home. They will then ensure that the local Service Organisation is aware of your move and able to look after you and your appliances.
-
Page 15: Technic Details
6 wood-screws 5 x 45 mm 2 metal screws 2,9 x 13 4 metal screws 3 x 9 2 hooks 1 chimney support 1 deflector 1 reduction flange Ø 125-120 mm 2060 D 81-126.5 89,8 81-136 89,8 215 W 1 x 130 W... -
Page 16: Electrical Connection
Electrical connection Safety warnings for the electrician The electric outlet should be placed inside the chimney.The hood has a power cable, 150 cm, with earth connection and the rated voltage is 220 - 240 V. Connect the hood to the mains supply via a double pole switch which has 3 mm minimum separation between the contacts. -
Page 17: Wall Unit Mounting
Wall unit mounting - Fig. 6 • Position the template (1) on the wall and mark the position, and drill (2) the holes (2 x Ø 8 mm). • Mount the two rawl plugs with the hooks (3). • Hang the hood on the hooks and level it with the adjustment screws (4). - Page 18 Fig. 6 Electric hob 500 mm Gas hob 650 mm Charcoal and oil 700 mm...
-
Page 19: Power Outlet
Electric hob 500 mm Gas hob 650 mm Charcoal and oil 700 mm Electric hob Gas hob Charcoal and oil Exhaust tube Ø 150mm Power outlet 500 mm 650 mm 700 mm Wall bracket... - Page 20 AEG Hausgeräte GmbH Postfach 1036 D-90327 Nürnberg http://www.aeg.hausgeraete.de © Copyright by AEG LI1VFB Ed. 04/02...
Need help?
Do you have a question about the 2060 D and is the answer not in the manual?
Questions and answers