Bose T1 ToneMatch Owner's Manual
Audio engine
Hide thumbs
Also See for T1 ToneMatch:
- Quick setup manual (2 pages) ,
- Owner's manual (2 pages) ,
- Service manual (70 pages)
Table of Contents
Advertisement
Advertisement
Table of Contents

Related Manuals for Bose T1 ToneMatch


Summary of Contents for Bose T1 ToneMatch
- Page 1 T1 ToneMatch AUDIO ENGINE Owner’s Guide...
-
Page 2: To Get Sound Right Away
Svenska Nederlands Italiano Français Español Deutsch Dansk English UICK AKING USIC To get sound right away Trim Remove your new T1 ToneMatch (CH 1) audio engine from the carrying bag and remove its protective cover (page 6). Refer to the Quick Setup Guide and connect your T1 to your L1 system. - Page 3 Scenes and save your settings as a new ToneMatch engine: Select a preset designed for your scene. If you don’t like it, try loading one of the five Bose ® specific instrument or microphone (see “Selecting a Tone- scenes to use as a new starting point (see “Loading and...
- Page 4 This product conforms to the EMC Directive 89/336/EEC and to the Low Voltage Directive 73/23/EEC. The complete Declaration of Conformity can be found on www.Bose.com/static/compliance/index.html. ©2007 Bose Corporation. No part of this work may be reproduced, modified, distributed or otherwise used without prior written permission.
-
Page 5: Important Safety Instructions
Svenska Nederlands Italiano Français Español Deutsch Dansk English Important Safety Instructions Read these instructions. 13. Unplug this apparatus during lightning storms or when unused for long periods of time. Keep these instructions. 14. Refer all servicing to qualified service personnel. Heed all warnings. - Page 6 Svenska Nederlands Italiano Français Español Deutsch Dansk English...
-
Page 7: Table Of Contents
English Dansk Deutsch Español Français Italiano Nederlands Svenska NTRODUCTION Welcome ..............Product overview . - Page 8 Bose scenes ........
-
Page 9: Introduction
T1 ToneMatch™ audio engine. The T1 ToneMatch™ audio engine provides the ultimate control for performing musicians. When used with the Bose L1™ model II or model I system, the T1 allows you to control the sound of your instrument as well as the output of the entire system. Using proprietary ToneMatch presets and associated zEQ tonal adjustments, the T1 enables you to preserve the natural sound of instruments or vocal microphones when amplified. -
Page 10: Product Overview
Optional accessories and the L1 model II system ToneMatch audio engine accessories T1 ToneMatch audio engine power supply T1 ToneMatch audio engine ToneMatch audio engine model II microphone stand bracket system To order accessories, call (800) 905-0886 or visit www.Bose.com/musicians. -
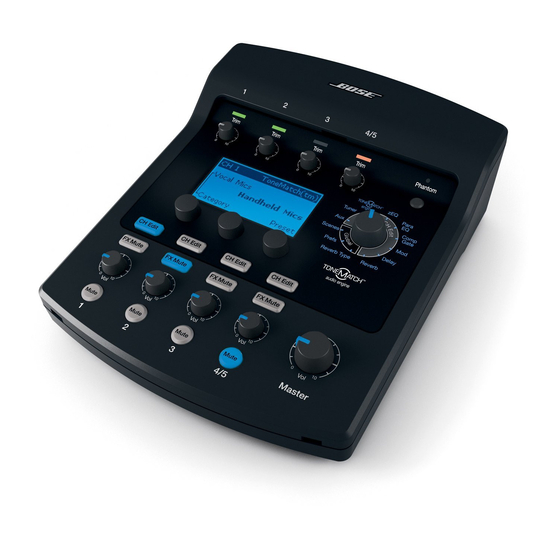
Page 11: Controls And Indicators
English Dansk Deutsch Español Français Italiano Nederlands Svenska NTRODUCTION Controls and indicators The control panel provides all the necessary controls and indicators for operation. Figure 2 Top panel Input signal/clip LEDs (1-4/5) – Displays the input signal status in color: Green indicates the presence of an input signal, yellow indicates a signal near clipping, and red indicates clipping. -
Page 12: Connection Panel
Svenska Nederlands Italiano Français Español Deutsch Dansk English NTRODUCTION Connection panel The rear panel provides all input/output connections. Figure 3 T1 connector panel IN – Analog input channels 1-3. Accepts XLR balanced cables for microphones, or ¼" TRS balanced or TS unbalanced cables for high-impedance inputs such as guitars. -
Page 13: System Setup
Now is a good time to record the serial number of your T1 ToneMatch audio engine here and on your product registration card. You can register your product online at www.Bose.com/register or call (800) 905-1044. Failure to do so will not affect your warranty rights. -
Page 14: Ystem Etup
Svenska Nederlands Italiano Français Español Deutsch Dansk English YSTEM ETUP Removing/attaching the cover The T1 ToneMatch audio engine comes out of the carton with a cover installed on the top panel. The cover is designed to protect the control panel while transporting or storing the audio engine. To remove the cover: Press and hold the cover latch release button (Figure 5). -
Page 15: Mounting Options
English Dansk Deutsch Español Français Italiano Nederlands Svenska YSTEM ETUP Mounting options The T1 includes hardware for mounting it on a Cylindrical Radiator ® loudspeaker. The optional microphone stand mounting bracket allows you to mount the T1 on the shaft of most microphone stands. - Page 16 Svenska Nederlands Italiano Français Español Deutsch Dansk English YSTEM ETUP The Cylindrical Radiator ® top section needs to be removed for this installation. Slide the carriage into the channel on the rear of the Cylindrical Radiator ® bottom section and turn the locking knob clockwise to lock it in place (Figure 7).
- Page 17 English Dansk Deutsch Español Français Italiano Nederlands Svenska YSTEM ETUP Mounting the T1 on a microphone stand (optional) The T1 ToneMatch audio engine microphone stand bracket allows you to mount the T1 on the shaft of most microphone stands. For installation help, refer to the Quick Setup Guide that came with the bracket. The bracket uses rotatable inserts which, when properly placed, provide a tight fit on the microphone stand shaft.
- Page 18 Svenska Nederlands Italiano Français Español Deutsch Dansk English YSTEM ETUP To install the microphone stand bracket: Determine the diameter of the shaft on your microphone stand. The cutouts on the edge of the Microphone Stand Bracket Quick Setup Guide can help you determine the diameter. Remove the inserts (Figure 8 on page 9) from the bracket and re-insert them for the diameter you need.
-
Page 19: Connecting The T1 To An L1
English Dansk Deutsch Español Français Italiano Nederlands Svenska YSTEM ETUP Connecting the T1 to an L1 model II power stand Make sure the power stand Power switch is OFF, the T1 power switch is OFF, and the T1 Master volume control is set to 0. -
Page 20: Connecting The T1 To An L1 Model I Power Stand
Svenska Nederlands Italiano Français Español Deutsch Dansk English YSTEM ETUP Connecting the T1 to an L1 model I power stand On an L1 model I power stand, the Channel 1 and Channel 2 Mic/Line inputs have independent volume, equaliza- tion, and ToneMatch preset controls that can affect the sound of the T1 audio engine. - Page 21 English Dansk Deutsch Español Français Italiano Nederlands Svenska YSTEM ETUP Figure 11 model I connections to a T1 ¼" audio cable (not supplied) T1 ToneMatch power supply (optional) Channel 3 & 4 input and Level control Note: To avoid problems caused by ground loops, connect the power stand and the T1 power supply to the same AC mains circuit.
-
Page 22: Connecting The T1 Tonematch
Svenska Nederlands Italiano Français Español Deutsch Dansk English YSTEM ETUP Connecting the T1 ToneMatch audio engine power supply (optional) The T1 power supply provides power for the T1 audio engine when connecting it to an L1 model I system or your computer. -
Page 23: Connecting The T1 To Your Computer
The T1 provides a USB port for connecting it to a computer. This allows you to download performance scenes to a computer or install system updates. Visit www.Bose.com/musicians for details on updating your system. When connected to a computer, you also can use the T1 as a general-purpose USB audio device for recording and playback. -
Page 24: Operating Instructions
Svenska Nederlands Italiano Français Español Deutsch Dansk English PERATING NSTRUCTIONS IMPORTANT! Optimizing input gain and output volume Getting a quality volume level from your system relies on the combined adjustments of input channel gain, master volume, and channel volume. Do the following for each channel used. Make sure the Master volume, Trim, and channel volume controls are set to 0. -
Page 25: Using The Master Volume Control
English Dansk Deutsch Español Français Italiano Nederlands Svenska PERATING NSTRUCTIONS Using the Master volume control The Master volume control adjusts the overall output level of the T1 ToneMatch output ( ) and analog Master output. During normal operation, it is recommended to keep the Master control set at the 12 o’clock position. Once you have set volume levels for all channels, you can adjust the Master volume up or down from this position. -
Page 26: Reading The T1 Display
Indicates that you change the setting rotate the button to change the value Rotary/pushbutton controls Asterisk indicates that All Channels Scenes the loaded scene was modified *Bose Scene 01 Load Shared Save Indicates that you press the button to activate the function... -
Page 27: Using The T1 Rotary Selector
English Dansk Deutsch Español Français Italiano Nederlands Svenska PERATING NSTRUCTIONS Using the T1 rotary selector The T1 rotary selector provides access to the functions that shape the sound of the ToneMatch audio engine out- put. Figure 15 provides a summary of the three global functions and the nine channel-related functions. The follow- ing pages describe how to adjust each function. -
Page 28: Editing The Sound Of A Channel
Svenska Nederlands Italiano Français Español Deutsch Dansk English PERATING NSTRUCTIONS Editing the sound of a channel The CH Edit functions allow access to settings that affect selected channels. The CH Edit functions are Aux, Tuner, ToneMatch the engine, zEQ, Para EQ, Comp/Gate, Mod, Delay, and Reverb. To edit a channel: Press the CH Edit 1, 2, 3, or 4/5 button. -
Page 29: Adjusting Zeq
English Dansk Deutsch Español Français Italiano Nederlands Svenska PERATING NSTRUCTIONS If you pressed Select, rotate the Preset button to access the list of presets and highlight your choice. CH 1 ToneMatch(tm) CH 1 ToneMatch(tm) Vocal Mics Vocal Mics Handheld Mics Headworn Handheld Mics Handheld Mics... -
Page 30: Using Compressor/Gate Functions
(release time). Well-suited for eliminating unwanted noise from microphones and instruments. KickGate 1: Regular..Gate featuring a preset attack time, and variable threshold and tightness (release time) parameters. This is a Bose ® proprietary technology designed specifically for kick drums. This robust gate provides maximum gain before feedback, making your kick drum as loud as possible through an L1 system. -
Page 31: Using The Kickgate
Tight button to adjust the tightness (how quickly the gate closes) from 0 (slowest) to 100% (fastest). Using the KickGate The KickGate is a Bose ® proprietary technology that allows you to raise the level of a kick drum channel while elim- inating the risk of feedback from the microphone. -
Page 32: Using Modulation Effects
Svenska Nederlands Italiano Français Español Deutsch Dansk English PERATING NSTRUCTIONS Using modulation effects CH 1 Modulator The Mod function allows you to apply modulation effects. Speed Type Depth To bypass the Mod settings, press the Type button. Press it again to activate. Note: Chorus1 Rotate the Type button to access the list of modulator types and highlight your... -
Page 33: Adding Delays
English Dansk Deutsch Español Français Italiano Nederlands Svenska PERATING NSTRUCTIONS Press the Select button to select your choice, or press the Cancel button to exit the list with no change. For Chorus1-3 and Flanger1-2: Rotate the Mix button to adjust the desired mix of dry signal to wet signal (modulator-processed). -
Page 34: Adding Reverb
Svenska Nederlands Italiano Français Español Deutsch Dansk English PERATING NSTRUCTIONS Adding reverb CH 1 Reverb The Reverb function applies a user-adjustable amount of reverb to the selected chan- nel. To select the type of reverb, see “Selecting a type of reverb” on page 27. Bright To bypass the Reverb effects, press the Mix button. -
Page 35: Using The Tuner
English Dansk Deutsch Español Français Italiano Nederlands Svenska PERATING NSTRUCTIONS Using the tuner CH 1 Tuner An independent tuner is available on each input channel. The display indicates the note being played at the bottom of the screen. As you tune, a pitch indicator appears on the display, showing you whether the note is sharp or flat. -
Page 36: Using The Prefs Utilities
Svenska Nederlands Italiano Français Español Deutsch Dansk English PERATING NSTRUCTIONS Large.... Creates the ambience of a large-sized space. Features adjustable time and balance (ratio of early/later reflections) parameters. Works well with guitars, horns, percussion instruments, and vocals. Cavern ..Creates the ambience of an extremely large space. Features adjustable time and balance (ratio of early/later reflections) parameters. - Page 37 ... . . USB R ... . . Menu • Versions – Displays revision levels of DSP Firmware, Bose Presets, and Bose Scenes (viewable only). Versions Preferences DSP Firmware: 1.0 Bose Presets: 1.0...
- Page 38 Deutsch Dansk English PERATING NSTRUCTIONS • ToneMatch – Displays the list of ToneMatch preset banks stored in the T1. Refer to www.Bose.com/ musicians for the latest preset banks. ToneMatch Preferences A: TaylorTM Feb 06 B: Audix Dec 2006 C: Empty Menu •...
- Page 39 English Dansk Deutsch Español Français Italiano Nederlands Svenska PERATING NSTRUCTIONS • USB from PC – Allows you to send USB left and right channels from your computer to a selected audio engine destination (Off, Ch4/5, or Master). If the destination is Ch4/5, the USB audio is inserted into chan- nels 4/5 directly after the trim control and can be fully processed.
-
Page 40: Loading And Saving Scenes
Phantom power switch position. The T1 includes three types of scenes: • (5) Bose scenes: Read-only factory-preset scenes. You cannot edit and write over them. • (10) My Scenes: User-definable scenes for saving and recalling all your favorite settings. You can update these scenes by writing over them as many times as you want. - Page 41 English Dansk Deutsch Español Français Italiano Nederlands Svenska PERATING NSTRUCTIONS To save a scene: Select Scenes with the T1 rotary selector. The currently loaded scene is displayed. All Channels Scenes (example) *Singer/Songwriter Load Shared Save Rotate the Save button to highlight the scene you wish to save. Press Select, or press Cancel to exit the list. The display returns to the Scenes screen if you do not Note: My Scene 01...
- Page 42 Svenska Nederlands Italiano Français Español Deutsch Dansk English PERATING NSTRUCTIONS To change the scene name before saving: You can use the following editing options to change the scene name. After changing the name, press the Save button and go to Step 4. •...
-
Page 43: Sharing A Scene
Shared Scene to your computer and then transfer the file to the computer of another T1 user. The other T1 user can upload the scene to their T1 using the L1 updater. The L1 updater is available at www.Bose.com/musicians. To save a Shared Scene: Load the scene that you want to share (see “To load a scene”... - Page 44 The T1 provides only one storage location for a Shared Scene. Saving a scene as a Shared Scene always over- Note: writes the previously saved Shared Scene. Please visit www.Bose.com/musicians for details on using the L1 updater application for downloading and uploading scenes to and from your computer.
-
Page 45: Bose Scenes
Bose scenes The five Bose scenes are provided as examples for you to use as a starting point. After loading a Bose scene, you can modify the settings and then save the settings as a My Scene or Shared Scene. -
Page 46: Singer/Songwriter
Svenska Nederlands Italiano Français Español Deutsch Dansk English PERATING NSTRUCTIONS Singer/Songwriter This scene is designed for a singer/songwriter playing keyboard or guitar and sometimes accompanied by an MP3 track. Figure 16 Example setup for Singer/ Songwriter... - Page 47 English Dansk Deutsch Español Français Italiano Nederlands Svenska PERATING NSTRUCTIONS Singer/Songwriter scene channel settings Microphone Guitar Keyboard MP3 Player CH 1 CH 2 CH 3 CH 4/5 Active Active Active Active Vocal Mics Acoustic Guitars Keyboards DJ/Playback ToneMatch Handheld Mics Steel String w/piezo General Keys Flat, zEQ Controls...
-
Page 48: Dj/Playback
Svenska Nederlands Italiano Français Español Deutsch Dansk English PERATING NSTRUCTIONS DJ/Playback The DJ/Playback scene is designed for a DJ event or any audio playback need. This setup uses two microphones and either an MP3 player, mixer, or laptop computer. Figure 17 Example setup DJ/Playback... - Page 49 English Dansk Deutsch Español Français Italiano Nederlands Svenska PERATING NSTRUCTIONS DJ/Playback scene channel settings Microphone Microphone Not Used MP3 Player CH 1 CH 2 CH 3 CH 4/5 Active Active Active Active Vocal Mics Vocal Mics Utility DJ/Playback ToneMatch Handheld Mics Handheld Mics Flat Flat, zEQ Controls...
-
Page 50: Drums And Bass
Svenska Nederlands Italiano Français Español Deutsch Dansk English PERATING NSTRUCTIONS Drums and Bass This scene is set up for a bass guitar, drum kit, and an MP3 player. Figure 18 Example setup for Drums and Bass... - Page 51 English Dansk Deutsch Español Français Italiano Nederlands Svenska PERATING NSTRUCTIONS Drums and Bass scene channel settings Bass Guitar Kick Drum Overhead MP3 Player CH 1 CH 2 CH 3 CH 4/5 Active Active Active Active Basses Percussion Percussion DJ/Playback ToneMatch Active Bass 1 Kick, General General Overhead...
-
Page 52: The Works Scene
Svenska Nederlands Italiano Français Español Deutsch Dansk English PERATING NSTRUCTIONS The Works scene The Works scene is designed for electric and acoustic guitars, bass guitar, and keyboard. Figure 19 Example setup for The Works... - Page 53 English Dansk Deutsch Español Français Italiano Nederlands Svenska PERATING NSTRUCTIONS The Works scene channel settings Electric Guitar Bass Guitar Acoustic Guitar Keyboard CH 1 CH 2 CH 3 CH 4/5 Active Active Active Active Electric Guitars Basses Acoustic Guitars Keyboards ToneMatch Miked Amp w/SM57 Active Bass 3...
-
Page 54: Factory
Dansk English ACTORY ETTINGS This section describes the settings in the T1 audio engine when it left the factory. To restore your T1 at any time to these factory settings, load Bose ® Factory Settings scene. Comp/Gate factory settings Type... - Page 55 English Dansk Deutsch Español Français Italiano Nederlands Svenska ACTORY ETTINGS Delay factory settings Type Time Feedback Digital 150ms Analog 275ms Tape 350ms Reverb Type factory settings Type Time Bal. Plate 1.20s Small 1.00s Medium 1.75s Large 2.20s Cavern 5.00s...
-
Page 56: Care & Maintenance
Your T1 ToneMatch audio engine is covered by a limited transferable warranty. Details of the warranty are pro- vided with your product. Register your products online at www.Bose.com/register or call (800) 905-1044. Failure to do so will not affect your warranty rights. - Page 57 English Dansk Deutsch Español Français Italiano Nederlands Svenska & M AINTENANCE Problem What to do T1 is plugged in, power • Make sure you have power at the AC outlet. Try operating a lamp or other equipment from the same AC outlet or switch is on, but no power.
- Page 58 • Connect the T1 Master output to the Analog Input on the power stand using a ¼" phone plug cable. Turn up the power stand Trim control, and verify that you hear sound. • Make sure power LED on power stand is blue. If LED is red, please call Bose Live Music Customer Support at (877) 335-2673 for assistance.
- Page 59 English Dansk Deutsch Español Français Italiano Nederlands Svenska & M AINTENANCE Problem What to do Not hearing any effects. • Check that you pressed the correct CH Edit button. • Make sure the FX Mute button is not pressed for the channel in question. T1 not responding to •...
- Page 60 Svenska Nederlands Italiano Français Español Deutsch Dansk English & M AINTENANCE Problem What to do ® Microphone is encountering • Orient the microphone so that it is not pointing directly at its respective L1 Cylindrical Radiator loudspeaker. feedback. • Try a different microphone. •...
-
Page 61: Technical Information
English Dansk Deutsch Español Français Italiano Nederlands Svenska & M AINTENANCE Problem What to do Unable to send audio from • Check that the USB cable is properly connected to the audio engine and computer. a computer to the T1 via •... - Page 62 ©2007 Bose Corporation, The Mountain, Framingham, MA 01701-9168 USA AM303150 Rev.00 N1E www.Bose.com/musicians...
Need help?
Do you have a question about the T1 ToneMatch and is the answer not in the manual?
Questions and answers