Table of Contents
Advertisement
Advertisement
Table of Contents

Related Manuals for Mackie Spike


Summary of Contents for Mackie Spike
-
Page 2: Safety Instructions
1. Read these instructions. Safety Instructions 2. Keep these instructions. 3. Heed all warnings. CAUTION AVIS RISK OF ELECTRIC SHOCK 4. Follow all instructions. DO NOT OPEN RISQUE DE CHOC ELECTRIQUE 5. Do not use this apparatus near water. NE PAS OUVRIR CAUTION: TO REDUCE THE RISK OF ELECTRIC SHOCK 6. - Page 3 13. Refer all servicing to qualifi ed service personnel. Servicing is required when the apparatus has been damaged in any way, such as power-supply cord or plug is damaged, liquid has been spilled or objects have fallen into the apparatus, the apparatus has been exposed to rain or moisture, does not operate normally, or has been dropped.
-
Page 4: Mackie Software License
Mackie Software License Please read this license carefully before using the accompanying Software. By loading and using the Software, you are agreeing to be bound by the terms of this license. Software as used herein means all computer code (both... - Page 5 without notice from LOUD Technologies if you fail to comply with any provisions of this License. Upon termina- tion you must destroy the Software and related documentation and all copies thereof. 5. Export Law Assurances. You agree and certify that neither the Software nor any other technical data re- ceived from LOUD Technologies, nor the direct product thereof, will be exported outside the United States except as authorized and as permitted by the laws and regulations of the United States and with LOUD Technologies’...
- Page 6 8. Disclaimer of Warranty on Software. You expressly acknowledge and agree that use of the Software is at your sole risk. The Software and related documentation are provided “AS IS” and without warranty of any kind. LOUD TECHNOLOGIES EXPRESSLY DISCLAIMS ALL WARRANTIES, EXPRESS OR IMPLIED, INCLUDING, BUT NOT LIMITED TO, THE IMPLIED WARRANTIES OF MERCHANTABILITY AND FITNESS FOR A PARTIC- ULAR PURPOSE OR USE.
- Page 7 10. Controlling Law and Severability. This License shall be governed by and construed in accordance with the laws of the United States and the State of Washington, as applied to agreements entered into and to be performed entirely within Washington between Washington residents. If for any reason a court of competent jurisdiction fi...
- Page 8 For details of the bundled software, please refer to the help documentation included within the soft- ware itself, or included on the Spike software installer CD-ROM. “Mackie,” “Spike,” and the “Running Man” fi gure are trademarks or registered trademarks of LOUD Technologies Inc. All other brand names mentioned are trademarks or registered trademarks of their respective holders, and are hereby acknowledged.
-
Page 9: Table Of Contents
Contents Safety Instructions-----------------------------------2 Using Spike ------------------------------------------ 59 Mackie Software License -------------------------- 4 Appendix A: Technical Information ------------64 System Requirements---------------------------64 Introduction----------------------------------------- 10 XD-2 Specifi cations------------------------------ 65 XD-2 USB Interface ------------------------------ 10 XD-2 Block Diagram -----------------------------68 Bundled Software -------------------------------- 11 Special Offers ------------------------------------- 11... -
Page 10: Introduction
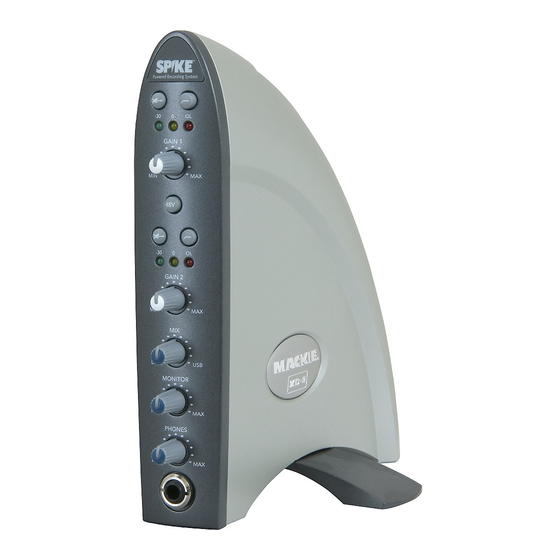
Introduction Thank you for purchasing the Mackie Spike Powered Recording System. GAIN 1 This is a complete, compact solution for computer-based music production on either a Macintosh or a PC. Spike consists of the XD-2 USB Interface and all the software you need to GAIN 2 record and create wonderful music using your computer. -
Page 11: Bundled Software
Warmer Phaser is a VST plug-in by Nomad Factory specifi cally designed for Spike to give a warmer tube sound to the digital recording process. Mackie Final Mix VST (PC only, for Tracktion) is a powerful stereo mastering suite with two 5-band parametric EQs on either side of a multi-band compressor. -
Page 12: Getting Started
• The Spike CD contains an installer which will help you install the various software applications, plug-ins and drivers. • Visit www.mackie.com/spikeauth to register your Spike, and download any updates to the soft- ware and fi rmware. • Your computer must meet the minimum system requirements (shown on page 64). -
Page 13: Installing Mac Software
4. Follow the instructions in the installer to load and authorize the various software applica- tions and plug-ins. A basic installation would be to install the XD-2 application, its drivers, and Tracktion. This will get you going fairly nicely. 5. If you want, go ahead and install Warmer Phaser (and other plug-ins from Nomad Factory), and Antares plug-ins. -
Page 14: Installing And Connecting The Hardware
Installing and connecting the hardware • To stand the XD-2 upright, pull the stabilizer bar downwards and twist it out 90˚ from the body, as shown here. The spring is quite strong, so be careful not to nip yourself as it snaps back into place. •... -
Page 15: Typical Hookup Diagram
DAT, CD/DVD player or CD-R recorder MIDI OUT MIDI MIDI IN MIDI MONITOR L / R INPUT 1 Mackie HR624 or other Active Studio Monitors INPUT 2 Guitar Power Supply 9V DC 750mA Microphone Headphones (plug into USB Connection... -
Page 16: Making A Recording
Making a Recording The following example of a recording session uses a guitar plugged directly into the XD-2 channel 1 input, and a microphone plugged into the channel 2 input, to record audio tracks in the Tracktion soft- ware. We will also record some MIDI data that will trigger a softsynth within Tracktion. Before starting, make sure you have correctly installed the XD-2 and Tracktion software. - Page 17 On the XD-2 front panel (with the MIX knob set to DIR) turn the PHONES knob gently to hear yourself through your headphones. Remember – to avoid feedback, keep your monitor volume turned down while using a microphone, especially if your mic is close to the monitors. To reduce any low-end bass rumble, push in the front panel HP fi...
- Page 18 10. Launch the Tracktion software and select the Mackie XD-2 hardware under Settings menu/WAVE devices. Also select Mackie XD-2 (for Mac), USB Audio Device (for PC) under the Settings/MIDI devices menu. For more details of the Tracktion software, press "F12" on your keyboard, or click the HELP button in Tracktion Settings screen the lower left of the Tracktion screen.
- Page 19 12. Navigate to a good location, enter a wonderful name for the new project in the pop-up dialog box, then click Save. All of this project's tracks, clips and edits will be saved here by Tracktion. Note: Do not create project folders inside the Tracktion main folder, or any software main folder.
- Page 20 The audio icon represents Tracktion's stereo audio input (from your XD-2). The MIDI icon repre- sents its MIDI input. If these icons do not appear, check the input selections in the "Settings" tab, and make sure the Mackie XD-2 is chosen as your audio input and output device. INPUT 1 + 2...
- Page 21 Click the audio icon and uncheck the "treat as stereo channel pair" button in the Properties area. Two independent audio icons will then appear. Ch.1 Icon INPUT 1 Ch.2 Icon INPUT 2 MACKIE XD2 Treat as INPUT 1 stereo channel pair (off)
- Page 22 (in the Properties area) will show the signal levels being recorded. M=Mute INPUT 1 S=Solo Channel Meter Pan and volume INPUT 2 MACKIE XD2 Play INPUT 1 Record Bit Depth Properties Area Transport Area User’s Tracktion Edit Screen (with connected Input 1 Icon, shown larger than real size)
- Page 23 17. To record, click the Record button in the Transport area (or press keyboard R). Tracktion records any armed tracks (icon with arrow). Play your guitar as the vertical cursor line moves right. A pink bar shows the track recording. 18.
- Page 24 23. MIDI data can be recorded using one of the softsynths supplied with Tracktion. Drag the MIDI icon to the left of a track, and Arm it. 24. Click the "New Filters" button, and drag down the new fi lter to the right of the track, in front of any existing fi...
-
Page 25: Features
XD-2 Features Front Panel INSTRUMENT button GAIN 1 Push this button in when directly connecting a guitar or other direct instru- ment. It adjusts the input impedance of the 1/4" TRS/TS input so you can plug an instrument directly into the XD-2. It does not affect the XLR input. High-Pass Filter button This button inserts a high-pass fi... - Page 26 GAIN 1 and GAIN 2 knobs These knobs adjust the analog gain of the input signal (before the A/D con- verters). Adjust them so the LEDs light as described on the previous page. Note: The XD-2 detects whether an XLR or 1/4" plug is connected to the input jack, and it adjusts the preamp stage accordingly.
- Page 27 USB: The signal from Tracktion arrives via USB, and is sent directly to your monitors, headphones, and SPDIF output. If the MIX knob is set to USB, you will only hear the output from Tracktion (or other audio software). Note: For details of using the MIX knob, please see page 59. GAIN 1 MONITOR knob This adjusts the level of the rear panel Monitor analog outputs.
-
Page 28: Rear Panel
MIX knob, but not by the MONITOR or PHONES knobs. INPUT 2 MIDI IN/OUT The MIDI IN and OUT connectors exchange MIDI commands with any MIDI device, such as a Mackie Control Universal or keyboard, and serves as a standard Windows or Mac MIDI I/O. 9V DC 750mA Note: The XD-2 is transparent to the MIDI commands;... - Page 29 MONITOR L/R outputs SPDIF These 1/4" TRS connectors provide a balanced stereo line-level output of the monitor mix. These outputs can be used to connect to a pair of active speakers, or to an amplifi er connected to passive speakers. The signal level is controlled by the front panel MONITOR knob, and it can be se- lected in software to be stereo or mono (see page 45).
- Page 30 9 VDC Input SPDIF Connect one end of the external power supply (included) to the XD-2's 9 VDC connector, and the other end to an AC power source between 90 VAC and 264 VAC (50–60 Hz). Note: There is no power switch on the XD-2, so as soon as the MIDI external power supply is plugged into AC power, it is powered up and ready to go.
-
Page 31: Connectors
Connectors XLR Connectors The inputs on the XD-2 accept 3-pin male XLR connectors, typically used for microphone cables. A balanced XLR connector uses a three-conductor shielded cable and is wired according to the AES (Audio Engineering Society) standard, as follows: SHIELD COLD Hot (+) - Page 32 Therefore, to avoid degradation of the digital signal, it is important to use 75 ohm rated cables that are designed for video or digital audio use. Your Mackie dealer can help you fi nd an appropriate cable for the S/PDIF connection. MIDI Connectors These are 5-pin male DIN connectors, which are the standard connectors used to make MIDI connec- tions.
-
Page 33: Software
XD-2 Software The XD-2 software application gives you access to a number of setup parameters and the EQ and dy- namics processing built-in to the XD-2 USB interface. See page 12 for instructions on how to load the XD-2 software. The on-screen user interface operates in the same way for the PC and Macintosh versions, except where noted (this guide uses the PC screens). - Page 34 The Spike Powered Recording System is compatible with the following drivers: • ASIO 2.0 (Audio Stream Input/Output, Steinberg Media Technologies) • WDM (Windows Driver Model, Microsoft Corporation) • OS X Core Audio (Audio Class USB device, Apple Computer), Core MIDI HAL9000®...
-
Page 35: The Xd-2 Software Screens
The XD-2 Software screens Once the XD-2 software application is started, there are three main views which can be selected using the buttons on the right of the screen: Overview, Setup, and DSP. Overview (see page 38) Overview This screen provides access to various channel functions such as: input select buttons, HP/LP fi... -
Page 36: Basic Controls
Basic Controls First, we'll look at a few basic controls common to all screens: Current snapshot Min/Max/Inactive (if any) Open Save Click here to access The Setup Screen this user's guide Open/Save/Window The SAVE button allows you to save a snapshot of all the current settings as a fi le on your comput- er's hard drive. - Page 37 Minimize/Maximize/Inactive These are standard controls to show or hide the screen display, or to inactivate the application. On a PC, if you click "X" the XD-2 software application closes, but the software continues to run the XD-2 in the background. This prevents accidental disconnection of signals to and from recording ap- plications, as well as being a convenience to avoid extra windows and desktop clutter.
-
Page 38: Overview Screen
Overview Screen When the Overview button is selected, the screen displays the following controls for both channels: input select buttons, HP fi lter indicators, LP fi lter buttons, adjustable frequency settings, input and output metering, DSP enable and ordering, output level controls, and master linking. The Overview Screen USB button When the USB button is off (not lit), the XD-2 operates in Rec/Play mode and acts as a standard... -
Page 39: Xd-2 Front Panel
Overview screen continued SPDIF 48 V The Overview Screen HiZ indicator These indicators light when the XD-2 front panel INSTRUMENT (guitar icon) buttons are pushed in. They let you know when the high impedance (HiZ) instrument 1/4" TS inputs are active for guitars and other fi... - Page 40 Overview screen continued Input/Output Meters The Overview Screen Input/Output meters These meters indicate the signal levels for channel 1 and channel 2 relative to 0 dBFS (decibels full scale). The input meters indicate the signal level after the input GAIN control and just after the A/D converters.
- Page 41 Overview screen continued HP/LP Filters The Overview Screen Frequency HP/LP Filter section The high pass (HP) and low pass (LP) fi lters are active when the HP and LP lights are on. You can turn the LP fi lters on and off here, and change the fi lter corner (cutoff) frequency. •...
- Page 42 Overview screen continued DSP Select/Order Output Faders Link All The Overview Screen Link Faders DSP Selection and Ordering buttons You can enable or disable the individual DSP modules by clicking the buttons in this section. This is the same as clicking on the ACTIVE button in each DSP module window. If you right-click and drag (control+click on a Mac), you can rearrange the order of the DSP modules in the signal path.
-
Page 43: Setup Screen
Setup Screen When the Setup button is selected, various setup options and indicators are displayed. Boot at Power Up Sample Clock Selection Monitor Source Save Template Load Template Reset Controls Clock Lock Detection Max Sample Rate Mode USB Connection Established The Setup Screen Boot at Powerup Click here if you want the XD-2 software to automatically launch when the host computer is turned... - Page 44 Sample Clock Selection Monitor Source Setup screen continued Save Template Load Template Reset Controls Clock Lock Detection Max Sample Rate Mode USB Connection Established The Setup Screen Load Template button Click this to load the template settings to the XD-2. This overwrites all current settings and cannot be undone, so use it with care, perhaps counting to ten, or humming a little song before clicking.
- Page 45 Setup screen continued Note: The XD-2 follows the sample rate settings (44.1, or 48 kHz) and bit depth (16 or 24 bit) of Tracktion. To adjust the sample rate and/or bit depth, see the system settings in Tracktion (under the "Settings" tab), or the system preferences in your audio software application.
-
Page 46: Dsp Screen
DSP Screen When the DSP button is selected, the DSP screen appears as if by magic: Zoom Ch. 1 Zoom Ch. 2 Parametric EQ Module Compressor Module Gate/Expander Module DSP Two-Channel View User’s Guide... - Page 47 DSP screen continued In addition to the high-pass and low-pass fi ltering, each channel has its own 4-band EQ, Compressor/ Limiter, and Gate/Expander DSP module. Any adjustments you make to the settings of these three modules will affect your recording. Each module has a graphical display in which you can click and drag the nodes to change the param- eters, or you can click and drag on the individual controls to fi...
- Page 48 DSP screen continued Active DSP Single Channel View (with no Active modules) This module has MENU activated, normally it shows the controls. Active buttons Each DSP module is active when its ACTIVE button is lit. A second click will de- activate and bypass that particular module.
- Page 49 Menu DSP screen continued Menu DSP Single Channel View (with no Active modules) This module has MENU activated, normally it shows the controls. Menu buttons Click this button to reveal fi ve menu buttons: SAVE (EQ – COMP – GATE) AS: allows you to save the individual DSP settings to its respective folder on the hard drive.
- Page 50 DSP screen continued Link DSP Single Channel View (with no Active modules) Link buttons These link the channel 1 and channel 2 controls in the selected DSP module, so they are always identical. This is useful when recording or mastering a stereo source, in which identical adjustments are normally made to both left and right channels at once.
-
Page 51: Parametric Equalizer Module
Parametric Equalizer Module The Parametric Equalizer provides four bands of equalization, with controls to adjust the gain, center frequency, and quality factor (Q) for each band. Note: EQ is rather like makeup: use it wisely and tastefully for a subtle and pleasing effect. - Page 52 Parametric EQ continued Shelf 1 and Shelf 4 buttons Click these buttons to convert band 1 into a low-fre- quency shelving fi lter, and band 4 into a high-frequency shelving fi lter, with gain and frequency control param- Nodes eters (no Q adjustment). Gain sliders These sliders control the gain for each node, with a range from –15 dB to +15 dB.
-
Page 53: Compressor Module
Compressor Module Reduction The compressor is used to reduce or limit transient Meter peaks in a signal, while providing make-up gain to compensate. As the input level to the compressor increases, the output level increases linearly until the threshold point is reached. After that point, the Nodes output level no longer increases linearly, but in- Output... - Page 54 Compressor module continued Reduction Attack slider Meter This control determines how fast the compressor re- acts once the threshold has been exceeded. It ranges from 0.25 ms to 250 ms. For a softer attack, move the slider more to the right. Nodes Output Release slider...
- Page 55 Compressor module continued Soft button This activates the soft knee feature. A Knee control appears in the controls section of the compressor. Increasing the Knee val- ue causes the compressor to begin working slightly before the threshold value and gradually adjusts the gain reduction ratio to its set value slightly after the threshold value.
-
Page 56: Gate/Expander Module
Gate/Expander Module A gate is used to lower the level of a channel when the signal level drops below a certain threshold level. This can reduce the overall noise level in your mix by muting unused or noisy channels. The XD-2 Gate has controls to adjust attack, release, hold, threshold, and range. It can also be turned into an Expander to allow ratio-based gain reduction. - Page 57 Gate/Expander module continued Attack slider This adjusts how fast the gate opens once the Reduction Threshold threshold has been exceeded. It ranges from Meter Node 0.25 ms to 2.5 sec. Release slider Range This determines how fast the gate closes once the Node signal falls below the threshold.
- Page 58 Gate/Expander module continued Expand button This activates the expander feature, sometimes re- Threshold ferred to as downward expansion. When the EXPAND Node button is activated, the Range and Hold controls are removed, and a Ratio control appears instead. Ratio Ratio slider Node This only appears when EXPAND is engaged.
-
Page 59: Using Spike
Using Spike This section shows some of the ways to use Spike, and how to use the MIX knob during overdubbing and mixing. Although we mention Tracktion in this section, the information generally applies to any other recording software you might be using with your XD-2. Mix Knob Revisited As mentioned on pages 26/27, the MIX knob adjusts the signal going to your monitors, headphones and S/PDIF output. - Page 60 Overdub (Direct Monitoring) Overdubbing means adding new material to an existing recording. You will need to hear both the input signal (Direct) as you perform, and the playback of the existing recording from Tracktion (USB). Set the MIX knob initially to the 12:00 position, start Tracktion playing and begin your vocal/guitar/sitar/whatev-ar performance.
- Page 61 Overdub (Software Monitoring) When you are playing and recording a guitar for example, you may want to listen through Tracktion. You may be thinking: “why? I have the MIX knob set to DIR and can hear myself just fi ne. Plus I’ve heard about this latency thing and I’m scared of running into it.”...
- Page 62 While you are mixing, you may want to apply processing to your fi nished mix. Tracktion comes with some nice effects, and we’ve included the Warmer Phaser plug-in and Mackie Final Mix to get you on your way. The great EQ and dynamics of the XD-2 can also be used for this purpose, by enabling the USB Processing mode.
- Page 63 There are many factors that contribute to latency, and there is one in particular that you can control: the software audio buffer size. The audio buffer (also referred to as ASIO buffer on a PC, or Core Audio buffer on a Mac) is an area in memory that Tracktion uses to hold your audio as it works. The buffer size is measured in samples, and usually ranges from just a few samples to thousands.
-
Page 64: Appendix A: Technical Information
Appendix A: Technical Information System Requirements PC requirements Hard Drive notes • WIN XP • To record a one minute 24-bit/44.1 kHz Mono track requires approximately 8 MB of • Intel Pentium 3 or 4, or AMD Athlon hard drive space. (750 MHz or better is recommended for Tracktion). -
Page 65: Specifi Cations
XD-2 Analog Specifi cations Dynamic Range (Noise) Maximum Output Level • –101.5 dBr Mic in to Monitor Out, Gain at Min • +22 dBu • –101.0 dBr Mic in to Monitor Out, Gain at Headphone Output nominal (+4 dBu XLR input) •... - Page 66 XD-2 Digital Specifi cations DSP Specifi cations A/D Conversion Parametric EQ • 24 bit, 44.1/48 kHz, 103 dB dynamic range • All Bands: +/–15 dB @ 20 Hz - 20 kHz (88.2/96 kHz in future software update) • Bandwidth: 1/12 to 3 octave for all bands (Q = 0.1-16) D/A Conversion HP/LP Shelving EQ...
- Page 67 • Because this guide is available as a PDF, it may be updated and posted on our website (www.mackie.com). Check the website and download the guide if it is a later version than this (Rev B).
-
Page 68: Block Diagram
XD-2 Block Diagram SHARC PHANTOM DSP AND MICROCONTROLLER CHANNEL 1 +48 VDC GATE/ 4-BAND COMP/ GAIN EXPAND LIMIT HP/LP OUTPUT FILTER LEVEL MIC IN CH 1/CH 2 INPUT INPUT USB OUTPUT SELECT MODE REC/PLAY (TO COMPUTER) ORDER CHANGEABLE SELECT 1/4" INPUT CH 1/CH 2 GATE/ 4-BAND... -
Page 69: Appendix B: Troubleshooting Guide
• Make sure you have selected the right driver Appendix B: Troubleshooting (Mackie XD-2) in your DAW. In Tracktion, this is in the Settings menu. Blinking Red LED on channel 1: This means the XD-2 did not boot properly. It can happen for a variety of reasons. - Page 70 • Try a song with fewer tracks, effects, and Glitchy/Distorted Playback from Computer: virtual instruments. If it plays fi ne, then you Increase the Buffer Size/Latency Setting: may be pushing your computer above it’s lim- • Tracktion (PC): choose the Settings Tab and its.
- Page 71 XD-2, but I don’t want to: • The XD-2 S/PDIF outputs are always active. The Mackie XD-2 should not be selected as your computer system sound source. To disable it: • If your external S/PDIF device has inputs •...
- Page 72 This fi rmware may be updated if needed, and download the latest versions from: made available for download. www.mackie.com/spikeauth • If after updating, you still are having prob- How do I fi nd my XD-2 Firmware version? lems, please call tech support.
-
Page 73: Appendix C: Service Information
3. Pack the XD-2 in its original packaging and box. ting up and using the XD-2 with the third-party This is very important. Mackie is not responsible software, please contact the software manufacturer’s for any damage that occurs due to non-factory technical support. - Page 74 Please read the warranty information on Contact our Technical Support the next page, then either register online at staff at 1-800-898-3211, Mon- www.mackie.com/spikeauth or complete and re- turn the product registration card included with day to Friday, from 7 AM to 5 your Spike system.
-
Page 75: Limited Warranty
If we cannot duplicate the problem at the factory-authorized service center or establish the C. Service and repairs of Mackie products are to be starting date of your Limited Warranty, we may, at performed only at a factory-authorized facility (see our option, charge for service time. - Page 76 Technologies to any location within the boundaries of CONSEQUENTIAL DAMAGES THAT MAY RESULT the USA. FROM ANY DEFECT IN THE MACKIE PRODUCT OR ANY WARRANTY CLAIM. Some states do not al- G. LOUD Technologies warrants all repairs performed low exclusion or limitation of incidental, special, or...
- Page 77 O U D T E C H N O O G I E S I N C . 1 6 2 2 0 W O O D - R E D R O A D N E ¥ W O O D I N V I E , W A 9 8 0 7 2 U S A U S A N D C A N A D A : 8 0 0 .
Need help?
Do you have a question about the Spike and is the answer not in the manual?
Questions and answers