Table of Contents
Advertisement
Quick Links
LaCie d2 Network
User Manual
Table of Contents
1. Introduction .................................................................................................................. 5
1.1. Box Content .................................................................................................................................... 6
1.2. Minimum System Requirements ......................................................................................................... 7
1.2.1. Windows Users ...................................................................................................................... 7
1.2.2. Mac Users ............................................................................................................................. 7
1.3. Hard Drive Heat Management .......................................................................................................... 8
1.4. Views of the d2 Network ................................................................................................................... 9
1.5. Ethernet Cable ............................................................................................................................... 10
2. Setting Up Your LaCie d2 Network ............................................................................. 11
2.1. Turning On the d2 Network ........................................................................................................... 12
2.2. Connecting the Ethernet Cable........................................................................................................ 13
2.3. Connecting Using LaCie Network Assistant....................................................................................... 14
2.4. Configuring the LaCie d2 Network on a Network Without a DHCP Server ........................................... 16
2.5. Unmounting d2 Network Volumes ................................................................................................... 17
3. Accessing & Managing Files ....................................................................................... 18
3.1. Accessing Shared Folders ............................................................................................................... 18
3.1.1. Other Connection Methods ................................................................................................... 19
3.2. FTP Access to Shares ...................................................................................................................... 21
3.3. Administration Page - Browse ......................................................................................................... 22
3.3.1. Uploading Files .................................................................................................................... 22
3.3.2. Downloading Files ................................................................................................................ 23
3.3.3. Deleting Files ....................................................................................................................... 23
3.3.4. Logging Out ........................................................................................................................ 23
3.4. Connecting an External Hard Disk ................................................................................................... 24
4. Administering Your LaCie d2 Network ....................................................................... 25
4.1. Accessing the Administration Page ................................................................................................... 26
4.1.1. Setting the Display Language................................................................................................. 27
4.1.2. Administration Home Page .................................................................................................... 27
4.2. Users ............................................................................................................................................ 28
4.2.1. Adding Users ....................................................................................................................... 29
4.2.2. Setting User Access to Shares ................................................................................................ 30
4.2.3. Setting Group Membership ................................................................................................... 30
4.2.4. About Access Privileges ......................................................................................................... 31
4.2.5. Deleting User Accounts ......................................................................................................... 31
4.2.6. Editing User Accounts ........................................................................................................... 31
4.3. Groups ......................................................................................................................................... 32
4.3.1. Adding Groups .................................................................................................................... 32
4.3.2. Setting Group Access to Shares ............................................................................................. 33
4.3.3. Deleting Groups .................................................................................................................. 33
4.3.4. Editing Groups ..................................................................................................................... 33
4.4. Shares .......................................................................................................................................... 34
4.4.1. Creating Shares ................................................................................................................... 34
4.4.2. Deleting Shares .................................................................................................................... 35
4.4.3. Editing Shares ...................................................................................................................... 35
4.5. System .......................................................................................................................................... 36
4.5.1. Active Directory .................................................................................................................... 36
4.5.2. Configuration ...................................................................................................................... 36
4.5.3. Network .............................................................................................................................. 37
Table of Contents
page 1
Advertisement
Table of Contents

Related Manuals for LaCie 301414U - d2 Network NAS Server


Summary of Contents for LaCie 301414U - d2 Network NAS Server
-
Page 1: Table Of Contents
2.2. Connecting the Ethernet Cable......................13 2.3. Connecting Using LaCie Network Assistant..................14 2.4. Configuring the LaCie d2 Network on a Network Without a DHCP Server ........... 16 2.5. Unmounting d2 Network Volumes ....................17 3. Accessing & Managing Files ..................18 3.1. - Page 2 4.9. Import (Snapshot) ........................... 48 4.10. Multimedia ............................ 49 5. LED Indicators ......................50 6. Email Notification Triggers ..................51 7. Troubleshooting ......................52 8. Contacting Customer Support ..................54 7.1. LaCie Technical Support Contacts ....................55 9. Warranty Information ....................56...
- Page 3 ✦ Consult the dealer or an experienced Directive 2002/95/EC on the Restriction of radio/TV technician for help. Hazardous Substances). Modifications to this product not authorized by LaCie could void the FCC & Industry Canada regulations and negate your au- thority to operate the product.
-
Page 4: Health And Safety Precautions
II). some other form of removable storage me- dia. LaCie offers a complete line of CD and DVD drives. If you would like more informa- General Use Precautions tion on backup, please refer to our website. -
Page 5: Introduction
User Manual page 5 1. Introduction Congratulations on your purchase of a LaCie d2 Network. Designed to satisfy the data sharing and backup needs of small offices, the LaCie d2 Network represents the new generation of shared storage with security. -
Page 6: Box Content
LaCie d2 Network Introduction User Manual page 6 1.1. Box Content Your LaCie d2 package contains the system tower and an acces- sories box containing items 2-5, listed below: LaCie d2 Network Cat 5E Ethernet cable Power supply Utilities CD-ROM... -
Page 7: Minimum System Requirements
LaCie d2 Network Introduction User Manual page 7 1.2. Minimum System Requirements 1.2.1. Windows Users ✦ Windows 2000, Windows XP or Windows Vista ✦ 500MHz processor or higher ✦ 512MB RAM or greater ✦ Ethernet switch or hub (10/100 or better) ✦... -
Page 8: Hard Drive Heat Management
Vertical, Horizontal & Rackmount Heat dissipation is maximized when the drive is in the vertical posi- tion. If you have several LaCie drives stacked on each other, please remember to attach the included rubber feet on the under side of your drives. -
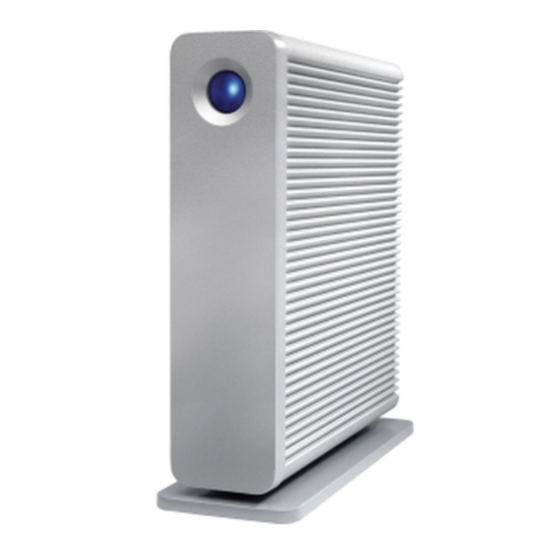
Page 9: Views Of The D2 Network
LaCie d2 Network Introduction User Manual page 9 1.4. Views of the d2 Network Front View Backup Button with Activity LED (Fig. The LED remains lit to show that the drive is on. The blue button on the front of the d2 Network allows you automati- cally back up an attached external hard drive onto the d2 Network. -
Page 10: Ethernet Cable
Gigabit Ethernet Cables And Connectors The cables and connectors used to attach Gigabit Ethernet devices are as follows (Fig. 03 - Ethernet Cable Ends): Fig. 03 - Ethernet Cable Ends TECHNICAL NOTE: LaCie recommends Cat 5E or Cat 6 cables, which support Gigabit Ethernet. -
Page 11: Setting Up Your Lacie D2 Network
Setting Up Your LaCie d2 Network User Manual page 11 2. Setting Up Your LaCie d2 Network Follow these steps to power on the LaCie d2 Network and to log on to the administration pages. Step 1 – 2.1. Turning On the d2 Network Step 2 –... -
Page 12: Turning On The D2 Network
2.1. Turning On the d2 Network The power supply kit is composed of two cables: one cable (A) con- nects to the LaCie drive; and the other cable (B) connects to a power outlet, such as a wall outlet or a surge protector (Fig. -
Page 13: Connecting The Ethernet Cable
LaCie d2 Network Setting Up Your LaCie d2 Network User Manual page 13 2.2. Connecting the Ethernet Cable Unlike regular desktop hard drives, the d2 Network is accessible when attached to your network and does not need to connect di- rectly to your computer (Fig. -
Page 14: Connecting Using Lacie Network Assistant
When a new device is found, an info bubble containing the name of the device will appear. When Network Assistant finds your LaCie d2 Network, you can con- nect to any of the shares on the d2 Network, log in to the Admin- istration Page, or configure the d2 Network’s network settings, all... - Page 15 15 Launch the Administration Page Windows Users 1. Select LaCie Network Assistant in Start/Programs. A Network As- sistant icon will appear in the system tray and Network Assistant will automatically detect your LaCie d2 Network and any other LaCie storage devices on your network.
-
Page 16: Configuring The Lacie D2 Network On A Network Without A Dhcp Server
IP address to all devices on the network to allow devices to find each other. If your network does not have DHCP server, you may need to manually assign your LaCie d2 Network an IP address and other network information. -
Page 17: Unmounting D2 Network Volumes
Drag all mounted volume icons to the trash. Windows Users: If you have used the LaCie Network Assistant to MOUNT volumes (i.e. if the volume has been assigned a letter in My Computer): 1. Right-click the LNA icon in the task bar and select Network Configuration... -
Page 18: Accessing & Managing Files
Cie Network Assistant will help you quickly connect to the shared folder(s) on your LaCie d2 Network. To access shared folders (all users): 1. Run the LaCie Network Assistant (LNA). Click on the LNA icon in the system tray (Windows users, Fig. -
Page 19: Other Connection Methods
(This user name and password is the factory default; if you have already created a user, input your user name and password.) The LaCie d2 Network will appear as a drive with one share folder on the network. Windows Me/2000 Fig. - Page 20 “LaCie-d2”. Select it and press OK. Linux Users Under KDE, open konqueror and type in the IP address of the LaCie d2 Network into the address field: For FTP access – ftp:// [IP address] For HTTP access –...
-
Page 21: Ftp Access To Shares
LaCie d2 Network Accessing & Managing Files User Manual page 21 3.2. FTP Access to Shares The FTP protocol is used to transfer files from one computer to an- other through a network, such as over the internet. This protocol... -
Page 22: Administration Page - Browse
LaCie d2 Network Accessing & Managing Files User Manual page 22 3.3. Administration Page – Browse To access files from the Administration page, just log in. Regular users will have direct access to the shares on the d2 Network (Fig. -
Page 23: Downloading Files
LaCie d2 Network Accessing & Managing Files User Manual page 23 3.3.2. Downloading Files To download a file: 1. Click on the share (folder) you want to download the file from. 2. Click on the file’s link (Fig. 21). 3. Internet Explorer: in the security warning window, click to al- low the download. -
Page 24: Connecting An External Hard Disk
3.4. Connecting an External Hard Disk You can connect an external USB or eSATA hard disk to back up the data on your LaCie d2 Network or as a way to add storage capac- ity. Connected hard disks are accessed similarly to shared folders. -
Page 25: Administering Your Lacie D2 Network
User Manual page 25 4. Administering Your LaCie d2 Network The LaCie d2 Network features an easy-to-use Web-based tool for configuring the drive and administering users, referred to here as the Administration Page. Accessing the Administration Page is easy, whether you’re using a browser (all users) or the LaCie Network Assistant (LNA). -
Page 26: Accessing The Administration Page
PC users: http://lacie-d2 (Fig. Fig. 28 http://IP address (Fig. Find the IP address by running the LaCie Network Assistant (section 2.3. Connecting Using LaCie Network Assistant). TECHNICAL NOTE: The IP address of your LaCie d2 Network may be different than the IP address shown in Fig. -
Page 27: Setting The Display Language
Fig. 30 Svenska Dansk Japanese 4.1.2. Administration Home Page When you log into LaCie d2 Network administration, the Home page opens (Fig. 31). This page contains information about the sta- tus of the d2 Network. Fig. 31, area A: Gives the product model name, IP address, ✦... -
Page 28: Users
23 March 2008 word again in the “Confirm password” field. This message is automatically generated by the LaCie email noti cation service. The temperature of the drive(s) is critical: SYSTEM WILL NOW DO AN EMERGENCY SHUTDOWN 3. Click Apply (b, Fig. -
Page 29: Adding Users
LaCie d2 Network Administering Your LaCie d2 Network User Manual page 29 4.2.1. Adding Users To add a user account: 1. Click Add on the User Accounts page (Fig. 34). The User Profile page opens (Fig. 35). 2. Enter a login name in the “Login” field. -
Page 30: Setting User Access To Shares
LaCie d2 Network Administering Your LaCie d2 Network User Manual page 30 4.2.2. Setting User Access to Shares All of the shares on your d2 Network are listed on the Shares tab of each user’s profile page. Shares have three access levels: ✦... -
Page 31: About Access Privileges
LaCie d2 Network Administering Your LaCie d2 Network User Manual page 31 4.2.4. About Access Privileges Access privileges can be assigned to users on an individual user basis or on a group basis. User-level access is more restrictive. Here is an example of the way access privileges work when a user... -
Page 32: Groups
LaCie d2 Network Administering Your LaCie d2 Network User Manual page 32 4.3. Groups Click on the Groups link in the navigation bar to open the Groups page (Fig. 40). Use this page to create, edit and delete groups. If you use your d2 Network in an office setting where many different... -
Page 33: Setting Group Access To Shares
LaCie d2 Network Administering Your LaCie d2 Network User Manual page 33 4.3.2. Setting Group Access to Shares All of the shares on your d2 Network are listed on the Shares tab of each group’s profile page. Shares have three access levels: ✦... -
Page 34: Shares
LaCie d2 Network Administering Your LaCie d2 Network User Manual page 34 4.4. Shares Click on the Shares link in the navigation bar to open the Shares page (Fig. 45). Use this page to create, edit and delete shares. 4.4.1. -
Page 35: Deleting Shares
LaCie d2 Network Administering Your LaCie d2 Network User Manual page 35 4.4.2. Deleting Shares On the Shares page (Fig. 47), check the box beside each share you want to delete (a) and click Remove (b). Deletion of the share could take just a few seconds to several minutes, depending on the size of the share. -
Page 36: System
LaCie d2 Network Administering Your LaCie d2 Network User Manual page 36 4.5. System In addition to the Configuration page, which is the main System page, the System menu has four sub-sections: Network, Disks, Sta- tus and Maintenance, each accessible from the navigation bar when you click System. -
Page 37: Configuration
LaCie d2 Network Administering Your LaCie d2 Network User Manual page 37 4.5.2. Configuration Click on the System link in the navigation bar to open the Configu- ration page. This page displays basic information about the d2 Net- work including the Machine name, the Windows workgroup, time zone and date and time (a, Fig. -
Page 38: Network
Your DHCP server will assign an IP address to the d2 Network every time it connects to your network. 4.5.3.2. Configure IP Manually Fig. 54 This method is used when the LaCie d2 Network is connected to a non-DHCP enabled network or if you have elected to manually configure your IP (Fig. -
Page 39: Disks
LaCie d2 Network Administering Your LaCie d2 Network User Manual page 39 4.5.4. Disks Attached external hard drives and their partitions appears as shares on the Browse page. See section 3.1. Accessing Shared Folders. Attaching external disks expands the available storage capacity through the network. - Page 40 IMPORTANT INFO: External hard disks must be formatted in one of the supported systems in order to mount on the LaCie d2 Network: FAT32, FAT, NTFS, HFS+, EXT3, EXT2, REISERFS or XFS. Note that you can reformat external drives to the XFS file system us- ing the d2 Network web interface.
-
Page 41: Status
LaCie d2 Network Administering Your LaCie d2 Network User Manual page 41 4.5.5. Status Click on Status under System in the navigation bar to display the system Status page (Fig. 61). On this page you can view the number of connected users, disable file server services (SMB, AFP, and FTP) and view, download or de- lete the system log. - Page 42 LaCie d2 Network Administering Your LaCie d2 Network User Manual page 42 4.5.6.1. Saving and Loading System Configurations It’s a good idea to save your system configuration in case the d2 Network needs to be reformatted or reset. You can then reload the configuration so that your settings, shares, groups and users are not lost.
- Page 43 LaCie d2 Network Administering Your LaCie d2 Network User Manual page 43 4.5.6.2. Updating the System Firmware updates may become available for the d2 Network. To install firmware updates: 1. Download updates from www.lacie.com/support/downloads/. 2. Click the Update the system tab in Maintenance (a, Fig.
-
Page 44: System Log
Fig. 67 4.5.7. System Log The system log allows you to review the type, date, time, source and event ID of activities on the LaCie d2 Network (Fig. 68). To view the system log, select System > Status > View. -
Page 45: Wake On Lan (Wol)
(LAN). For WOL to work, the power switch must be in the AUTO position. This function is accessed using the LaCie Network Assistant software. Follow these steps to activate WOL: 1. Click the LNA icon in your menu bar (Mac Users, Fig. -
Page 46: Download
46 4.6. Download The LaCie d2 Network has the capability to act as a torrent client. Torrent is a peer-to-peer file sharing system used to share large files. Those in possession of a file act as seeders, and those who download files are peers. -
Page 47: Backup
When an external USB or eSATA hard disk is connected to your LaCie d2 Network, you can perform manual, bidirectional backups of your files. Copy files from your LaCie d2 Network to the external disk, or from the external disk to the LaCie d2 Network. -
Page 48: Browse
LaCie d2 Network Administering Your LaCie d2 Network User Manual page 48 8. If the frequency is set to “Once,” the backup will begin after a few seconds. An in-progress backup will be indicated with yel- low highlighting (Fig. 78). -
Page 49: Multimedia
LaCie d2 Network Administering Your LaCie d2 Network User Manual page 49 4.10. Multimedia Thanks to its support of UPnP A/V and DLNA protocols, the d2 Net- work can act as a multimedia server, providing access to its files to compliant digital media appliances. Such appliances include Playstation 3, Xbox360, many LCD TV and stereos, or Digital Media Adapters (DMA). -
Page 50: Led Indicators
LaCie d2 Network LED Indicators User Manual page 50 5. LED Indicators The LED indicators above the drive bays and the front LED indicate drive status and activity. This section describes the behavior of the LED indicators. Front LED Color... -
Page 51: Email Notification Triggers
LaCie d2 Network LED Indicators User Manual page 51 6. Email Notification Triggers Download Machine Temperature Snapshot 1. Download completed 1. High temperature 1. Error creating share 2. Critical temperature 2. No external devices detected 3. No temperature sensed 3. External device not yet mounted 4. -
Page 52: Troubleshooting
52 7. Troubleshooting Manual Updates In the event that your LaCie d2 Network is not working correctly, please take a look at the Troubleshooting section on the following LaCie strives to give you the most up-to-date, comprehensive user pages and at the FAQs published on our web site – www.lacie.com. - Page 53 LaCie Network Assistant, which is located on the LaCie Storage Utilities CD-ROM. If your network is NOT managed by a DHCP server, the d2 Network uses its default IP address, which is 192.168.xx.100. To change this IP address, use LaCie Network Assistant.
-
Page 54: Contacting Customer Support
If you have asked yourself all of the pertinent questions in the trou- bleshooting checklist, and you still can’t get your LaCie drive to work properly, contact us via the contacts on the following page. Before... -
Page 55: Lacie Technical Support Contacts
LaCie d2 Network Contacting Customer Support User Manual page 55 7.1. LaCie Technical Support Contacts LaCie Asia, Singapore, and Hong Kong LaCie Australia Contact us at: Contact us at: http://www.lacie.com/asia/contact/ http://www.lacie.com/au/contact/ LaCie Belgium LaCie Canada Contact us at: Contact us at: http://www.lacie.com/be/contact/... -
Page 56: Warranty Information
✦ The tamper seal on the drive casing is broken. LaCie and its suppliers accept no liability for any loss of data during the use of this device, or for any of the problems caused as a result. LaCie will not, under any circumstances, be liable for direct, special...
Need help?
Do you have a question about the 301414U - d2 Network NAS Server and is the answer not in the manual?
Questions and answers