Table of Contents
Advertisement
Advertisement
Table of Contents

Related Manuals for Sony PSS-610


Summary of Contents for Sony PSS-610
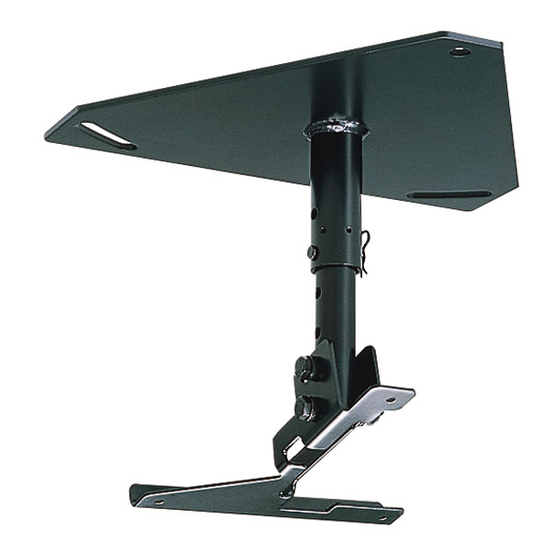
- Page 1 4-074-715-11(1) Projector Suspension Support Installation manual for Dealers Manuel d’installation destiné aux revendeurs Installationshandbuch für Händler Manual de instalación para proveedores Manuale d’installazione per i rivenditori PSS-610 2005 Sony Corporation...
- Page 2 • Be sure to assemble and attach the bracket in the order indicated; otherwise the projector may fall. • The PSS-610 suspension support is designed for use with Sony LCD projector. Never use it for another purpose. • Use the screws supplied with the PSS-610 to install the projector suspension support on the projector.
- Page 3 • El soporte de suspensión PSS-610 está diseñado • Die Aufhängung PSS-610 wurde speziell für para utilizarse con el proyector LCD de Sony. den LCD-Projektor von Sony konzipiert. No lo utilice para ningún otro propósito. Verwenden Sie sie ausschließlich für diesen Projektor.
-
Page 4: Table Of Contents
/Table of contents/Table des matières/Inhalt/ Indice/Indice/ English ................. Parts List ..............5 ................Installation Diagram ..........7 ............Attaching to the ceiling ..........8 ............Installation Examples ..........18 ................Specifications ............22 ..............Appendix ............ Back cover Français Deutsch Composants .............. - Page 5 /Parts List/Composants/Teileliste/Lista de componentes/Elenco dei componenti/ Upper ceiling mount bracket (1) Support supérieur de montage au plafond (1) Obere Deckenmontagehalterung (1) Soporte superior de montaje en el techo (1) Staffa superiore di montaggio al soffitto (1) Adjustment pipe (1) Tube de réglage (1) Einstellrohr (1) Tubo de ajuste (1) Tubo di regolazione (1)
-
Page 6: Composants
/Parts List/Composants/Teile liste/Lista de componentes/ Elenco dei componenti/ Parts number/ Washer M8 (4) Numéro de pièce/ Rondelle M8 (4) Teilenummer/ Unterlegscheibe M8 (4) N´ u mero de componentes/ Arandela M8 (4) Numero dei componenti/ Rondella M8 (4) 4-047-748-11 M8 (4) Parts number/ Toothed lock washer M8 (4) Numéro de pièce/... -
Page 7: Schéma D'installation
/Installation Diagram/Schéma d’installation/ Installationsdiagramm/Diagrama de instalación/ Schema dell’installazione/ For details of screen size and installation measurement for projection and the distance between the ceiling and the projector, refer to the following manuals. - Operating Instructions of your projector - Installation Manual for Dealers of your projector - Installation Manual of the projection lens (when using the optional lens) To attach the suspension support on the VPL-S900, see page 14 of this manual. -
Page 8: Adjustment
/Attaching to the ceiling/ Montage au plafond/Montage an der Decke/ Bottom of projector (b)/(c) Base du projecteur Unterseite des Projektors Base del proyector Base del proiettore (h) (j) (b)/(c) (h) (j) English A: One screw hole for the lens side B: Two screw holes for the lens side The difference between A and B in the above figures is that the mounting bracket direction is different (180°). -
Page 9: Staffa Di Montaggio Del
Montaje en el techo/Montaggio al soffitto/ Français Deutsch Un orifice de vissage du côté de l’objectif Eine Schraubenbohrung auf der Objektivseite Deux orifices de vissage du côté de l’objectif Zwei Schraubenbohrungen auf der Objektivseite La différence entre A et B dans les figures ci-dessus est que le Der Unterschied zwischen der Abbildung A und B oben liegt in sens de montage du support est différent (180°). -
Page 10: Upper Ceiling Mount
/Attaching to the ceiling/ Montage au plafond/Montage an der Decke/Montaje en el techo/ (h) (j) Screen forward Ecran Projektionsschirm Pantalla Direzione dello schermo (h) (j) English Attach the adjustment pipe to the projector mount bracket (d) using a bolt M8 50 (f), two toothed ×... -
Page 11: Support Supérieur De Montage Au
Montaggio al soffitto/ Français Deutsch Montez les tubes de réglage sur le support de Bringen Sie das Einstellrohr mit einer M8 × montage du projecteur (d) à l’aide d’un boulon M8 × Schraube (f), zwei M8-Zahnscheiben (i), zwei M8- 50 (f), de deux rondelles hélice M8 (i), de deux Unterlegscheiben (h) und einer M8-Mutter (j) an die rondelle M8 (h) et d’un écrou M8 (j). - Page 12 /Attaching to the ceiling/ Montage au plafond/Montage an der Decke/Montaje en el techo/ English Insert the adjustment pipe into the upper ceiling mount bracket (a). Attach the pipe with the two 6 mm pins (k) and the two snap pins (l). Pipe (b) can be adjusted to a height of 150/175/200 mm (6/7/7 inches);...
- Page 13 Montaggio al soffitto/ Français Deutsch Setzen Sie das Einstellrohr in die Obere Introduisez le tube de réglage dans le support Deckenmontagehalterung (a) ein. Bringen Sie das supérieur de montage au plafond (a). Fixez le tube à Rohr mit den zwei 6-mm-Stiften (k) und den zwei l’aide de deux goupilles de 6 mm (k) et de deux Klammern (l) an.
- Page 14 /Attaching to the ceiling/ Montage au plafond/Montage an der Decke/Montaje en el techo/ / Dimensions for attaching the projector VPL-S900 suspension support to the VPL-S900 / Dimensions d’installation du support de suspension pour projecteur sur le VPL-S900 / Abmessungen zum Anbringen der Projektoraufhängung am VPL-S900 / Dimensiones para instalar el soporte de suspensión para proyector al VPL-S900 / Dimensioni per l’applicazione del supporto di sospensione del proiettore al modello VPL-S900 /...
- Page 15 Montaggio al soffitto/ Français Deutsch Vue du dessus Draufsicht Alignez le centre de l’objectif sur le centre de l’écran. Richten Sie die Mitte des Objektivs an der Mitte des Projektionsschirms aus. a) Distance entre l’écran et le centre de l’objectif 1 Centre de l’écran a) Abstand zwischen dem Projektionsschirm und der Mitte des Objektivs...
- Page 16 /Attaching to the ceiling/ Montage au plafond/Montage an der Decke/Montaje en el techo/ : mm Units : mm (inches) Unité : mm (pouces) Einheit : mm Unidades : mm (pulgadas) Unità : mm English Front view The lens is offset 49 mm (1 inches) to the right from the center of the supporting pole.
- Page 17 Montaggio al soffitto/ Français Deutsch Vue frontal Vorderansicht L’objectif est décalé de 49 mm (1 pouces) vers la droite Das Objektiv am Projektor ist 49 mm nach rechts von der du centre du pivot de support. Au moment du montage, veillez Mitte des Ständers versetzt.
-
Page 18: Installation Examples
/Installation Examples/Exemples d’installation au plafond/Installationsbeispiele/ The following illustrations show the projector suspension support attached to the ceiling. Installation is different depending on the material of ceiling. Caution Before installation, check that the maximum ceiling loading is in excess of 120 kg (264 lb 8 oz) . Les illustrations suivantes représentent le support de In den Abbildungen unten ist dargestellt, wie die suspension du projecteur fixé... -
Page 19: Ejemplos De Instalación En El Techo
Ejemplos de instalación en el techo/Esempi di installazione al soffitto/ /For wooden ceiling/Pour un plancher/Montage an einer Holzdecke/Para techos de madera/Montaggio ad un soffitto in legno/ /For-one-story house or uppermost floor/Pour maison à un étage ou plafond sous un toit/Decke eines einstöckigen Hauses oder des obersten Stockwerks/ Para casas de una planta o plantas superiores/Montaggio in una casa a piano unico o all’ultimo piano/ Front of the cabinet Avant du meuble... - Page 20 /Installation Examples/Exemples d’installation au plafond/Installationsbeispiele/ /For other floors/Autres sols/Zwischendecken/Para otros suelos/Per altri piani/ Front of the cabinet Avant du meuble Vorderseite des Gehäuses Parte frontal de la caja Parte anteriore dell’apparecchio /Floor line/Niveau du plancher/ Bodenlinie/Línea de suelo/Livello del pavimento/ /Joist (2”...
- Page 21 Ejemplos de instalación en el techo/Esempi di installazione al soffitto/ /For concrete ceiling/Pour un plafond en béton/Betondecke/Para techos de hormigón/Montaggio ad un soffitto di cemento/ /Concrete ceiling/Plafond en béton/Betondecke/Techo de hormigón/Soffitto di cemento/ (12 mm ) /Anchor for concrete (over 12 mm; inch dia.) / Ancrage pour béton (supérieur à...
-
Page 22: Technische Daten
/Specifications/Spécifications/Technische Daten/Especificaciones/Caratteristiche tecniche/ /Dimensions/Mesures/Abmessungen/Dimensiones/Dimensioni/ Upper ceiling mount bracket Support supérieur de montage au 250 (9 plafond Obere Deckenmontagehalterung Soporte superior de montaje en el techo 12.7( Staffa di montaggio al soffitto 12.7( 250 (9 317.5 (12 94.8 (3 /Adjustment pipes/Tubes de réglage/Einstellrohre/Tubos de ajuste/Tubi di regolazione/ 26 (1 240 (9 140 (5... -
Page 23: Spécifications
/Dimensions of the assembled bracket/Dimensions du support assemblé/ Abmessungen de montierten Halterung/Dimensiones del soporte de monitaje/Dimensioni della staffa montata/ /Front view/Vue frontale/Vorderansicht/Vista frontal/Vista frontale/ 317.5 (12 317.5 (12 250 (9 250 (9 125(4 125(4 : mm Units : mm (inches) Unité... - Page 24 /Appendix/ Appendice/Anhang/Apéndice/Appendice/ /Adjusting the Angle of the Projector/Réglage de l’angle du projecteur/Anpassen des Projektorwinkels/Ajuste de ángulo del projector/Regolazione dell’angolazione del proiettore/ Screen forward Ecran +15° Projektionsschirm –15° Pantalla Direzione dello schermo English Depending on the installation condition, adjust the angle between the bottom surface of the projector and the ceiling, and the tighten the two bolts (f).
Need help?
Do you have a question about the PSS-610 and is the answer not in the manual?
Questions and answers