Table of Contents
Advertisement
Advertisement
Table of Contents

Related Manuals for E.Digital Treo 10

Summary of Contents for E.Digital Treo 10
-
Page 2: Copyright Information
Copyright Information How to Use and Enjoy Your Treó 10 © 2001 e.Digital Corporation. All rights reserved. Created for e.Digital Corporation by Manual Labour, Inc. Under the copyright laws, neither the documentation nor the software maybe copied, photocopied, reproduced, translated, or reduced to any electronic medium or machine-readable form, in whole or in part, without the prior expressed written consent of e.Digital Corporation. - Page 3 Introduction Welcome to the future of personal music play- ers! Using the latest technological advances in both hardware and software, the Treó™ 10 Digital Music Jukebox allows you to carry a sizable audio library—over 150 hours—of your favorite music wherever you go. You can enjoy the following features: •...
- Page 4 How to Use and Enjoy Your Treó 10...
-
Page 5: Table Of Contents
Table of Contents Introduction ... iii Chapter 1: Getting Your Treó 10 Up and Running ... 1 What Accessories Are Included with My Treó 10? ... 1 How Do I Begin Using My Treó 10?... 2 Charging the Battery ...2 Installing Music Explorer ...3 Installing MusicMatch ...6 Downloading Music ...7... - Page 6 How Do I Convert Music Tracks to Digital Music Files?... 24 Creating Digital Music Files ...25 Chapter 3: Navigating Your Music ...29 How Do I Navigate and Play Music Files? ... 29 Understanding the Music File System ...30 Browsing Your Music ...31 Chapter 4: Customizing Your Treó...
- Page 7 How Do I Solve Problems Connecting to My PC? ... 43 Why Can’t I Connect to My PC? ...43 Why Do I Get “Undefined USB Driver” Error Messages When I Connect to My PC? ...43 I Inserted the Treó 10 Installation CD, but it Didn’t Automatically Start.
- Page 8 viii How to Use and Enjoy Your Treó 10...
-
Page 9: Chapter 1: Getting Your Treó
Chapter 1: Getting Your Treó 10 Up and Running Your Treó 10 Music Jukebox allows you to carry a virtual library of music with you. Using this chapter, you’ll be able to get your Treó 10 up and running quickly. This chapter covers how to begin using your Treó... -
Page 10: How Do I Begin Using My Treó 10
How Do I Begin Using My Treó 10? Before you can use your Treó 10 jukebox, you need to get it charged and loaded with music. You can do that using the accessories included with your jukebox. Charging the Battery Your Treó... -
Page 11: Installing Music Explorer
Installing Music Explorer Before you can transfer music files to your Treó 10, you must install the Music Explorer software on your PC. This software allows you • Organize your music files and • Move them to and from your player. The Music Explorer software works much like Windows Explorer™... - Page 12 The License Agreement appears. 3. Read the License Agreement and click 4. Click Browse to select an installation The Setup Type screen appears: 5. Choose the type of installation (TYPICAL Yes. The Choose Destination Location screen appears: directory, then click Next. Or, to store the software at the default location, click Next.
- Page 13 The Select Program Folder screen appears: 6. Select a program folder, then click Next. The Setup Status screen appears: After the installation is finished loading, the InstallShield Wizard Complete screen appears. How to Use and Enjoy Your Treó 10...
-
Page 14: Installing Musicmatch
If you need a way to create digital music files from your current music collection, you can install the MusicMatch™ software included on your e.Digital Music Explorer CD. To install MusicMatch: 1. Right-click on the Start button. 2. Select Explore. Windows Explorer™... -
Page 15: Downloading Music
5. Double-click the .exe file. The 6. Complete the setup as instructed. For Downloading Music Once you’ve installed Music Explorer, you can transfer music files to and from your Treó 10. Until you do that, you won’t have any music on your player to listen to. -
Page 16: Powering Your Treó 10 On And Off
Powering Your Treó 10 On and Off • To turn on the jukebox, press and hold the The Play screen will appear: • To shut off the jukebox: Play/Pause button. You will see this startup screen: Classical Beethoven Moonlight Sonata 1. -
Page 17: Listening To Music
Listening to Music Once you have loaded music onto your player, you can begin listening to it. For more information about adding music to your Treó 10, see “Adding Music to Your Treó 10” on page 17. To listen to a track, press Play. The selected track begins playing. -
Page 18: What's On My Treó 10
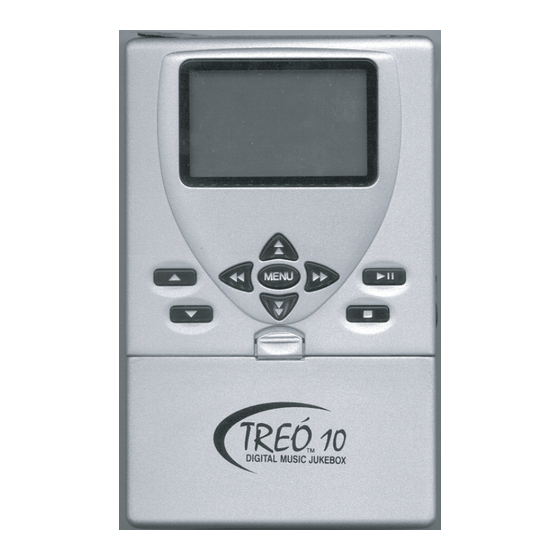
What’s On My Treó 10? Once you’ve unpacked your jukebox, you can see the following features on the front of your player. 2. Left Arrow 3. Volume Controls 5. Battery Latch Press this: 1. Menu Button View the Main Menu. For more infor- 2. -
Page 19: What's On The Treó 10 Screen
Press this: 9. Power On 10. Power Off/ Then, look at the right side and the top for the following connection jacks: HEADPHONE JACK What’s On the Treó 10 Screen? Understanding your Treó 10 screen’s layout will help you navigate and play the music you want quickly. - Page 20 Your Treó 10 displays information in similar ways no matter whether you’re playing music, browsing files, or changing your settings: Battery Level Volume Level Genre Classical Album Beethoven Track Track Information Battery Level You can see the condition of the Treó 10’s bat- tery in the top left of the screen When you see this: The battery is: External Power Source...
- Page 21 Play Mode The Play Mode controls what order your tracks play in. You can change this setting from the Main Menu. For more information about changing the Play Mode, see “Selecting the Play Mode” on page 36. Player Status You can quickly tell whether you are playing, pausing, or stopped by looking at the player status area of the screen.
-
Page 22: How Do I Change The Lithium Ion Battery
Track Information Along the bottom of the display you will see information about the selected or playing track. The information displayed will vary depending on what state your player is in: • When no music is playing or paused, you •... - Page 23 1. Slide the battery latch up, towards the top 2. Grasp either side of the battery and pull The battery detaches from the player. To order a new battery, contact e.Digital at • www.edigital-store.com or • 1-877-278-1574 How to Use and Enjoy Your Treó 10 of the player.
- Page 24 How to Use and Enjoy Your Treó 10...
-
Page 25: Chapter 2: Adding Music To Your
Chapter 2: Adding Music to Your Treó 10 In order to begin enjoying your Treó 10, you must download music from your PC. The Treó 10 includes software that allows you to easily transfer music back and forth between your PC and your player. This chapter includes the following sections: “How Do I Get Ready to Transfer Music?”... -
Page 26: Connecting The Usb Cable
Connecting the USB Cable Use the USB cable packaged with your Treó 10 to connect the player to your PC. For more information on the location of the USB port on your Treó 10, see “What’s On My Treó 10?” on page 10. Make sure that you already have the Music Explorer and MusicMatch software installed... -
Page 27: How Do I Transfer Music From My Pc To
How Do I Transfer Music from My PC to My Treó 10? The Music Explorer software included with Treó 10 allows you to manage your music files. Establishing file folders and transferring music tracks between the Treó 10 and your computer is quick and easy with Music Explorer. -
Page 28: Creating Subfolders
Creating Subfolders Level two folders, or “subfolders,” store the music files. Music files are what show up as tracks on your Treó 10. For more information on tracks, see “What Is a Track?” on page 30. The names you assign the subfolders here are the album names you will see on your Treó... - Page 29 • Using the quick menu: • Using drag and drop: How to Use and Enjoy Your Treó 10 1. Right-click a subfolder. 2. Select a transfer method: • Insert files places transferred music in front of any stored music already in the folder. •...
-
Page 30: Initializing Storage Media
3. Hold down the left mouse button and drag Initializing Storage Media Like formatting a computer disk drive, you can initialize your Treó 10’s hard disk drive. To initialize the media: 1. Verify that the Treó 10 does not contain 2. -
Page 31: How Do I Transfer Music From My Treó 10 To My Pc
music files to the Treó 10. For more informa- tion, see “How Do I Transfer Music from My PC to My Treó 10?” on page 19. How Do I Transfer Music from My Treó 10 to My PC? Music Explorer also allows you to move the files stored on your Treó... -
Page 32: Deleting Files
2. Select Rename. 3. Enter a new name for the folder or track. 4. Click OK. Deleting Files Music Explorer allows you to remove music files you no longer want on your Treó 10. To delete files: 1. Highlight a file, a group of files, or a folder. 2. -
Page 33: Creating Digital Music Files
Creating Digital Music Files The Treó 10 plays only MP3 and Windows Media™ files. However, you can place any type of file in any of the subfolders, which means you can use your Treó 10 as a data transport tool. Certain CODEC settings optimize the music files you create. - Page 34 4. Select the Recorder tab. 5. Click Tracks Directory. 6. Specify the directory where the new files 7. Click OK. will be stored after they are converted by doing one of the following: • Select the default directory. • Type a path. •...
- Page 35 8. On the MusicMatch player, press 9. Select the tracks on the CD you wish to 10. Select the Record option on the recorder 11. MusicMatch will record the selected tracks How to Use and Enjoy Your Treó 10 convert into digital music format. Checked tracks will be recorded.
- Page 36 How to Use and Enjoy Your Treó 10...
-
Page 37: Chapter 3: Navigating Your Music
Chapter 3: Navigating Your Music Your Treó 10 has a simple file system that allows you to navigate and play the music you’re looking for quickly. Or, you can begin playing music immediately, without having to browse files at all. You can also navigate files while you’re playing music. -
Page 38: Understanding The Music File System
For more information about navi- gating folders, see “Browsing Your Music” on page 31. The e.Digital Music Explorer soft- ware included with your player allows you to organize your files. For more information about managing your files, see “Adding Music... -
Page 39: Browsing Your Music
Browsing Your Music You can look for music on the Treó 10 at the genre, album, or track level using the arrow buttons. When the Treó 10 is not playing music, you can browse to a desired genre, album, or track and press Play to begin play- ing. - Page 40 the new song, just stop pressing buttons for ten seconds and the display will revert to the currently playing song. How to Use and Enjoy Your Treó 10...
-
Page 41: Chapter 4: Customizing Your
Chapter 4: Customizing Your Treó 10 Your Treó 10 can be quickly customized to meet your needs. You can change its settings using the Main Menu, or reformat the player’s hard drive. This chapter includes the following sections: “How Do I Adjust My Treó 10’s Settings?” “How Do I Reformat the Treó... -
Page 42: Locking And Unlocking The Buttons
To access the Settings menu, press Menu. The Main Menu appears: Use the up and down arrows to highlight the option you wish to change. Use the right and left arrows to change the settings. To exit the Main Menu, press Menu. The Play screen appears. -
Page 43: Choosing The Equalizer Setting
Choosing the Equalizer Setting The Treó 10 equalizer adjusts bass or treble to a variety of presets, or to a customized equal- izer setting. Use the equalizer to enhance the sound of specific genres of music. The equalizer presets are Flat, Rock, Latin, Dance, and Jazz. -
Page 44: Turning On The Backlight
3. Use the up and down arrows to highlight 4. Use the right and left arrows to change the 5. When you’re finished, press Menu to save 6. Press Menu again to return to the Play Turning On the Backlight When the Backlight setting is on, press any button to illuminate the display during low- light situations. -
Page 45: Play Mode
In this mode Your player will: PlyAlb PlyTrk RptAll RptGen RptAlb RptTrk RdmAll RdmGen RdmAlb Intro To set the play mode: 1. Using the up and down arrows, highlight 2. Scroll through the available settings with 3. Press Menu to save your settings and How to Use and Enjoy Your Treó... -
Page 46: Setting Up The Automatic Power Off
Setting Up the Automatic Power Off Customize your Treó 10 to turn off automati- cally if you’re not using it. You can set your player to turn off after one to ten minutes of inactivity. Or, select “Never,” and your Treó... - Page 47 After a moment, a message will appear on your screen. Continue holding the buttons. After a few more seconds, the screen will dis- play the following message: 4. Release both buttons. The player will take How to Use and Enjoy Your Treó 10 Format Disk? Formatting...
- Page 48 How to Use and Enjoy Your Treó 10...
-
Page 49: Chapter 5: Troubleshooting
Chapter 5: Troubleshooting How Do I Solve Problems With My Jukebox? Why Can’t I Turn On My Treó 10? • The battery may be weak. Connect to • If your unit has power and you know that Why Did My Treó 10 Turn Itself Off? Treó... -
Page 50: Why Does My Jukebox's Screen Look Scrambled
Why Does My Jukebox’s Screen Look Scrambled? This can occur when the battery is very weak. Replace or recharge the battery as soon as possible. For more information about charging the battery, see “Charging the Battery” on page 2. I Got a Message that There Are No Music Files On My Player. -
Page 51: Why Do The Files On My Treó 10 Sound Distorted
Why Do The Files On My Treó 10 Sound Distorted? • Some CD-ROM drives are not best suited Why is My Player Skipping? Exposing your jukebox to rough handling for extended periods can cause skipping. Try not to continuously jar the player. How Do I Solve Problems Connecting to My PC? Why Can’t I Connect to My PC? -
Page 52: I Inserted The Treó 10 Installation Cd, But It Didn't Automatically Start. What Should I Do
3. Click Settings. 4. Click Control Panel. 5. Double-click System. 6. Click the Device Manager tab. 7. Click the’+’ sign beside the Universal You should see an undefined driver in the list. Select it, and delete it. I Inserted the Treó 10 Installation CD, but it Didn’t Automatically Start. -
Page 53: Appendix: Product Information
Appendix: Product Information Technical Specifications Your Treó 10 conforms to the following speci- fications: Music Storage: 10GB—Up to 150 hours of audio content, encoded at 128Kb/s (approxi- mately 3000+ tracks) System: 16-bit DSP running at 150MHz. Micro OS 2.0 operating system Large, crisp display (100 x 64 pixel bitmapped LCD) Audio: Music is encoded at bit rates up to... -
Page 54: Minimum System Requirements
MusicMatch® companion software to down- load music to your Treó™10 Digital Music Jukebox. You must meet the following hard- ware and software requirements to run the Music Explorer and MusicMatch® software: Minimum System Requirements • Pentium class processor 233 MHZ or faster •... -
Page 55: Factory-Default Treó 10 Settings
Windows Media™ Decoder Sampling Frequencies: 32, 44.1, 48 kHz Bit Rates: 64, 80, 96, 128 kbps Factory-Default Treó 10 Settings Your Treó 10 comes with the following factory presets: Volume: 20 Lock: Off Eq: Flat User Eq: 0 dB (all bands) Backlight: Never Play Mode: PlyAll Power Off: 1 min... -
Page 56: Warnings
• Avoid handling the unit roughly, as this expose the unit to moisture. case. If your Treó 10 needs service, con- tact e.Digital at http://www.edigital- store.com. When you get to the page, click the Customer Support page. handling or disposal could lead to heat generation, smoke, bursting, and/or fire. -
Page 57: Approvals
Approvals This equipment has been tested and found to comply with the limitations for a Class B digi- tal device, pursuant to Part 15 of the FCC rules and regulations. These limitations are designed to provide reasonable protection against harmful interference within a residen- tial installation. -
Page 58: Limited Warranty
• EN60950 (IEC950) – Product Safety Limited Warranty Your Treó 10 Digital Music Jukebox is covered by an e.Digital Corporation Limited Warranty. This product is warranted to be free from manufacturer defects for 180 days from the date of purchase. If the product fails or mal-... - Page 59 Damage from modification or incorporation of other products Damage from repair or replacement of war- ranted parts by parties other than an e.Digital authorized service provider Damage to or loss of any programs or data Damage resulting from an Act of God...
- Page 60 Ship prepaid and insured to: e.Digital Customer Service 1500 World Wide Blvd. Hebron, KY 41048 This warranty expresses specific contractual rights; retail purchasers may have additional statutory rights, which vary from state to state. For on-line based information go to http://www.edigital-store.com.
-
Page 61: Index
See CD computer connecting specifications transferring music troubleshooting ... 38 connecting AC adapter computer connection jacks contacting e.Digital controlling music order converting CDs to files copyright information creating folders music files subfolders customer support, contacting customizing settings ...44... - Page 62 ... 51 equalizer customizing ...35 selecting setting ...35 erasing files ...24 player. See initializing hard drive error no music files ...42 undefined USB driver Explorer, Music. See Music Explorer factory default settings ... 47 FCC information ... 49 features, explained ...
- Page 63 navigating music ... 29 no music files, troubleshooting no sound, troubleshooting order, music ... 13 troubleshooting ...41 organizing music files ... 19 play order selecting ...36 troubleshooting ...41 player state ... 13 playing music ... 9 ports. See jacks power setting automatic off troubleshooting unexpected ...41...
- Page 64 turning power on, off ... 8 troubleshooting ...41 undefined USB driver, troubleshooting ... 43 understanding features ...10 file structure ...30 screen ...11 connecting cable ...18 undefined driver ...43 user equalizer, customizing using Music Explorer ...19 volume ...10 warnings ...48 warranty ...50 Windows Media™...
Need help?
Do you have a question about the Treo 10 and is the answer not in the manual?
Questions and answers