Advertisement
Note: This Installation Sheet is for the installer. Fill out the Owner Questionnaire below and give this entire
document to the professional installer.
Garmin highly recommends that a professional installer complete the installation.
Note: If this unit installs directly from a retailer, the owner may not be able to fill out the questionnaire.
Consult the owner to find out answers to the questionnaire before installing the receiver.
For the Owner
Due to the location of the vehicle's radio antenna, Garmin highly recommends that the GTM 10 be
installed by a professional installer. Installing the GTM 10 without the aid of a professional installer
may damage the GTM 10 and void your warranty.
Owner Questionnaire
1. Do you have a preference for how the installer runs the mini-USB cable out from behind the radio? For
safety purposes, Garmin recommends running the cable on the passenger's side of the vehicle.
No
Yes, run the mini-USB cable out from behind the radio by _ __________________________________
________________________________________________________________________________
2. What type of traffic service are you currently using?
Free services (where available)
Trial subscription
Purchased subscription
2a. I f you purchased a subscription, have you activated your subscription by entering your
25-character subscription code in your GPS device?
Yes
No
2b. I f No, would you like the installer to enter your 25-character subscription code into your
GPS device?
Yes (Please provide the GPS device's Owner's Manual to the installer.)
25-Character Traffic Subscription Code_______-________-_______-_______-_______
No
3. How do you want the installer to mount the GTM 10 after it is connected?
Attach with foam tape to a surface
Let it hang freely
Note: You can purchase a subscription at any time. You do not need to purchase a subscription before
having the GTM 10 installed in your vehicle.
GTM 10 FM TMC T
i
nsTallaTion
r
raFFiC
eCeiver
s
heeT
Advertisement
Table of Contents

Related Manuals for Garmin GTM 10 - TMC Module


Summary of Contents for Garmin GTM 10 - TMC Module
- Page 1 Consult the owner to find out answers to the questionnaire before installing the receiver. For the Owner Due to the location of the vehicle’s radio antenna, Garmin highly recommends that the GTM 10 be installed by a professional installer. Installing the GTM 10 without the aid of a professional installer may damage the GTM 10 and void your warranty.
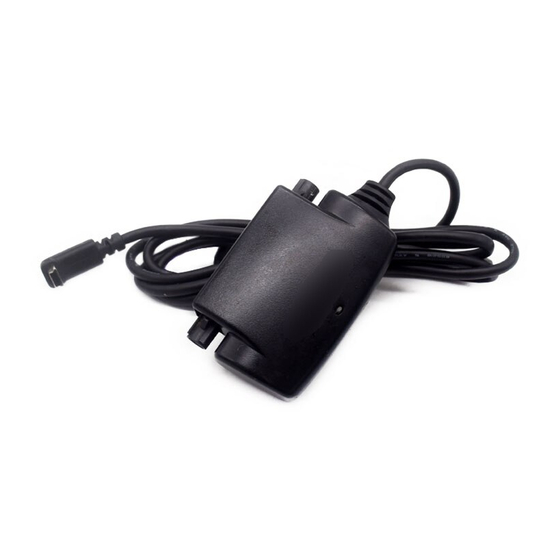
- Page 2 GTM 10 or loosen the case screws. in: In from antenna. Connect the antenna adapter here. out: Out to radio. Connect the radio adapter cable here. Mini-USB cable (cord is not to scale) leD: displays the signal status. Mini-UsB cable: 1 .5-meter built-in cable to connect to a Garmin GPS device. step 1: Prepare the radio teSt: Before installation, test the vehicle’s radio to ensure that the antenna is functioning properly and the radio can receive all normal FM signals. If the antenna functions improperly, the GTM 10 may not work properly. Consult the owner about continuing with installation. Remove the trim panel and other parts of the dashboard to Radio access the vehicle’s radio antenna cable.
- Page 3 GPS device. Do not cut the mini-USB cable. If the mini-USB cable is not long enough to reach the GPS device, a 2-meter extension cable is available for purchase from a Garmin dealer or from the Garmin Web site at http://www.garmin.com/products/gtm10. Step 5: Test the GTM 10 Test the GTM 10 for proper installation and service reception.
- Page 4 • Attach with foam tape: clean and dry a flat surface behind the dashboard. Remove the backing from the foam tape and attach the GTM 10 to the flat surface. • Hang freely: bind up any slack cable from the mini-USB cable with a wire tie and let the GTM 10 hang freely behind the radio. 2. Check that all cables and the GTM 10 are secure and free of obstruction. 3. Replace all parts of the dashboard to their original locations. 4. Repeat the testing as described in Step 5. © Copyright 2005 Garmin Ltd. or its subsidiaries Garmin International, Inc. Garmin (Europe) Ltd. Garmin Corporation 1200 East 151st Street, Unit 5, The Quadrangle, No. 68, Jangshu 2nd Road, Olathe, Kansas 66062 U.S.A.
Need help?
Do you have a question about the GTM 10 - TMC Module and is the answer not in the manual?
Questions and answers